Chkdsk will Not Run at Startup in Vista

How to Fix Chkdsk will Not Run at Startup in Vista

information   Information
If after you set Check Disk or chkdsk to run at startup it will not run, then this will show you how to fix this problem so chkdsk will run at startup. This problem is usually caused when the autochk.exe file gets corrupted, or the registry BootExecute data value is incorrect.

This is not for if chkdsk cannot finish or stops running.

Note   Note

  • Check Disk uses the file autochk.exe to run chkdsk.
  • If you still cannot run chkdsk at startup after this, then you might consider performing a System Restore, Repair Installation, or Clean Installation to fix the problem. See related links below.
  • If you had changed your default boot screen, then you will need to temporarily uncheck the No GUI boot to be able to see what is happening when chkdsk is running at boot up. See: How to Enable or Replace the Hidden Aurora Boot Screen in Vista


STEP ONE
Safe Mode Workaround

Note   Note
This is to see if something may be loading before the check disk program preventing chkdsk from running.

1. Schedule check disk to run using chkdsk /f (STEP FIVE below) in the command promt.​
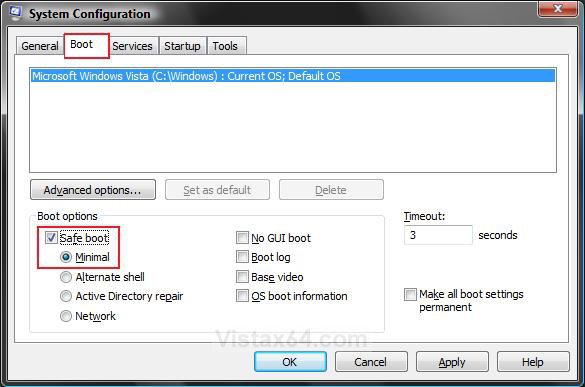
2. Run msconfig (step 1 in METHOD TWO at link), and click on the Boot
tab and click on Safe boot with the minimal button selected. (See screenshot below)​
MSConfig1.jpg

3. Restart the computer to hopefully have chkdsk run.​
4. Set msconfig (step 2 in METHOD TWO at link) to boot normally again.​
5. If chkdsk still will not run at startup, then proceed with the steps below. If it did, then you're done.​


STEP TWO
Reset chkdsk BootExecute
Note   Note

  • This will reset chkdsk back to it's default setting of not to run at startup.
  • This step will also fix the problem of chkdsk always running at startup.
  • If BootExecute already has a Data value of autocheck autochk *, then you do not need to do this. (See the Manual Way below to check) Continue to STEP THREE below instead.

Through a Download:
1. Click on the download button below to download the Reset_chkdsk.reg file.​
download

2. Click on Save, and save the .reg file to the Desktop.​
3. Right click on the .reg file (on Desktop) and click on Merge.​
4. Click on the Run button for Security Warning pop-up.​
5. Click on Continue (UAC), Yes, and then OK when prompted.​
6. When done, you can delete the .reg file (on Desktop).​
The Manual Way:
1. Open the Start Menu.​
2. In the white line (Start Search) area, type regedit and press Enter.​
3. Click on the Continue button in the UAC prompt.​
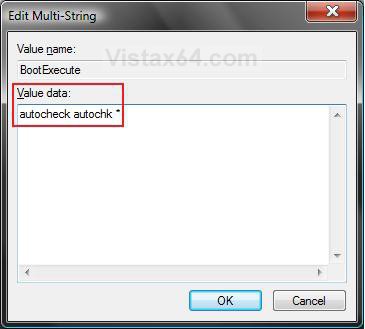
4. In regedit, go to: (See screenshot below step 5)​
HKEY_LOCAL_MACHINE\SYSTEM\CurrentControlSet\Control\Session Manager

5. In the right pane, right click on BootExecute and click on Modify.​
BootExecute_Reg.jpg

6. Type autocheck autochk * and click on OK. (See screenshot below)​
NOTE: You will be replacing autocheck autochk /p \??\C: with autocheck autochk* instead. If BootExecute already has a Data value of autocheck autochk *, then you do not need to do this. Go to STEP THREE below.​
Modify.jpg

7. Close regedit.​


STEP THREE
Run a SFC /SCANNOW Command

1. Try running a sfc /scannow command to see if it can fix chkdsk.​
2. When SFC is finished, try running chkdsk again.​
3. If chkdsk still will not run at startup, then proceed with the steps below. If it did, then you're done.​


STEP FOUR
Replace autochk.exe File

NOTE: This will show you how to replace your corrupted copy of the autochk.exe file with clean copy to be able to run chkdsk at startup.
1. Be sure that you already have ran a SFC /scannow from STEP THREE above to see verify that the autochk.exe file was foud to be corrupted first in the sfcdetails.txt file. If it's not, then you do not need to do STEP FOUR.​
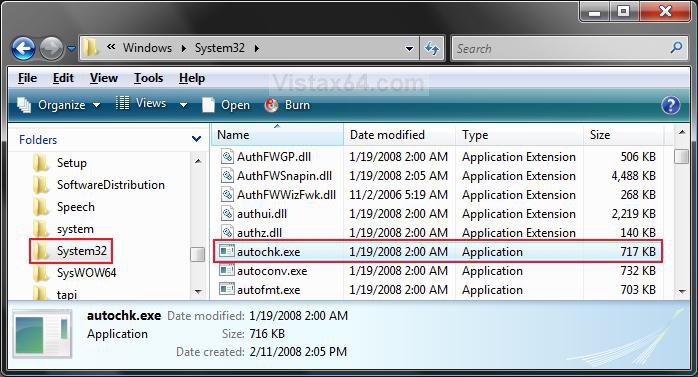
2. In Windows Explorer, go to C:\Windows\System32\autochk.exe. (See screenshot below)​
System32.jpg

3. Take ownership of the file autochk.exe at the C:\Windows\System32\autochk.exe location, and "Allow" your user account "Full Control" of it. (See screenshot above)​
4. Right click on autochk.exe and click on Properties. (See screenshot below step 2)​
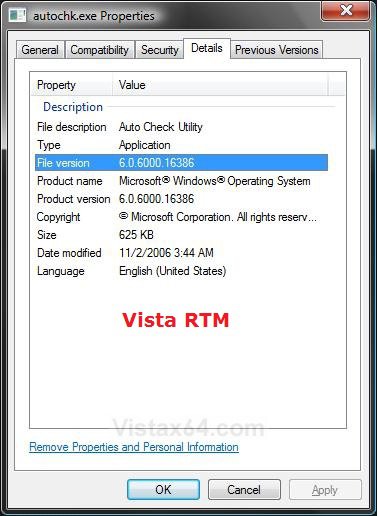
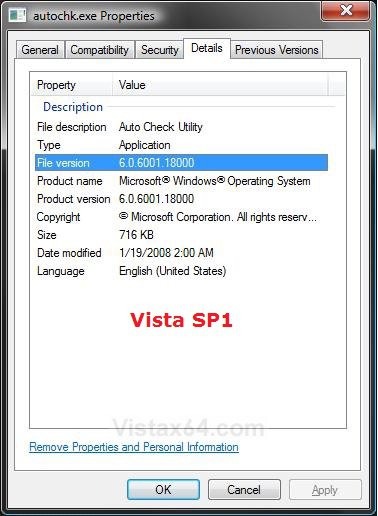
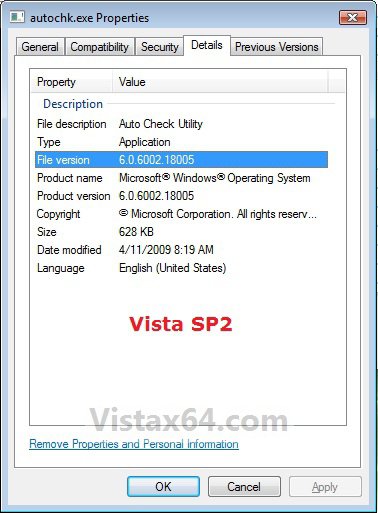
5. Click on the Details tab. (See screenshots below)​
A) Make note of what File version the autochk.exe file is.​
NOTE: If the File version is blank or you have SP1 installed, then do step 6. If not, then do step 8.​
Properties1.jpg
Properties2.jpg
Vista_SP2.jpg

6. Download the same version that you have in step 5.​
7. For the Vista 6.0.6002.18005 SP2 Version of autochk.exe
NOTE: This is for the 32 bit and 64 bit Vista with SP1 and SP2 installed.​
A) Click on the download button below to download the 6.0.6002.18005.zip file.​
B) Go to step 10.​
download

8. For the Vista 6.0.6001.18000 SP1 Version of autochk.exe
NOTE: This is for the 32 bit and 64 bit Vista with SP1 installed.​
A) Click on the download button below to download the 6.0.6001.18000.zip file.​
B) Go to step 10.​
download

9. For the Vista 6.0.6000.16386 RTM Version of autochk.exe
NOTE: This is for the 32 bit and 64 bit Vista without SP1 or SP2 installed. This version has been reported to still work with or without SP1 installed, so you may try it if you still have problems with the newer 6.0.6001.18000 SP1 or 6.0.6002.18005 SP2 version.​
A) Click on the download button below to download the 6.0.6000.16386.zip file.​
download

10. Save the ZIP file to your desktop.​
11. Open on the downloaded autochk.exe.zip file.​
12. Extract (drag and drop) the autochk.exe file from wihtin the ZIP file to your desktop.​
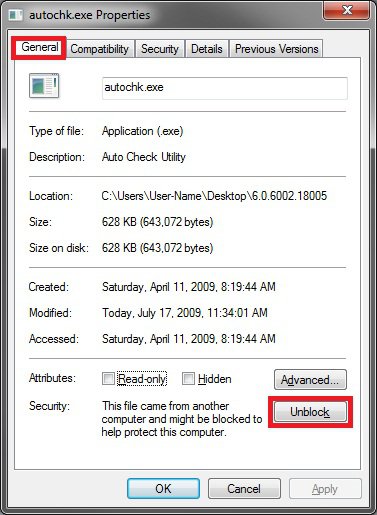
13. Right click on the autochk.exe file on your desktop and click on Properties and the Unblock button under the General tab. (See screenshot below)​
NOTE: If you do not have the Unblock button, then it is already unblocked. Continue on to step 14.​
Unblock.jpg

14. Right click on the autochk.exe file on your desktop and click on Copy.​
15. Go back to the Windows Explore window at C:\Windows\System32\autochk.exe. (See screenshot below step 2)​
16. Right click on a empty space in the Windows Explorer window and click on Paste. (See screenshot below step 2)​
NOTE: If it will not let you Copy or Paste the new autochk.exe file (on desktop) over, then rename the old one and repeat step 14, then delete the old renamed autochk.exe file afterwards.​
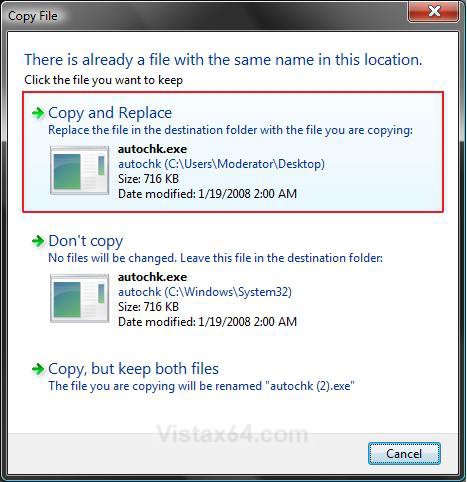
17. Click on Copy and Replace. (See screenshot below)​
NOTE: This replaces your autochk.exe with the downloaded clean one on the desktop that has not been taken ownership of.​
Copy_Replace.jpg

18. Click on Continue for Access Denied prompt.​
19. Click on Continue for UAC prompt.​
20. Close the Windows Explorer window.​


STEP FIVE
Set Chkdsk to Run at Startup

1. Try the different methods in this tutorial below to run chkdsk to see which one works best for you.​
That's it,
Shawn


Attachments

Last edited:
Hello Ray, and welcome to Vista Forums.

You would want to use the version in step 7 instead since you only have SP1 installed. :)
 

My Computers

System One System Two

  • Operating System
    Windows 10 Pro 64-bit
    Manufacturer/Model
    Custom
    CPU
    Intel i7-8700K 5 GHz
    Motherboard
    ASUS ROG Maximus XI Formula Z390
    Memory
    64 GB (4x16GB) G.SKILL TridentZ RGB DDR4 3600 MHz (F4-3600C18D-32GTZR)
    Graphics card(s)
    ASUS ROG-STRIX-GTX1080TI-O11G-GAMING
    Sound Card
    Integrated Digital Audio (S/PDIF)
    Monitor(s) Displays
    2 x Samsung Odyssey G7 27"
    Screen Resolution
    2560x1440
    Hard Drives
    1TB Samsung 990 PRO M.2, 4TB Samsung 990 PRO PRO M.2, 8TB WD MyCloudEX2Ultra NAS
    PSU
    Seasonic Prime Titanium 850W
    Case
    Thermaltake Core P3
    Cooling
    Corsair Hydro H115i
    Mouse
    Logitech MX Master 3
    Keyboard
    Logitech wireless K800
    Internet Speed
    1 Gb/s Download and 35 Mb/s Upload
    Other Info
    Logitech Z625 speaker system, Logitech BRIO 4K Pro webcam, HP Color LaserJet Pro MFP M477fdn, APC SMART-UPS RT 1000 XL - SURT1000XLI, Galaxy S23 Plus phone
  • Operating System
    Windows 10 Pro
    Manufacturer/Model
    HP Envy Y0F94AV
    CPU
    i7-7500U @ 2.70 GHz
    Memory
    16 GB DDR4-2133
    Sound Card
    Conexant ISST Audio
    Monitor(s) Displays
    17.3" UHD IPS touch
    Screen Resolution
    3480 x 2160
    Hard Drives
    512 GB M.2 SSD
Hello all. I'm glad that I found this site, it seems like there is a lot of good information here.

Now, onto the problem. I managed to install Windows 7 Premium 32 bit on my computer and was in the process of installing it on my other computer (Vista Home Premium 32bit SP2).

Naturally, I ran into issues with the installation. I noticed on my computer that when I tried to install Windows 7 that it failed the first time (the power went out). My computer automatically ran a chkdsk and fixed several errors that I didn't know existed. I ran the upgrade for 7 again and it installed perfectly.

So, after 5 attempts at unsuccessfully installing it on the other computer, I put 2 and 2 together and decided "Hey, maybe I should run chkdsk to see if there are any errors".

I tried to run chkdsk to find out that I'm having the same problem as others have had.

I right click on the C: drive and tell it to perform the chkdsk function when it restarts. I restart the computer and when it goes to perform the chkdsk function it instead tells me:

"The file type is NTFS. Cannot open the volume for direct access."
 

My Computer

Hello SpawnoChaos, and welcome to Vista Forums.

Since the installation was interrupted by a power failure, I would recommend to completely format the hard drive and do a clean install again. :(
 

My Computers

System One System Two

  • Operating System
    Windows 10 Pro 64-bit
    Manufacturer/Model
    Custom
    CPU
    Intel i7-8700K 5 GHz
    Motherboard
    ASUS ROG Maximus XI Formula Z390
    Memory
    64 GB (4x16GB) G.SKILL TridentZ RGB DDR4 3600 MHz (F4-3600C18D-32GTZR)
    Graphics card(s)
    ASUS ROG-STRIX-GTX1080TI-O11G-GAMING
    Sound Card
    Integrated Digital Audio (S/PDIF)
    Monitor(s) Displays
    2 x Samsung Odyssey G7 27"
    Screen Resolution
    2560x1440
    Hard Drives
    1TB Samsung 990 PRO M.2, 4TB Samsung 990 PRO PRO M.2, 8TB WD MyCloudEX2Ultra NAS
    PSU
    Seasonic Prime Titanium 850W
    Case
    Thermaltake Core P3
    Cooling
    Corsair Hydro H115i
    Mouse
    Logitech MX Master 3
    Keyboard
    Logitech wireless K800
    Internet Speed
    1 Gb/s Download and 35 Mb/s Upload
    Other Info
    Logitech Z625 speaker system, Logitech BRIO 4K Pro webcam, HP Color LaserJet Pro MFP M477fdn, APC SMART-UPS RT 1000 XL - SURT1000XLI, Galaxy S23 Plus phone
  • Operating System
    Windows 10 Pro
    Manufacturer/Model
    HP Envy Y0F94AV
    CPU
    i7-7500U @ 2.70 GHz
    Memory
    16 GB DDR4-2133
    Sound Card
    Conexant ISST Audio
    Monitor(s) Displays
    17.3" UHD IPS touch
    Screen Resolution
    3480 x 2160
    Hard Drives
    512 GB M.2 SSD
Thanks for the expedient reply, Brink! :)

Unfortunately, I believe my description may have been confusing. The computer that I was uprgrading, that lost power during the upgrade, has upgraded just fine and is currently running Windows 7. It was after the power loss that chkdsk ran and discovered the errors. This, I believe, allowed me to install Windows 7 afterwards with no issues.

The other computer (Vista Home Premium 32bit) was not upgrading anything at the time that I lost power. Once I had my above computer running 7 normally, I set about the task of upgrading my 2nd computer from Vista Home Premium 32bit to Windows 7. After several failed attempts, I decided "Hey, maybe if I run chkdsk like I did with my other computer, this one will upgrade to 7 also without any problem".

Now when I ran chkdsk on this computer. I ran into the following chkdsk condition:

"The file type is NTFS. Cannot open the volume for direct access."

I've read on this forum, somewhere, that this could be related to another program running during startup that is preventing chkdsk from running. There is no anti-virus program installed on the computer (at least not anymore, I removed them due to Windows 7 possibly conflicting with them... it didn't help the upgrade process...).

Right now I'm experiencing the "62% Windows 7 install, then reboot, then BSOD for 1/3 of a second, followed by Windows didn't update successfully. Restoring old OS" message. I figured that chkdsk may have fixed my other system that successfully upgraded... it may allow this one to do the same thing. At this point, aside from getting even NEWER hardware than what I just put in there, I can't think of anything else to do but wait for Microsoft to fix the Windows 7 install issue.
 

My Computer

My Computers

System One System Two

  • Operating System
    Windows 10 Pro 64-bit
    Manufacturer/Model
    Custom
    CPU
    Intel i7-8700K 5 GHz
    Motherboard
    ASUS ROG Maximus XI Formula Z390
    Memory
    64 GB (4x16GB) G.SKILL TridentZ RGB DDR4 3600 MHz (F4-3600C18D-32GTZR)
    Graphics card(s)
    ASUS ROG-STRIX-GTX1080TI-O11G-GAMING
    Sound Card
    Integrated Digital Audio (S/PDIF)
    Monitor(s) Displays
    2 x Samsung Odyssey G7 27"
    Screen Resolution
    2560x1440
    Hard Drives
    1TB Samsung 990 PRO M.2, 4TB Samsung 990 PRO PRO M.2, 8TB WD MyCloudEX2Ultra NAS
    PSU
    Seasonic Prime Titanium 850W
    Case
    Thermaltake Core P3
    Cooling
    Corsair Hydro H115i
    Mouse
    Logitech MX Master 3
    Keyboard
    Logitech wireless K800
    Internet Speed
    1 Gb/s Download and 35 Mb/s Upload
    Other Info
    Logitech Z625 speaker system, Logitech BRIO 4K Pro webcam, HP Color LaserJet Pro MFP M477fdn, APC SMART-UPS RT 1000 XL - SURT1000XLI, Galaxy S23 Plus phone
  • Operating System
    Windows 10 Pro
    Manufacturer/Model
    HP Envy Y0F94AV
    CPU
    i7-7500U @ 2.70 GHz
    Memory
    16 GB DDR4-2133
    Sound Card
    Conexant ISST Audio
    Monitor(s) Displays
    17.3" UHD IPS touch
    Screen Resolution
    3480 x 2160
    Hard Drives
    512 GB M.2 SSD
Thank you very much. This worked like a charm.

I tried adding "Take Ownership" registry setting, but ended up having to manually take ownership through the advanced file features.

End result was the same and now my chkdsk runs perfectly on boot when scheduled to do so.

Thanks again for posting this procedure.
 

My Computer

Thank you very much. This worked like a charm.

I tried adding "Take Ownership" registry setting, but ended up having to manually take ownership through the advanced file features.

End result was the same and now my chkdsk runs perfectly on boot when scheduled to do so.

Thanks again for posting this procedure.

You're welcome Pasca, and welcome to Vista Forums. :)
 

My Computers

System One System Two

  • Operating System
    Windows 10 Pro 64-bit
    Manufacturer/Model
    Custom
    CPU
    Intel i7-8700K 5 GHz
    Motherboard
    ASUS ROG Maximus XI Formula Z390
    Memory
    64 GB (4x16GB) G.SKILL TridentZ RGB DDR4 3600 MHz (F4-3600C18D-32GTZR)
    Graphics card(s)
    ASUS ROG-STRIX-GTX1080TI-O11G-GAMING
    Sound Card
    Integrated Digital Audio (S/PDIF)
    Monitor(s) Displays
    2 x Samsung Odyssey G7 27"
    Screen Resolution
    2560x1440
    Hard Drives
    1TB Samsung 990 PRO M.2, 4TB Samsung 990 PRO PRO M.2, 8TB WD MyCloudEX2Ultra NAS
    PSU
    Seasonic Prime Titanium 850W
    Case
    Thermaltake Core P3
    Cooling
    Corsair Hydro H115i
    Mouse
    Logitech MX Master 3
    Keyboard
    Logitech wireless K800
    Internet Speed
    1 Gb/s Download and 35 Mb/s Upload
    Other Info
    Logitech Z625 speaker system, Logitech BRIO 4K Pro webcam, HP Color LaserJet Pro MFP M477fdn, APC SMART-UPS RT 1000 XL - SURT1000XLI, Galaxy S23 Plus phone
  • Operating System
    Windows 10 Pro
    Manufacturer/Model
    HP Envy Y0F94AV
    CPU
    i7-7500U @ 2.70 GHz
    Memory
    16 GB DDR4-2133
    Sound Card
    Conexant ISST Audio
    Monitor(s) Displays
    17.3" UHD IPS touch
    Screen Resolution
    3480 x 2160
    Hard Drives
    512 GB M.2 SSD
Hello,

I should say that my tech level isn't very high.

I have been following many of your tutorials for the last hour, trying to get my chkdsk to work like my computer tells me 15 times every startup.

I got all the way down to step 4 but when I try to extract the clean autochk file I get the message saying "...6.0.6002.18005.zip/autochk.exe application cannot be run in Win32 mode." Then states "Windows cannot complete the extraction. The desination file could not be created." Any idea what I'm doing wrong?

thx,
Jeramy
 

My Computer

Sounds like you're attempting to "run" the file by single- or double-clicking from inside the zip file instead of righ-clicking and extracting the file to the hard-drive. Alternatively, you can open the zip file and drag the file outside to the folder where you opened it. Then, you need to copy/paste to the system file. Depending on permissions for the system folder in Windows, you may or may not be able to paste it directly into the folder. In that case, you can try the posted "take ownership" registry file (which didn't work for me) or change the permissions settings in the folder to permit you to paste over the existing file.
 

My Computer

Thanks pasca, you were right.

Now, I got the file and just like everyone else, it said I didnt have permission. So I added take ownership to the context menu just like another tuitorial showed me. As you guessed, I used it and even saw the command prompt pop up really fast, so I thought it really worked, but I still do not have permission to move and replace the autochk application. Any thoughts?
 

My Computer

Hello NoMoreSorrow,

Be sure that you also "Allow" your user account "Full Control" of the autochk file after taking ownership it in step 2 of that section in this tutorial.

Hope this helps,
Shawn
 

My Computers

System One System Two

  • Operating System
    Windows 10 Pro 64-bit
    Manufacturer/Model
    Custom
    CPU
    Intel i7-8700K 5 GHz
    Motherboard
    ASUS ROG Maximus XI Formula Z390
    Memory
    64 GB (4x16GB) G.SKILL TridentZ RGB DDR4 3600 MHz (F4-3600C18D-32GTZR)
    Graphics card(s)
    ASUS ROG-STRIX-GTX1080TI-O11G-GAMING
    Sound Card
    Integrated Digital Audio (S/PDIF)
    Monitor(s) Displays
    2 x Samsung Odyssey G7 27"
    Screen Resolution
    2560x1440
    Hard Drives
    1TB Samsung 990 PRO M.2, 4TB Samsung 990 PRO PRO M.2, 8TB WD MyCloudEX2Ultra NAS
    PSU
    Seasonic Prime Titanium 850W
    Case
    Thermaltake Core P3
    Cooling
    Corsair Hydro H115i
    Mouse
    Logitech MX Master 3
    Keyboard
    Logitech wireless K800
    Internet Speed
    1 Gb/s Download and 35 Mb/s Upload
    Other Info
    Logitech Z625 speaker system, Logitech BRIO 4K Pro webcam, HP Color LaserJet Pro MFP M477fdn, APC SMART-UPS RT 1000 XL - SURT1000XLI, Galaxy S23 Plus phone
  • Operating System
    Windows 10 Pro
    Manufacturer/Model
    HP Envy Y0F94AV
    CPU
    i7-7500U @ 2.70 GHz
    Memory
    16 GB DDR4-2133
    Sound Card
    Conexant ISST Audio
    Monitor(s) Displays
    17.3" UHD IPS touch
    Screen Resolution
    3480 x 2160
    Hard Drives
    512 GB M.2 SSD
What I had to do was right-click on the Windows/System folder and select properties. Next, under the Security tab, select Users. Click the Advanced button. In the open window, select the Effective Permissions tab. Click the Select button. Below "Enter the object to select", type your login name and then click Check Names. Your login name should then have the machine name prefix auto-added. Then click OK. You will be returned to the previous window. Make certain all check boxes are checked (most especially, Full Control). Click Apply when finished. Then OK/Apply all the way out.

At that point, you should have full control over the System sub-folder. Now you can delete the old version of the file in the system folder and paste the new version.

As as safety measure, you should repeat the process when finished and deselect Full Control. Click Apply, OK all the way out again.
 

My Computer

I can't do check disk. I tried steps 1 & 2, but haven't moved on to steps 3 or 4 yet, because I was kind of afraid that if I change something in registry I might mess up my computer, and I'm not too computer savvy.
I was originally trying to do system restore, but ran across the error that OS C: has errors and you must check disk for errors before it can be restored, so that's why I tried to run check disk. But check disk won't run on start up.
I really don't want to do a resintallation of Vista, unless I absolutely had to, and right now my computer is working okay, except for the fact that I can't do system restore and get errors about C: drive.
I only have the reinstallation disk for Vista. Don't I need full version if I wanted to do repair of Vista?
 

My Computer

Hello Snickers,

To be safe, backup anything that you do not want to lose. Afterwards, you can use the download in STEP THREE to make that easy, then as long as you follow each step in STEP FOUR you'll do fine. We'll be here if you have any questions or problems. :)

To do a repair install, you will need a retail Vista installation disc that is the same version and edition that you have installed. For example, SP1 or SP2.
 

My Computers

System One System Two

  • Operating System
    Windows 10 Pro 64-bit
    Manufacturer/Model
    Custom
    CPU
    Intel i7-8700K 5 GHz
    Motherboard
    ASUS ROG Maximus XI Formula Z390
    Memory
    64 GB (4x16GB) G.SKILL TridentZ RGB DDR4 3600 MHz (F4-3600C18D-32GTZR)
    Graphics card(s)
    ASUS ROG-STRIX-GTX1080TI-O11G-GAMING
    Sound Card
    Integrated Digital Audio (S/PDIF)
    Monitor(s) Displays
    2 x Samsung Odyssey G7 27"
    Screen Resolution
    2560x1440
    Hard Drives
    1TB Samsung 990 PRO M.2, 4TB Samsung 990 PRO PRO M.2, 8TB WD MyCloudEX2Ultra NAS
    PSU
    Seasonic Prime Titanium 850W
    Case
    Thermaltake Core P3
    Cooling
    Corsair Hydro H115i
    Mouse
    Logitech MX Master 3
    Keyboard
    Logitech wireless K800
    Internet Speed
    1 Gb/s Download and 35 Mb/s Upload
    Other Info
    Logitech Z625 speaker system, Logitech BRIO 4K Pro webcam, HP Color LaserJet Pro MFP M477fdn, APC SMART-UPS RT 1000 XL - SURT1000XLI, Galaxy S23 Plus phone
  • Operating System
    Windows 10 Pro
    Manufacturer/Model
    HP Envy Y0F94AV
    CPU
    i7-7500U @ 2.70 GHz
    Memory
    16 GB DDR4-2133
    Sound Card
    Conexant ISST Audio
    Monitor(s) Displays
    17.3" UHD IPS touch
    Screen Resolution
    3480 x 2160
    Hard Drives
    512 GB M.2 SSD
Hello Snickers,

To be safe, backup anything that you do not want to lose. Afterwards, you can use the download in STEP THREE to make that easy, then as long as you follow each step in STEP FOUR you'll do fine. We'll be here if you have any questions or problems. :)

To do a repair install, you will need a retail Vista installation disc that is the same version and edition that you have installed. For example, SP1 or SP2.

I was just wondering if by any chance if I upgraded from Vista to Windows 7, that would solve any problems?
 

My Computer

I performed an in-place upgrade to Windows 7 last night. It took about 90 minutes. If you perform an in-place upgrade (keeping all your files and settings, as opposed to a "clean" upgrade, which overwrites everything), it should replace the file--but I can't swear that it will. You would have to take that risk.

You should not have to deal with the registry. The only problem you will encounter is pasting in the good chkdsk file from the forum. You'll have to give yourself the ownership rights for the System folder. The registry file posted here in the forum which is supposed to make the process simple did not work for me. I had to manually give myself permission to delete and paste the new chkdsk file. That step is detailed above.

Before doing an in-place upgrade, try the procedure posted here. It really does work.
 

My Computer

hi

i'm trying to follow STEP FOUR and replace my autochk.exe

but i'm having problem at step 16...
for some reason, i cannot copy and replace it, even though i am using the administrator account.

help?
 

My Computer

Hello Lorri, and welcome to Vista Forums.

Did you do all of step 2 to take ownership of the original file, then allow your account full control of the file as well?

Hope this helps,
Shawn
 

My Computers

System One System Two

  • Operating System
    Windows 10 Pro 64-bit
    Manufacturer/Model
    Custom
    CPU
    Intel i7-8700K 5 GHz
    Motherboard
    ASUS ROG Maximus XI Formula Z390
    Memory
    64 GB (4x16GB) G.SKILL TridentZ RGB DDR4 3600 MHz (F4-3600C18D-32GTZR)
    Graphics card(s)
    ASUS ROG-STRIX-GTX1080TI-O11G-GAMING
    Sound Card
    Integrated Digital Audio (S/PDIF)
    Monitor(s) Displays
    2 x Samsung Odyssey G7 27"
    Screen Resolution
    2560x1440
    Hard Drives
    1TB Samsung 990 PRO M.2, 4TB Samsung 990 PRO PRO M.2, 8TB WD MyCloudEX2Ultra NAS
    PSU
    Seasonic Prime Titanium 850W
    Case
    Thermaltake Core P3
    Cooling
    Corsair Hydro H115i
    Mouse
    Logitech MX Master 3
    Keyboard
    Logitech wireless K800
    Internet Speed
    1 Gb/s Download and 35 Mb/s Upload
    Other Info
    Logitech Z625 speaker system, Logitech BRIO 4K Pro webcam, HP Color LaserJet Pro MFP M477fdn, APC SMART-UPS RT 1000 XL - SURT1000XLI, Galaxy S23 Plus phone
  • Operating System
    Windows 10 Pro
    Manufacturer/Model
    HP Envy Y0F94AV
    CPU
    i7-7500U @ 2.70 GHz
    Memory
    16 GB DDR4-2133
    Sound Card
    Conexant ISST Audio
    Monitor(s) Displays
    17.3" UHD IPS touch
    Screen Resolution
    3480 x 2160
    Hard Drives
    512 GB M.2 SSD
Back
Top