Chkdsk will Not Run at Startup in Vista

How to Fix Chkdsk will Not Run at Startup in Vista

information   Information
If after you set Check Disk or chkdsk to run at startup it will not run, then this will show you how to fix this problem so chkdsk will run at startup. This problem is usually caused when the autochk.exe file gets corrupted, or the registry BootExecute data value is incorrect.

This is not for if chkdsk cannot finish or stops running.

Note   Note

  • Check Disk uses the file autochk.exe to run chkdsk.
  • If you still cannot run chkdsk at startup after this, then you might consider performing a System Restore, Repair Installation, or Clean Installation to fix the problem. See related links below.
  • If you had changed your default boot screen, then you will need to temporarily uncheck the No GUI boot to be able to see what is happening when chkdsk is running at boot up. See: How to Enable or Replace the Hidden Aurora Boot Screen in Vista


STEP ONE
Safe Mode Workaround

Note   Note
This is to see if something may be loading before the check disk program preventing chkdsk from running.

1. Schedule check disk to run using chkdsk /f (STEP FIVE below) in the command promt.​
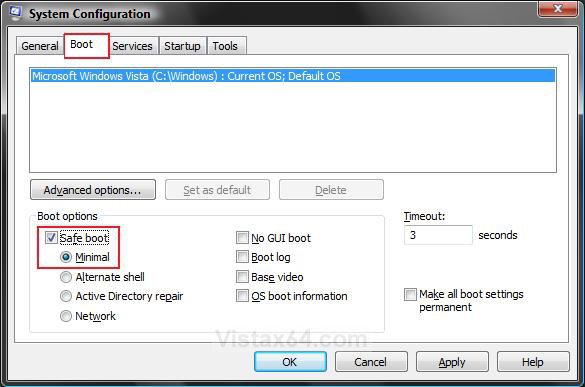
2. Run msconfig (step 1 in METHOD TWO at link), and click on the Boot
tab and click on Safe boot with the minimal button selected. (See screenshot below)​
MSConfig1.jpg

3. Restart the computer to hopefully have chkdsk run.​
4. Set msconfig (step 2 in METHOD TWO at link) to boot normally again.​
5. If chkdsk still will not run at startup, then proceed with the steps below. If it did, then you're done.​


STEP TWO
Reset chkdsk BootExecute
Note   Note

  • This will reset chkdsk back to it's default setting of not to run at startup.
  • This step will also fix the problem of chkdsk always running at startup.
  • If BootExecute already has a Data value of autocheck autochk *, then you do not need to do this. (See the Manual Way below to check) Continue to STEP THREE below instead.

Through a Download:
1. Click on the download button below to download the Reset_chkdsk.reg file.​
download

2. Click on Save, and save the .reg file to the Desktop.​
3. Right click on the .reg file (on Desktop) and click on Merge.​
4. Click on the Run button for Security Warning pop-up.​
5. Click on Continue (UAC), Yes, and then OK when prompted.​
6. When done, you can delete the .reg file (on Desktop).​
The Manual Way:
1. Open the Start Menu.​
2. In the white line (Start Search) area, type regedit and press Enter.​
3. Click on the Continue button in the UAC prompt.​
4. In regedit, go to: (See screenshot below step 5)​
HKEY_LOCAL_MACHINE\SYSTEM\CurrentControlSet\Control\Session Manager

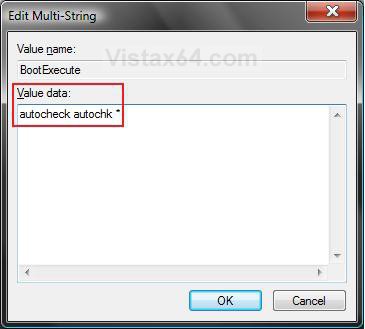
5. In the right pane, right click on BootExecute and click on Modify.​
BootExecute_Reg.jpg

6. Type autocheck autochk * and click on OK. (See screenshot below)​
NOTE: You will be replacing autocheck autochk /p \??\C: with autocheck autochk* instead. If BootExecute already has a Data value of autocheck autochk *, then you do not need to do this. Go to STEP THREE below.​
Modify.jpg

7. Close regedit.​


STEP THREE
Run a SFC /SCANNOW Command

1. Try running a sfc /scannow command to see if it can fix chkdsk.​
2. When SFC is finished, try running chkdsk again.​
3. If chkdsk still will not run at startup, then proceed with the steps below. If it did, then you're done.​


STEP FOUR
Replace autochk.exe File

NOTE: This will show you how to replace your corrupted copy of the autochk.exe file with clean copy to be able to run chkdsk at startup.
1. Be sure that you already have ran a SFC /scannow from STEP THREE above to see verify that the autochk.exe file was foud to be corrupted first in the sfcdetails.txt file. If it's not, then you do not need to do STEP FOUR.​
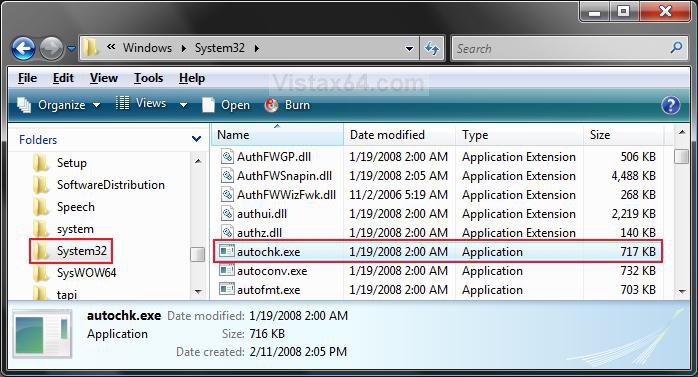
2. In Windows Explorer, go to C:\Windows\System32\autochk.exe. (See screenshot below)​
System32.jpg

3. Take ownership of the file autochk.exe at the C:\Windows\System32\autochk.exe location, and "Allow" your user account "Full Control" of it. (See screenshot above)​
4. Right click on autochk.exe and click on Properties. (See screenshot below step 2)​
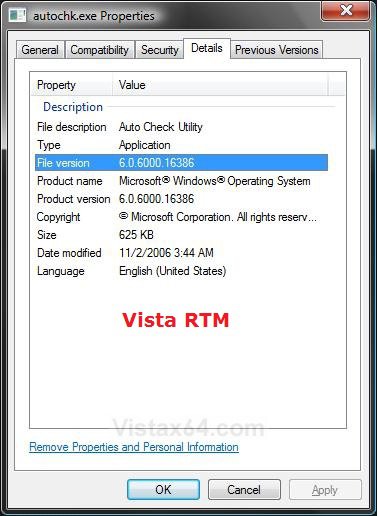
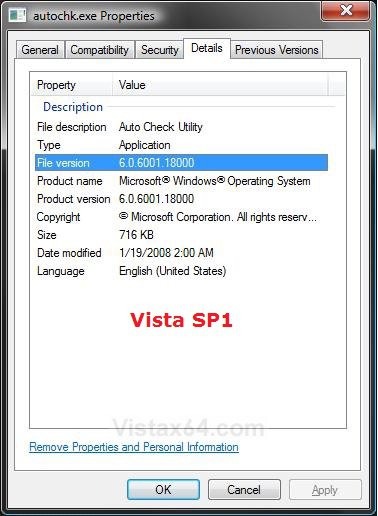
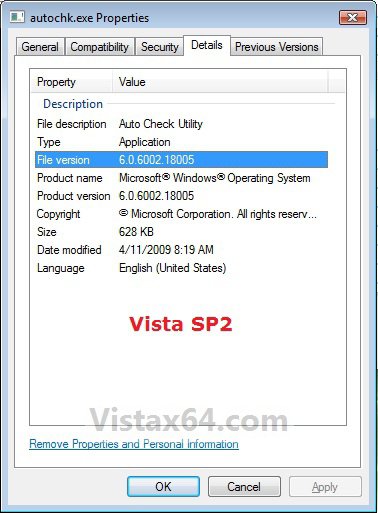
5. Click on the Details tab. (See screenshots below)​
A) Make note of what File version the autochk.exe file is.​
NOTE: If the File version is blank or you have SP1 installed, then do step 6. If not, then do step 8.​
Properties1.jpg
Properties2.jpg
Vista_SP2.jpg

6. Download the same version that you have in step 5.​
7. For the Vista 6.0.6002.18005 SP2 Version of autochk.exe
NOTE: This is for the 32 bit and 64 bit Vista with SP1 and SP2 installed.​
A) Click on the download button below to download the 6.0.6002.18005.zip file.​
B) Go to step 10.​
download

8. For the Vista 6.0.6001.18000 SP1 Version of autochk.exe
NOTE: This is for the 32 bit and 64 bit Vista with SP1 installed.​
A) Click on the download button below to download the 6.0.6001.18000.zip file.​
B) Go to step 10.​
download

9. For the Vista 6.0.6000.16386 RTM Version of autochk.exe
NOTE: This is for the 32 bit and 64 bit Vista without SP1 or SP2 installed. This version has been reported to still work with or without SP1 installed, so you may try it if you still have problems with the newer 6.0.6001.18000 SP1 or 6.0.6002.18005 SP2 version.​
A) Click on the download button below to download the 6.0.6000.16386.zip file.​
download

10. Save the ZIP file to your desktop.​
11. Open on the downloaded autochk.exe.zip file.​
12. Extract (drag and drop) the autochk.exe file from wihtin the ZIP file to your desktop.​
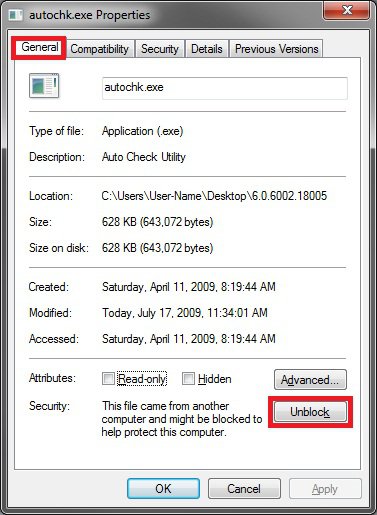
13. Right click on the autochk.exe file on your desktop and click on Properties and the Unblock button under the General tab. (See screenshot below)​
NOTE: If you do not have the Unblock button, then it is already unblocked. Continue on to step 14.​
Unblock.jpg

14. Right click on the autochk.exe file on your desktop and click on Copy.​
15. Go back to the Windows Explore window at C:\Windows\System32\autochk.exe. (See screenshot below step 2)​
16. Right click on a empty space in the Windows Explorer window and click on Paste. (See screenshot below step 2)​
NOTE: If it will not let you Copy or Paste the new autochk.exe file (on desktop) over, then rename the old one and repeat step 14, then delete the old renamed autochk.exe file afterwards.​
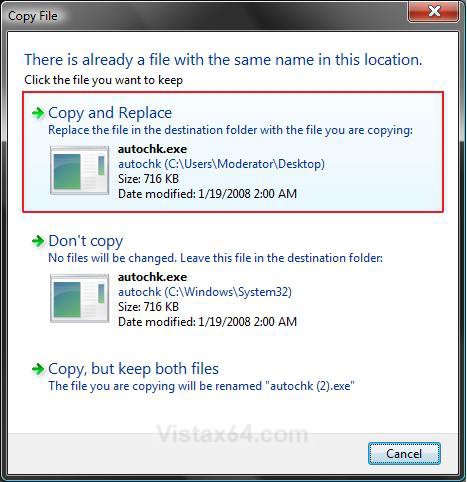
17. Click on Copy and Replace. (See screenshot below)​
NOTE: This replaces your autochk.exe with the downloaded clean one on the desktop that has not been taken ownership of.​
Copy_Replace.jpg

18. Click on Continue for Access Denied prompt.​
19. Click on Continue for UAC prompt.​
20. Close the Windows Explorer window.​


STEP FIVE
Set Chkdsk to Run at Startup

1. Try the different methods in this tutorial below to run chkdsk to see which one works best for you.​
That's it,
Shawn


Attachments

Last edited:
Many thanks, Shawn. After several hours working on my Toshiba Satellite P205D w/ Vista Home Premium SP1, I found the correct sequence of steps. Just a couple of notes for others with this configuration.

The Boot Execute data kept reverting to the value autocheck autochk /p \??\C: after each reboot, so I had to change it back again to autocheck autochk * when I tried the "non-SP1" version of autochk.exe (.16386) and, voila, it worked!

I guess my configuration is one of the exceptions to the SP1 rule. Thanks again, Harvey
 

My Computer

You're welcome Harvey. I'm happy to hear that you got it sorted despite the SP1 issue. :)

That reminds me that I needed to update this to include the SP2 version as well.

Shawn
 

My Computers

System One System Two

  • Operating System
    Windows 10 Pro 64-bit
    Manufacturer/Model
    Custom
    CPU
    Intel i7-8700K 5 GHz
    Motherboard
    ASUS ROG Maximus XI Formula Z390
    Memory
    64 GB (4x16GB) G.SKILL TridentZ RGB DDR4 3600 MHz (F4-3600C18D-32GTZR)
    Graphics card(s)
    ASUS ROG-STRIX-GTX1080TI-O11G-GAMING
    Sound Card
    Integrated Digital Audio (S/PDIF)
    Monitor(s) Displays
    2 x Samsung Odyssey G7 27"
    Screen Resolution
    2560x1440
    Hard Drives
    1TB Samsung 990 PRO M.2, 4TB Samsung 990 PRO PRO M.2, 8TB WD MyCloudEX2Ultra NAS
    PSU
    Seasonic Prime Titanium 850W
    Case
    Thermaltake Core P3
    Cooling
    Corsair Hydro H115i
    Mouse
    Logitech MX Master 3
    Keyboard
    Logitech wireless K800
    Internet Speed
    1 Gb/s Download and 35 Mb/s Upload
    Other Info
    Logitech Z625 speaker system, Logitech BRIO 4K Pro webcam, HP Color LaserJet Pro MFP M477fdn, APC SMART-UPS RT 1000 XL - SURT1000XLI, Galaxy S23 Plus phone
  • Operating System
    Windows 10 Pro
    Manufacturer/Model
    HP Envy Y0F94AV
    CPU
    i7-7500U @ 2.70 GHz
    Memory
    16 GB DDR4-2133
    Sound Card
    Conexant ISST Audio
    Monitor(s) Displays
    17.3" UHD IPS touch
    Screen Resolution
    3480 x 2160
    Hard Drives
    512 GB M.2 SSD
Thank you for sharing that. It does work. My question is why does it happen as this is about the third time i've used this method? Also, Vista is not seeing one of my external HDD's that it had before. It will come up and ask to format it, which i loathe doing, cuz it's got most of my music files, etc on it. So what i'm asking is is it the HDD / VISTA not playing nicely or is the drive boot sector jacked? Its an acomada 500 gig external. And is there any way if the boot sector is bad that i can either retrieve or wipe it clean. It wont let me scan it, as it either freezes dear VISTA or sez fomat and it wont. Thanks for the help:D:geek:;)
 

My Computer

Hello Lewis,

Not sure exactly what may be causing it, but backing up your music and formating it from within Vista will hopefully help.
 

My Computers

System One System Two

  • Operating System
    Windows 10 Pro 64-bit
    Manufacturer/Model
    Custom
    CPU
    Intel i7-8700K 5 GHz
    Motherboard
    ASUS ROG Maximus XI Formula Z390
    Memory
    64 GB (4x16GB) G.SKILL TridentZ RGB DDR4 3600 MHz (F4-3600C18D-32GTZR)
    Graphics card(s)
    ASUS ROG-STRIX-GTX1080TI-O11G-GAMING
    Sound Card
    Integrated Digital Audio (S/PDIF)
    Monitor(s) Displays
    2 x Samsung Odyssey G7 27"
    Screen Resolution
    2560x1440
    Hard Drives
    1TB Samsung 990 PRO M.2, 4TB Samsung 990 PRO PRO M.2, 8TB WD MyCloudEX2Ultra NAS
    PSU
    Seasonic Prime Titanium 850W
    Case
    Thermaltake Core P3
    Cooling
    Corsair Hydro H115i
    Mouse
    Logitech MX Master 3
    Keyboard
    Logitech wireless K800
    Internet Speed
    1 Gb/s Download and 35 Mb/s Upload
    Other Info
    Logitech Z625 speaker system, Logitech BRIO 4K Pro webcam, HP Color LaserJet Pro MFP M477fdn, APC SMART-UPS RT 1000 XL - SURT1000XLI, Galaxy S23 Plus phone
  • Operating System
    Windows 10 Pro
    Manufacturer/Model
    HP Envy Y0F94AV
    CPU
    i7-7500U @ 2.70 GHz
    Memory
    16 GB DDR4-2133
    Sound Card
    Conexant ISST Audio
    Monitor(s) Displays
    17.3" UHD IPS touch
    Screen Resolution
    3480 x 2160
    Hard Drives
    512 GB M.2 SSD
PhoenixHawke,

Could you post back the permalink (top right corned in post) for that individual post with the solution that worked for you? (right click, copy shortcut, paste) I'm unclear if it is the last post in the thread or in the page for the link you posted.
 

My Computers

System One System Two

  • Operating System
    Windows 10 Pro 64-bit
    Manufacturer/Model
    Custom
    CPU
    Intel i7-8700K 5 GHz
    Motherboard
    ASUS ROG Maximus XI Formula Z390
    Memory
    64 GB (4x16GB) G.SKILL TridentZ RGB DDR4 3600 MHz (F4-3600C18D-32GTZR)
    Graphics card(s)
    ASUS ROG-STRIX-GTX1080TI-O11G-GAMING
    Sound Card
    Integrated Digital Audio (S/PDIF)
    Monitor(s) Displays
    2 x Samsung Odyssey G7 27"
    Screen Resolution
    2560x1440
    Hard Drives
    1TB Samsung 990 PRO M.2, 4TB Samsung 990 PRO PRO M.2, 8TB WD MyCloudEX2Ultra NAS
    PSU
    Seasonic Prime Titanium 850W
    Case
    Thermaltake Core P3
    Cooling
    Corsair Hydro H115i
    Mouse
    Logitech MX Master 3
    Keyboard
    Logitech wireless K800
    Internet Speed
    1 Gb/s Download and 35 Mb/s Upload
    Other Info
    Logitech Z625 speaker system, Logitech BRIO 4K Pro webcam, HP Color LaserJet Pro MFP M477fdn, APC SMART-UPS RT 1000 XL - SURT1000XLI, Galaxy S23 Plus phone
  • Operating System
    Windows 10 Pro
    Manufacturer/Model
    HP Envy Y0F94AV
    CPU
    i7-7500U @ 2.70 GHz
    Memory
    16 GB DDR4-2133
    Sound Card
    Conexant ISST Audio
    Monitor(s) Displays
    17.3" UHD IPS touch
    Screen Resolution
    3480 x 2160
    Hard Drives
    512 GB M.2 SSD
Thank you Brian. It has been added as STEP ONE. :)


Haha, awesome. Thanks for having this up here though - Even though what you initially had posted didn't solve my particular variation of this problem, it brought enough people with similar problems together that I was able to track down something that worked. Much appreciated. :geek:

Oh, and now FireFox isn't locking up my system and forcing me to do a hard-shutdown to recover anymore! :D
 

My Computer

That's great news. I'm happy to hear everything seems to be sorted out now for you. :)
 

My Computers

System One System Two

  • Operating System
    Windows 10 Pro 64-bit
    Manufacturer/Model
    Custom
    CPU
    Intel i7-8700K 5 GHz
    Motherboard
    ASUS ROG Maximus XI Formula Z390
    Memory
    64 GB (4x16GB) G.SKILL TridentZ RGB DDR4 3600 MHz (F4-3600C18D-32GTZR)
    Graphics card(s)
    ASUS ROG-STRIX-GTX1080TI-O11G-GAMING
    Sound Card
    Integrated Digital Audio (S/PDIF)
    Monitor(s) Displays
    2 x Samsung Odyssey G7 27"
    Screen Resolution
    2560x1440
    Hard Drives
    1TB Samsung 990 PRO M.2, 4TB Samsung 990 PRO PRO M.2, 8TB WD MyCloudEX2Ultra NAS
    PSU
    Seasonic Prime Titanium 850W
    Case
    Thermaltake Core P3
    Cooling
    Corsair Hydro H115i
    Mouse
    Logitech MX Master 3
    Keyboard
    Logitech wireless K800
    Internet Speed
    1 Gb/s Download and 35 Mb/s Upload
    Other Info
    Logitech Z625 speaker system, Logitech BRIO 4K Pro webcam, HP Color LaserJet Pro MFP M477fdn, APC SMART-UPS RT 1000 XL - SURT1000XLI, Galaxy S23 Plus phone
  • Operating System
    Windows 10 Pro
    Manufacturer/Model
    HP Envy Y0F94AV
    CPU
    i7-7500U @ 2.70 GHz
    Memory
    16 GB DDR4-2133
    Sound Card
    Conexant ISST Audio
    Monitor(s) Displays
    17.3" UHD IPS touch
    Screen Resolution
    3480 x 2160
    Hard Drives
    512 GB M.2 SSD
I have followed the steps down through attempting to replace the autochk.exe file - at this point permission is asked for (after selecting Copy and replace) - I click to give permission and receive message "Try Again".

How do I authorize the system to perform this file copy.

FYI - I received the same message when I tried to rename the original autochk file.


Any help you can offer will be greatly appreciated.

God Bless
 

My Computer

I have followed the steps down through attempting to replace the autochk.exe file - at this point permission is asked for (after selecting Copy and replace) - I click to give permission and receive message "Try Again".

How do I authorize the system to perform this file copy.

FYI - I received the same message when I tried to rename the original autochk file.


Any help you can offer will be greatly appreciated.

God Bless

You need to give yourself permissions - first take ownership of the file, then close properties, reopen properties, and give yourself "Full Control" permissions. If you do not do both of these steps in order, you will not be able to replace the files.

Full instructions for this are located in the original tutorial post (Click the link for "taking ownership".)
 

My Computer

I've gone through downloading the Take Ownership patch, but when I right click on the desktop file, I don't find the "Take Ownership" option.

I know this is probably simple, but it's virtually Greek to me.

Thanks
 

My Computer

Hi,
I run Vista Home Premium at level Service Pack 1 on a Dell Inspiron 537s x64 laptop. I too cannot get Check Disk to run after booting. Using MSCONFIG to set SAFE mode doesn't help and SFC runs clean. My Boot Execute registery entry is equal to "autocheck autochk *" before I invoke Check Disk from the Tools panel and "autocheck autochk /r\??\C:autocheck autochk *" afterwards. This is exactly what I see on my other Vista PC, where Check Disk runs every time. I went on to try to replace the AutoChk file. I first attempted to take ownership of the file --
takeown /F C:\Windows\System32\autochk.exe
icacls C:\Windows\System32\autochk.exe /grant Rachel:F.
I then downloaded the SP1 file and extracted autochk.exe. But when I went to cut and paste the new file or rename the old one, I got the message "You'll need to provide administrative permission to copy to this folder". I selected contine and then got the admin waring prompt "Windows needs your permission to continue". Again, I chose to continue, at which point, I got "Destination folder access denied".
I assume I'm doing something wrong with either takeown or icacls, but don't know what it is.
Thanks in advance,
s660117
 

My Computer

Hello s660117, and welcome to Vista Forums.

Try the manual Method two, option two in the tutorial below instead to see if you have ownership and full permission of the autochk.exe file.

Take Ownership of file
 

My Computers

System One System Two

  • Operating System
    Windows 10 Pro 64-bit
    Manufacturer/Model
    Custom
    CPU
    Intel i7-8700K 5 GHz
    Motherboard
    ASUS ROG Maximus XI Formula Z390
    Memory
    64 GB (4x16GB) G.SKILL TridentZ RGB DDR4 3600 MHz (F4-3600C18D-32GTZR)
    Graphics card(s)
    ASUS ROG-STRIX-GTX1080TI-O11G-GAMING
    Sound Card
    Integrated Digital Audio (S/PDIF)
    Monitor(s) Displays
    2 x Samsung Odyssey G7 27"
    Screen Resolution
    2560x1440
    Hard Drives
    1TB Samsung 990 PRO M.2, 4TB Samsung 990 PRO PRO M.2, 8TB WD MyCloudEX2Ultra NAS
    PSU
    Seasonic Prime Titanium 850W
    Case
    Thermaltake Core P3
    Cooling
    Corsair Hydro H115i
    Mouse
    Logitech MX Master 3
    Keyboard
    Logitech wireless K800
    Internet Speed
    1 Gb/s Download and 35 Mb/s Upload
    Other Info
    Logitech Z625 speaker system, Logitech BRIO 4K Pro webcam, HP Color LaserJet Pro MFP M477fdn, APC SMART-UPS RT 1000 XL - SURT1000XLI, Galaxy S23 Plus phone
  • Operating System
    Windows 10 Pro
    Manufacturer/Model
    HP Envy Y0F94AV
    CPU
    i7-7500U @ 2.70 GHz
    Memory
    16 GB DDR4-2133
    Sound Card
    Conexant ISST Audio
    Monitor(s) Displays
    17.3" UHD IPS touch
    Screen Resolution
    3480 x 2160
    Hard Drives
    512 GB M.2 SSD
Yes, option 2 worked fine and ChkDsk did run once I refreshed autochk.exe.
Thanks for your help,
s660117
 

My Computer

You're welcome s660117. I'm happy to hear that you got it to run now. :)
 

My Computers

System One System Two

  • Operating System
    Windows 10 Pro 64-bit
    Manufacturer/Model
    Custom
    CPU
    Intel i7-8700K 5 GHz
    Motherboard
    ASUS ROG Maximus XI Formula Z390
    Memory
    64 GB (4x16GB) G.SKILL TridentZ RGB DDR4 3600 MHz (F4-3600C18D-32GTZR)
    Graphics card(s)
    ASUS ROG-STRIX-GTX1080TI-O11G-GAMING
    Sound Card
    Integrated Digital Audio (S/PDIF)
    Monitor(s) Displays
    2 x Samsung Odyssey G7 27"
    Screen Resolution
    2560x1440
    Hard Drives
    1TB Samsung 990 PRO M.2, 4TB Samsung 990 PRO PRO M.2, 8TB WD MyCloudEX2Ultra NAS
    PSU
    Seasonic Prime Titanium 850W
    Case
    Thermaltake Core P3
    Cooling
    Corsair Hydro H115i
    Mouse
    Logitech MX Master 3
    Keyboard
    Logitech wireless K800
    Internet Speed
    1 Gb/s Download and 35 Mb/s Upload
    Other Info
    Logitech Z625 speaker system, Logitech BRIO 4K Pro webcam, HP Color LaserJet Pro MFP M477fdn, APC SMART-UPS RT 1000 XL - SURT1000XLI, Galaxy S23 Plus phone
  • Operating System
    Windows 10 Pro
    Manufacturer/Model
    HP Envy Y0F94AV
    CPU
    i7-7500U @ 2.70 GHz
    Memory
    16 GB DDR4-2133
    Sound Card
    Conexant ISST Audio
    Monitor(s) Displays
    17.3" UHD IPS touch
    Screen Resolution
    3480 x 2160
    Hard Drives
    512 GB M.2 SSD
Instructions Question

Step Four
#4
NOTE: If the File version is blank or you have SP1 installed, then do step 6. If not, then do step 7.

6. For the 6.0.6002.18005 SP2 Version of autochk.exe -
NOTE: This is for the 32 bit and 64 bit Vista with SP1 and SP2 installed.

My file version is blank and I have SP1 installed. In the sfc scannow log it says it is version 6.0.6001.18000, the SP1 version. Please verify. You want me to install the SP2 version, even though I don't have SP2 installed?
 
Last edited:

My Computer

System One

  • Manufacturer/Model
    HP HDX18
    CPU
    Intel Core 2 Duo T9550 @ 2.66Ghz
    Memory
    4GB
    Graphics card(s)
    Nvidia GeForce 9600M GT
    Hard Drives
    Hitachi HTS723232L9A360 ATA
    Mouse
    Logitech VX Nano
Back
Top