How to Fix Chkdsk will Not Run at Startup in Vista
If after you set Check Disk or chkdsk to run at startup it will not run, then this will show you how to fix this problem so chkdsk will run at startup. This problem is usually caused when the autochk.exe file gets corrupted, or the registry BootExecute data value is incorrect.
This is not for if chkdsk cannot finish or stops running.
This is not for if chkdsk cannot finish or stops running.
- Check Disk uses the file autochk.exe to run chkdsk.
- If you still cannot run chkdsk at startup after this, then you might consider performing a System Restore, Repair Installation, or Clean Installation to fix the problem. See related links below.
- If you had changed your default boot screen, then you will need to temporarily uncheck the No GUI boot to be able to see what is happening when chkdsk is running at boot up. See: How to Enable or Replace the Hidden Aurora Boot Screen in Vista
 STEP ONE
This is to see if something may be loading before the check disk program preventing chkdsk from running.
1. Schedule check disk to run using chkdsk /f (STEP FIVE below) in the command promt.
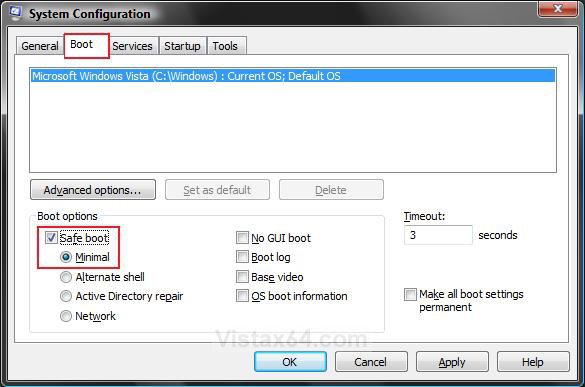
2. Run msconfig (step 1 in METHOD TWO at link), and click on the Boot
tab and click on Safe boot with the minimal button selected. (See screenshot below)
3. Restart the computer to hopefully have chkdsk run.
4. Set msconfig (step 2 in METHOD TWO at link) to boot normally again.
5. If chkdsk still will not run at startup, then proceed with the steps below. If it did, then you're done.
 STEP TWO
- This will reset chkdsk back to it's default setting of not to run at startup.
- This step will also fix the problem of chkdsk always running at startup.
- If BootExecute already has a Data value of autocheck autochk *, then you do not need to do this. (See the Manual Way below to check) Continue to STEP THREE below instead.
Through a Download:
1. Click on the download button below to download the Reset_chkdsk.reg file.
2. Click on Save, and save the .reg file to the Desktop.
3. Right click on the .reg file (on Desktop) and click on Merge.
4. Click on the Run button for Security Warning pop-up.
5. Click on Continue (UAC), Yes, and then OK when prompted.
6. When done, you can delete the .reg file (on Desktop).
The Manual Way:
1. Open the Start Menu.
2. In the white line (Start Search) area, type regedit and press Enter.
3. Click on the Continue button in the UAC prompt.
4. In regedit, go to: (See screenshot below step 5)
HKEY_LOCAL_MACHINE\SYSTEM\CurrentControlSet\Control\Session Manager
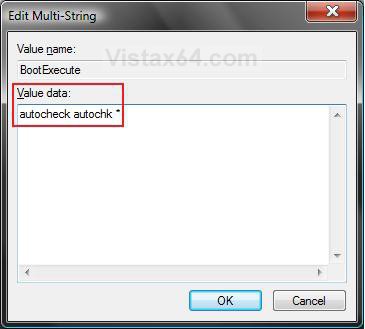
5. In the right pane, right click on BootExecute and click on Modify.
6. Type autocheck autochk * and click on OK. (See screenshot below)
NOTE: You will be replacing autocheck autochk /p \??\C: with autocheck autochk* instead. If BootExecute already has a Data value of autocheck autochk *, then you do not need to do this. Go to STEP THREE below.
7. Close regedit.
 STEP THREE
1. Try running a sfc /scannow command to see if it can fix chkdsk.
2. When SFC is finished, try running chkdsk again.
3. If chkdsk still will not run at startup, then proceed with the steps below. If it did, then you're done.
 STEP FOUR
NOTE: This will show you how to replace your corrupted copy of the autochk.exe file with clean copy to be able to run chkdsk at startup.
1. Be sure that you already have ran a SFC /scannow from STEP THREE above to see verify that the autochk.exe file was foud to be corrupted first in the sfcdetails.txt file. If it's not, then you do not need to do STEP FOUR.
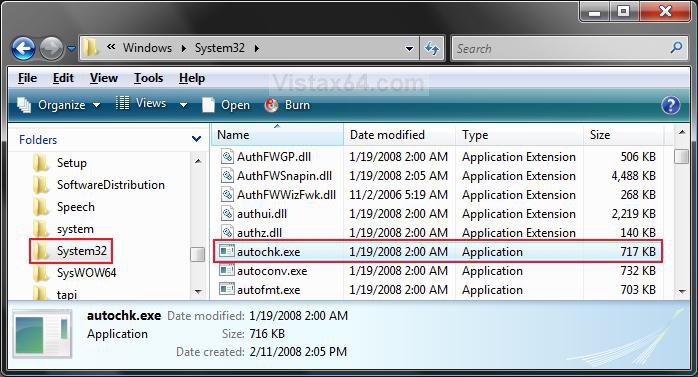
2. In Windows Explorer, go to C:\Windows\System32\autochk.exe. (See screenshot below)
3. Take ownership of the file autochk.exe at the C:\Windows\System32\autochk.exe location, and "Allow" your user account "Full Control" of it. (See screenshot above)
4. Right click on autochk.exe and click on Properties. (See screenshot below step 2)
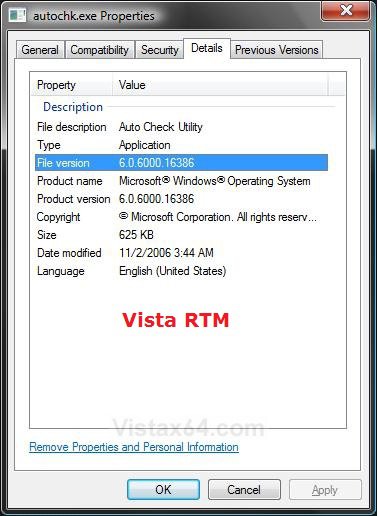
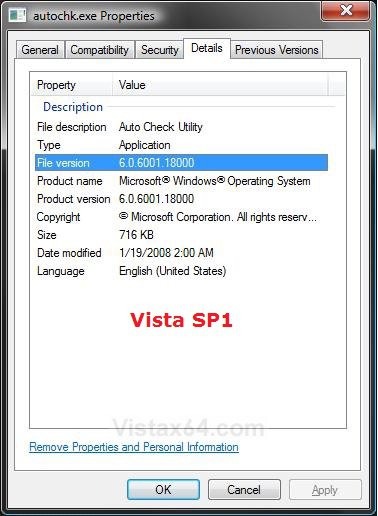
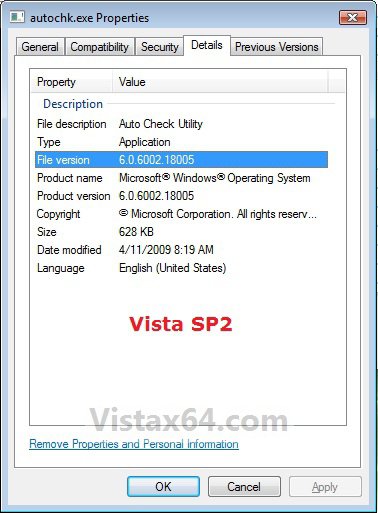
5. Click on the Details tab. (See screenshots below)
A) Make note of what File version the autochk.exe file is.
NOTE: If the File version is blank or you have SP1 installed, then do step 6. If not, then do step 8.
6. Download the same version that you have in step 5.
7. For the Vista 6.0.6002.18005 SP2 Version of autochk.exe
NOTE: This is for the 32 bit and 64 bit Vista with SP1 and SP2 installed.
A) Click on the download button below to download the 6.0.6002.18005.zip file.
B) Go to step 10.
8. For the Vista 6.0.6001.18000 SP1 Version of autochk.exe
NOTE: This is for the 32 bit and 64 bit Vista with SP1 installed.
A) Click on the download button below to download the 6.0.6001.18000.zip file.
B) Go to step 10.
9. For the Vista 6.0.6000.16386 RTM Version of autochk.exe
NOTE: This is for the 32 bit and 64 bit Vista without SP1 or SP2 installed. This version has been reported to still work with or without SP1 installed, so you may try it if you still have problems with the newer 6.0.6001.18000 SP1 or 6.0.6002.18005 SP2 version.
A) Click on the download button below to download the 6.0.6000.16386.zip file.
10. Save the ZIP file to your desktop.
11. Open on the downloaded autochk.exe.zip file.
12. Extract (drag and drop) the autochk.exe file from wihtin the ZIP file to your desktop.
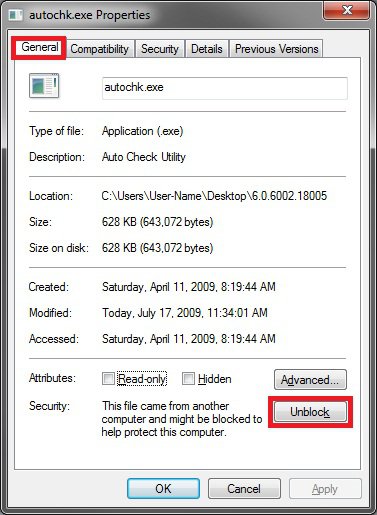
13. Right click on the autochk.exe file on your desktop and click on Properties and the Unblock button under the General tab. (See screenshot below)
NOTE: If you do not have the Unblock button, then it is already unblocked. Continue on to step 14.
14. Right click on the autochk.exe file on your desktop and click on Copy.
15. Go back to the Windows Explore window at C:\Windows\System32\autochk.exe. (See screenshot below step 2)
16. Right click on a empty space in the Windows Explorer window and click on Paste. (See screenshot below step 2)
NOTE: If it will not let you Copy or Paste the new autochk.exe file (on desktop) over, then rename the old one and repeat step 14, then delete the old renamed autochk.exe file afterwards.
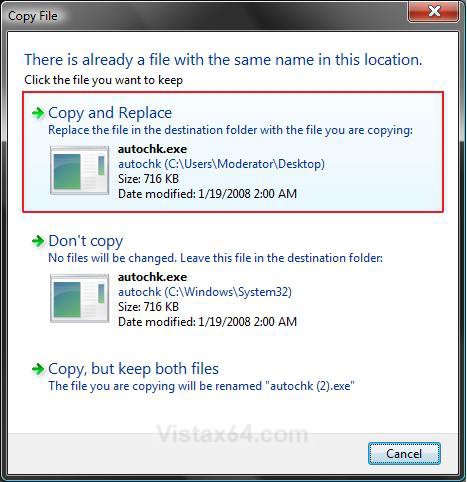
17. Click on Copy and Replace. (See screenshot below)
NOTE: This replaces your autochk.exe with the downloaded clean one on the desktop that has not been taken ownership of.
18. Click on Continue for Access Denied prompt.
19. Click on Continue for UAC prompt.
20. Close the Windows Explorer window.
 STEP FIVE
1. Try the different methods in this tutorial below to run chkdsk to see which one works best for you.
That's it,Shawn
Related Tutorials
- How to Run Check Disk at Startup in Vista
- How To Perform a Repair Installation For Vista
- How to Do a Clean Install of Vista with a Upgrade Version
- How to Do a Clean Install with a Full Version of Vista
- How to Do a System Restore in Vista
- How to Repair and Verify the Integrity of Vista System Files with System File Checker
- How to Change Vista Disk Check Press Any Key Timeout Value at Startup
- How to Read the Event Viewer Log for Check Disk (chkdsk) in Windows
Attachments
Last edited:

