Vista SP1 Slipstream Installation DVD

How to Create a Vista SP1 Slipstream Installation DVD

information   Information
This will show you how to create a Vista installation DVD with the Vista SP1 slipstreamed into it for any 32 and 64 bit version of Vista you want. This DVD will allow you to do a clean install of Vista with the SP1 all at once instead of installing Vista first then the SP1.
Note   Note
This Vista SP1 slipstream installation DVD will also allow you to run a Repair install on Vista with SP1 installed now. Before, you could not use a normal Vista installation DVD ro run a Repair install on Vista with SP1 installed since Vista with SP1 was a new version than what was on the Vista DVD.
Tip   Tip
If you have a Dell OEM computer, then see this link to help you possibly create a sliptream installation DVD from your Dell installation disc.
warning   Warning
You can only make a 64-bit Vista DVD in a installed 64-bit Vista, and only a 32-bit Vista DVD in a installed 32-bit Vista.


REQUIREMENTS:
Microsoft has issued a note to users, of “v-Lited” Windows Vista SP1 installs, having issues upgrading to SP2. Their advice? Reinstall Windows with genuine media. For more on this, see: Short: vLite screws up Windows Vista SP1 upgrade path - Within Windows


Here's How:
Note   Note
You will need to temporarily disable your antivirus program before you start this to prevent possible interference to the vLite program below. This program is safe, but could be mistaken as not by some antivirus programs and prevent you from creating the SP1 slipstream DVD.

1. Copy the Vista Installation DVD Contents to the Desktop
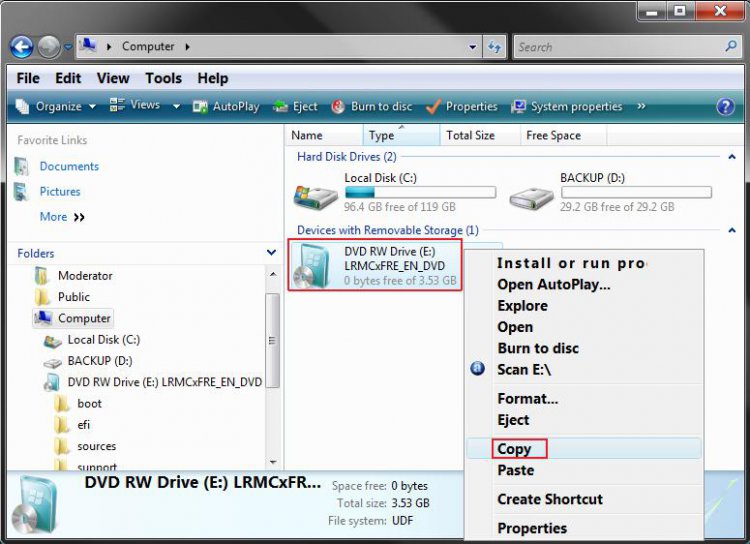
A) Place the retail or OEM (not Recovery) Vista installation DVD into the DVD drive.​
NOTE: If AutoPlay or the Vista install window pops-up, just close it.​
B) Open the Start Menu and click on Computer.​
C) Right click on the DVD drive in Computer with the Vista installation DVD and click on Copy. (See screenshot below)​
Step1.jpg

D) Right click on a empty space on the desktop and click on Paste.​
NOTE: This may take a few minutes to finish copying all of the Vista installation DVD contents to the folder on the desktop.​

2. Download the SP1 Standalone Installer to the Desktop
NOTE: See Requirements at the top of the tutorial for the download links. You will need to select the same 32 bit or 64 bit version of the SP1 as the Vista installation DVD from step 1.​
A) Download and save the SP1 standalone installer to the desktop.​

3. Download and Install the vLite Program
NOTE: See Requirements at the top of the tutorial for the download link.​
A) Right click on the vLite program shortcut and click Run as Administrator.​
B) Click on Allow.​
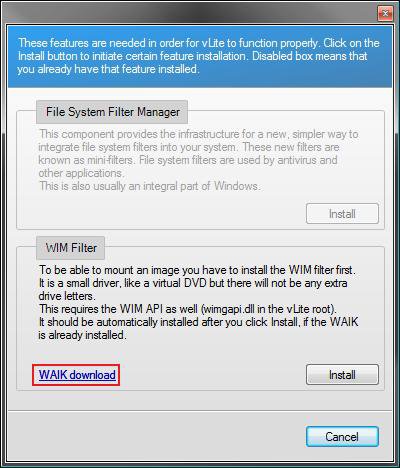
C) If this window pops-up, then click on the Install button(s) for the missing features needed by vLite. (See screenshot below)​
NOTE: If you see the WAIK Download link, then you will need to click on the Install button to download the 1.34GB ISO WAIK file first. Next, follow the instructions at the download link:​
  • Click the Download button on this page to start the download.
  • Click on Save, and save the .iso file to your desktop.
  • Burn the saved .iso file to a DVD. You can use ISO Recorder to do this. This link will show you how to use ISO Recorder.
  • Run the DVD to install WAIK.
WARNING: There is a glitch in the vLite 1.2 version where you may receive an error about WAIK when trying to run vLite. WAIK is not always properly recognized in Vista 32 bit. You may need to manually copy and paste the wimgapi.dll file from WAIK into the root vLite folder (main folder) in C:\Programs for it to work properly.​
Step2.jpg


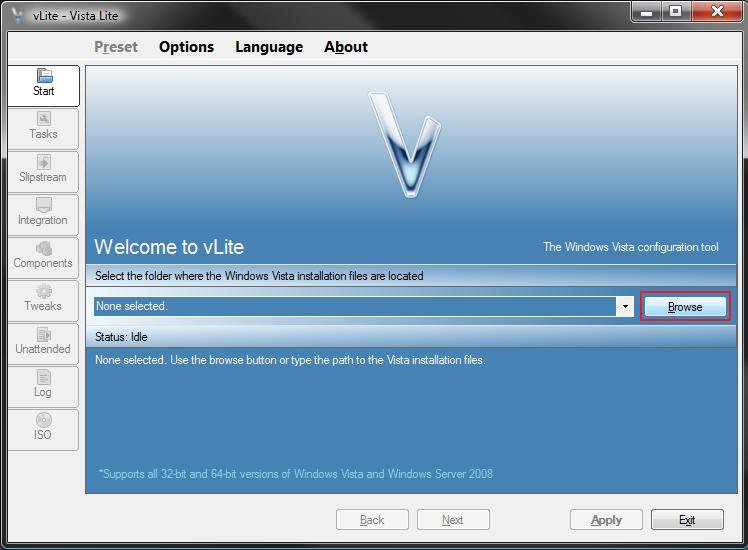
4. Click on the Browse button. (See screenshot below)​
Step3.jpg

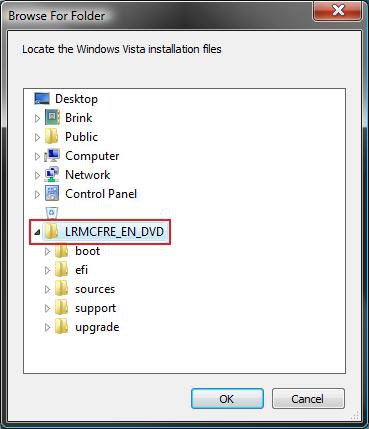
5. Click on the Vista folder (created from step 1) on the desktop and click on the LRMCFRE_EN_DVD folder, then click OK. (See screenshot below)​
NOTE: You may have a different name than LRMCFRE_EN_DVD based on your type of Vista installation DVD, but it will be the one right under Vista.​
Step4.jpg

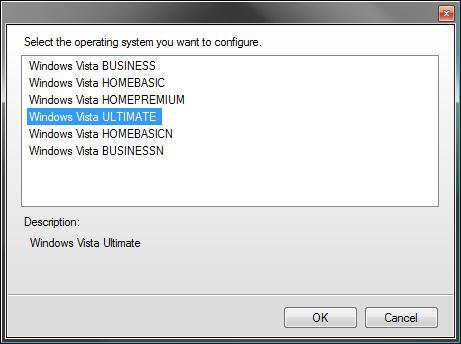
6. Click on the Vista edition that you want to use for the Vista SP1 slipstream DVD to highlight it and click OK. (See screenshot below)​
NOTE: You can only have one Vista edition per slipstream DVD. If you want to have more than one Vista edition, then you must repeat this tutorial for each individual Vista edition for their own DVD.​
Step5.jpg

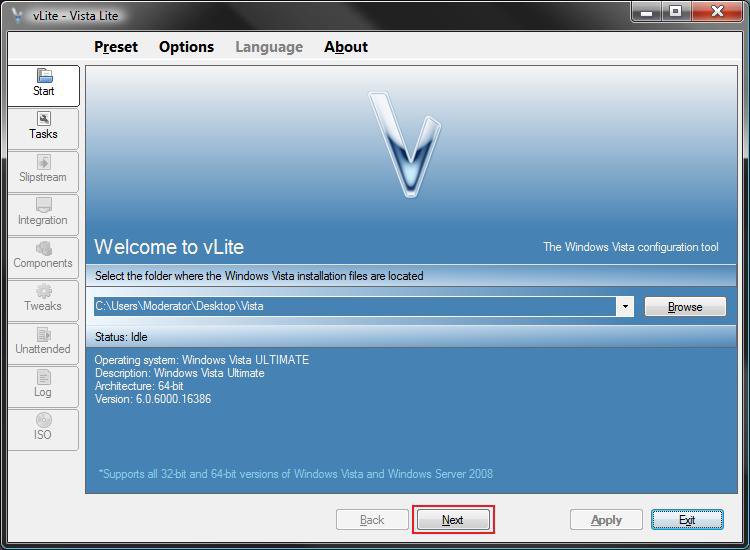
7. Click on the Next button. (See screenshot below)​
Step6.jpg

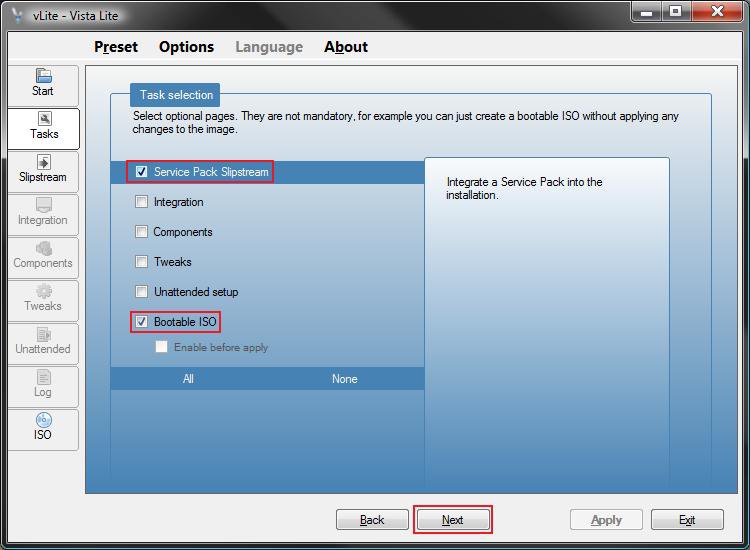
8. Check both the Service Pack Slipstream and Bootable ISO boxes and click on the Next button. (See screenshot below)​
Step7.jpg

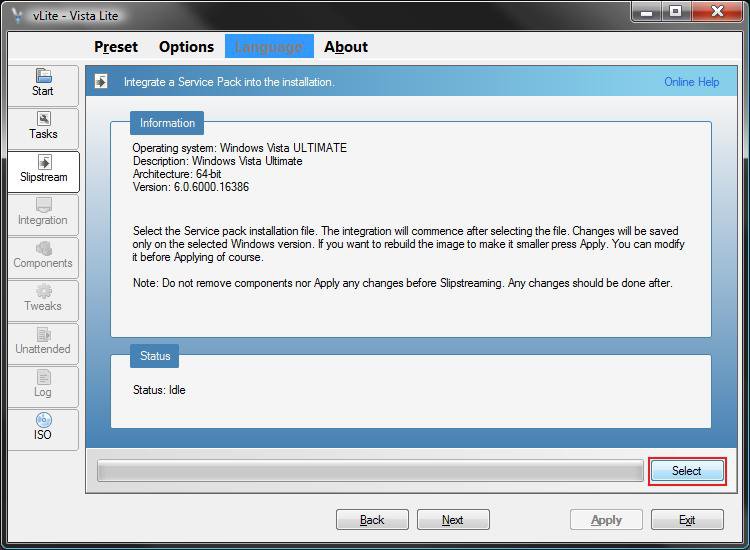
9. Click on the Select button. (See screenshot below)​
Step8.jpg

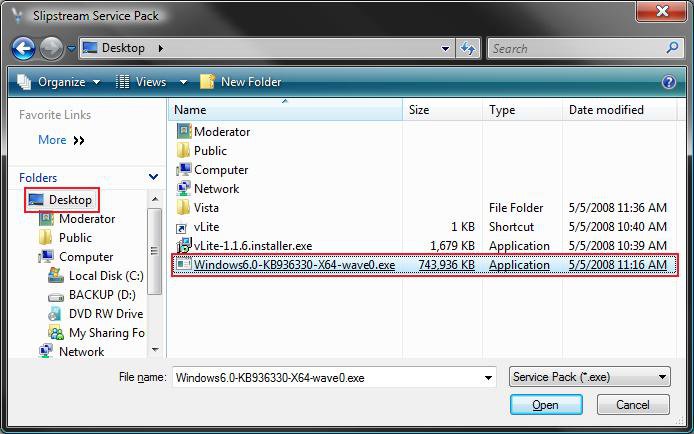
10. Select the SP1 standalone program (from step 2) on the desktop and click on the Open button. (See screenshot below)​
Step9.jpg

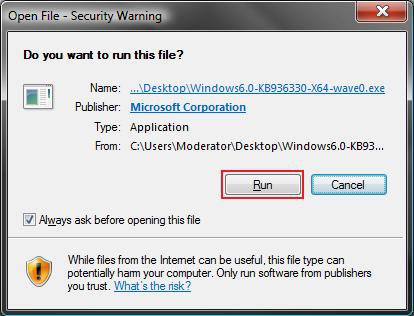
11. Click on Run when this window pops-up in a few seconds. (See screenshot below)​
NOTE: This runs the SP1 installer program for the vLite program only. It will not install the SP1 on your computer.​
Step10.jpg

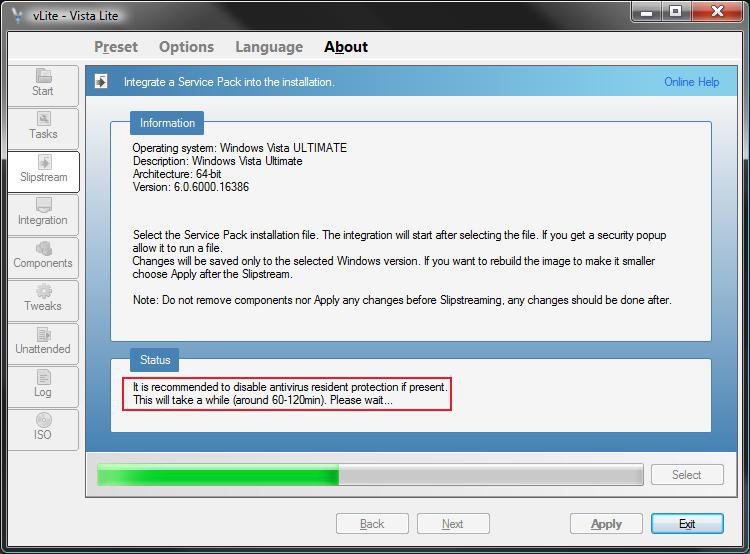
12. This will take around 60 to 120 minutes or so to complete this part. Some older slower systems may take a bit longer. (See screenshot below)​
Enjoy your break. ;)
NOTE: In the Status box, you will see Preparing first, Extracting second, Integrating third, then this below until it is finished with this part. It will seem like it is stuck about 60% of the way, but it is not.​
Step11.jpg

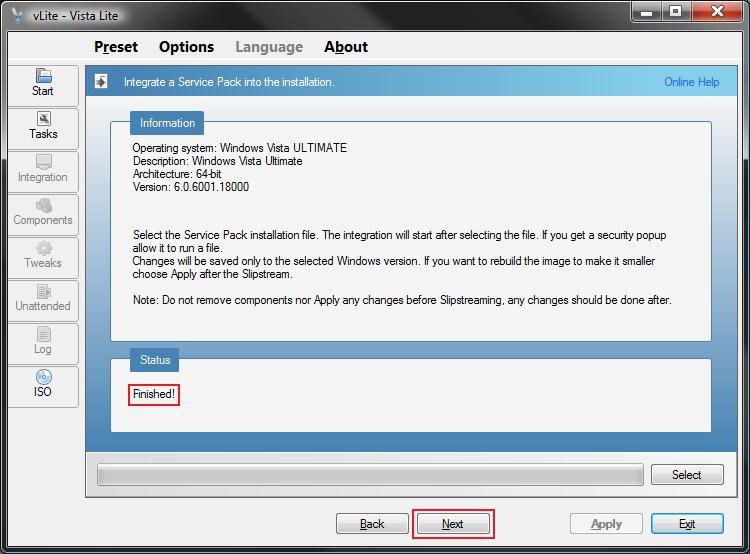
13. When Finished, click on Next. (See screenshot below)​
NOTE: If this fails, then verify that you are using the same 32 bit or 64 bit versions of the Vista SP1 and Vista Installation DVD files. If they are not the same, it will fail.​
Step12.jpg

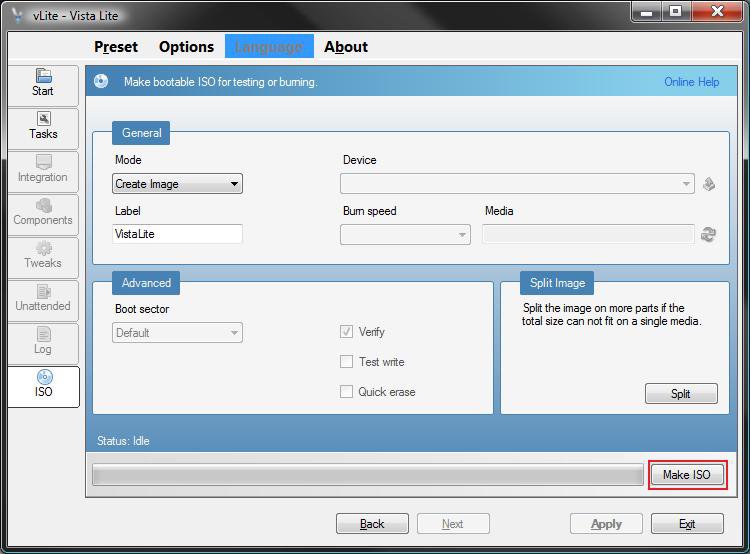
14. Under the General section, make sure that Create Image is selected and click on the Make ISO button. (See screenshot below)​
Step13.jpg

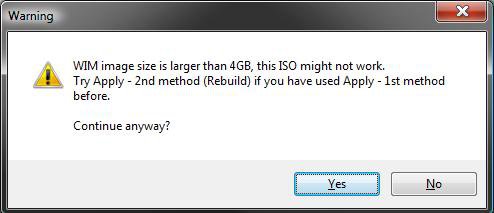
15. If the Created Image is over 4 GB
A) If this window pops-up on you with a similar message after you click on the Make ISO button (from step 14), then click on No and continue to step 16. (See screenshot below)​
NOTE: If you do not get the option to make the ISO image smaller, then see:
B) If not, then go to step 19 and skip steps 16, 17, and 18.​
Step14.jpg


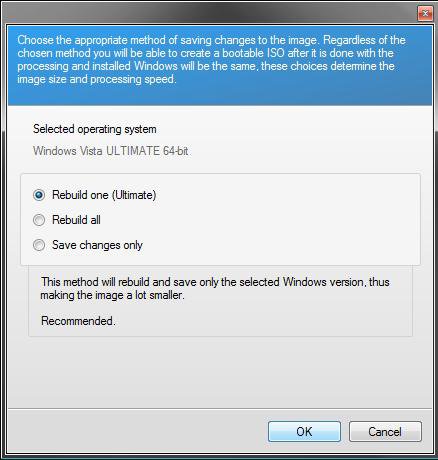
16. Dot Rebuild one (Vista edition from step 5) and click OK. (See screenshot below)​
Step15.jpg

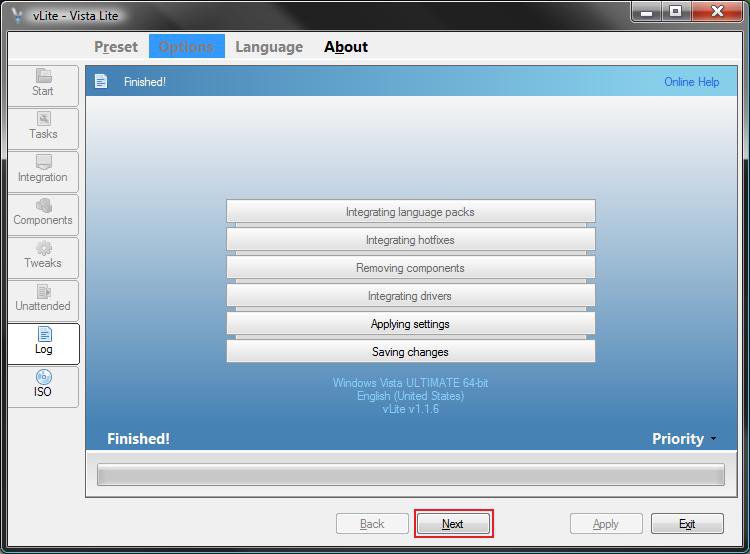
17. When finished, click on the Next button. (See screenshot below)​
NOTE: This will take a little bit to finish.​
Step16.jpg

18. Under the General section, make sure that Create Image is selected and click on the Make ISO button. (See screenshot below)​
NOTE: After the Vista and SP1 image file has been rebuilt to make it smaller, you will return to the same screen in step 14.​
Step13.jpg

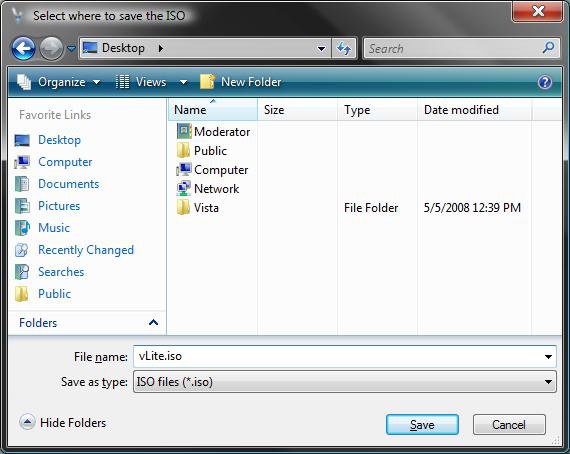
19. Select the Desktop and click on the Save button. (See screenshot below)​
NOTE: This is where the ISO file will be saved when it is finished being created.​
Step17.jpg

20. When it is finished creating the ISO file, place a blank unformated DVD into the DVD drive.​
NOTE: If AutoPlay pops-up asking you to format the DVD, just close it.​
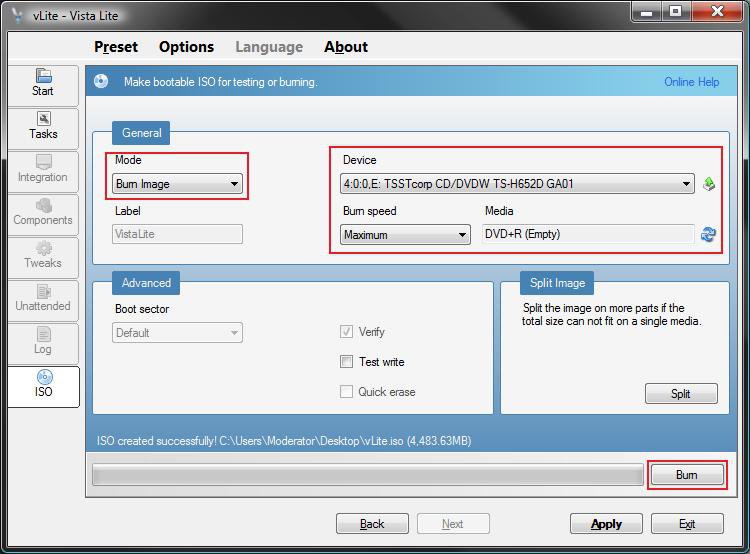
21. Under the General section, make sure that Burn Image is selected and that you have your DVD drive selected under Device. Click on the Burn button. (See screenshot below)​
Step18.jpg

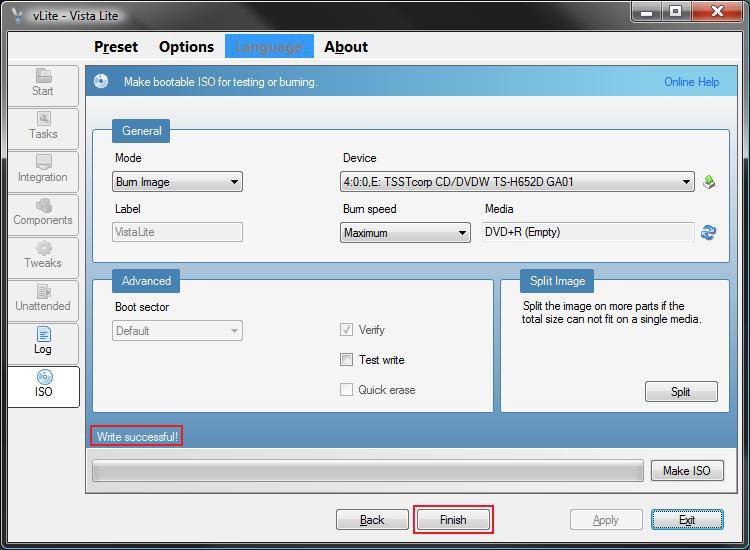
22. When it is finished making the Vista SP1 Slipstream Installation DVD it will say Write Successful, then click on the Finish or Exit button. (See screenshot below)​
NOTE: It will take a few minutes to finish this. When you click Finish, it will close vLite.​
Step19.jpg

23. Remove your new Vista SP1 Slipstream Installation DVD from the DVD drive.​
NOTE: You will use this DVD the same way you did the retail Vista installation DVD.​
24. Do not forget to enable your antivirus program again.​
That's it, your done. Finally. LOL ;)
Shawn


Attachments

  • thumb_vista_install_logo.jpg
    thumb_vista_install_logo.jpg
    2.7 KB · Views: 471
Last edited by a moderator:
Hi Bad_the_ba,

Since you have not received any responses from anyone, you might check at the vLite program forum to see what you may find to.

vLite - MSFN Forums

Hope this helps,
Shawn
 

My Computers

System One System Two

  • Operating System
    Windows 10 Pro 64-bit
    Manufacturer/Model
    Custom
    CPU
    Intel i7-8700K 5 GHz
    Motherboard
    ASUS ROG Maximus XI Formula Z390
    Memory
    64 GB (4x16GB) G.SKILL TridentZ RGB DDR4 3600 MHz (F4-3600C18D-32GTZR)
    Graphics card(s)
    ASUS ROG-STRIX-GTX1080TI-O11G-GAMING
    Sound Card
    Integrated Digital Audio (S/PDIF)
    Monitor(s) Displays
    2 x Samsung Odyssey G7 27"
    Screen Resolution
    2560x1440
    Hard Drives
    1TB Samsung 990 PRO M.2, 4TB Samsung 990 PRO PRO M.2, 8TB WD MyCloudEX2Ultra NAS
    PSU
    Seasonic Prime Titanium 850W
    Case
    Thermaltake Core P3
    Cooling
    Corsair Hydro H115i
    Mouse
    Logitech MX Master 3
    Keyboard
    Logitech wireless K800
    Internet Speed
    1 Gb/s Download and 35 Mb/s Upload
    Other Info
    Logitech Z625 speaker system, Logitech BRIO 4K Pro webcam, HP Color LaserJet Pro MFP M477fdn, APC SMART-UPS RT 1000 XL - SURT1000XLI, Galaxy S23 Plus phone
  • Operating System
    Windows 10 Pro
    Manufacturer/Model
    HP Envy Y0F94AV
    CPU
    i7-7500U @ 2.70 GHz
    Memory
    16 GB DDR4-2133
    Sound Card
    Conexant ISST Audio
    Monitor(s) Displays
    17.3" UHD IPS touch
    Screen Resolution
    3480 x 2160
    Hard Drives
    512 GB M.2 SSD
Looks like it's explained here:
vLite v1.2 Beta - Time Machine - MSFN Forums
Apparently he had to include the WAIK download link instead of redistributing the necessary files because of pressure from MS... But the old version avoids it, and installing the new over the old also avoids the massive 1.3GB WAIK download. Thanks again Shawn. I'll be trying this slpstream with Vista Biz x64 in the next couple days.
 

My Computer

System One

  • CPU
    Core 2 Duo E8400
    Motherboard
    ASUS P5N32-E SLI Plus
    Memory
    2GB Kingston HyperX DDR800
    Graphics card(s)
    ASUS Silent EN8800GT (Nvidia)
    Hard Drives
    2x Seagate Barracuda 7200.11 750GB SATA2 1x Maxtor 160GB SATA
You're welcome Bad_the_ba,

Let us know how it went for you.

Shawn
 

My Computers

System One System Two

  • Operating System
    Windows 10 Pro 64-bit
    Manufacturer/Model
    Custom
    CPU
    Intel i7-8700K 5 GHz
    Motherboard
    ASUS ROG Maximus XI Formula Z390
    Memory
    64 GB (4x16GB) G.SKILL TridentZ RGB DDR4 3600 MHz (F4-3600C18D-32GTZR)
    Graphics card(s)
    ASUS ROG-STRIX-GTX1080TI-O11G-GAMING
    Sound Card
    Integrated Digital Audio (S/PDIF)
    Monitor(s) Displays
    2 x Samsung Odyssey G7 27"
    Screen Resolution
    2560x1440
    Hard Drives
    1TB Samsung 990 PRO M.2, 4TB Samsung 990 PRO PRO M.2, 8TB WD MyCloudEX2Ultra NAS
    PSU
    Seasonic Prime Titanium 850W
    Case
    Thermaltake Core P3
    Cooling
    Corsair Hydro H115i
    Mouse
    Logitech MX Master 3
    Keyboard
    Logitech wireless K800
    Internet Speed
    1 Gb/s Download and 35 Mb/s Upload
    Other Info
    Logitech Z625 speaker system, Logitech BRIO 4K Pro webcam, HP Color LaserJet Pro MFP M477fdn, APC SMART-UPS RT 1000 XL - SURT1000XLI, Galaxy S23 Plus phone
  • Operating System
    Windows 10 Pro
    Manufacturer/Model
    HP Envy Y0F94AV
    CPU
    i7-7500U @ 2.70 GHz
    Memory
    16 GB DDR4-2133
    Sound Card
    Conexant ISST Audio
    Monitor(s) Displays
    17.3" UHD IPS touch
    Screen Resolution
    3480 x 2160
    Hard Drives
    512 GB M.2 SSD
Brink,

Iforgot,

You will not see step 16 unless the created image was over 4 GB and you got the pop-up message in step 15. That's all. ;)

nLite is the version of this program for XP.

Thank you for letting us know that it will work on a OEM Vista as well. I look forward to seeing your results.

Shawn

Great tutorial and so far I made it through to Step 16. (I did have some issues with vLite because I had thought I needed to download the 1.4GB file necessary for it to work. I ended up finding a post that noted downloading 1.1 and then installing the latest version over it; worked great.)

Now when I get to step 16 I am a little confused. I do get the message that my WIM image size is larger than 4GB, however when select NO I do not get step 16, therefore I cannot "Dot Rebuild one" --- what am I missing?
 
Last edited:

My Computer

System One

  • CPU
    AMD 6000+ Dual Core
    Motherboard
    Gigabyte
    Memory
    4GB
    Graphics card(s)
    Twin Fatal1ty 8600's SLI
    Hard Drives
    2 750 GB WD 1 320 GB WD (OS)
Hi Bradlaw,

Go ahead and continue to see if you get the option to Rebuild later before you burn the DVD.

Shawn
 

My Computers

System One System Two

  • Operating System
    Windows 10 Pro 64-bit
    Manufacturer/Model
    Custom
    CPU
    Intel i7-8700K 5 GHz
    Motherboard
    ASUS ROG Maximus XI Formula Z390
    Memory
    64 GB (4x16GB) G.SKILL TridentZ RGB DDR4 3600 MHz (F4-3600C18D-32GTZR)
    Graphics card(s)
    ASUS ROG-STRIX-GTX1080TI-O11G-GAMING
    Sound Card
    Integrated Digital Audio (S/PDIF)
    Monitor(s) Displays
    2 x Samsung Odyssey G7 27"
    Screen Resolution
    2560x1440
    Hard Drives
    1TB Samsung 990 PRO M.2, 4TB Samsung 990 PRO PRO M.2, 8TB WD MyCloudEX2Ultra NAS
    PSU
    Seasonic Prime Titanium 850W
    Case
    Thermaltake Core P3
    Cooling
    Corsair Hydro H115i
    Mouse
    Logitech MX Master 3
    Keyboard
    Logitech wireless K800
    Internet Speed
    1 Gb/s Download and 35 Mb/s Upload
    Other Info
    Logitech Z625 speaker system, Logitech BRIO 4K Pro webcam, HP Color LaserJet Pro MFP M477fdn, APC SMART-UPS RT 1000 XL - SURT1000XLI, Galaxy S23 Plus phone
  • Operating System
    Windows 10 Pro
    Manufacturer/Model
    HP Envy Y0F94AV
    CPU
    i7-7500U @ 2.70 GHz
    Memory
    16 GB DDR4-2133
    Sound Card
    Conexant ISST Audio
    Monitor(s) Displays
    17.3" UHD IPS touch
    Screen Resolution
    3480 x 2160
    Hard Drives
    512 GB M.2 SSD
Ok this may not be the correct way but here is what I had happened:


  1. I Said Yes to continue to build the ISO despite it being larger than 4GB
  2. vLite created an ISO in the location on my PC I specified that was 4.35+-GB
  3. Similar to the Step 14 Image in your tutorial I was allowed to select the Apply button. This had not be available before.
  4. This brought up Step 16!
  5. Next was Step 17, and on to 18
 

My Computer

System One

  • CPU
    AMD 6000+ Dual Core
    Motherboard
    Gigabyte
    Memory
    4GB
    Graphics card(s)
    Twin Fatal1ty 8600's SLI
    Hard Drives
    2 750 GB WD 1 320 GB WD (OS)
In your step 3, was this the same as step 14 in the tutorial with Apply enabled or at step 21?
 

My Computers

System One System Two

  • Operating System
    Windows 10 Pro 64-bit
    Manufacturer/Model
    Custom
    CPU
    Intel i7-8700K 5 GHz
    Motherboard
    ASUS ROG Maximus XI Formula Z390
    Memory
    64 GB (4x16GB) G.SKILL TridentZ RGB DDR4 3600 MHz (F4-3600C18D-32GTZR)
    Graphics card(s)
    ASUS ROG-STRIX-GTX1080TI-O11G-GAMING
    Sound Card
    Integrated Digital Audio (S/PDIF)
    Monitor(s) Displays
    2 x Samsung Odyssey G7 27"
    Screen Resolution
    2560x1440
    Hard Drives
    1TB Samsung 990 PRO M.2, 4TB Samsung 990 PRO PRO M.2, 8TB WD MyCloudEX2Ultra NAS
    PSU
    Seasonic Prime Titanium 850W
    Case
    Thermaltake Core P3
    Cooling
    Corsair Hydro H115i
    Mouse
    Logitech MX Master 3
    Keyboard
    Logitech wireless K800
    Internet Speed
    1 Gb/s Download and 35 Mb/s Upload
    Other Info
    Logitech Z625 speaker system, Logitech BRIO 4K Pro webcam, HP Color LaserJet Pro MFP M477fdn, APC SMART-UPS RT 1000 XL - SURT1000XLI, Galaxy S23 Plus phone
  • Operating System
    Windows 10 Pro
    Manufacturer/Model
    HP Envy Y0F94AV
    CPU
    i7-7500U @ 2.70 GHz
    Memory
    16 GB DDR4-2133
    Sound Card
    Conexant ISST Audio
    Monitor(s) Displays
    17.3" UHD IPS touch
    Screen Resolution
    3480 x 2160
    Hard Drives
    512 GB M.2 SSD
Yes, now my only issue is I exited out of vLite before burning the image to disk. It does not appear I can just use vLite to brun at this point?
 

My Computer

System One

  • CPU
    AMD 6000+ Dual Core
    Motherboard
    Gigabyte
    Memory
    4GB
    Graphics card(s)
    Twin Fatal1ty 8600's SLI
    Hard Drives
    2 750 GB WD 1 320 GB WD (OS)
Brad,

You should still be able to use the ISO it created. Just run vLite again, but only check Bootable ISO in step 8 instead. Select the ISO when prompted, then burn the DVD.

Shawn
 

My Computers

System One System Two

  • Operating System
    Windows 10 Pro 64-bit
    Manufacturer/Model
    Custom
    CPU
    Intel i7-8700K 5 GHz
    Motherboard
    ASUS ROG Maximus XI Formula Z390
    Memory
    64 GB (4x16GB) G.SKILL TridentZ RGB DDR4 3600 MHz (F4-3600C18D-32GTZR)
    Graphics card(s)
    ASUS ROG-STRIX-GTX1080TI-O11G-GAMING
    Sound Card
    Integrated Digital Audio (S/PDIF)
    Monitor(s) Displays
    2 x Samsung Odyssey G7 27"
    Screen Resolution
    2560x1440
    Hard Drives
    1TB Samsung 990 PRO M.2, 4TB Samsung 990 PRO PRO M.2, 8TB WD MyCloudEX2Ultra NAS
    PSU
    Seasonic Prime Titanium 850W
    Case
    Thermaltake Core P3
    Cooling
    Corsair Hydro H115i
    Mouse
    Logitech MX Master 3
    Keyboard
    Logitech wireless K800
    Internet Speed
    1 Gb/s Download and 35 Mb/s Upload
    Other Info
    Logitech Z625 speaker system, Logitech BRIO 4K Pro webcam, HP Color LaserJet Pro MFP M477fdn, APC SMART-UPS RT 1000 XL - SURT1000XLI, Galaxy S23 Plus phone
  • Operating System
    Windows 10 Pro
    Manufacturer/Model
    HP Envy Y0F94AV
    CPU
    i7-7500U @ 2.70 GHz
    Memory
    16 GB DDR4-2133
    Sound Card
    Conexant ISST Audio
    Monitor(s) Displays
    17.3" UHD IPS touch
    Screen Resolution
    3480 x 2160
    Hard Drives
    512 GB M.2 SSD
Brink, you're a genius man ....been waiting to do something like this since SP1 came out.
Thanx again!
 

My Computer

System One

  • Manufacturer/Model
    custom of course...
    CPU
    Intel Quad Q9650 3.00GHz
    Motherboard
    EVGA 790i Ultra 3-way SLi
    Memory
    OCZ NVIDIA SLI Ready 8GB DDR3 1800MHz @1.9V
    Graphics card(s)
    BFG GeForce 280 GTX OC EditionX2 SLi'd
    Sound Card
    SoundBlaster X-FI Titanium Fatal1ty Pro Series
    Monitor(s) Displays
    Samsung 52" 1080P LCD HDTV (LN52B550)
    Screen Resolution
    1920X1080
    Hard Drives
    2XWestern Digital WD1001FALS Caviar Black Hard Drive - 1TB
    PSU
    ThermalTake ToughPower 1200watt W0113RU
    Case
    Thermaltake Armor 6000BWS
    Cooling
    ThermalTake MaxOrb CL-P0369
    Mouse
    Logitech G7 Laser Cordless mouse black - niiice:)
    Keyboard
    Logitech cordless Y-RAJ56A piece of ****
    Internet Speed
    10 Mb/sec DL - 1 Mb/sec UL
    Other Info
    D-Link DGL-4500 Extreme N wireless router ...siiick:) 2XSamsung SH-S223Q/BEBN SATA LightScribe 1XLG GGW-H20L super-multi Blu-Ray burner Belkin UPS F6C1500TWRK Pioneer 7.1 Channel HDMI Receiver (VSX-9130TXV-K)
You're welcome Grimreaper. vLite is a nice program.

Shawn
 

My Computers

System One System Two

  • Operating System
    Windows 10 Pro 64-bit
    Manufacturer/Model
    Custom
    CPU
    Intel i7-8700K 5 GHz
    Motherboard
    ASUS ROG Maximus XI Formula Z390
    Memory
    64 GB (4x16GB) G.SKILL TridentZ RGB DDR4 3600 MHz (F4-3600C18D-32GTZR)
    Graphics card(s)
    ASUS ROG-STRIX-GTX1080TI-O11G-GAMING
    Sound Card
    Integrated Digital Audio (S/PDIF)
    Monitor(s) Displays
    2 x Samsung Odyssey G7 27"
    Screen Resolution
    2560x1440
    Hard Drives
    1TB Samsung 990 PRO M.2, 4TB Samsung 990 PRO PRO M.2, 8TB WD MyCloudEX2Ultra NAS
    PSU
    Seasonic Prime Titanium 850W
    Case
    Thermaltake Core P3
    Cooling
    Corsair Hydro H115i
    Mouse
    Logitech MX Master 3
    Keyboard
    Logitech wireless K800
    Internet Speed
    1 Gb/s Download and 35 Mb/s Upload
    Other Info
    Logitech Z625 speaker system, Logitech BRIO 4K Pro webcam, HP Color LaserJet Pro MFP M477fdn, APC SMART-UPS RT 1000 XL - SURT1000XLI, Galaxy S23 Plus phone
  • Operating System
    Windows 10 Pro
    Manufacturer/Model
    HP Envy Y0F94AV
    CPU
    i7-7500U @ 2.70 GHz
    Memory
    16 GB DDR4-2133
    Sound Card
    Conexant ISST Audio
    Monitor(s) Displays
    17.3" UHD IPS touch
    Screen Resolution
    3480 x 2160
    Hard Drives
    512 GB M.2 SSD
Well I believe everything as you said worked (Thanks Brink) and now for some reason I am getting a blue screen shortly after the installation files upload. I'll repost what the message is.
 

My Computer

System One

  • CPU
    AMD 6000+ Dual Core
    Motherboard
    Gigabyte
    Memory
    4GB
    Graphics card(s)
    Twin Fatal1ty 8600's SLI
    Hard Drives
    2 750 GB WD 1 320 GB WD (OS)
Hi,

I have made several versions using vLite ( I like to tinker) but always get a blue screen if I try to integrate .cab files of microsoft updates - it warns I may not have enough disk space even though I have 50gb spare on that partition . Everything else works beautifully. Do you know how to make this work - otherwise I have to get all the updates after reinstalling which takes ages. I tried varying the order of the .cab files but still get the bluescreen.


Another question, well more of an observation.

1) I reinstalled new vlite version which hit my hard disk at 6.4gb. I installed a few programs of my own ( 117mb plus 50mb graphic card drivers ). That makes 6.6gb.

2) Then downloaded 142mb of microsoft programs. I installed them and now there is 10.6gb of disk space used up . Where has that 4gb gone?

3) Hibernation is turned off and I only have one Shadow copy I made of 500mb.

4) Have the microsoft updates used up 3.5gb of disk space ?

I already have Sp1 and as I say the downloaded updates were only 142 mb.

Thanks

SIW2
 

My Computers

System One System Two

  • Operating System
    Vista
    CPU
    Intel E8400
    Motherboard
    ASRock1333-GLAN R2.0
    Memory
    4gb DDR2 800
    Graphics card(s)
    nvidia 9500GT 1gb
  • Operating System
    win7/vista
    CPU
    intel i5-8400
    Motherboard
    gigabyte b365m ds3h
    Memory
    ballistix 2x8gb 3200
Hi SIW2,

I would recommend asking about the CAB files at the vLite forum since that is specific to that program.

MSFN Forums -> vLite


You might download and install the 1.1.6 version and then install the 1.2 beta version until there is a newer version released to avoid the large WAIK download.

Hope this helps,
Shawn
 

My Computers

System One System Two

  • Operating System
    Windows 10 Pro 64-bit
    Manufacturer/Model
    Custom
    CPU
    Intel i7-8700K 5 GHz
    Motherboard
    ASUS ROG Maximus XI Formula Z390
    Memory
    64 GB (4x16GB) G.SKILL TridentZ RGB DDR4 3600 MHz (F4-3600C18D-32GTZR)
    Graphics card(s)
    ASUS ROG-STRIX-GTX1080TI-O11G-GAMING
    Sound Card
    Integrated Digital Audio (S/PDIF)
    Monitor(s) Displays
    2 x Samsung Odyssey G7 27"
    Screen Resolution
    2560x1440
    Hard Drives
    1TB Samsung 990 PRO M.2, 4TB Samsung 990 PRO PRO M.2, 8TB WD MyCloudEX2Ultra NAS
    PSU
    Seasonic Prime Titanium 850W
    Case
    Thermaltake Core P3
    Cooling
    Corsair Hydro H115i
    Mouse
    Logitech MX Master 3
    Keyboard
    Logitech wireless K800
    Internet Speed
    1 Gb/s Download and 35 Mb/s Upload
    Other Info
    Logitech Z625 speaker system, Logitech BRIO 4K Pro webcam, HP Color LaserJet Pro MFP M477fdn, APC SMART-UPS RT 1000 XL - SURT1000XLI, Galaxy S23 Plus phone
  • Operating System
    Windows 10 Pro
    Manufacturer/Model
    HP Envy Y0F94AV
    CPU
    i7-7500U @ 2.70 GHz
    Memory
    16 GB DDR4-2133
    Sound Card
    Conexant ISST Audio
    Monitor(s) Displays
    17.3" UHD IPS touch
    Screen Resolution
    3480 x 2160
    Hard Drives
    512 GB M.2 SSD
Ok this may not be the correct way but here is what I had happened:


  1. I Said Yes to continue to build the ISO despite it being larger than 4GB
  2. vLite created an ISO in the location on my PC I specified that was 4.35+-GB
  3. Similar to the Step 14 Image in your tutorial I was allowed to select the Apply button. This had not be available before.
  4. This brought up Step 16!
  5. Next was Step 17, and on to 18

I had the same thing, I had to click Yes, then choose a location for an ISO to be created then was able to click Apply and continue with Step 16. So two ISO's were created in total.

Thank you Brink for this tutorial and thank you bradlaw for this post cos I was stuck.
 

My Computer

You're welcome Lovyan, and welcome to Vista Forums. Thank you for posting your experience and results.

Shawn
 

My Computers

System One System Two

  • Operating System
    Windows 10 Pro 64-bit
    Manufacturer/Model
    Custom
    CPU
    Intel i7-8700K 5 GHz
    Motherboard
    ASUS ROG Maximus XI Formula Z390
    Memory
    64 GB (4x16GB) G.SKILL TridentZ RGB DDR4 3600 MHz (F4-3600C18D-32GTZR)
    Graphics card(s)
    ASUS ROG-STRIX-GTX1080TI-O11G-GAMING
    Sound Card
    Integrated Digital Audio (S/PDIF)
    Monitor(s) Displays
    2 x Samsung Odyssey G7 27"
    Screen Resolution
    2560x1440
    Hard Drives
    1TB Samsung 990 PRO M.2, 4TB Samsung 990 PRO PRO M.2, 8TB WD MyCloudEX2Ultra NAS
    PSU
    Seasonic Prime Titanium 850W
    Case
    Thermaltake Core P3
    Cooling
    Corsair Hydro H115i
    Mouse
    Logitech MX Master 3
    Keyboard
    Logitech wireless K800
    Internet Speed
    1 Gb/s Download and 35 Mb/s Upload
    Other Info
    Logitech Z625 speaker system, Logitech BRIO 4K Pro webcam, HP Color LaserJet Pro MFP M477fdn, APC SMART-UPS RT 1000 XL - SURT1000XLI, Galaxy S23 Plus phone
  • Operating System
    Windows 10 Pro
    Manufacturer/Model
    HP Envy Y0F94AV
    CPU
    i7-7500U @ 2.70 GHz
    Memory
    16 GB DDR4-2133
    Sound Card
    Conexant ISST Audio
    Monitor(s) Displays
    17.3" UHD IPS touch
    Screen Resolution
    3480 x 2160
    Hard Drives
    512 GB M.2 SSD
Ok this may not be the correct way but here is what I had happened:


  1. I Said Yes to continue to build the ISO despite it being larger than 4GB
  2. vLite created an ISO in the location on my PC I specified that was 4.35+-GB
  3. Similar to the Step 14 Image in your tutorial I was allowed to select the Apply button. This had not be available before.
  4. This brought up Step 16!
  5. Next was Step 17, and on to 18

I had the same thing, I had to click Yes, then choose a location for an ISO to be created then was able to click Apply and continue with Step 16. So two ISO's were created in total.

Thank you Brink for this tutorial and thank you bradlaw for this post cos I was stuck.

Step 16 still did not pop-up after clicking on Yes to create a ISO. The Apply button is still greyed out.
Am I missing something? Or do I have to redo the entire process?

Edit: Even though Step 16 did not show, I went straight to Step 21, clicked on Burn, the pop up from Step 15 showed up. After clicking No, the Apply button was still greyed out. So I burned the image that is supposedly larger than 4.4GB and after successfully burning the image, the DVD does boot up properly, BUT... will the DVD install Windows Vista properly the next time I choose to do a clean install? Because I did burn an image larger than what the DVD can hold.
 
Last edited:

My Computer

Hi Digito, and welcome to Vista Forums.

It would not be able to finish burning to the DVD if the DVD ran out of space, so since it finished and the DVD boots up properly then it should work just fine. :)

Shawn
 

My Computers

System One System Two

  • Operating System
    Windows 10 Pro 64-bit
    Manufacturer/Model
    Custom
    CPU
    Intel i7-8700K 5 GHz
    Motherboard
    ASUS ROG Maximus XI Formula Z390
    Memory
    64 GB (4x16GB) G.SKILL TridentZ RGB DDR4 3600 MHz (F4-3600C18D-32GTZR)
    Graphics card(s)
    ASUS ROG-STRIX-GTX1080TI-O11G-GAMING
    Sound Card
    Integrated Digital Audio (S/PDIF)
    Monitor(s) Displays
    2 x Samsung Odyssey G7 27"
    Screen Resolution
    2560x1440
    Hard Drives
    1TB Samsung 990 PRO M.2, 4TB Samsung 990 PRO PRO M.2, 8TB WD MyCloudEX2Ultra NAS
    PSU
    Seasonic Prime Titanium 850W
    Case
    Thermaltake Core P3
    Cooling
    Corsair Hydro H115i
    Mouse
    Logitech MX Master 3
    Keyboard
    Logitech wireless K800
    Internet Speed
    1 Gb/s Download and 35 Mb/s Upload
    Other Info
    Logitech Z625 speaker system, Logitech BRIO 4K Pro webcam, HP Color LaserJet Pro MFP M477fdn, APC SMART-UPS RT 1000 XL - SURT1000XLI, Galaxy S23 Plus phone
  • Operating System
    Windows 10 Pro
    Manufacturer/Model
    HP Envy Y0F94AV
    CPU
    i7-7500U @ 2.70 GHz
    Memory
    16 GB DDR4-2133
    Sound Card
    Conexant ISST Audio
    Monitor(s) Displays
    17.3" UHD IPS touch
    Screen Resolution
    3480 x 2160
    Hard Drives
    512 GB M.2 SSD
Cheers.
 

My Computers

System One System Two

  • Operating System
    Windows 10 Pro 64-bit
    Manufacturer/Model
    Custom
    CPU
    Intel i7-8700K 5 GHz
    Motherboard
    ASUS ROG Maximus XI Formula Z390
    Memory
    64 GB (4x16GB) G.SKILL TridentZ RGB DDR4 3600 MHz (F4-3600C18D-32GTZR)
    Graphics card(s)
    ASUS ROG-STRIX-GTX1080TI-O11G-GAMING
    Sound Card
    Integrated Digital Audio (S/PDIF)
    Monitor(s) Displays
    2 x Samsung Odyssey G7 27"
    Screen Resolution
    2560x1440
    Hard Drives
    1TB Samsung 990 PRO M.2, 4TB Samsung 990 PRO PRO M.2, 8TB WD MyCloudEX2Ultra NAS
    PSU
    Seasonic Prime Titanium 850W
    Case
    Thermaltake Core P3
    Cooling
    Corsair Hydro H115i
    Mouse
    Logitech MX Master 3
    Keyboard
    Logitech wireless K800
    Internet Speed
    1 Gb/s Download and 35 Mb/s Upload
    Other Info
    Logitech Z625 speaker system, Logitech BRIO 4K Pro webcam, HP Color LaserJet Pro MFP M477fdn, APC SMART-UPS RT 1000 XL - SURT1000XLI, Galaxy S23 Plus phone
  • Operating System
    Windows 10 Pro
    Manufacturer/Model
    HP Envy Y0F94AV
    CPU
    i7-7500U @ 2.70 GHz
    Memory
    16 GB DDR4-2133
    Sound Card
    Conexant ISST Audio
    Monitor(s) Displays
    17.3" UHD IPS touch
    Screen Resolution
    3480 x 2160
    Hard Drives
    512 GB M.2 SSD
Back
Top