How to Create a Vista SP1 Slipstream Installation DVD
This will show you how to create a Vista installation DVD with the Vista SP1 slipstreamed into it for any 32 and 64 bit version of Vista you want. This DVD will allow you to do a clean install of Vista with the SP1 all at once instead of installing Vista first then the SP1.
This Vista SP1 slipstream installation DVD will also allow you to run a Repair install on Vista with SP1 installed now. Before, you could not use a normal Vista installation DVD ro run a Repair install on Vista with SP1 installed since Vista with SP1 was a new version than what was on the Vista DVD.
If you have a Dell OEM computer, then see this link to help you possibly create a sliptream installation DVD from your Dell installation disc.
You can only make a 64-bit Vista DVD in a installed 64-bit Vista, and only a 32-bit Vista DVD in a installed 32-bit Vista.
REQUIREMENTS:
REQUIREMENTS:
- 32 bit or 64 bit Retail or OEM (not Recovery) Vista Installation DVDNOTE: If you would like to use that same bit version you have of Vista, then open the Control Panel (Classic View) and click the System icon, or right click Computer in the Start Menu and click Properties. You will see the bit version under the System type section.
- vLiteNOTE: You can download vLite from here: http://www.vlite.net/download.html . Please post questions about specific errors with the vLite program at their forum here: http://www.msfn.org/board/vLite-f153.html
WARNING: I would recommend to Download and install the latest 1.2 Final version. - SP1 Standalone Installer
NOTE: Use the SP1 standalone installer for you 32 bit or 64 bit version and language of Vista. The smaller the file, the better. To see what version you have, press the Windows Key + Pause/Break key and look under System type.- Download details: Windows 32 bit Vista Service Pack 1 Five Language Standalone (KB936330) 434.5 MB
NOTE: For English (US), French, German, Japanese, or Spanish (Traditional) only. - Download details: Windows 32 bit Vista Service Pack 1 All Language Standalone (KB936330) 544.3 MB
- Download details: Windows Vista Service Pack 1 Five Language Standalone for 64 bit based Systems (KB936330) 726.5 MB
NOTE: English (US), French, German, Japanese, or Spanish (Traditional) only. - Download details: Windows Vista Service Pack 1 All Language Standalone for 64 bit Systems (KB936330) 873.0 MB
- Download details: Windows 32 bit Vista Service Pack 1 Five Language Standalone (KB936330) 434.5 MB
- A blank unformated DVD at least 4 GB in size
- Around 3.5 hours or so of your time and patience.

Here's How:
You will need to temporarily disable your antivirus program before you start this to prevent possible interference to the vLite program below. This program is safe, but could be mistaken as not by some antivirus programs and prevent you from creating the SP1 slipstream DVD.
1. Copy the Vista Installation DVD Contents to the Desktop
A) Place the retail or OEM (not Recovery) Vista installation DVD into the DVD drive.
NOTE: If AutoPlay or the Vista install window pops-up, just close it.
B) Open the Start Menu and click on Computer.
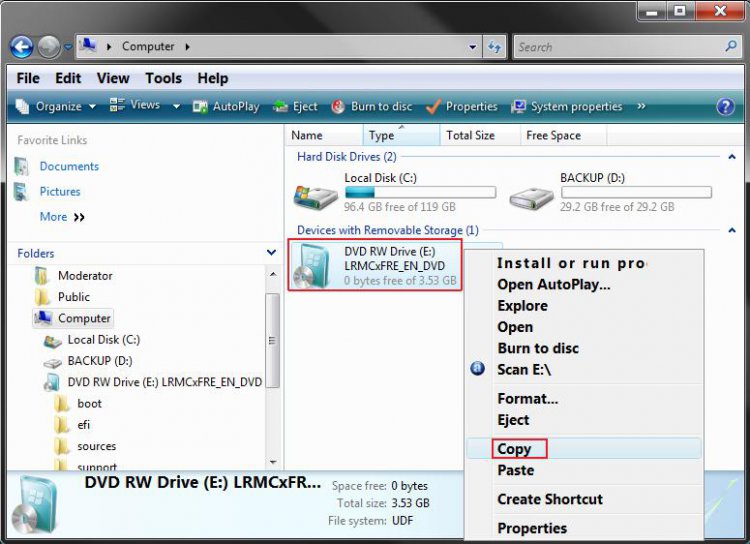
C) Right click on the DVD drive in Computer with the Vista installation DVD and click on Copy. (See screenshot below)
D) Right click on a empty space on the desktop and click on Paste.
NOTE: This may take a few minutes to finish copying all of the Vista installation DVD contents to the folder on the desktop.
2. Download the SP1 Standalone Installer to the Desktop
NOTE: See Requirements at the top of the tutorial for the download links. You will need to select the same 32 bit or 64 bit version of the SP1 as the Vista installation DVD from step 1.
A) Download and save the SP1 standalone installer to the desktop.
3. Download and Install the vLite Program
NOTE: See Requirements at the top of the tutorial for the download link.
A) Right click on the vLite program shortcut and click Run as Administrator.
B) Click on Allow.
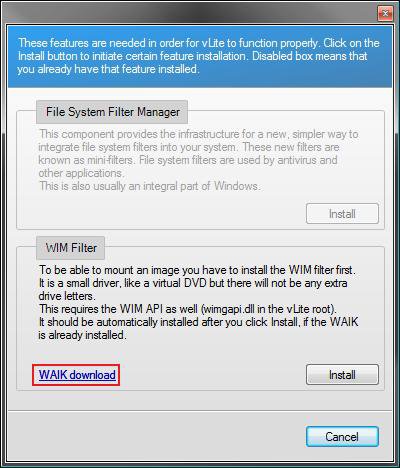
C) If this window pops-up, then click on the Install button(s) for the missing features needed by vLite. (See screenshot below)
NOTE: If you see the WAIK Download link, then you will need to click on the Install button to download the 1.34GB ISO WAIK file first. Next, follow the instructions at the download link:
- Click the Download button on this page to start the download.
- Click on Save, and save the .iso file to your desktop.
- Burn the saved .iso file to a DVD. You can use ISO Recorder to do this. This link will show you how to use ISO Recorder.
- Run the DVD to install WAIK.
WARNING: There is a glitch in the vLite 1.2 version where you may receive an error about WAIK when trying to run vLite. WAIK is not always properly recognized in Vista 32 bit. You may need to manually copy and paste the wimgapi.dll file from WAIK into the root vLite folder (main folder) in C:\Programs for it to work properly.
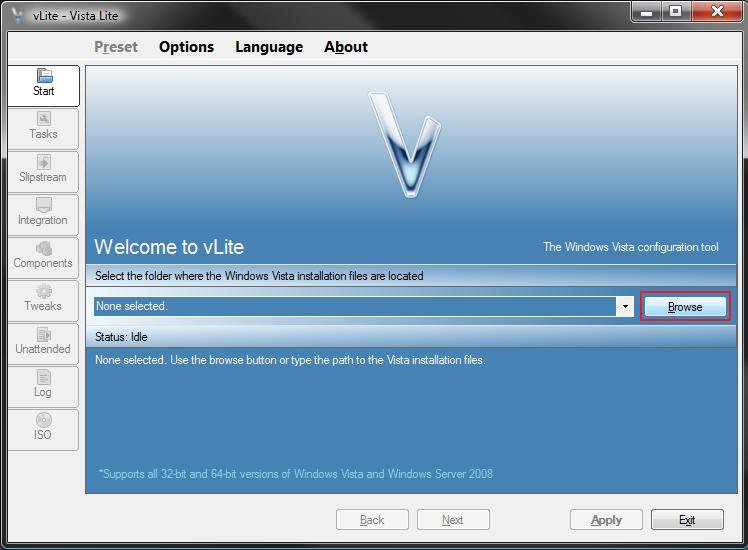
4. Click on the Browse button. (See screenshot below)
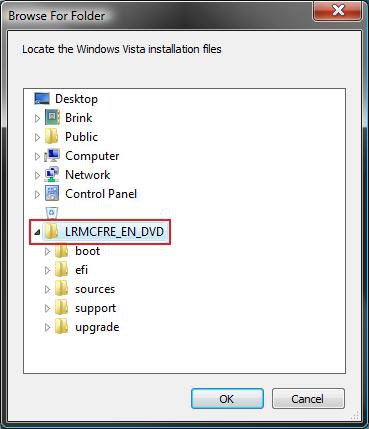
5. Click on the Vista folder (created from step 1) on the desktop and click on the LRMCFRE_EN_DVD folder, then click OK. (See screenshot below)
NOTE: You may have a different name than LRMCFRE_EN_DVD based on your type of Vista installation DVD, but it will be the one right under Vista.
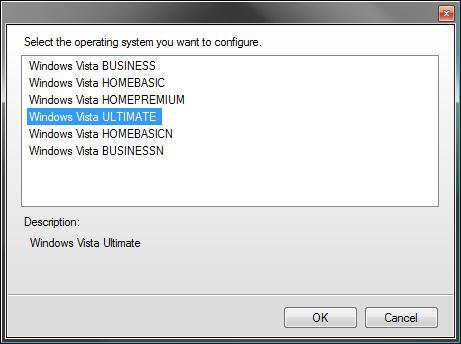
6. Click on the Vista edition that you want to use for the Vista SP1 slipstream DVD to highlight it and click OK. (See screenshot below)
NOTE: You can only have one Vista edition per slipstream DVD. If you want to have more than one Vista edition, then you must repeat this tutorial for each individual Vista edition for their own DVD.
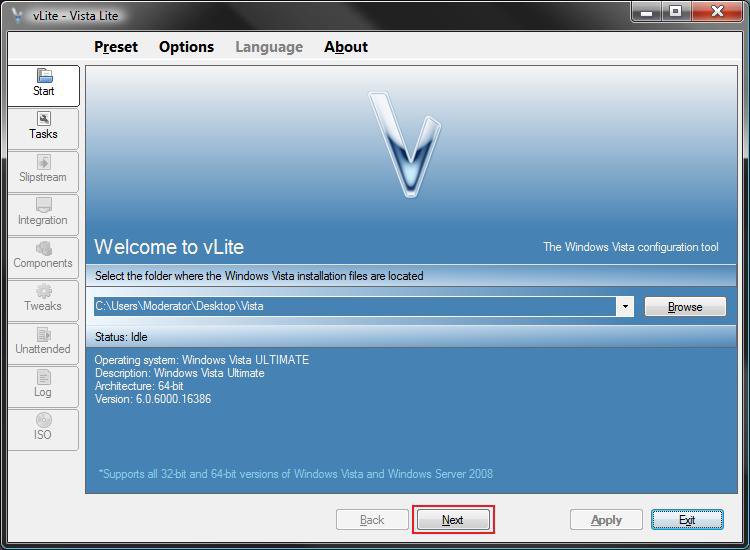
7. Click on the Next button. (See screenshot below)
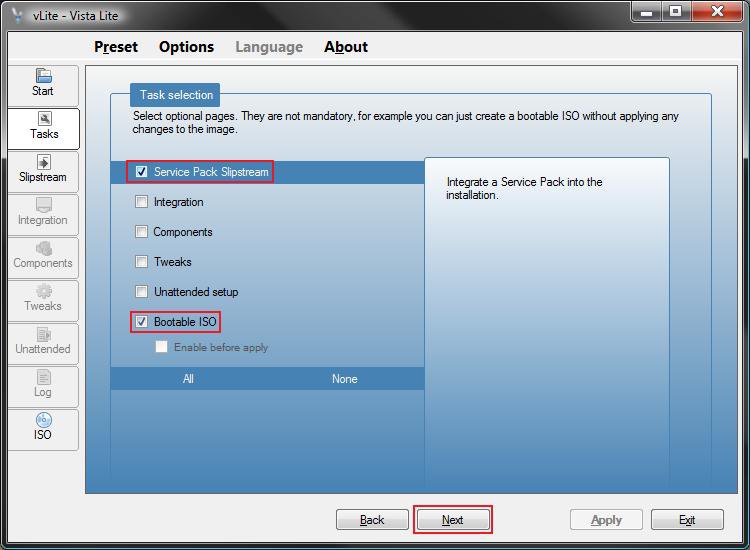
8. Check both the Service Pack Slipstream and Bootable ISO boxes and click on the Next button. (See screenshot below)
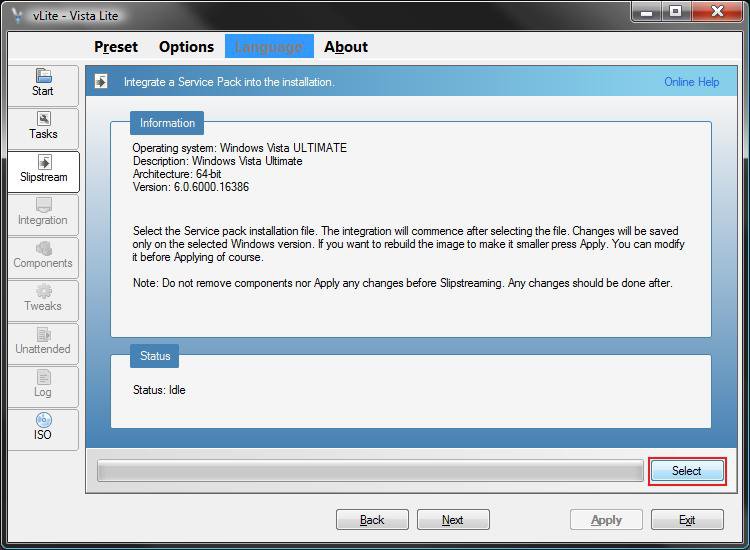
9. Click on the Select button. (See screenshot below)
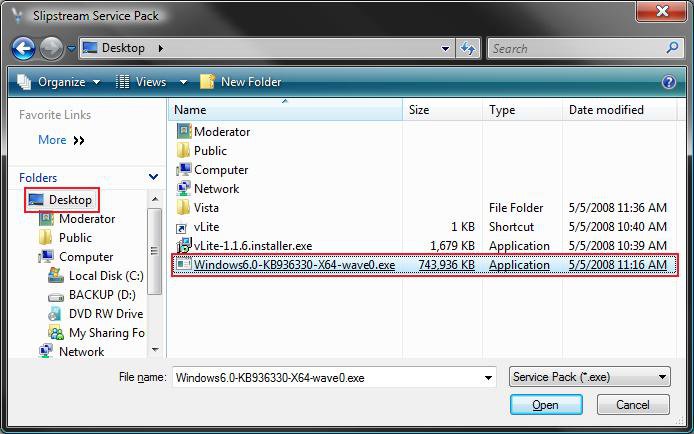
10. Select the SP1 standalone program (from step 2) on the desktop and click on the Open button. (See screenshot below)
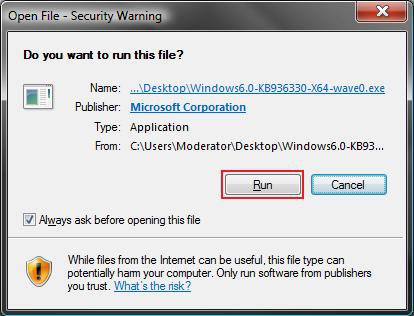
11. Click on Run when this window pops-up in a few seconds. (See screenshot below)
NOTE: This runs the SP1 installer program for the vLite program only. It will not install the SP1 on your computer.
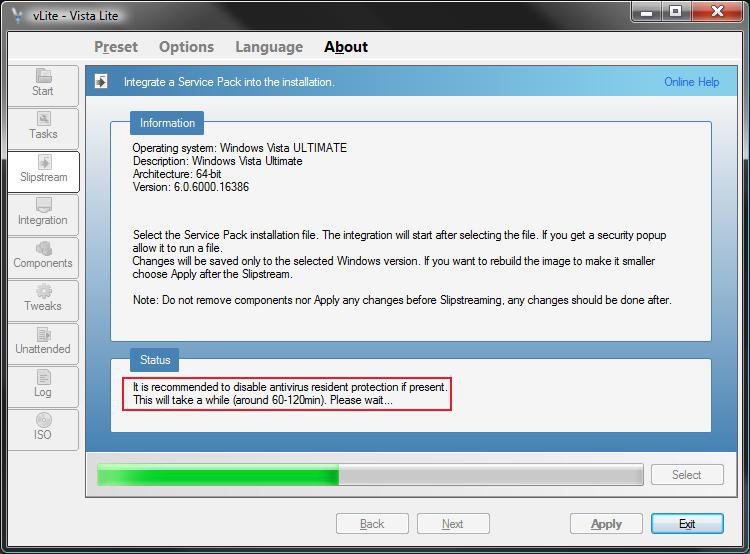
12. This will take around 60 to 120 minutes or so to complete this part. Some older slower systems may take a bit longer. (See screenshot below)
Enjoy your break. 

NOTE: In the Status box, you will see Preparing first, Extracting second, Integrating third, then this below until it is finished with this part. It will seem like it is stuck about 60% of the way, but it is not.
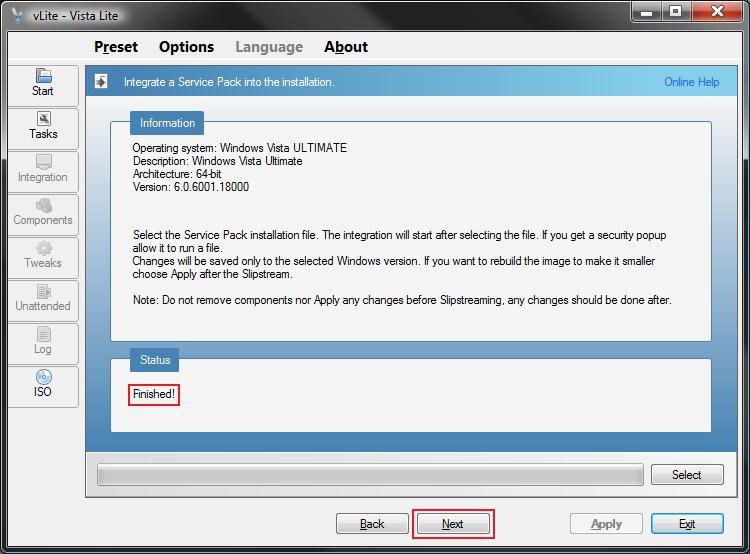
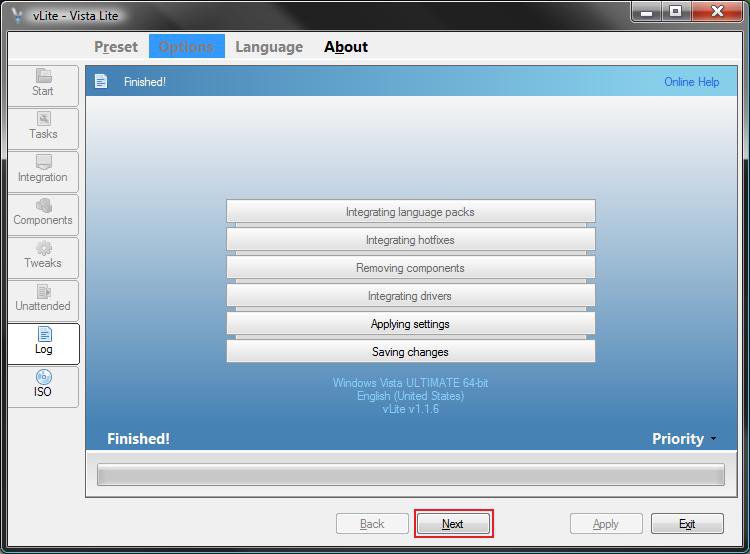
13. When Finished, click on Next. (See screenshot below)
NOTE: If this fails, then verify that you are using the same 32 bit or 64 bit versions of the Vista SP1 and Vista Installation DVD files. If they are not the same, it will fail.
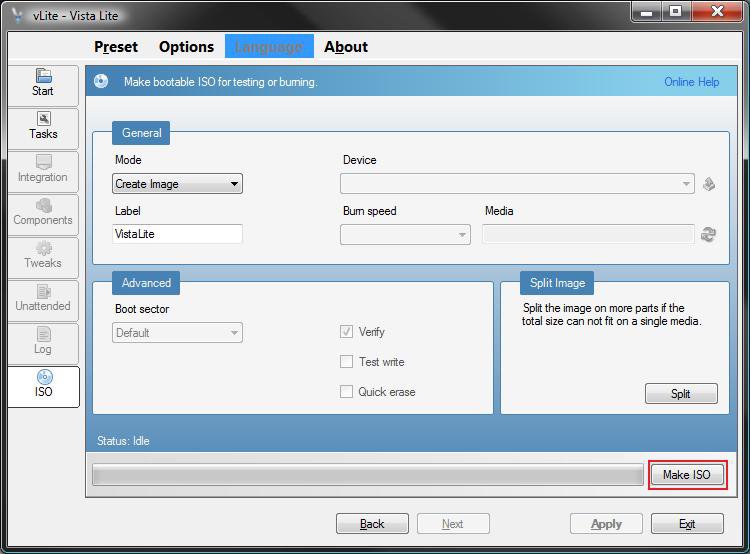
14. Under the General section, make sure that Create Image is selected and click on the Make ISO button. (See screenshot below)
15. If the Created Image is over 4 GB
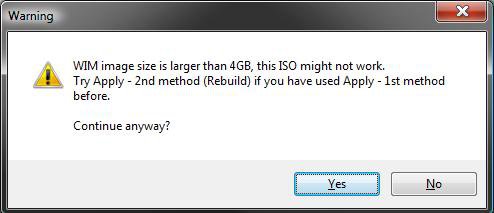
A) If this window pops-up on you with a similar message after you click on the Make ISO button (from step 14), then click on No and continue to step 16. (See screenshot below)
NOTE: If you do not get the option to make the ISO image smaller, then see:
B) If not, then go to step 19 and skip steps 16, 17, and 18.
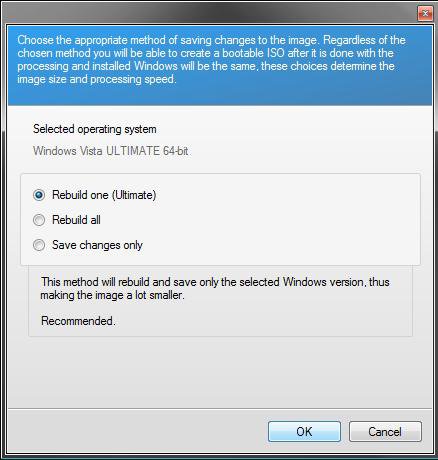
16. Dot Rebuild one (Vista edition from step 5) and click OK. (See screenshot below)
17. When finished, click on the Next button. (See screenshot below)
NOTE: This will take a little bit to finish.
18. Under the General section, make sure that Create Image is selected and click on the Make ISO button. (See screenshot below)
NOTE: After the Vista and SP1 image file has been rebuilt to make it smaller, you will return to the same screen in step 14.
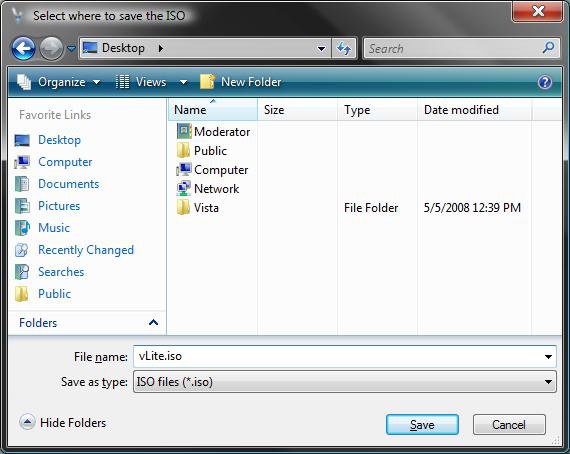
19. Select the Desktop and click on the Save button. (See screenshot below)
NOTE: This is where the ISO file will be saved when it is finished being created.
20. When it is finished creating the ISO file, place a blank unformated DVD into the DVD drive.
NOTE: If AutoPlay pops-up asking you to format the DVD, just close it.
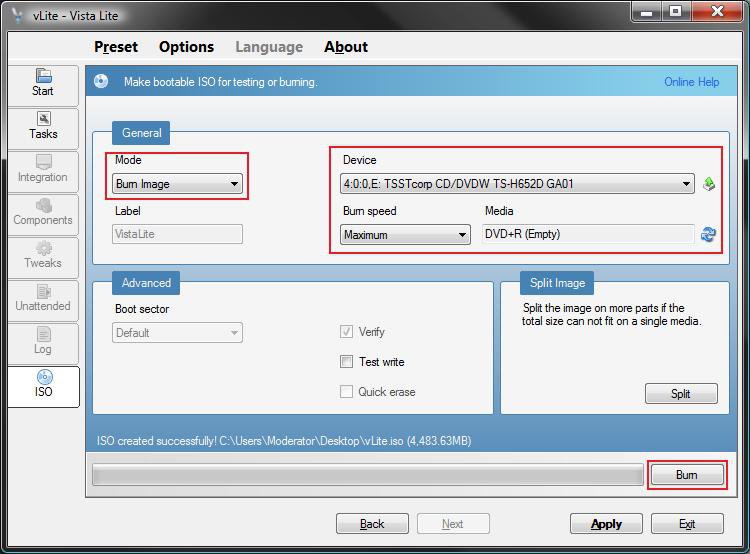
21. Under the General section, make sure that Burn Image is selected and that you have your DVD drive selected under Device. Click on the Burn button. (See screenshot below)
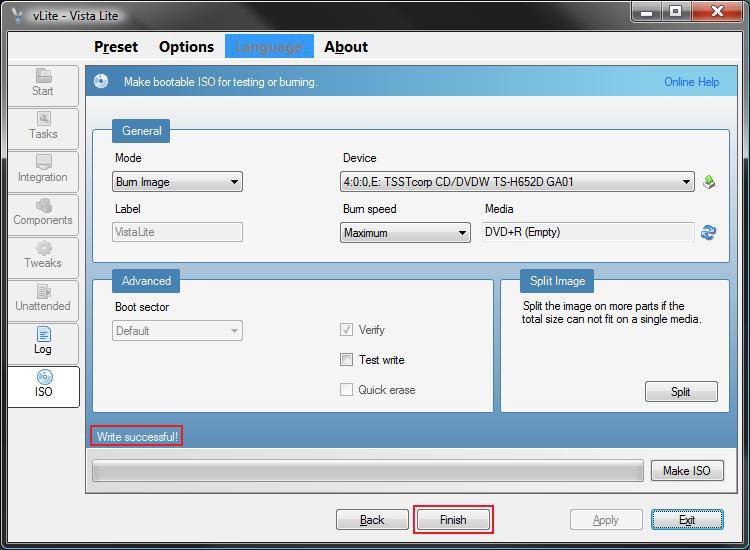
22. When it is finished making the Vista SP1 Slipstream Installation DVD it will say Write Successful, then click on the Finish or Exit button. (See screenshot below)
NOTE: It will take a few minutes to finish this. When you click Finish, it will close vLite.
23. Remove your new Vista SP1 Slipstream Installation DVD from the DVD drive.
NOTE: You will use this DVD the same way you did the retail Vista installation DVD.
24. Do not forget to enable your antivirus program again.
That's it, your done. Finally. LOL 
Shawn
Related Tutorials
- How to Slipstream Vista SP2
- How to Do a Clean Install of Vista with a Upgrade Version
- How to Do a Clean Install with a Full Version of Vista
- How to Create a Vista Recovery Disc
- How To Perform a Repair Installation For Vista
- How to Create a Bootable USB Flash Thumb Drive to Install Vista
- How to Do a Dual Boot Installation with Windows Vista and XP
- How to Do a Dual Boot Installation with Windows 7 and Vista
- How to Do a Custom Installation of Vista
- How to Slipstream Office 2010 with Service Pack 1 (SP1)
Attachments
Last edited by a moderator:

