Power Options and Sleep Mode Problems

How to Troubleshoot a Vista or Windows 7 Sleep Mode Problem

information   Information
This will show you some steps to help you troubleshoot and find out what is causing your sleep mode problem. These are the usual reasons for sleep mode problems. For more information, see: Windows Help and How-to: Turn Off a Computer FAQs
Note   Note

  • When your computer is in hibernation, the only way to wake it is to tap the case power button.
  • If this sleep mode problem just started recently, then you might consider doing a System Restore before or after trying the steps below if they do not help.
Common Problems:
  • Computer will wake up for no reason.
  • Sleep mode does not work any more.
  • Hibernate option is not available in Power Options, then you accidentally deleted the Hibernation file Cleaner in Disk Cleanup.
  • Screen saver not working.
Tip   Tip
BEFORE STARTING:Make sure you have the latest device drivers and BIOS installed for your motherboard.NOTE: A out-of-date video driver or other drivers are sometimes the source of sleep mode problems. It is best to keep these up to date to resolve issues found with them.


STEP 1
Check Your Mouse and Keyboard

NOTE: A wireless mouse and keyboard can cause your computer to wake up for no apparent reason, and to not wake up from sleep mode when you press a key or move the mouse. This may also cause your screen saver to not work to. If the computer is using an optical mouse, changes in light can cause the computer to wake.
For a USB Mouse or Keyboard:
1. Check the BIOS settings to make sure that you have a Legacy USB option enabled.​

For a Wireless Mouse or Keyboard:
1. Unplug the receiver on the back of the computer and test.​
2. If sleep or hibernation works now, then try:​
A) Download new drivers for you wireless mouse and test again with the receiver plugged in.​
NOTE: Always get your drivers from the source, never from Windows Updates. They do not work properly sometimes.
B) Disable the wireless mouse and/or keyboard wake up option in Step Five below. If you have to disable both of them, then you can wake the computer up by pressing the power button on the case.​
C) Time to get a new mouse and/or keyboard that is compatible with Vista.​


For a Optical Mouse:
1. Try not to have direct bright light shining on the sensor or moving around it.​


STEP 2
Check Advanced Power Plan Settings

NOTE: Power settings control the computer’s ability to go into and come out of sleep/standby mode.
1. Open the Control Panel. (Classic View)​
2. Click on the Power Options icon.​
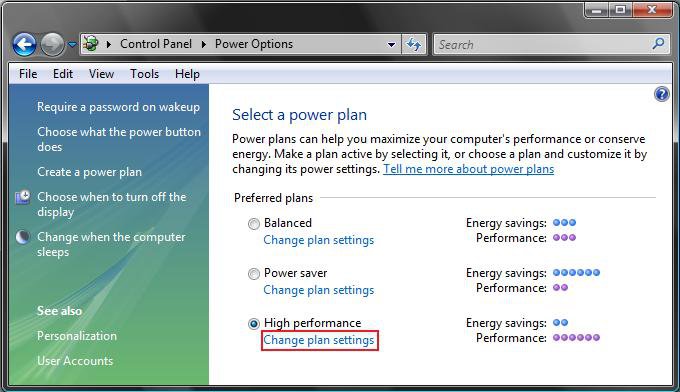
3. Click on the Change plan settings link under your power plan. (See screenshot below)​
Change1.jpg

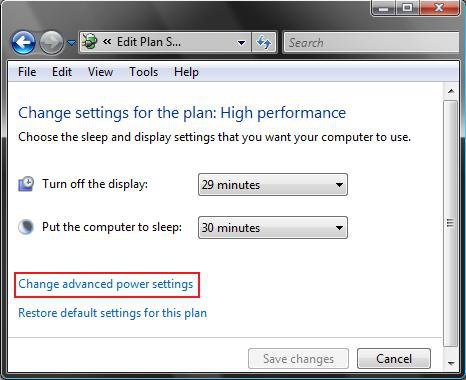
4. Click on Change advanced power settings. (See screenshot below)​
Change2.jpg

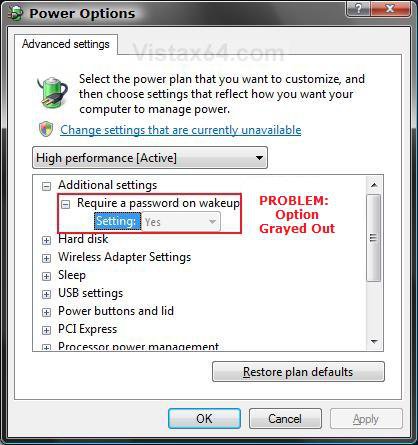
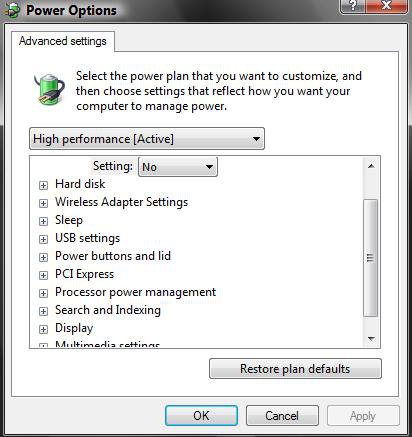
5. Click on Change settings that are currently unavailable. (See screenshots below step 10)​
NOTE: This will allow any Power Options that are grayed out to now work and not be grayed out.​
6. Recommended Settings for Sleep
NOTE: Sleep saves any open documents and programs to memory only, and then puts the computer into a low-power state.
WARNING: If you lose power to the computer, you will also lose what is in memory.​
[TABLE=class:-grid,-width:-700][TR][TD]
Main Setting
[/TD]
[TD]
Sub Setting
[/TD]
[TD]
Recommendation
[/TD][/TR]
[TR][TD]
Hard disk
[/TD]
[TD]

[/TD]
[TD]
Set to at least 1 minute before the computer (Sleep after setting below) is set to sleep.
[/TD][/TR]
[TR][TD]
Sleep
[/TD]
[TD]
Sleep after
[/TD]
[TD]
This is for the computer. Set to at least 1 minute after Hard disk and Display is set to turn off.
[/TD][/TR]
[TR][TD]
Sleep
[/TD]
[TD]
Allow hybrid sleep
[/TD]
[TD]
Set to Off.
[/TD][/TR]
[TR][TD]
Sleep
[/TD]
[TD]
Hibernate after
[/TD]
[TD]
Set to Never.
[/TD][/TR]
[TR][TD]
USB settings
[/TD]
[TD]
USB selective suspend setting
[/TD]
[TD]
Set to Disabled.
[/TD][/TR]
[TR][TD]
Power buttons and lid
[/TD]
[TD]
Start menu power button
[/TD]
[TD]
Set to Sleep.
[/TD][/TR]
[TR][TD]
PCI Express
[/TD]
[TD]
Link State Power Management
[/TD]
[TD]
Set to Off.
[/TD][/TR]
[TR][TD]
Display
[/TD]
[TD]
Turn off display after
[/TD]
[TD]
Set to at least 1 minute before the computer (Sleep after setting above) is set to sleep. Usually set this as the same as the Hard drive is set to turn off.
[/TD][/TR]
[TR][TD]
Multimedia settings
[/TD]
[TD]
When sharing media
[/TD]
[TD]
Set to Allow the computer to sleep.
[/TD][/TR][/TABLE]


7. Recommended Settings for Hybrid Sleep
NOTE: Hybrid sleep saves your open documents and programs to memory and to the hard drive, and then puts the computer into a low-power state. After the Hibernate after time you set, it will then put the computer into hibernation.
WARNING: Use the same Recommended Settings for Sleep in step 6 above, except for these changes:​
[TABLE=class:-grid,-width:-700][TR][TD]
Main Setting
[/TD]
[TD]
Sub Setting
[/TD]
[TD]
Recommendation
[/TD][/TR]
[TR][TD]
Sleep
[/TD]
[TD]
Allow hybrid sleep
[/TD]
[TD]
Set to On.
[/TD][/TR]
[TR][TD]
Sleep
[/TD]
[TD]
Hibernate after
[/TD]
[TD]
Set to at least 1 minute after the computer (Sleep after setting above) is set to sleep.
[/TD][/TR][/TABLE]


8. Recommended Settings for Hibernation
NOTE: Hibernation is a power-saving state that saves your open documents and programs to the hard drive and then turns off your computer. If Hibernate after is not listed, then make sure that you have the Hibernation File enabled or restored to. It is by default unless it was cleaned in Disk Cleanup.​
WARNING: Use the same Recommended Settings for Sleep in step 6 above, except for these changes:​
[TABLE=class:-grid,-width:-700][TR][TD]
Main Setting
[/TD]
[TD]
Sub Setting
[/TD]
[TD]
Recommendation
[/TD][/TR]
[TR][TD]
Sleep
[/TD]
[TD]
Sleep after
[/TD]
[TD]
Set it to Never.
[/TD][/TR]
[TR][TD]
Sleep
[/TD]
[TD]
Allow hybrid sleep
[/TD]
[TD]
Set it to Never.
[/TD][/TR]
[TR][TD]
Sleep
[/TD]
[TD]
Hibernate after
[/TD]
[TD]
Set it to at least 1 minute after Hard disk and Display is set to turn off.
[/TD][/TR]
[TR][TD]
Power buttons and lid
[/TD]
[TD]
Start menu power button
[/TD]
[TD]
Set it to Hibernate.
[/TD][/TR][/TABLE]


9. Click on OK to apply​
10. Just exit out the other windows.​
Power_Options.jpgOptions 1.jpg

11. Test sleep mode. If it is still not working correctly, then continue to the next step.​


STEP 3
Check Sleep State Settings in BIOS

NOTE: Make sure you have the latest Video drivers and BIOS for your motherboard. Read your motherboard manual to see if you have any jumpers or settings that sets different sleep voltages for USB.
1. Open the Start Menu.​
2. In white line (Start Search) area, type cmd and press Enter.​
3. In command prompt, type powercfg -a and press Enter. (See screenshot below)​
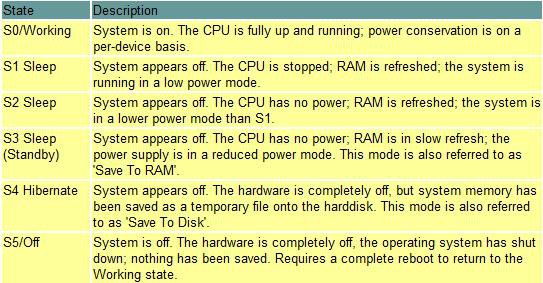
NOTE: This will give you a report of the available sleep states for your computer and will attempt to report reasons why sleep states are unavailable. You will want to see if the ACPI S1 and/or S3 is listed.
CMD_Sleep_States.jpg

4. Restart the computer into the BIOS settings, and go into the Power Management section in the BIOS.​
NOTE: Usually you will press the F2 or Delete key as soon as your computer starts booting to enter the BIOS.
5. Make sure ACPI mode: S3 or S1 is enabled.​
WARNING: S1 (Sleep) and S3 (Hybrid deeper sleep). If you are running an incompatible video card, some or all of these states below may be unavailable. If one of the settings causes your computer to not wake back up afterwards, then reset the CMOS on the motherboard and restart the computer, or unplug the computer for a moment and plug it back in, and reset the BIOS back to the factory default settings.
BIOS_States.jpg

6. Make sure Wake on Ring and Wake on Lan are disabled.​
NOTE: This will help keep the computer from waking up on its own.​
7. Save the BIOS setting changes and exit to restart the computer.​
8. Test sleep mode. If this does not help, then move on to the next step.​


STEP 4
To See what had Waken Up Windows Last

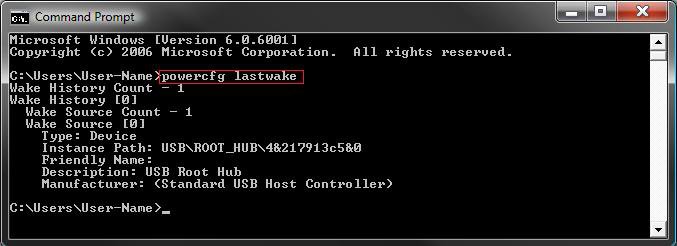
NOTE: This will give you a list of items that woke up the computer last that may help narrow down what is waking up the computer.
1. Open the Start Menu.​
2. In white line (Start Search) area, type cmd and press Enter.​
3. In command prompt, type powercfg lastwake and press Enter. (See screenshot below)​
NOTE: Notice that I had USB\ROOT\HUB listed. For me, this would be the USB wireless mouse. Your list results will vary of course.​
cmd_lastwake.jpg


STEP 5
To List, Enable, or Disable Device Names Currently Configured to Wake Up the System From any Sleep State

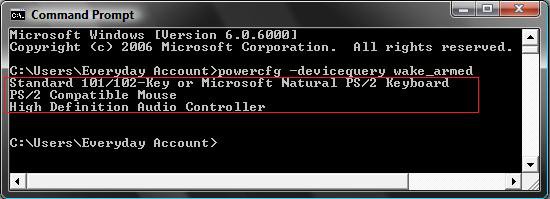
NOTE: This will show you a list of devices that are able to wake up your computer to help you narrow down a device that may be responsible for waking up your computer. It does not mean that these devices are the ones that woke up your computer though, just that they are able to.
2. To List Devices that Can Wake Up the Computer
A) In the command prompt, copy and paste in bold: (See screenshot below)​
powercfg -devicequery wake_armed and press Enter.​
Device_List.jpg

B) Go through the list of devices to see if you have one you do not want to wake up your system.​
EX: A Network Device (Modem, Ethernet, etc.) or Wireless Mouse.​
C) If you found a device that may be causing the problem, then check with the STEP SIX section below first to see if you can disable a wake up option for the device in it's Power Management settings in Device Manager to test to see if that is it before proceding.​

3. To Disable a Listed Device From Waking Up the Computer
NOTE: Only do this step if you cannot do it from STEP SIX below using Device Manager instead.​
A) In the elevated command prompt, type below in bold and press Enter.​
WARNING: Be sure to write this device name down in case you want to be able to enable it again in step 4. Once you disable it, it will not be listed again in step 2A until enabled again.​
powercfg -devicedisablewake "exact name of device listed in step 2A"

NOTE: For example, if I wanted to disable the listed (step 2A) High Definition device (HDAC), then I would type powercfg -devicedisablewake "High Definition Audio Controller" and press enter.​

4. To Enable a Listed Device Again to Waking Up the Computer
NOTE: Only do this step if you cannot do it from STEP SIX below using Device Manager instead, or you have done step 3 above with the device.​
A) In the elevated command prompt, type below in bold and press Enter.​
powercfg -deviceenablewake "exact name of device listed in step 2A"

NOTE: For example, if I wanted to reenable the High Definition device (HDAC) that was disable and removed from the list in step 3, then I would type powercfg -deviceenablewake "High Definition Audio Controller" and press enter.​

5. When done, close the elevated command prompt, and test sleep mode.​


STEP 6
To Disable or Enable the "Allow this device to wake the computer" Option for a Device

Note   Note

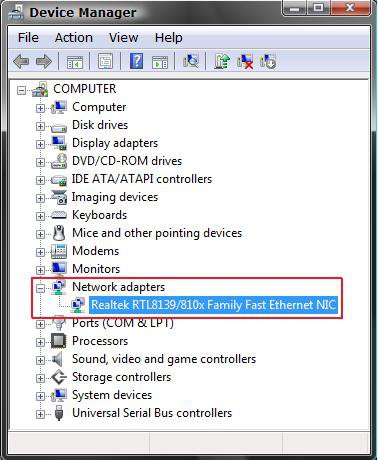
  • Check your Network device. Network activity can cause the network hardware to wake the computer, especially when the network is always on (like cable and DSL connections).
  • High Definition Audio, if listed in STEP FIVE, may also rarely cause the computer to wake from sleep mode. You can disable (only option available) the device as a test in Device Manager to see before putting the computer to sleep. Just enable it again if it is not the problem.

1. Open the Control Panel. (Classic View)​
2. Click on the Device Manager icon.​
NOTE: You need to be in a Administrator account.
3. Click on Continue in the UAC prompt.​
4. Open the device's list that you want to change. (See screenshot below)​
EX: Network Devices
5. Right click on the device name and click on Properties.​
EX: Network Devices
Device.jpg

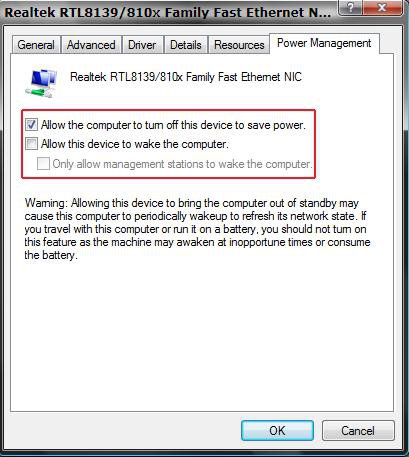
6. Click on the Power Management tab. (See screenshot below)​
Power_Management.jpg

7. Uncheck Allow this device to wake the computer. (See screenshot above)​
NOTE: To Enable it again, just check this instead. If you need to disable the wireless mouse and keyboard, then you can wake the computer by pressing the power button on the case.
8. If listed, check Allow the computer to turn off this device to save power. (See screenshot below step 6)​
NOTE: This will turn the device off when the computer goes into sleep mode.
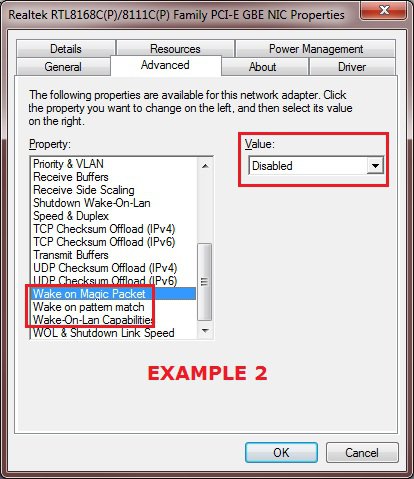
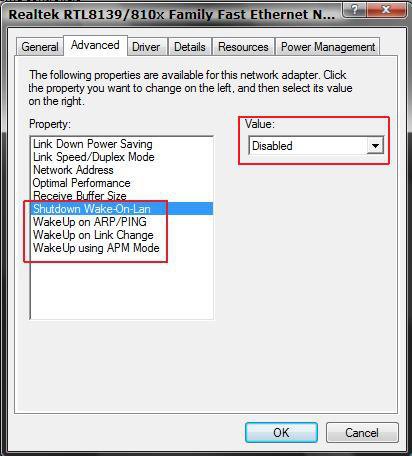
9. Click on the Advanced tab. (See screenshot below)​
NOTE: This is only for the Network device.
Advanced_tab.jpgAdvanced_tab-2.jpg

10. Check the boxed in red Property: items below to see if they are set to Disabled in the Value: area. (See screenshot above)​
NOTE: This area may be different for your particular network device since it is based on the driver, but it should be similar. You will be looking for any Wake on type property options listed.​
11. Click on OK to apply and close properties window. (See screenshot below step 6 or 9)​


STEP 7
Check the Screen Saver

NOTE: Some screen savers can interfere with the computer’s ability to go into and come out of sleep/standby mode. Disabling or changing the screen saver may resolve the problem.
1. In the Screen saver settings, select an alternate screen saver, or set it to None, then click on OK.​
2. Test sleep mode.​


STEP 8
Check Startup Programs

Note   Note


  • Many software components start up automatically with Vista and run in the background. Some of these programs may not be necessary, and can interfere with the sleep/standby mode. For troubleshooting purposes, use the following steps to prevent programs from starting up with Vista to see if this is the issue.
  • If you are having these problems, you can avoid from having to do this completely if you logoff and put the computer to sleep from within the logon screen.

1. Open the Start Menu.​
A) In the white line (Start Search) area, type msconfig and press Enter.​
B) Go to step 3.​

OR
2. Click on All Programs, Administrative Tools, and System Configuration.​
3. Click on Continue in the UAC prompt.​
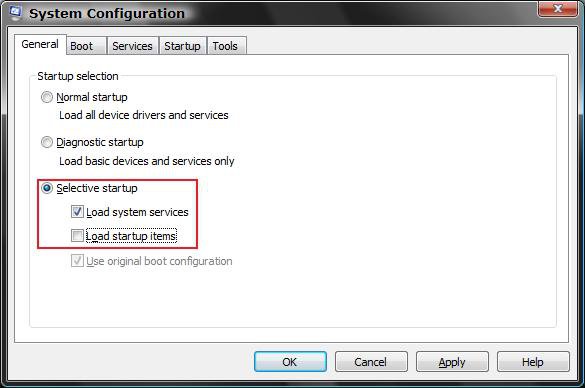
4. Under the General tab, dot Selective startup. (See screenshot below)​
NOTE: When done with the test, dot Normal startup, to return to the default settings before the test, and click on OK.
5. Uncheck Load startup items and click on OK and restart the computer.​
NOTE: You will get a notification that you made changes to the Startup programs in the bottom right Notification area. Just ignore it for now. It will go away when you put it back to Normal startup after you finish.
System_Configuration.jpg

6. Test sleep mode.​
7. If unchecking (disabling) Load startup items fixed the sleep problem, then enable one startup item at a time and test to see if the problem occurs again. Continue enabling startup items, until you find the program that is causing the problem. Remove or update the problem program.​
NOTE: See Method One or Two here: How to Check and Change the Startup Programs in Vista
A) When done, change the setting back to Normal startup (step 4).​

8. If unchecking (disabling) Load startup items did not resolve the sleep problem, then set it back to Normal startup (Step 4) and go to the next step below.​


STEP 9
Check Scheduled Tasks for Programs

NOTE: Sometimes a program will have something scheduled to run that will wake the computer up. Try turning them off temporarily to see if it resolves the problem.
1. Check in the suspected program settings to see if there is a feature that may wake the computer.​
NOTE: Sometimes it can be the Auto-Update feature in the program.​
2. Check Task Scheduler for items that are set to Wake-Up the computer to perform it's action.​
A) Expand out the list in the left pane and click on the suspect item's folder. Double click on the task in the middle pane.​
B) Click on the Conditions tab.​
C) Uncheck the Wake the computer to run this task box.​

3. Check Windows Automatic Updates settings.​


STEP 10
Check Windows Sidebar Gadgets

NOTE: Sometimes a Windows Sidebar Gadget may cause the computer to not sleep on it's own.
1. Turn off Windows Sidebar as a test to see if your computer will enter sleep on it's own now.​
NOTE: Sometimes, you may need to restart the computer afterwards as well.​
2. If it does, then turn Windows Sidebar back on and turn off each Gadget one by one. Test sleep again after each one until you find the one causing the problem.​


STEP 11
Check Motherboard Jumpers

NOTE: A few motherboards have been reported has having jumpers on the board for certain functions (ex: USB device wake-up) that may need to be enabled or disabled.
1. Pull out or download your motherboard manual, and check for any such jumpers.​
2. If you have one that is related (ex: USB device wake-up), then test sleep mode inbetween toggling the jumper on and off.​


STEP 12
Reset Print Spooler

NOTE: This may help if your computer will sleep fine manually, but will not sleep automatically or not go to sleep at all. Credit to Artxie for this.
1. Open Services, and temporaily Stop the Print Spooler service.​
2. Open the Start Menu and type %WINDIR%\system32\spool\printers in the search line and press enter, then delete all files in this folder.​
3. In Services, Start the Print Spooler service. Close Services window.​
Note   Note
If the print spooler issue persists, the installed printer driver may not be compatible or corrupted. Check the printer manufacturer's website to download and install the latest Windows compatible driver for it.


STEP 13
Enable or Disable Windows Media Center Updates to Wake Up the Computer

NOTE: This will show you how to enable or disable the Windows Media Center (mcupdate) task from waking up the computer from sleep when it checks for Media Center updates in Windows 7 and Vista.


STEP 14
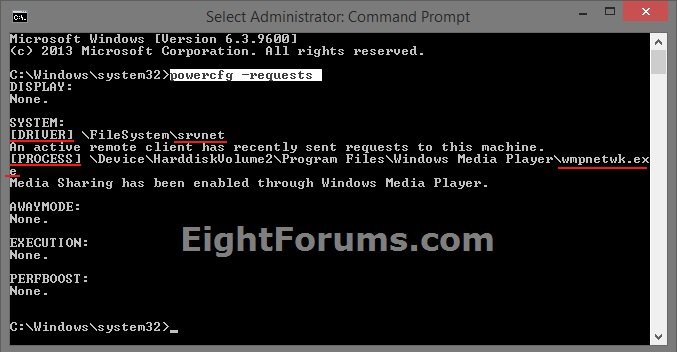
View and Override Power Availability Requests

By using power availability requests, applications, services, and drivers can temporarily disable power management features to accomplish user scenarios. Availability requests can prevent the display from turning off after inactivity, and prevent the computer from automatically sleeping, enable Away Mode, and shutting down.
requests.jpg
requestsoverride_Driver.jpg


STEP 15
Try System Restore

NOTE: If sleep/standby mode previously worked, attempt a system restore back to a time when it worked. If the problem has always existed, skip this step.
1. Save any open files and close all programs, then backup anything that you do not want to lose to be safe..​
NOTE: If System Restore resolves the problem, the problem is probably caused by software that was installed after the restore point date.


I hope this helps,
Shawn


Attachments

  • thumb_14728231780Power_Options.png
    thumb_14728231780Power_Options.png
    12.2 KB · Views: 596
Last edited by a moderator:
I just got a new MS Wireless Laser 6000 desktop set that uses a USB thumbdrive instead of the previous receiver that is supposed to eleminate any interference, but no change at all. There are no other USB devices, no routers, etc. This is really frustrating as I've been messing with this for one year now. The sleep feature is an important one for me to have and I really want to get this straightened out.

I have the settings exactly as shown only 25 minutes instead of 29. The monitors shut down at 25 minutes. Why should the monitors be set to shut down at a certain time anyway when I would only want them to do so when the machine goes into sleep?

Thanks - Saidsas
 

My Computer

Saidas,

You could set the monitor to "Never" shut down if you like to only have it shut down when the computer get puts to sleep automatically or manually instead.

Have you already checked your network adapter to make sure that the Allow this device to wake the computer option is unchecked (STEP SIX)? You might also do this with the mouse to test to see if that helps as well.
 

My Computers

System One System Two

  • Operating System
    Windows 10 Pro 64-bit
    Manufacturer/Model
    Custom
    CPU
    Intel i7-8700K 5 GHz
    Motherboard
    ASUS ROG Maximus XI Formula Z390
    Memory
    64 GB (4x16GB) G.SKILL TridentZ RGB DDR4 3600 MHz (F4-3600C18D-32GTZR)
    Graphics card(s)
    ASUS ROG-STRIX-GTX1080TI-O11G-GAMING
    Sound Card
    Integrated Digital Audio (S/PDIF)
    Monitor(s) Displays
    2 x Samsung Odyssey G7 27"
    Screen Resolution
    2560x1440
    Hard Drives
    1TB Samsung 990 PRO M.2, 4TB Samsung 990 PRO PRO M.2, 8TB WD MyCloudEX2Ultra NAS
    PSU
    Seasonic Prime Titanium 850W
    Case
    Thermaltake Core P3
    Cooling
    Corsair Hydro H115i
    Mouse
    Logitech MX Master 3
    Keyboard
    Logitech wireless K800
    Internet Speed
    1 Gb/s Download and 35 Mb/s Upload
    Other Info
    Logitech Z625 speaker system, Logitech BRIO 4K Pro webcam, HP Color LaserJet Pro MFP M477fdn, APC SMART-UPS RT 1000 XL - SURT1000XLI, Galaxy S23 Plus phone
  • Operating System
    Windows 10 Pro
    Manufacturer/Model
    HP Envy Y0F94AV
    CPU
    i7-7500U @ 2.70 GHz
    Memory
    16 GB DDR4-2133
    Sound Card
    Conexant ISST Audio
    Monitor(s) Displays
    17.3" UHD IPS touch
    Screen Resolution
    3480 x 2160
    Hard Drives
    512 GB M.2 SSD
Regarding Step 6, I was fine until I got to 10. In the Advanced tab, it shows Flow Control (disabled), Interrupt Moderation (enabled), Network Address (not present), Priority & VLAN (priority enabled), Speed & Duplex Settings (auto negotiation) and nothing like what is shown in the tutorial. It is an Nvidia nForce controller???

Btw....like the display setting shown in the tutorial, why would I have Put the Computer to Sleep set at 30 minutes (not that it's working...the display does but not this). Shouldn't it be set to something to do so when given a specific command?
 

My Computer

Saidas,

You would want to make the change for the network adapter in the Power Management tab instead. The Advanced tab was only an example screenshot since is not always the same per device since this is based on the driver.

It's up to, but you could set the computer to never go to sleep, hibernate, or shutdown in Power Options, and only put the computer to sleep manually from the Start Menu if you like instead.
 

My Computers

System One System Two

  • Operating System
    Windows 10 Pro 64-bit
    Manufacturer/Model
    Custom
    CPU
    Intel i7-8700K 5 GHz
    Motherboard
    ASUS ROG Maximus XI Formula Z390
    Memory
    64 GB (4x16GB) G.SKILL TridentZ RGB DDR4 3600 MHz (F4-3600C18D-32GTZR)
    Graphics card(s)
    ASUS ROG-STRIX-GTX1080TI-O11G-GAMING
    Sound Card
    Integrated Digital Audio (S/PDIF)
    Monitor(s) Displays
    2 x Samsung Odyssey G7 27"
    Screen Resolution
    2560x1440
    Hard Drives
    1TB Samsung 990 PRO M.2, 4TB Samsung 990 PRO PRO M.2, 8TB WD MyCloudEX2Ultra NAS
    PSU
    Seasonic Prime Titanium 850W
    Case
    Thermaltake Core P3
    Cooling
    Corsair Hydro H115i
    Mouse
    Logitech MX Master 3
    Keyboard
    Logitech wireless K800
    Internet Speed
    1 Gb/s Download and 35 Mb/s Upload
    Other Info
    Logitech Z625 speaker system, Logitech BRIO 4K Pro webcam, HP Color LaserJet Pro MFP M477fdn, APC SMART-UPS RT 1000 XL - SURT1000XLI, Galaxy S23 Plus phone
  • Operating System
    Windows 10 Pro
    Manufacturer/Model
    HP Envy Y0F94AV
    CPU
    i7-7500U @ 2.70 GHz
    Memory
    16 GB DDR4-2133
    Sound Card
    Conexant ISST Audio
    Monitor(s) Displays
    17.3" UHD IPS touch
    Screen Resolution
    3480 x 2160
    Hard Drives
    512 GB M.2 SSD
Ok. I'm really getting confused now. CP/Power Options/Advanced then what exactly (Vista)? I'm not understanding the Network Adapter thing and it seems from a process of elemination that this might be it.

All I want to do is to be able put the computer into sleep mode either from a keystroke or from the Shutdown Menu and then wake up with a mouse gesture. Why is this so bloody complicated anyway to do something so common and basic?

Thanks!
 

My Computer

Saidas,


This tutorial may help better. It's for Windows 7, but it's the same. Set all of your selected Power Plan settings to: :)
  • Hard disk - never
  • Sleep after - never
  • Hybrd - off
  • Hibernate - never
  • USB settings - disabled
  • Start Menu power button - sleep
  • Display - never
  • Multimedia Settings - Allow computer to sleep
For the Network adapter, use the STEP SIX section in this tutorial to open the Control Panel (Classic view), Device Manager, expand network adapter, etc.... in the steps.

Hope this helps. :)
 

My Computers

System One System Two

  • Operating System
    Windows 10 Pro 64-bit
    Manufacturer/Model
    Custom
    CPU
    Intel i7-8700K 5 GHz
    Motherboard
    ASUS ROG Maximus XI Formula Z390
    Memory
    64 GB (4x16GB) G.SKILL TridentZ RGB DDR4 3600 MHz (F4-3600C18D-32GTZR)
    Graphics card(s)
    ASUS ROG-STRIX-GTX1080TI-O11G-GAMING
    Sound Card
    Integrated Digital Audio (S/PDIF)
    Monitor(s) Displays
    2 x Samsung Odyssey G7 27"
    Screen Resolution
    2560x1440
    Hard Drives
    1TB Samsung 990 PRO M.2, 4TB Samsung 990 PRO PRO M.2, 8TB WD MyCloudEX2Ultra NAS
    PSU
    Seasonic Prime Titanium 850W
    Case
    Thermaltake Core P3
    Cooling
    Corsair Hydro H115i
    Mouse
    Logitech MX Master 3
    Keyboard
    Logitech wireless K800
    Internet Speed
    1 Gb/s Download and 35 Mb/s Upload
    Other Info
    Logitech Z625 speaker system, Logitech BRIO 4K Pro webcam, HP Color LaserJet Pro MFP M477fdn, APC SMART-UPS RT 1000 XL - SURT1000XLI, Galaxy S23 Plus phone
  • Operating System
    Windows 10 Pro
    Manufacturer/Model
    HP Envy Y0F94AV
    CPU
    i7-7500U @ 2.70 GHz
    Memory
    16 GB DDR4-2133
    Sound Card
    Conexant ISST Audio
    Monitor(s) Displays
    17.3" UHD IPS touch
    Screen Resolution
    3480 x 2160
    Hard Drives
    512 GB M.2 SSD
I set everything exactly as directed with still no change. I click Sleep and the monitors go dark for a second and the pc pauses for the same then it continues normally. Regarding these settings, why do I have Sleep/HD/Display set to never when I want them to on command?

<For the Network adapter, use the STEP SIX section in this tutorial to open the Control Panel (Classic view), Device Manager, expand network adapter, etc.... in the steps> Two replies ago I stated <Regarding Step 6, I was fine until I got to 10. In the Advanced tab, it shows Flow Control (disabled), Interrupt Moderation (enabled), Network Address (not present), Priority & VLAN (priority enabled), Speed & Duplex Settings (auto negotiation) and nothing like what is shown in the tutorial. It is an Nvidia nForce controller???> So I can't do this step so far.
 

My Computer

If you wanted to only have the computer to go to sleep when you manually put it to sleep from the Start Menu, then you would want to set the Power Options to never so the computer will not go to sleep automatically. Unless that is what you wanted to.


The problem with the network adapter is that you are going into the Advanced tab instead of the Power Management tab to uncheck the "Allow to wake up computer" option. ;)

I'm thinking it may be the network setting there, but we will have to see when you check it to be sure. :)
 

My Computers

System One System Two

  • Operating System
    Windows 10 Pro 64-bit
    Manufacturer/Model
    Custom
    CPU
    Intel i7-8700K 5 GHz
    Motherboard
    ASUS ROG Maximus XI Formula Z390
    Memory
    64 GB (4x16GB) G.SKILL TridentZ RGB DDR4 3600 MHz (F4-3600C18D-32GTZR)
    Graphics card(s)
    ASUS ROG-STRIX-GTX1080TI-O11G-GAMING
    Sound Card
    Integrated Digital Audio (S/PDIF)
    Monitor(s) Displays
    2 x Samsung Odyssey G7 27"
    Screen Resolution
    2560x1440
    Hard Drives
    1TB Samsung 990 PRO M.2, 4TB Samsung 990 PRO PRO M.2, 8TB WD MyCloudEX2Ultra NAS
    PSU
    Seasonic Prime Titanium 850W
    Case
    Thermaltake Core P3
    Cooling
    Corsair Hydro H115i
    Mouse
    Logitech MX Master 3
    Keyboard
    Logitech wireless K800
    Internet Speed
    1 Gb/s Download and 35 Mb/s Upload
    Other Info
    Logitech Z625 speaker system, Logitech BRIO 4K Pro webcam, HP Color LaserJet Pro MFP M477fdn, APC SMART-UPS RT 1000 XL - SURT1000XLI, Galaxy S23 Plus phone
  • Operating System
    Windows 10 Pro
    Manufacturer/Model
    HP Envy Y0F94AV
    CPU
    i7-7500U @ 2.70 GHz
    Memory
    16 GB DDR4-2133
    Sound Card
    Conexant ISST Audio
    Monitor(s) Displays
    17.3" UHD IPS touch
    Screen Resolution
    3480 x 2160
    Hard Drives
    512 GB M.2 SSD
<The problem with the network adapter is that you are going into the Advanced tab instead of the Power Management tab to uncheck the "Allow to wake up computer" option.>

As instructed, I've gone into (Step Six) Device Manager/Network Adapters then rt. clicked on NVIDIA nForce Networking Controller, clicked Properties/Power Management and made the settings exactly as shown in 8. The next part 9. says <Click on the Advanced tab>. The next part 10. shows the screen clip under Advanced with those nine properties mine doesn't show. What mine shows is what I listed previously.

So I'm confused because the intructions say to go to the Advanced tab and here you say not to....and when in Advanced, what I show is completely different than what the tutorial shows.

Thanks Brink. I really appreciate your continued patience and assistance.
 

My Computer

I'm sorry Saidas. I had thought that you had not checked in the Power Management tab yet. The Advanced tab will vary for each person's device since the options listed there are based on the driver. The ones that need to be disabled are any that are for Wake On if listed.

The only other thing I can think for you to check, is to look in the BIOS under it's power management options to see if there is a Wake on Ring and Wake on Lan to disable.
 

My Computers

System One System Two

  • Operating System
    Windows 10 Pro 64-bit
    Manufacturer/Model
    Custom
    CPU
    Intel i7-8700K 5 GHz
    Motherboard
    ASUS ROG Maximus XI Formula Z390
    Memory
    64 GB (4x16GB) G.SKILL TridentZ RGB DDR4 3600 MHz (F4-3600C18D-32GTZR)
    Graphics card(s)
    ASUS ROG-STRIX-GTX1080TI-O11G-GAMING
    Sound Card
    Integrated Digital Audio (S/PDIF)
    Monitor(s) Displays
    2 x Samsung Odyssey G7 27"
    Screen Resolution
    2560x1440
    Hard Drives
    1TB Samsung 990 PRO M.2, 4TB Samsung 990 PRO PRO M.2, 8TB WD MyCloudEX2Ultra NAS
    PSU
    Seasonic Prime Titanium 850W
    Case
    Thermaltake Core P3
    Cooling
    Corsair Hydro H115i
    Mouse
    Logitech MX Master 3
    Keyboard
    Logitech wireless K800
    Internet Speed
    1 Gb/s Download and 35 Mb/s Upload
    Other Info
    Logitech Z625 speaker system, Logitech BRIO 4K Pro webcam, HP Color LaserJet Pro MFP M477fdn, APC SMART-UPS RT 1000 XL - SURT1000XLI, Galaxy S23 Plus phone
  • Operating System
    Windows 10 Pro
    Manufacturer/Model
    HP Envy Y0F94AV
    CPU
    i7-7500U @ 2.70 GHz
    Memory
    16 GB DDR4-2133
    Sound Card
    Conexant ISST Audio
    Monitor(s) Displays
    17.3" UHD IPS touch
    Screen Resolution
    3480 x 2160
    Hard Drives
    512 GB M.2 SSD
I wouldn't recommend messing with the BIOS if your not comfortable or familiar with it then. It can mess things up with one wrong move.

I'm afraid that I do not know what else may be causing this. :(
 

My Computers

System One System Two

  • Operating System
    Windows 10 Pro 64-bit
    Manufacturer/Model
    Custom
    CPU
    Intel i7-8700K 5 GHz
    Motherboard
    ASUS ROG Maximus XI Formula Z390
    Memory
    64 GB (4x16GB) G.SKILL TridentZ RGB DDR4 3600 MHz (F4-3600C18D-32GTZR)
    Graphics card(s)
    ASUS ROG-STRIX-GTX1080TI-O11G-GAMING
    Sound Card
    Integrated Digital Audio (S/PDIF)
    Monitor(s) Displays
    2 x Samsung Odyssey G7 27"
    Screen Resolution
    2560x1440
    Hard Drives
    1TB Samsung 990 PRO M.2, 4TB Samsung 990 PRO PRO M.2, 8TB WD MyCloudEX2Ultra NAS
    PSU
    Seasonic Prime Titanium 850W
    Case
    Thermaltake Core P3
    Cooling
    Corsair Hydro H115i
    Mouse
    Logitech MX Master 3
    Keyboard
    Logitech wireless K800
    Internet Speed
    1 Gb/s Download and 35 Mb/s Upload
    Other Info
    Logitech Z625 speaker system, Logitech BRIO 4K Pro webcam, HP Color LaserJet Pro MFP M477fdn, APC SMART-UPS RT 1000 XL - SURT1000XLI, Galaxy S23 Plus phone
  • Operating System
    Windows 10 Pro
    Manufacturer/Model
    HP Envy Y0F94AV
    CPU
    i7-7500U @ 2.70 GHz
    Memory
    16 GB DDR4-2133
    Sound Card
    Conexant ISST Audio
    Monitor(s) Displays
    17.3" UHD IPS touch
    Screen Resolution
    3480 x 2160
    Hard Drives
    512 GB M.2 SSD
Surely there must be something I can do. I'm not using anything esoteric by any means. It was like this from Day One when I had the computer built. I've read on various forums over the last year that many people have problems with Sleep & Hibernation with Vista. I never had this problem with XP. Is this just another reason to dislike Vista or am I going to be able to remedy this?
 

My Computer

Without being at your computer, it's hard to tell what the problem may be. We tried pretty much everything that I can think of that are the common reasons for this. Other than seeing if a reinstall with the latest driver versions may help, I can't think of anything specific to check that we haven't already. :(
 

My Computers

System One System Two

  • Operating System
    Windows 10 Pro 64-bit
    Manufacturer/Model
    Custom
    CPU
    Intel i7-8700K 5 GHz
    Motherboard
    ASUS ROG Maximus XI Formula Z390
    Memory
    64 GB (4x16GB) G.SKILL TridentZ RGB DDR4 3600 MHz (F4-3600C18D-32GTZR)
    Graphics card(s)
    ASUS ROG-STRIX-GTX1080TI-O11G-GAMING
    Sound Card
    Integrated Digital Audio (S/PDIF)
    Monitor(s) Displays
    2 x Samsung Odyssey G7 27"
    Screen Resolution
    2560x1440
    Hard Drives
    1TB Samsung 990 PRO M.2, 4TB Samsung 990 PRO PRO M.2, 8TB WD MyCloudEX2Ultra NAS
    PSU
    Seasonic Prime Titanium 850W
    Case
    Thermaltake Core P3
    Cooling
    Corsair Hydro H115i
    Mouse
    Logitech MX Master 3
    Keyboard
    Logitech wireless K800
    Internet Speed
    1 Gb/s Download and 35 Mb/s Upload
    Other Info
    Logitech Z625 speaker system, Logitech BRIO 4K Pro webcam, HP Color LaserJet Pro MFP M477fdn, APC SMART-UPS RT 1000 XL - SURT1000XLI, Galaxy S23 Plus phone
  • Operating System
    Windows 10 Pro
    Manufacturer/Model
    HP Envy Y0F94AV
    CPU
    i7-7500U @ 2.70 GHz
    Memory
    16 GB DDR4-2133
    Sound Card
    Conexant ISST Audio
    Monitor(s) Displays
    17.3" UHD IPS touch
    Screen Resolution
    3480 x 2160
    Hard Drives
    512 GB M.2 SSD
I set everything exactly as directed with still no change. I click Sleep and the monitors go dark for a second and the pc pauses for the same then it continues normally.

This happened to me too, when I moved my PC to an other home and the sleep did not work anymore, it went to standby and then immidiately continued normaly. Then I checked what caused the last wakeup (Step 4 in the tutorial) and it was my optical mouse (I had previously set it to "can not wake up", but I had plugged the mouse to an other USB port (or I have two identical Logitec mice) and somehow this setting was lost).
Check what caused your last wakup from standby.

Also check what devices are armed for wakeup, so you know, what can possibly wake up your PC.

Hope this helps.
 

My Computer

I got a new MS desktop set that with USB instead of the large receiver. This setup is supposed to cause less or no interferrance like this. I did step 4 again and both the keyboard & mouse came up. How do I disable these? I don't see it shown in the tutorial. Thanks!
 

My Computer

Re: Power Options and Sleep Mode Problems *And* Corrupt Video/Audio after 2GB to 4GB

Greetings,

I have the apparently nearly identical problem (problem w/ sleep and corrupted video and audio after waking) on my Gateway T-1625 laptop as the member below describes. I have 4GB of ram installed (2x2 - purchased as a matched pair and they test error free) and if I remove a 2GB stick all the problems go away...i.e. it sleeps properly and wakes back up without the horizontal video lines and scratchy sound issues that are only solved once I reboot.

So my question is...has anyone learned yet why there is a problem with Vista Ultimate 64 bit not properly accepting 4GB of ram? This seems to be the only problem but it is aggravating. And incidentally...hibernation works fine (but not hybrid) with 4GB ram...except it takes nearly 3 minutes to wake up so that's only a partial solution!

I've read otherwise that this *might* be a BIOS upgrade issue, however no one has said so definitively. Gateway shipped it with 32 bit Vista, but since every other component/feature seems to work perfectly (w/ no errors in reporting the correct ram), and the AMD TL-60 processor is 64 bit, I'm not convinced either way just yet whether it's the bios or Vista 64.

Unfortunately I simply cannot find any good information about the bios. I know it's Phoenix version 60.03, but cannot for sure find the original motherboard manufacturer to be certain of any flash upgrade. Different tests report it as either "Gateway" or "ASUS_ - 6040000".

So...has anyone discovered what the solution to this is? The other member with this problem eventually went back to 32 bit it seems...and this is tempting...but geesh it's so terribly slow with the smaller amount of ram it will accept.

Thanks so much for your attention...moderator, please feel free to move this to another thread if you feel I will get better results.

Cheers,

jorgia


Hey people,

I just discovered something!

I ended up not re installing vista, but I was going to. I took out 2 GB of RAM because I've heard of problems while installing Vista with more that 2 GB of RAM. I ended up booting into Vista for one last time and I decided to try sleep.

SLEEP WORKED!!!

After removing my 4 GB of RAM and reduced it to 2 GB, sleep was working, my video was working, sound was working and network was working.

The only thing is, is that I play Microsoft Flight Simulator X (FSX uses a whole bunch of resources) and when I tried to play with 2 GB of RAM, I was getting "exploding" autogen (tall vertical lines coming out of autogen). That is usually a warning that an out of memory error is about to occur.

I am about to try to disable hybrid sleep to see if that is a problem. I guess this would have never occurred originally because Vista 32 bit can only use like 3.25 GB of RAM.

Does anyone know why my computer won't sleep with 4 GB or RAM? Or can anybody help me?

Thanks

-Orion
 

My Computer

Hello Jorgia, and welcome to Vista Forums.

It could be that your BIOS may just need to be flashed with the latest version to update your computer's motherboard. I looked it up at Gateway, and the latest BIOS version for you computer is 90.03. You will also see the latest version for your other drivers there as well.

Another possibility is that the RAM may be bad. You can get a free copy of Memtest86+ and burn the downloaded ISO file to disk with the free program ImgBurn. Afterwards, juss boot with the DVD in the drive and let it run the memory test with the RAM sticks installed to see if it finds any errors or not with them.

Hope this helps for now,
Shawn
 

My Computers

System One System Two

  • Operating System
    Windows 10 Pro 64-bit
    Manufacturer/Model
    Custom
    CPU
    Intel i7-8700K 5 GHz
    Motherboard
    ASUS ROG Maximus XI Formula Z390
    Memory
    64 GB (4x16GB) G.SKILL TridentZ RGB DDR4 3600 MHz (F4-3600C18D-32GTZR)
    Graphics card(s)
    ASUS ROG-STRIX-GTX1080TI-O11G-GAMING
    Sound Card
    Integrated Digital Audio (S/PDIF)
    Monitor(s) Displays
    2 x Samsung Odyssey G7 27"
    Screen Resolution
    2560x1440
    Hard Drives
    1TB Samsung 990 PRO M.2, 4TB Samsung 990 PRO PRO M.2, 8TB WD MyCloudEX2Ultra NAS
    PSU
    Seasonic Prime Titanium 850W
    Case
    Thermaltake Core P3
    Cooling
    Corsair Hydro H115i
    Mouse
    Logitech MX Master 3
    Keyboard
    Logitech wireless K800
    Internet Speed
    1 Gb/s Download and 35 Mb/s Upload
    Other Info
    Logitech Z625 speaker system, Logitech BRIO 4K Pro webcam, HP Color LaserJet Pro MFP M477fdn, APC SMART-UPS RT 1000 XL - SURT1000XLI, Galaxy S23 Plus phone
  • Operating System
    Windows 10 Pro
    Manufacturer/Model
    HP Envy Y0F94AV
    CPU
    i7-7500U @ 2.70 GHz
    Memory
    16 GB DDR4-2133
    Sound Card
    Conexant ISST Audio
    Monitor(s) Displays
    17.3" UHD IPS touch
    Screen Resolution
    3480 x 2160
    Hard Drives
    512 GB M.2 SSD
Hello Shawn...and thank you for your reply...

i didn't download and run memtest as you suggested, however i did run several passes of Vista's built in memory tester during the boot process and it reports no errors at all.

And i actually have Phoenix bios version 90.03 already installed...not 60.03 as i'd posted (apologies for that)...and 90.03 is the latest version i am able to find.

Do you have any other ideas? It seems odd that a bios issue would "only" show up as a sleep problem (the video/sound corruption happens only after waking from sleep...not hibernate)...and only if 4GB ram is installed, not just 2.

I'm willing to pursue it if someone knows which direction to point. One of the most frustrating things is how hard it is to locate *who* the original motherboard manufacturer is...for certain...and then to reliably know whether or not there is an updated version of the bios for it. They sure don't make it easy...

Thanks for your attention,

jorgia


Hello Jorgia, and welcome to Vista Forums.

It could be that your BIOS may just need to be flashed with the latest version to update your computer's motherboard. I looked it up at Gateway, and the latest BIOS version for you computer is 90.03. You will also see the latest version for your other drivers there as well.

Another possibility is that the RAM may be bad. You can get a free copy of Memtest86+ and burn the downloaded ISO file to disk with the free program ImgBurn. Afterwards, juss boot with the DVD in the drive and let it run the memory test with the RAM sticks installed to see if it finds any errors or not with them.

Hope this helps for now,
Shawn
 

My Computer

Method to Disable or Enable the Wake Up Computer Option for ALL Devices.

This forum has been extremely helpful in my Vista ventures. So here is something I would like to contribute. This is a very simple way to disable everything in one line from a command prompt. You can also use this to disable that pesky "High Definition Audio Device" from being allowed to wake up your pc if the device manager tab does not show any power options.

1. Open a command prompt as Administrator. Do this by right clicking on the command prompt shortcut and choosing run as Administrator. You will be prompted by UAC to continue.

2. First to verify this command will run correctly and see what you are about to disable. Copy and paste the following text into the Administrator command prompt or type it exactly as you see it and press enter.
FOR /F "usebackq delims==" %i IN (`PowerCfg -DEVICEQUERY wake_armed`) DO @Echo "%i"

3. Now to actually disable everything just copy and paste the following text into the Administrator command prompt or type it exactly as you see it and press enter.
FOR /F "usebackq delims==" %i IN (`PowerCfg -DEVICEQUERY wake_armed`) DO powercfg -DEVICEDISABLEWAKE "%i"

4. If you wanted to keep something in that list enabled. You will need to look at your output from step 2. Then in the Administrator command prompt type the following and press enter.
POWERCFG -DEVICEENABLEWAKE "device from step 2"

5. To verify what is enabled just run the command in step 2 again.

TIP: In the command window you can just use the up and down arrows to cycle through the command history.
 

My Computer

Back
Top