How to Create a Vista Installation USB Key
This will show you how to create a USB flash key drive that you can boot from to install Vista with.
If the USB flash drive is of sufficient capacity, say 8GB, then after copying the Vista installation DVD onto it, you can create a new folder (ex: Device Drivers) in the USB key and place all of your latest driver installation files in it. This way you will have them handy to manually install the drivers after installing Vista from the USB key.
- You can only create a 32-bit Vista USB key from within a 32-bit OS (ex: Vista or XP).
- You can only create a 64-bit Vista USB key from within a 64-bit OS (ex: Vista or XP).
- The USB key needs to be at least 4 GB in size.
- You must have a Retail Vista installation DVD, not a OEM Vista recovery CD.
- This will delete everything on the USB key. Be sure to save anything that you do not want to lose on it somewhere else.
- Before installing Vista from the USB key, you will need to:
- Enable Legacy USB storage detect in the BIOS
- Temporarily set the USB FDD (USB Flash Disk Drive) to be listed right before the hard drive (or partition) that you will be installing Vista on in the hard drive Boot Priority order list in the BIOS.
- After you are finished installing Vista from the USB key, make the Vista hard drive (or partition) listed first in the hard drive Boot Priority order list in the BIOS.
 METHOD ONE
You will need to have a Vista ISO file to do this option.
If you like, you can use the Create image file from disc feature of the free program ImgBurn with a retail Vista installation DVD to create a Vista ISO file.
If you do not have a retail Vista installation DVD, then you can download and create an official Vista ISO file using the tutorial here: Installation & Upgrade - Vista ISO - Download and Create Installation DVD or USB
1. Download and install the trial version of UltraIso.
2. Plug in your USB key.
3. Right click on the UltraIso shortcut, and click on Run as administrator.
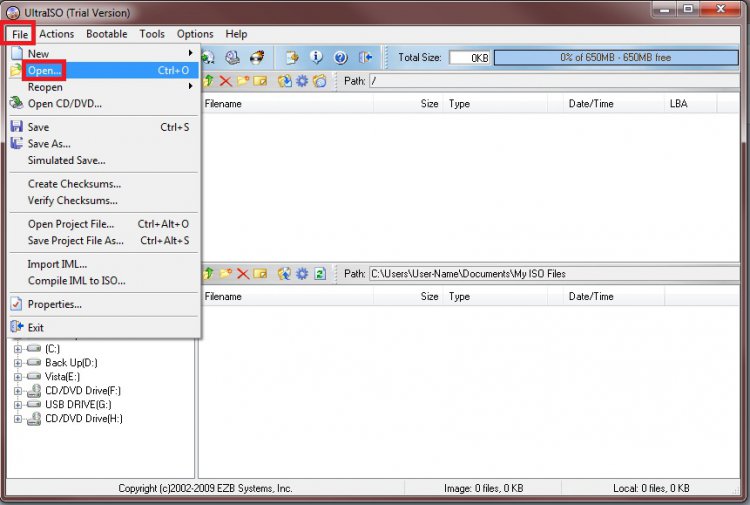
4. Click on File (menu bar) and Open. (See screenshot below)
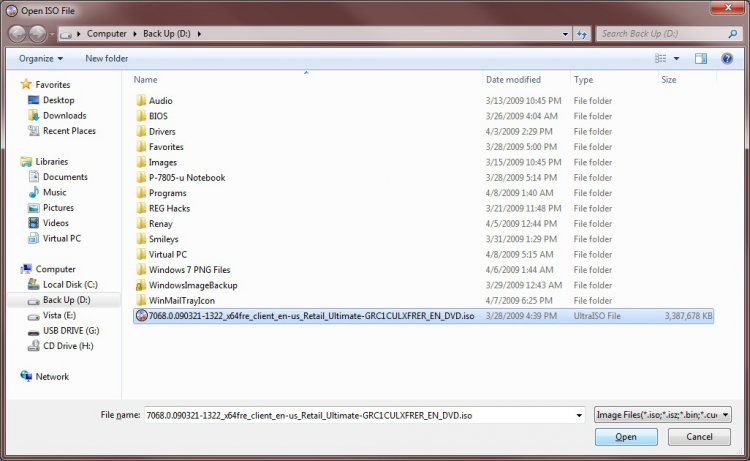
5. Navigate to your Vista ISO file and select it and click on the Open button. (See screenshot below)
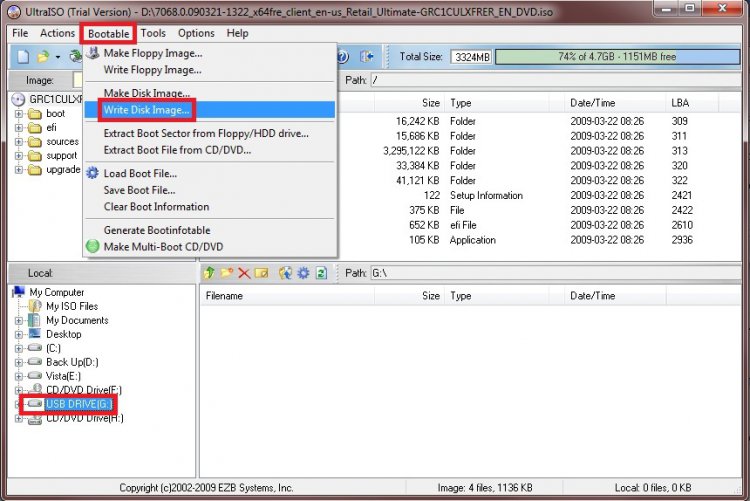
6. In the bottom Local pane, select your USB flash key drive. (See screenshot below)
7. Click on Bootable (menu bar) and Write Disk Image. (See screenshot above)
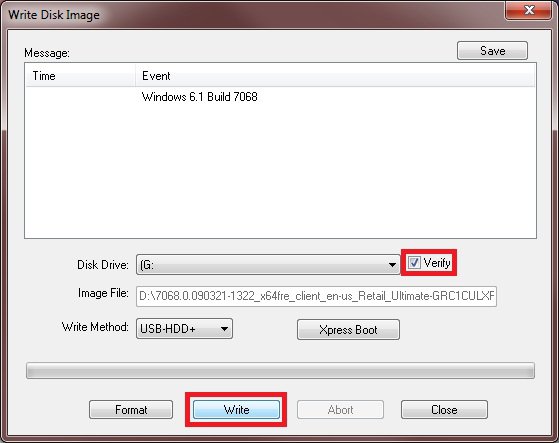
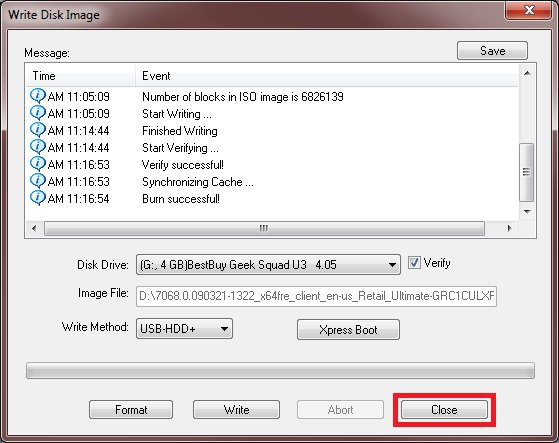
8. Make sure the locations are correct, and check the Verify box and click on the Write button. (See screenshot below)
9. Click on Yes to confirm writing to the USB drive.
10. When it's done, click on the Close button. (See screenshot below)
11. You now have a Vista installation USB flash key drive. 

 METHOD TWO
1. Plug the USB key in.
2. If AutoPlay opens a pop-up for the USB key, then just close it.
NOTE: Make note of what the drive size is for the USB key for step 6 below. You can also open Computer (step 21) to see what the drive size is to. For example, mine is 3920 MB.
3. Open an elevated command prompt.
4. In the elevated command prompt, type diskpart and press Enter. (See screenshot below)
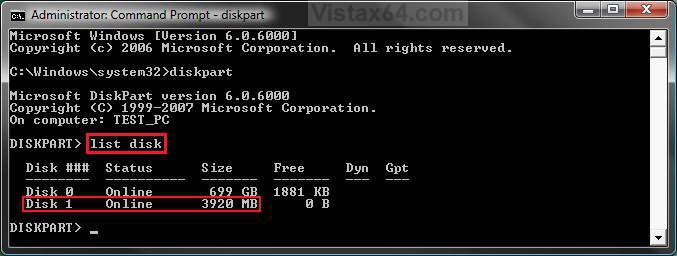
5. In the elevated command prompt, type list disk and press Enter. (See screenshot below)
NOTE: Make note of what disk # your USB key is listed as for step 6 below. You can also look for the drive size (step 2) for the USB key to help ID the disk number. For example, mine is listed as Disk 1 here for the 3920 MB disk.
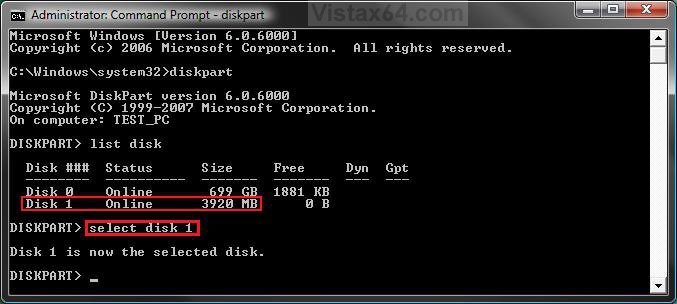
6. In the elevated command prompt, type select disk # (your USB disk #) and press Enter. (See screenshot below)
NOTE: You can also look for the drive size (step 2) for the USB key to help ID the disk number. For example, my USB key is listed as Disk 1, so I would type select disk 1 and press Enter.
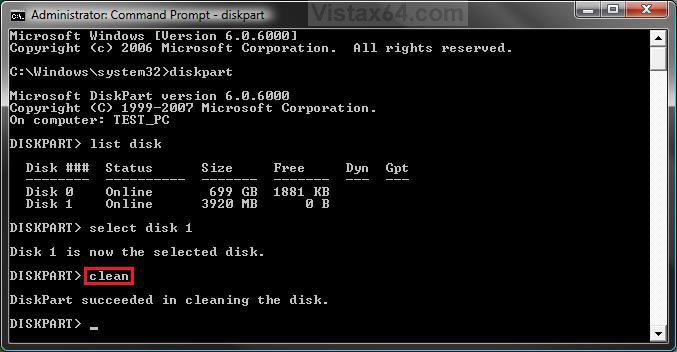
7. In the elevated command prompt, type clean and press Enter. (See screenshot below)
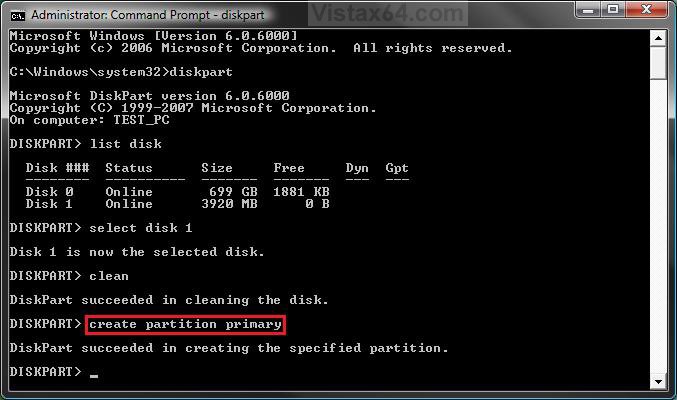
8. In the elevated command prompt, type create partition primary and press Enter. (See screenshot below)
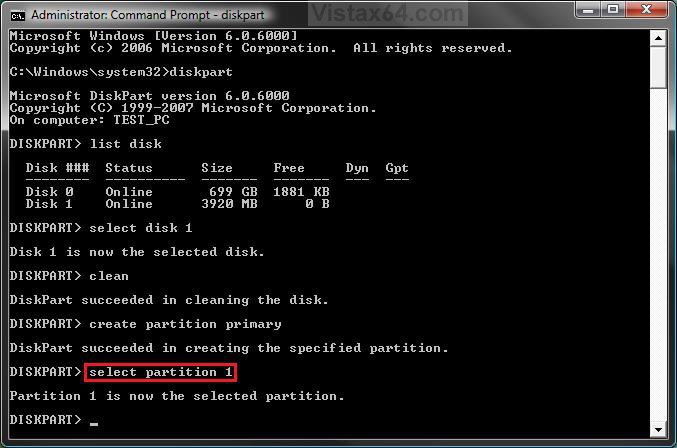
9. In the elevated command prompt, type select partition 1 and press Enter. (See screenshot below)
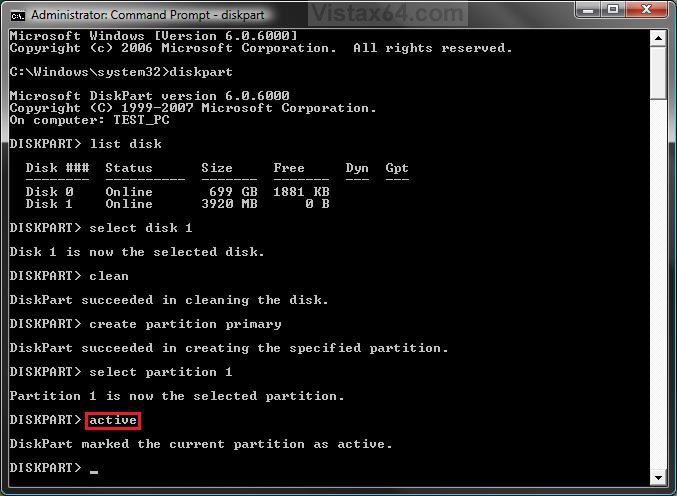
10. In the elevated command prompt, type active and press Enter. (See screenshot below)
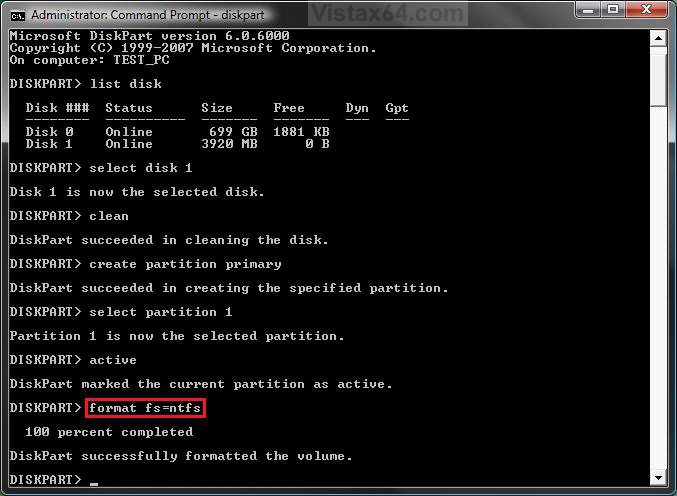
11. In the elevated command prompt, type format fs=ntfs and press Enter. (See screenshot below)
NOTE: This may take a few moments to finish formatting the USB key.
12. If AutoPlay opens a pop-up for the USB key, then just close it.
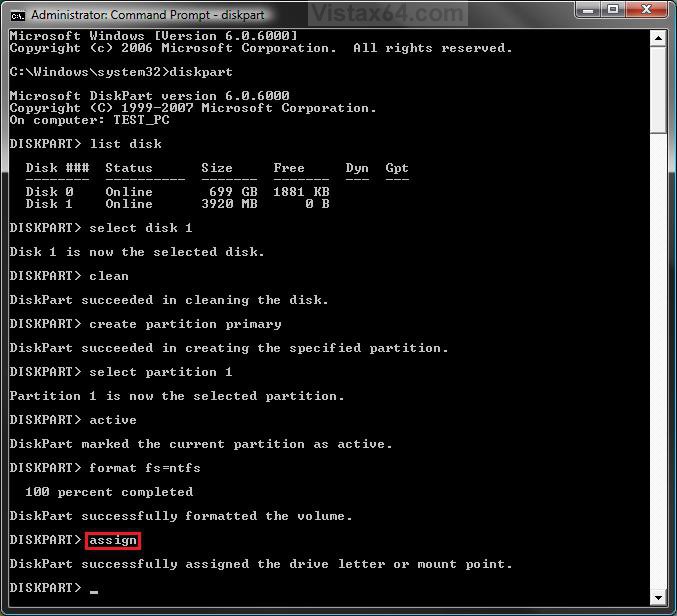
13. In the elevated command prompt, type assign and press Enter. (See screenshot below)
NOTE: This will assign a new drive letter to the USB key. Make note of the new USB drive letter for step 19 below. For example, mine is now H.
14. If AutoPlay opens a pop-up for the USB key, then just close it.
NOTE: Make note of the new USB drive letter for step 18 below. For example, mine is now H.
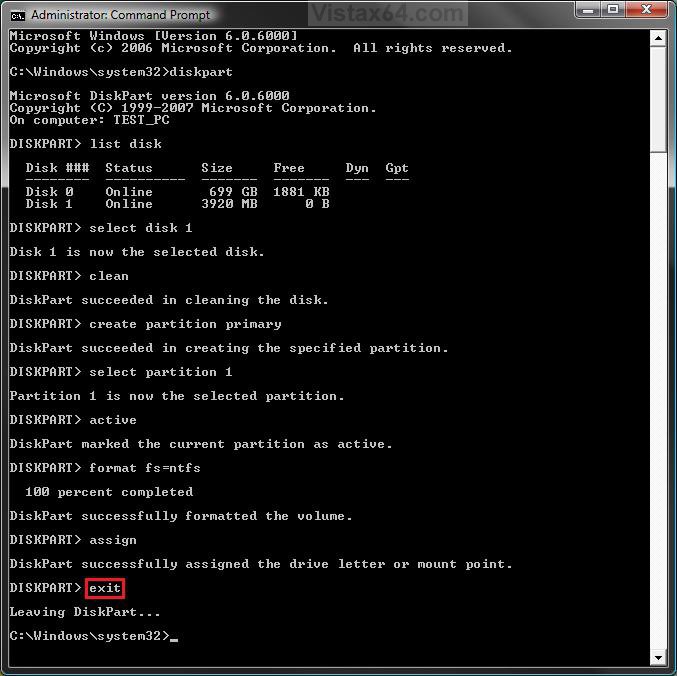
15. In the elevated command prompt, type exit and press Enter. (See screenshot below)
NOTE: This will exit you from DiskPart from step 4.
16. Insert your retail Vista installation DVD into the DVD drive.
17. If AutoPlay opens a pop-up for the retail Vista installation DVD, then just close it.
NOTE: Make note of what the drive letter is for the DVD drive that has the retail Vista installation DVD in for step 19 below. You can also open Computer (step 21) to see what the drive letter is to. (See right screenshot below)
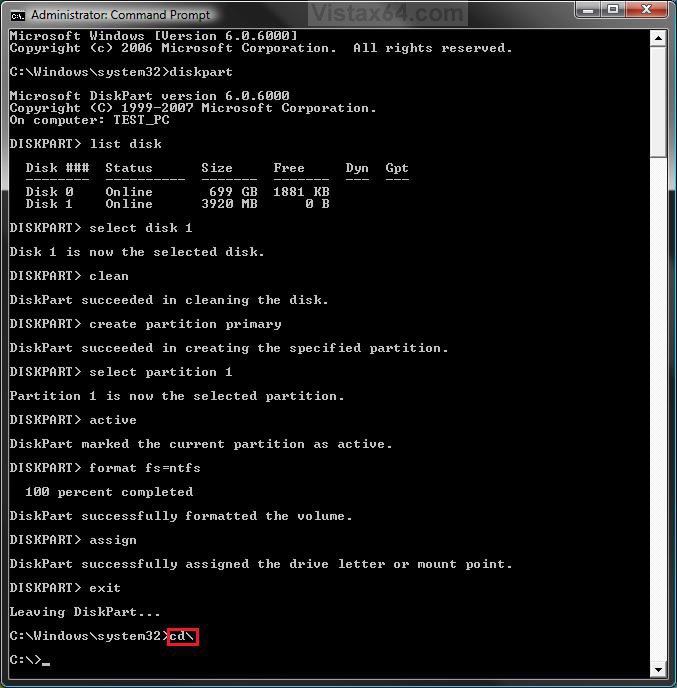
18. In the elevated command prompt, type cd\ and press Enter. (See screenshot below)
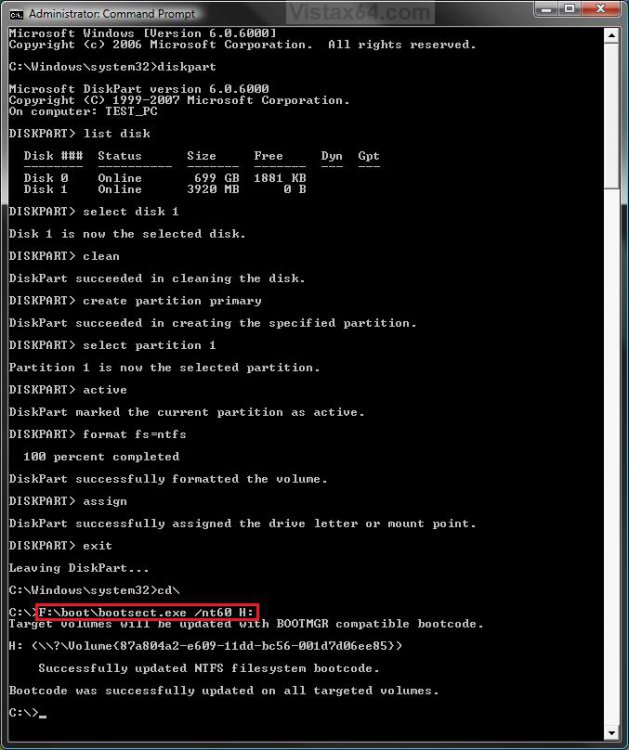
19. In the elevated command prompt, type the command below, and press Enter. (See screenshot below)
WARNING: Subtitute the letter F with your actual DVD drive letter (step 17), and substitute H with your actual USB key drive letter (step 13).
F:\boot\bootsect.exe /nt60 H:
20. When it finishes, close the elevated command prompt.
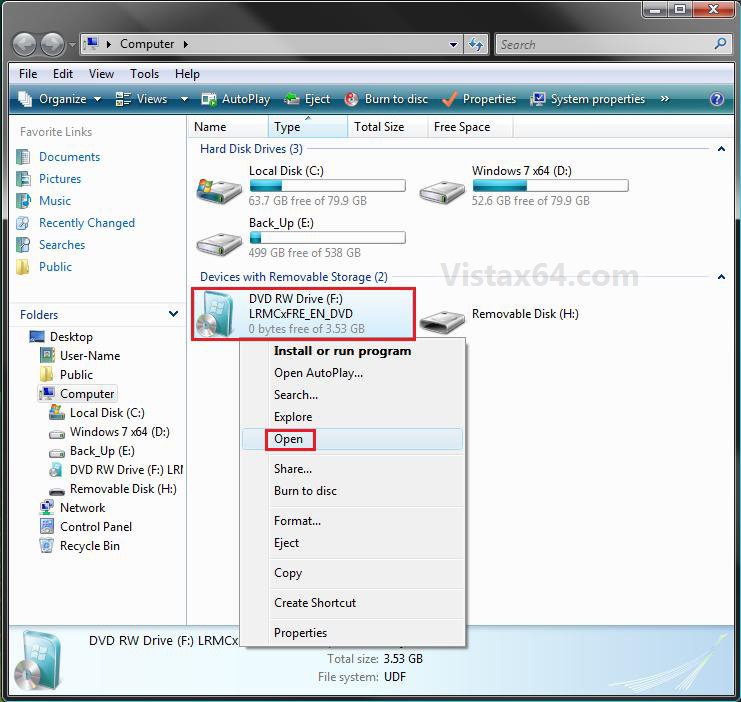
21. Open the Start Menu, and right click on the Computer button and click on Open.
22. Right click on the DVD drive (ex: F: ) that has the retail Vista installation DVD, and click on Open. (See screenshot below)
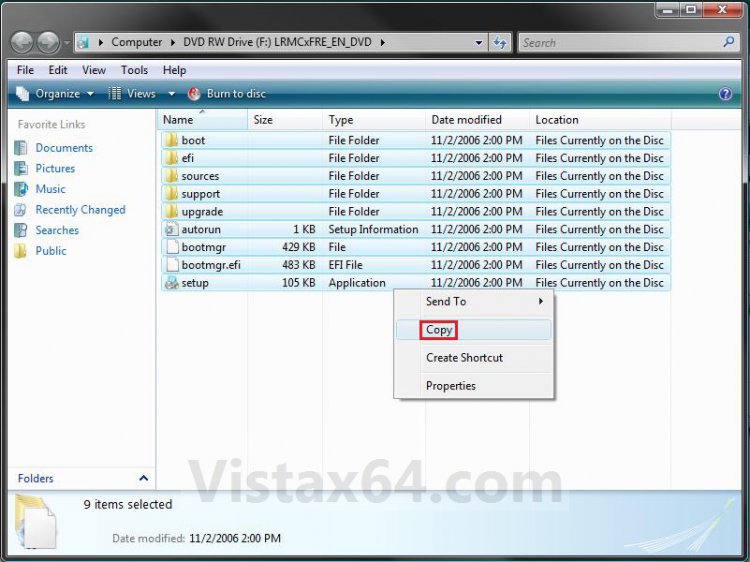
23. Highlight all of the contents, right click on the highlighted contents, and click on Copy. (See screenshot below)
NOTE: You will need to copy all of the files and folders on the retail Vista installation DVD to the USB key.
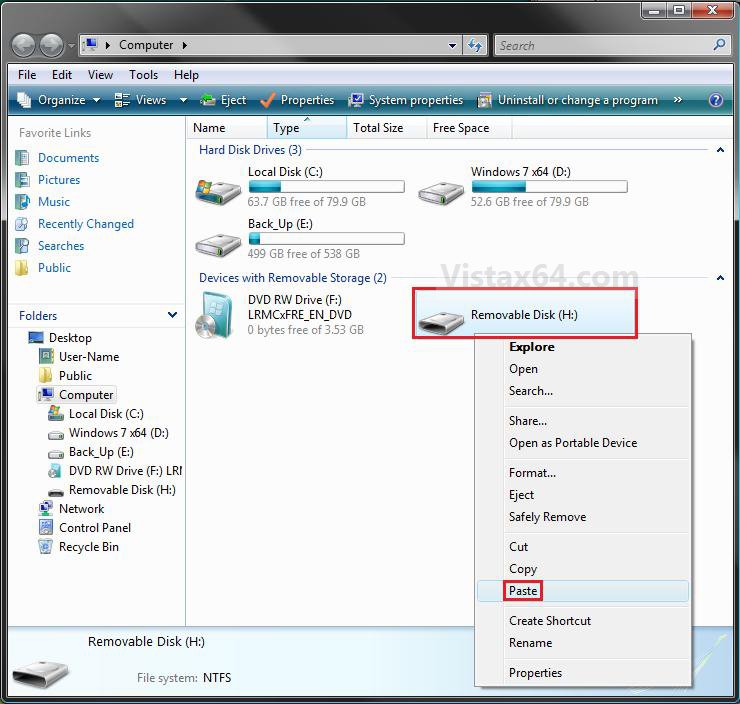
24. Go back to Computer, right click on the USB key drive (ex: H ), and click on Paste. (See screenshot below)
25. The contents of the retail Vista installation DVD will now start copying over to the USB key.
NOTE: This may take a few moments to complete.
26. When finished, you can close the Computer window and unplug the USB key.
27. You now have a Vista installation USB flash drive.
Before installing Vista from the USB key, you will need to:
- Enable Legacy USB storage detect in the BIOS
- Temporarily set the USB FDD (USB Flash Disk Drive) to be listed right before the hard drive (or partition) that you will be installing Vista on in the hard drive Boot Priority order list in the BIOS.
- After you are finished installing Vista from the USB key, make the Vista hard drive (or partition) listed first in the hard drive Boot Priority order list in the BIOS.
That's it,Shawn
Related Tutorials
- How to Download a Vista ISO and Create an Installation DVD or USB
- How to Create a Vista SP1 Slipstream Installation DVD
- How to Create a Vista Recovery Disc
- How to Do a Clean Install of Vista with a Upgrade Version
- How to Do a Clean Install with a Full Version of Vista
- How to Do a Dual Boot Installation with Windows Vista and XP
- How to Do a Dual Boot Installation with Windows 7 and Vista
- How to Do a Custom Installation of Vista
- How to Create a YUMI MultiBoot USB Flash Drive for Windows
Attachments
Last edited by a moderator:

