USB Bootable Vista Installation Flash Thumb Drive

How to Create a Vista Installation USB Key


information   Information
This will show you how to create a USB flash key drive that you can boot from to install Vista with.
Tip   Tip
If the USB flash drive is of sufficient capacity, say 8GB, then after copying the Vista installation DVD onto it, you can create a new folder (ex: Device Drivers) in the USB key and place all of your latest driver installation files in it. This way you will have them handy to manually install the drivers after installing Vista from the USB key.
warning   Warning

  • You can only create a 32-bit Vista USB key from within a 32-bit OS (ex: Vista or XP).
  • You can only create a 64-bit Vista USB key from within a 64-bit OS (ex: Vista or XP).
  • The USB key needs to be at least 4 GB in size.
  • You must have a Retail Vista installation DVD, not a OEM Vista recovery CD.
  • This will delete everything on the USB key. Be sure to save anything that you do not want to lose on it somewhere else.
  • Before installing Vista from the USB key, you will need to:
    • Enable Legacy USB storage detect in the BIOS
    • Temporarily set the USB FDD (USB Flash Disk Drive) to be listed right before the hard drive (or partition) that you will be installing Vista on in the hard drive Boot Priority order list in the BIOS.
    • After you are finished installing Vista from the USB key, make the Vista hard drive (or partition) listed first in the hard drive Boot Priority order list in the BIOS.


METHOD ONE
Create Vista Installation USB Key using Vista ISO


Note   Note
You will need to have a Vista ISO file to do this option.

If you like, you can use the Create image file from disc feature of the free program ImgBurn with a retail Vista installation DVD to create a Vista ISO file.

If you do not have a retail Vista installation DVD, then you can download and create an official Vista ISO file using the tutorial here: Installation & Upgrade - Vista ISO - Download and Create Installation DVD or USB


1. Download and install the trial version of UltraIso.​
2. Plug in your USB key.​
3. Right click on the UltraIso shortcut, and click on Run as administrator.​
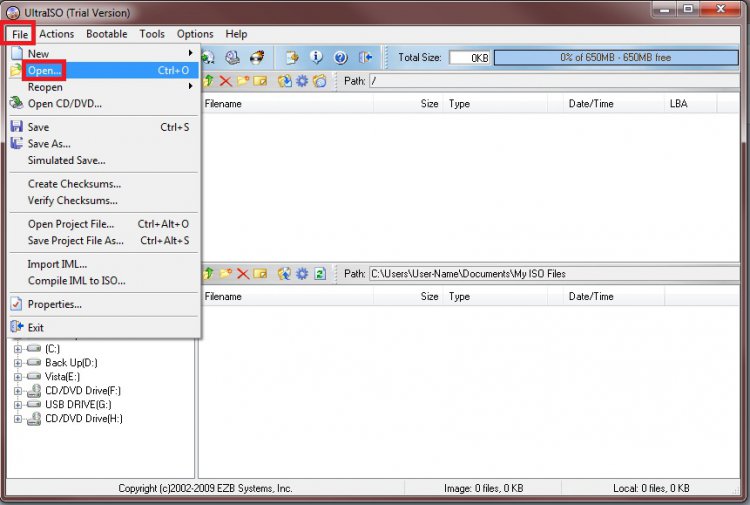
4. Click on File (menu bar) and Open. (See screenshot below)​
UltrISO-2.jpg

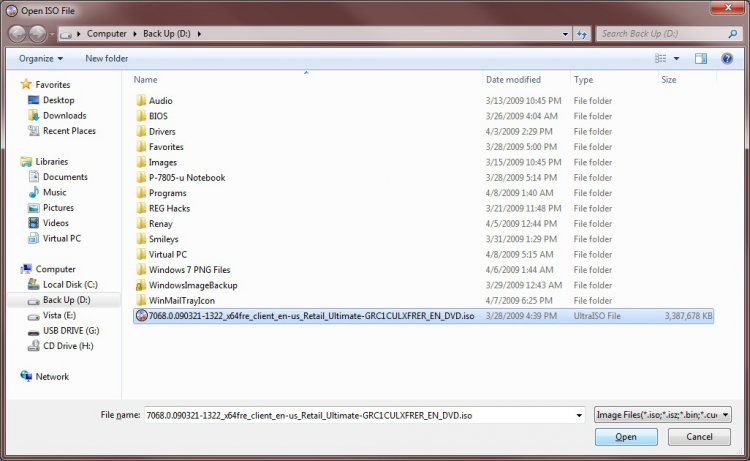
5. Navigate to your Vista ISO file and select it and click on the Open button. (See screenshot below)​
UltrISO-3.jpg

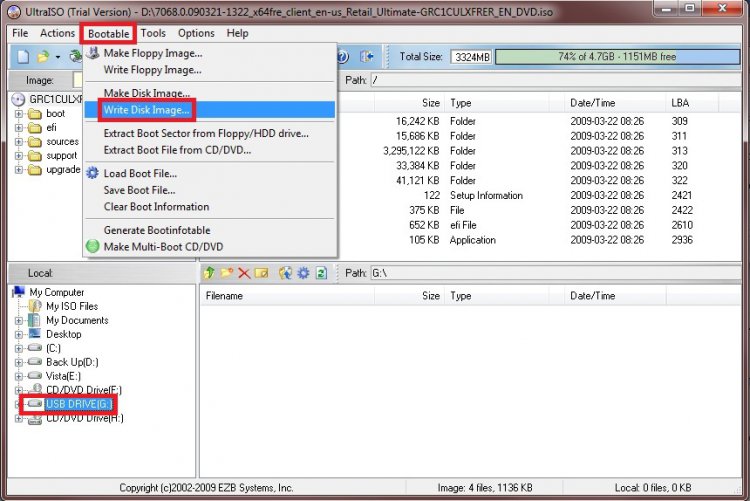
6. In the bottom Local pane, select your USB flash key drive. (See screenshot below)​
UltrISO-5.jpg

7. Click on Bootable (menu bar) and Write Disk Image. (See screenshot above)​
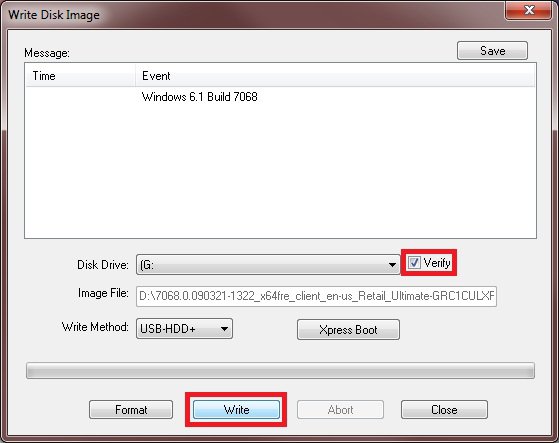
8. Make sure the locations are correct, and check the Verify box and click on the Write button. (See screenshot below)​
UltrISO-6.jpg

9. Click on Yes to confirm writing to the USB drive.​
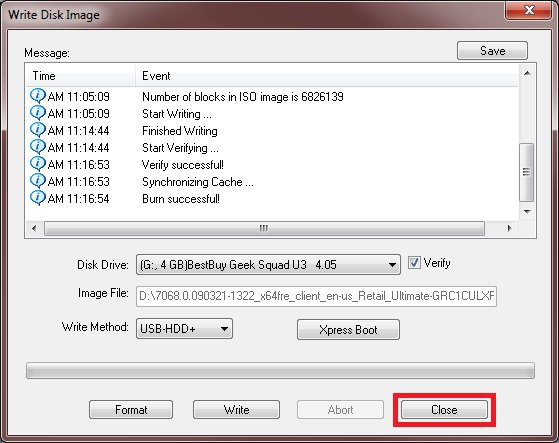
10. When it's done, click on the Close button. (See screenshot below)​
UltrISO-8.jpg

11. You now have a Vista installation USB flash key drive. :)


METHOD TWO
Manually Create Vista Installation USB Key

1. Plug the USB key in.​
2. If AutoPlay opens a pop-up for the USB key, then just close it.​
NOTE: Make note of what the drive size is for the USB key for step 6 below. You can also open Computer (step 21) to see what the drive size is to. For example, mine is 3920 MB.​
4. In the elevated command prompt, type diskpart and press Enter. (See screenshot below)​
Step1.jpg

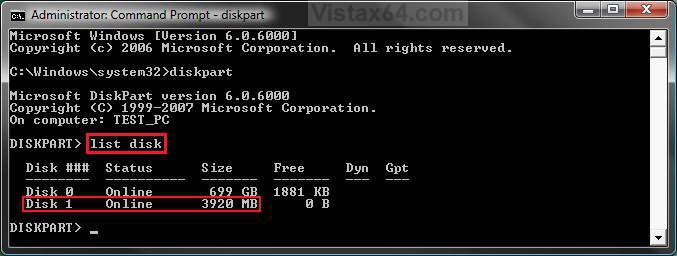
5. In the elevated command prompt, type list disk and press Enter. (See screenshot below)​
NOTE: Make note of what disk # your USB key is listed as for step 6 below. You can also look for the drive size (step 2) for the USB key to help ID the disk number. For example, mine is listed as Disk 1 here for the 3920 MB disk.​
Step2.jpg

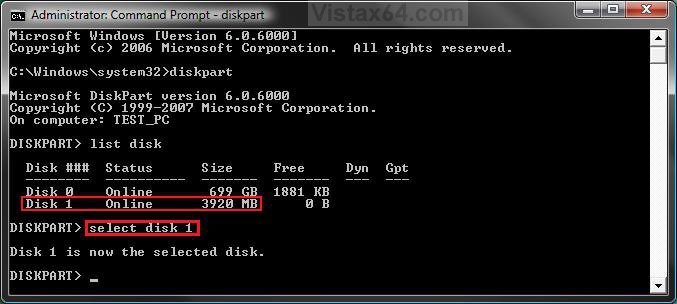
6. In the elevated command prompt, type select disk # (your USB disk #) and press Enter. (See screenshot below)​
NOTE: You can also look for the drive size (step 2) for the USB key to help ID the disk number. For example, my USB key is listed as Disk 1, so I would type select disk 1 and press Enter.​
Step3.jpg

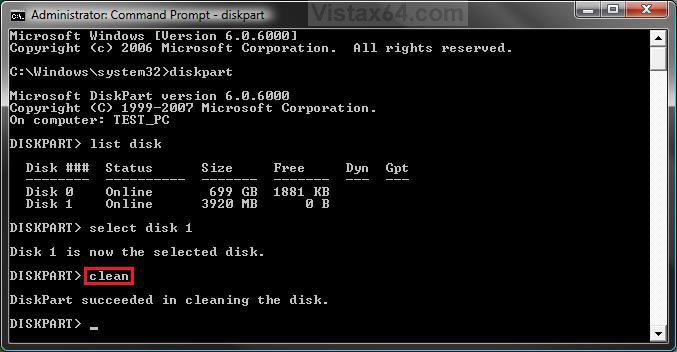
7. In the elevated command prompt, type clean and press Enter. (See screenshot below)​
Step4.jpg

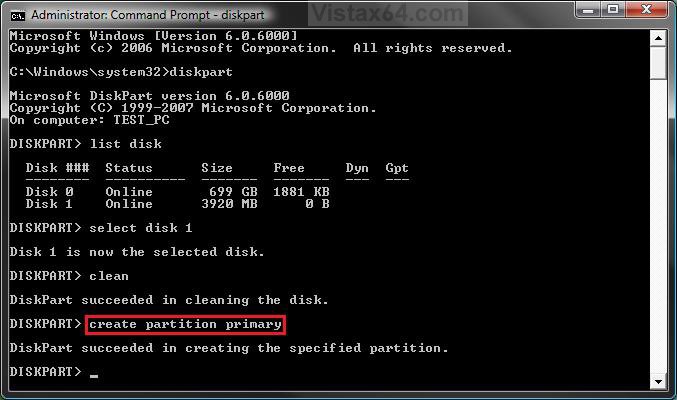
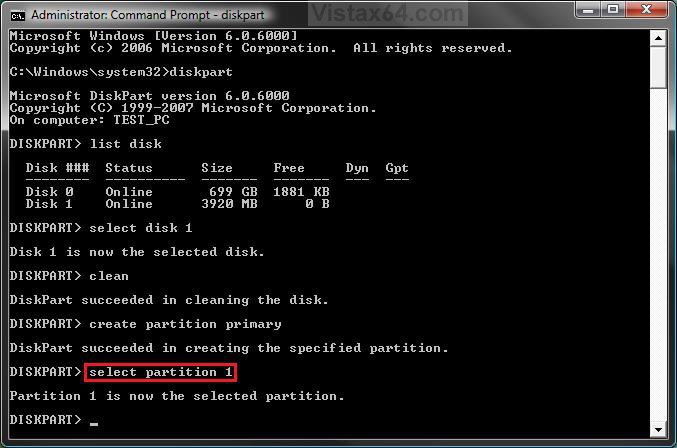
8. In the elevated command prompt, type create partition primary and press Enter. (See screenshot below)​
Step5.jpg

9. In the elevated command prompt, type select partition 1 and press Enter. (See screenshot below)​
Step6.jpg

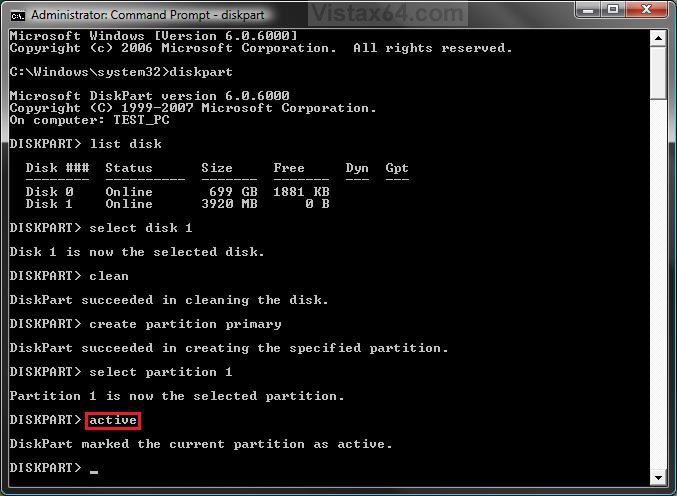
10. In the elevated command prompt, type active and press Enter. (See screenshot below)​
Step7.jpg

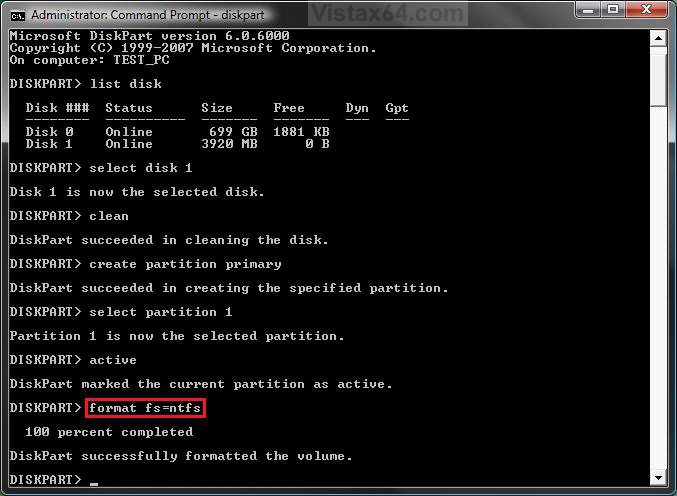
11. In the elevated command prompt, type format fs=ntfs and press Enter. (See screenshot below)​
NOTE: This may take a few moments to finish formatting the USB key.​
Step8.jpg

12. If AutoPlay opens a pop-up for the USB key, then just close it.
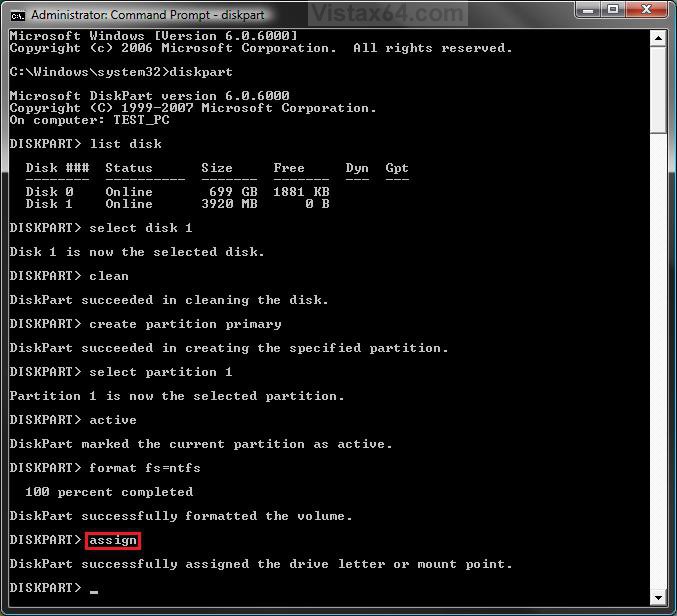
13. In the elevated command prompt, type assign and press Enter. (See screenshot below)​
NOTE: This will assign a new drive letter to the USB key. Make note of the new USB drive letter for step 19 below. For example, mine is now H.​
Step9.jpg

14. If AutoPlay opens a pop-up for the USB key, then just close it.​
NOTE: Make note of the new USB drive letter for step 18 below. For example, mine is now H.​
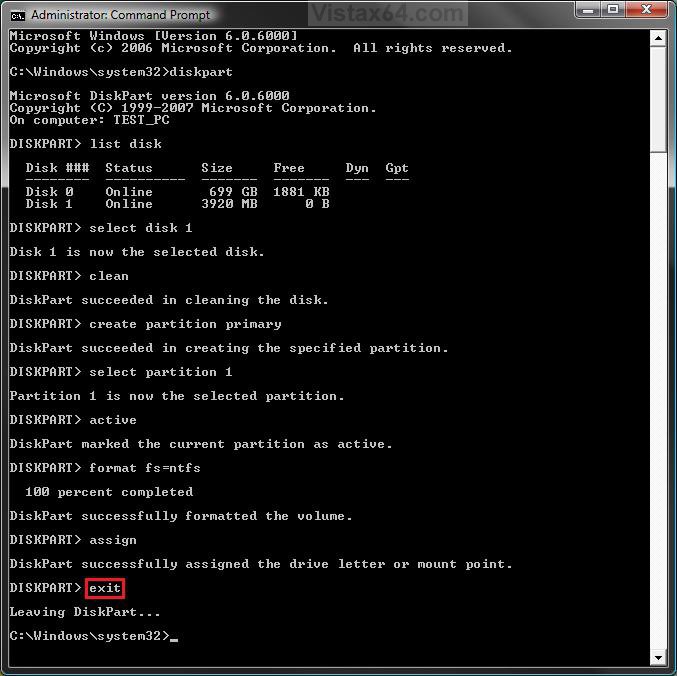
15. In the elevated command prompt, type exit and press Enter. (See screenshot below)​
NOTE: This will exit you from DiskPart from step 4.​
Step10.jpg

16. Insert your retail Vista installation DVD into the DVD drive.​
17. If AutoPlay opens a pop-up for the retail Vista installation DVD, then just close it.​
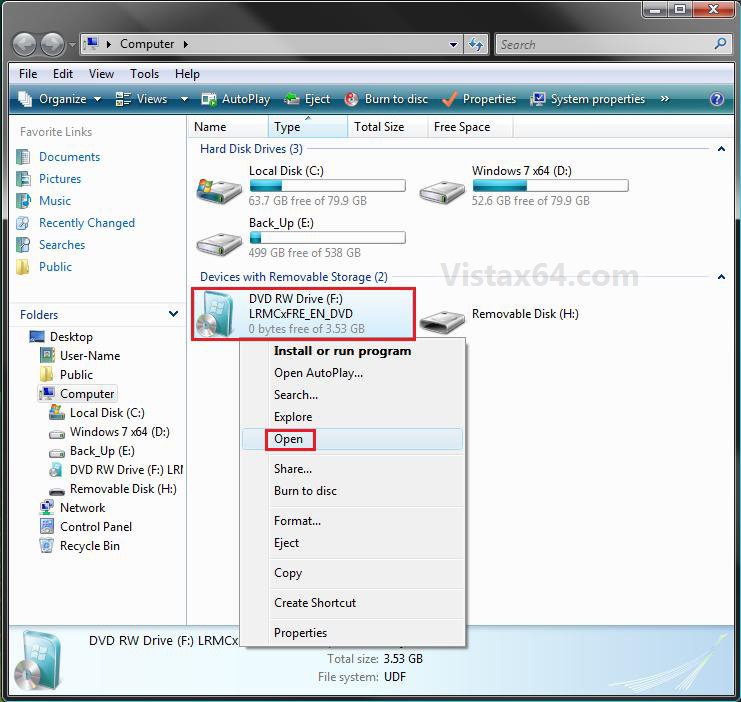
NOTE: Make note of what the drive letter is for the DVD drive that has the retail Vista installation DVD in for step 19 below. You can also open Computer (step 21) to see what the drive letter is to. (See right screenshot below)
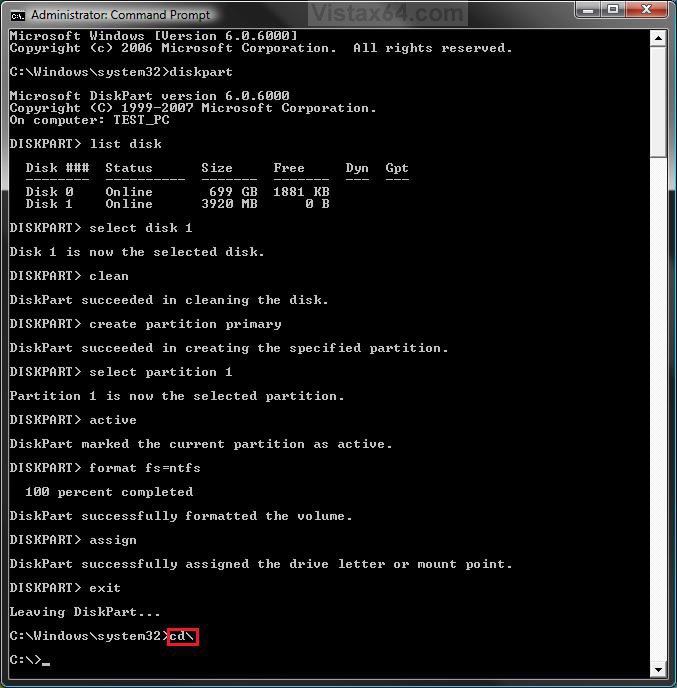
18. In the elevated command prompt, type cd\ and press Enter. (See screenshot below)​
Step11.jpg

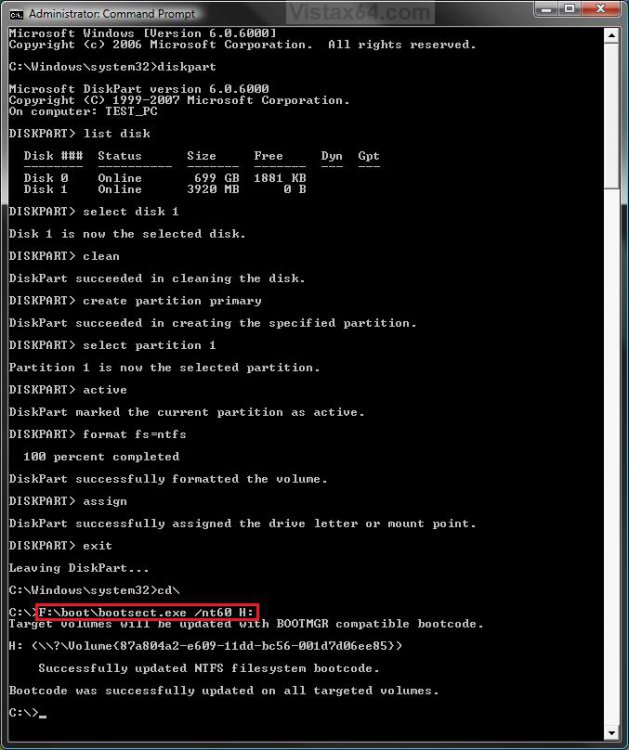
19. In the elevated command prompt, type the command below, and press Enter. (See screenshot below)​
WARNING: Subtitute the letter F with your actual DVD drive letter (step 17), and substitute H with your actual USB key drive letter (step 13).​
F:\boot\bootsect.exe /nt60 H:
Step12.jpg

20. When it finishes, close the elevated command prompt.​
21. Open the Start Menu, and right click on the Computer button and click on Open.​
22. Right click on the DVD drive (ex: F: ) that has the retail Vista installation DVD, and click on Open. (See screenshot below)​
Open.jpg

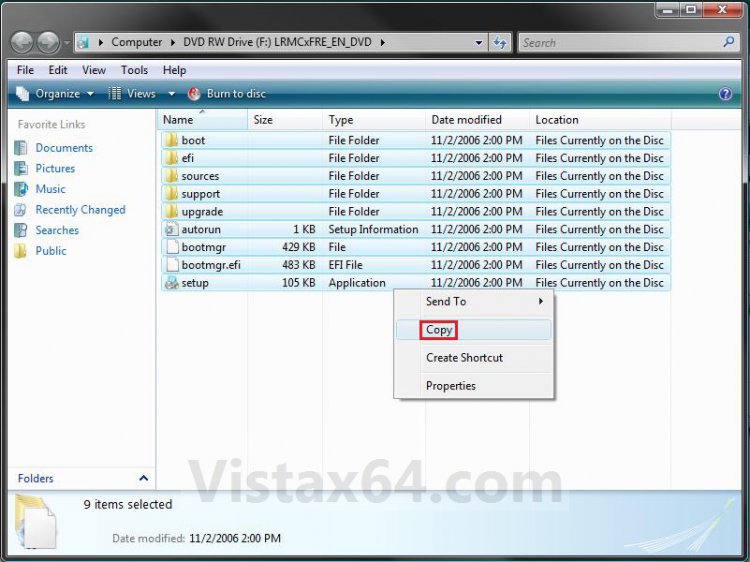
23. Highlight all of the contents, right click on the highlighted contents, and click on Copy. (See screenshot below)​
NOTE: You will need to copy all of the files and folders on the retail Vista installation DVD to the USB key.​
Copy.jpg

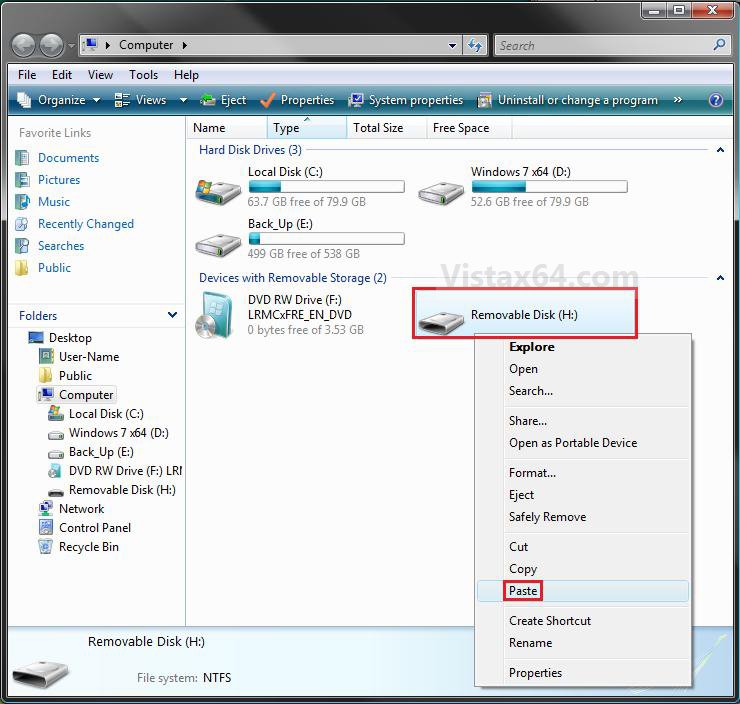
24. Go back to Computer, right click on the USB key drive (ex: H ), and click on Paste. (See screenshot below)​
Paste.jpg

25. The contents of the retail Vista installation DVD will now start copying over to the USB key.​
NOTE: This may take a few moments to complete.​
26. When finished, you can close the Computer window and unplug the USB key.​
27. You now have a Vista installation USB flash drive.​
warning   Warning
Before installing Vista from the USB key, you will need to:
warning   Warning

  • Enable Legacy USB storage detect in the BIOS
  • Temporarily set the USB FDD (USB Flash Disk Drive) to be listed right before the hard drive (or partition) that you will be installing Vista on in the hard drive Boot Priority order list in the BIOS.
  • After you are finished installing Vista from the USB key, make the Vista hard drive (or partition) listed first in the hard drive Boot Priority order list in the BIOS.

That's it,
Shawn


Attachments

  • thumb_USB_Flash_Drive.jpg
    thumb_USB_Flash_Drive.jpg
    1.8 KB · Views: 557
Last edited by a moderator:
This may be a silly question, so I hope you don't laugh at me! :) The Package x14-63453 should only be included in the Vista folder and not opened---am I correct?

While boot.wim & install.wim should be extracted first to the Vista folder...Thanks! :)

maujhsn209
 

My Computer

System One

  • Manufacturer/Model
    HP Compaq
No worries.

You would just need to download and save all 3 files to the same location, say your desktop.

Afterwards, run the .exe file. It will automatically extract the .wim files into a folder named Vista it created.

Next, you would continue on to create the ISO file. :)
 

My Computers

System One System Two

  • Operating System
    Windows 10 Pro 64-bit
    Manufacturer/Model
    Custom
    CPU
    Intel i7-8700K 5 GHz
    Motherboard
    ASUS ROG Maximus XI Formula Z390
    Memory
    64 GB (4x16GB) G.SKILL TridentZ RGB DDR4 3600 MHz (F4-3600C18D-32GTZR)
    Graphics Card(s)
    ASUS ROG-STRIX-GTX1080TI-O11G-GAMING
    Sound Card
    Integrated Digital Audio (S/PDIF)
    Monitor(s) Displays
    2 x Samsung Odyssey G7 27"
    Screen Resolution
    2560x1440
    Hard Drives
    1TB Samsung 990 PRO M.2,
    4TB Samsung 990 PRO PRO M.2,
    8TB WD MyCloudEX2Ultra NAS
    PSU
    Seasonic Prime Titanium 850W
    Case
    Thermaltake Core P3
    Cooling
    Corsair Hydro H115i
    Keyboard
    Logitech wireless K800
    Mouse
    Logitech MX Master 3
    Internet Speed
    1 Gb/s Download and 35 Mb/s Upload
    Other Info
    Logitech Z625 speaker system,
    Logitech BRIO 4K Pro webcam,
    HP Color LaserJet Pro MFP M477fdn,
    APC SMART-UPS RT 1000 XL - SURT1000XLI,
    Galaxy S23 Plus phone
  • Operating System
    Windows 10 Pro
    Manufacturer/Model
    HP Envy Y0F94AV
    CPU
    i7-7500U @ 2.70 GHz
    Memory
    16 GB DDR4-2133
    Graphics card(s)
    NVIDIA GeForce 940MX
    Sound Card
    Conexant ISST Audio
    Monitor(s) Displays
    17.3" UHD IPS touch
    Screen Resolution
    3480 x 2160
    Hard Drives
    512 GB M.2 SSD
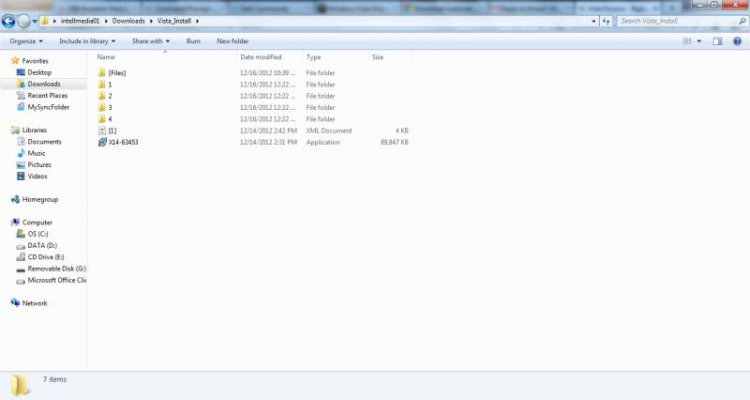
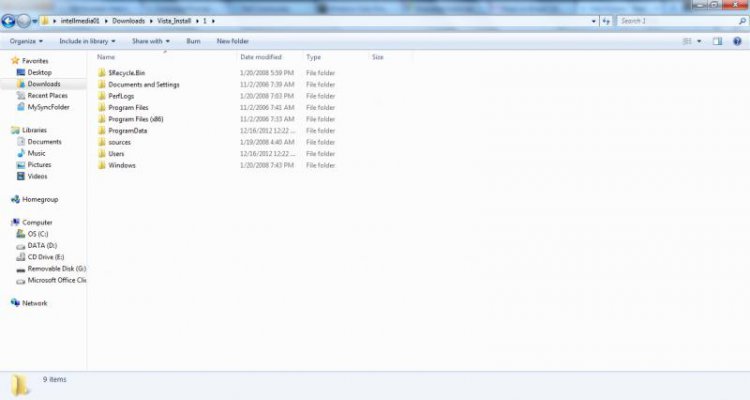
I get the steps that you laid out for me to create in a folder named Vista: But check this out earlier I downloaded the file "7-zip" I created a folder and called it "Vista_Install" The 7-zip file Manager extracted the contents of boot.wim, and install.wim into the folder Vista_Install here is the picture of the file structure!
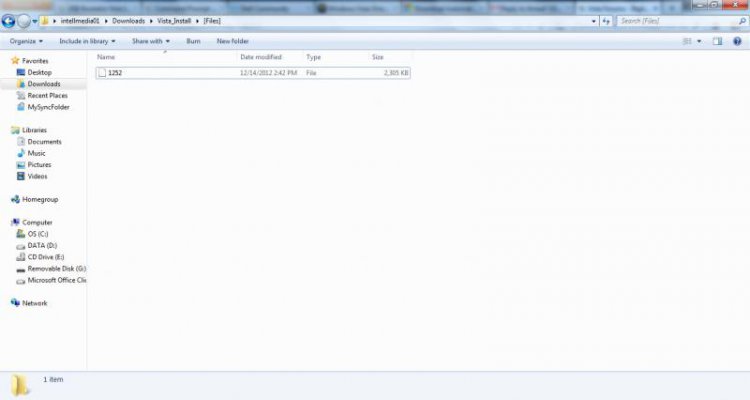
(See exhibit 1) Now just for argument sake here is exhibit 2. the file is called "1252".
In exhibit 3 Folder "1" has several installation files. Folders 2,3,and 4 are exact duplicates of Folder "1" in exhibit 3.
Which now goes back to my original point! What I laid out here is different than creating a folder called Vista putting "install", "boot", and "x14-68069.exe" and then extracting .exe file in the folder then creating an .iso afterward.
Can you you see my confusion with the two different course of actions?
 

Attachments

  • exhibit 1.jpg
    exhibit 1.jpg
    18.3 KB · Views: 292
  • exhibit_2.jpg
    exhibit_2.jpg
    15.6 KB · Views: 283
  • exhibit_3.jpg
    exhibit_3.jpg
    19.9 KB · Views: 294

My Computer

System One

  • Manufacturer/Model
    HP Compaq
Forget 7-Zip and doing it manually.

You would just need to download and save all 3 files to the same location, say your desktop.

Afterwards, run the .exe file. The .exe file will automatically extract the .wim files into a folder named Vista it created.

Next, you would scroll down there for how to create the ISO file.
 

My Computers

System One System Two

  • Operating System
    Windows 10 Pro 64-bit
    Manufacturer/Model
    Custom
    CPU
    Intel i7-8700K 5 GHz
    Motherboard
    ASUS ROG Maximus XI Formula Z390
    Memory
    64 GB (4x16GB) G.SKILL TridentZ RGB DDR4 3600 MHz (F4-3600C18D-32GTZR)
    Graphics Card(s)
    ASUS ROG-STRIX-GTX1080TI-O11G-GAMING
    Sound Card
    Integrated Digital Audio (S/PDIF)
    Monitor(s) Displays
    2 x Samsung Odyssey G7 27"
    Screen Resolution
    2560x1440
    Hard Drives
    1TB Samsung 990 PRO M.2,
    4TB Samsung 990 PRO PRO M.2,
    8TB WD MyCloudEX2Ultra NAS
    PSU
    Seasonic Prime Titanium 850W
    Case
    Thermaltake Core P3
    Cooling
    Corsair Hydro H115i
    Keyboard
    Logitech wireless K800
    Mouse
    Logitech MX Master 3
    Internet Speed
    1 Gb/s Download and 35 Mb/s Upload
    Other Info
    Logitech Z625 speaker system,
    Logitech BRIO 4K Pro webcam,
    HP Color LaserJet Pro MFP M477fdn,
    APC SMART-UPS RT 1000 XL - SURT1000XLI,
    Galaxy S23 Plus phone
  • Operating System
    Windows 10 Pro
    Manufacturer/Model
    HP Envy Y0F94AV
    CPU
    i7-7500U @ 2.70 GHz
    Memory
    16 GB DDR4-2133
    Graphics card(s)
    NVIDIA GeForce 940MX
    Sound Card
    Conexant ISST Audio
    Monitor(s) Displays
    17.3" UHD IPS touch
    Screen Resolution
    3480 x 2160
    Hard Drives
    512 GB M.2 SSD
I don't know if you believe in reincarnation! But, if you do perhaps I come back as a parrot---because I say the same things over, and over, and over....:) :)
:cry:
 

My Computer

System One

  • Manufacturer/Model
    HP Compaq
LOL, no worries. :)
 

My Computers

System One System Two

  • Operating System
    Windows 10 Pro 64-bit
    Manufacturer/Model
    Custom
    CPU
    Intel i7-8700K 5 GHz
    Motherboard
    ASUS ROG Maximus XI Formula Z390
    Memory
    64 GB (4x16GB) G.SKILL TridentZ RGB DDR4 3600 MHz (F4-3600C18D-32GTZR)
    Graphics Card(s)
    ASUS ROG-STRIX-GTX1080TI-O11G-GAMING
    Sound Card
    Integrated Digital Audio (S/PDIF)
    Monitor(s) Displays
    2 x Samsung Odyssey G7 27"
    Screen Resolution
    2560x1440
    Hard Drives
    1TB Samsung 990 PRO M.2,
    4TB Samsung 990 PRO PRO M.2,
    8TB WD MyCloudEX2Ultra NAS
    PSU
    Seasonic Prime Titanium 850W
    Case
    Thermaltake Core P3
    Cooling
    Corsair Hydro H115i
    Keyboard
    Logitech wireless K800
    Mouse
    Logitech MX Master 3
    Internet Speed
    1 Gb/s Download and 35 Mb/s Upload
    Other Info
    Logitech Z625 speaker system,
    Logitech BRIO 4K Pro webcam,
    HP Color LaserJet Pro MFP M477fdn,
    APC SMART-UPS RT 1000 XL - SURT1000XLI,
    Galaxy S23 Plus phone
  • Operating System
    Windows 10 Pro
    Manufacturer/Model
    HP Envy Y0F94AV
    CPU
    i7-7500U @ 2.70 GHz
    Memory
    16 GB DDR4-2133
    Graphics card(s)
    NVIDIA GeForce 940MX
    Sound Card
    Conexant ISST Audio
    Monitor(s) Displays
    17.3" UHD IPS touch
    Screen Resolution
    3480 x 2160
    Hard Drives
    512 GB M.2 SSD
[SIZE=+1]Difficulty with Diskpart Create Partition Primary
Hi,
I am in the process of creating a boot USB flash drive. as specified in this post.
I am stuck at Diskpart Create Partition Primary, step eight.
The error is "Insufficient free space to create a partition at the specified size and offset
Use a different size and offset or don't specify either to create the maximum size'.
I read that this error may be caused by CLEAN and to try CLEAN ALL. I did, but got the same error.
DOS says there is zero free space on the drive of 7512 MB . It is a Lexar JumpDrive FireFly 8GB.
I just bought it from Amazon.
Suggestions?
Thanks
Frank C
[/SIZE]
 

My Computer

More info
I discovered that the Lexar 8 GB was assigned the letter K, the next available that I was going to use. I can see it in Windows Explorer the properties say it is File System FAT and has 4.0 KB used space and 7.72 GB free space.
At this point could I continue with format fs=ntfs without creating the primary partition?
Frank C
 

My Computer

Hello Frank,

"Clean" and "Clean All" does the same thing except "Clean All" also does a 1x secure erase which takes much longer to finish.

See if you may be able to use Disk Management (diskmgmt.msc) to right click on the USB flash drive and Format it with a NTFS file system.

Afterwards, do only steps 1-6 again, and pick up at step 13 to do the rest of the tutorial.

Hope this helps, :)
Shawn
 

My Computers

System One System Two

  • Operating System
    Windows 10 Pro 64-bit
    Manufacturer/Model
    Custom
    CPU
    Intel i7-8700K 5 GHz
    Motherboard
    ASUS ROG Maximus XI Formula Z390
    Memory
    64 GB (4x16GB) G.SKILL TridentZ RGB DDR4 3600 MHz (F4-3600C18D-32GTZR)
    Graphics Card(s)
    ASUS ROG-STRIX-GTX1080TI-O11G-GAMING
    Sound Card
    Integrated Digital Audio (S/PDIF)
    Monitor(s) Displays
    2 x Samsung Odyssey G7 27"
    Screen Resolution
    2560x1440
    Hard Drives
    1TB Samsung 990 PRO M.2,
    4TB Samsung 990 PRO PRO M.2,
    8TB WD MyCloudEX2Ultra NAS
    PSU
    Seasonic Prime Titanium 850W
    Case
    Thermaltake Core P3
    Cooling
    Corsair Hydro H115i
    Keyboard
    Logitech wireless K800
    Mouse
    Logitech MX Master 3
    Internet Speed
    1 Gb/s Download and 35 Mb/s Upload
    Other Info
    Logitech Z625 speaker system,
    Logitech BRIO 4K Pro webcam,
    HP Color LaserJet Pro MFP M477fdn,
    APC SMART-UPS RT 1000 XL - SURT1000XLI,
    Galaxy S23 Plus phone
  • Operating System
    Windows 10 Pro
    Manufacturer/Model
    HP Envy Y0F94AV
    CPU
    i7-7500U @ 2.70 GHz
    Memory
    16 GB DDR4-2133
    Graphics card(s)
    NVIDIA GeForce 940MX
    Sound Card
    Conexant ISST Audio
    Monitor(s) Displays
    17.3" UHD IPS touch
    Screen Resolution
    3480 x 2160
    Hard Drives
    512 GB M.2 SSD
[SIZE=+1]Thanks Brink,
I was able to format NTFS using
Start > Programs > Administrative Tools > Computer Management > Disk Management
Right click on Disk 6 and format NTFS. Since it was already assigned K, I did not do ASSIGN (step13).
Marching On - I'll report again!
[SIZE=+1]Frank C[/SIZE]
[/SIZE]
 

My Computer

[SIZE=+1]Thanks Brink,
I was able to format NTFS using
Start > Programs > Administrative Tools > Computer Management > Disk Management
Right click on Disk 6 and format NTFS. Since it was already assigned K, I did not do ASSIGN (step13).
Marching On - I'll report again!
[SIZE=+1]Frank C[/SIZE]
[/SIZE]

Great news Frank. :party:
 

My Computers

System One System Two

  • Operating System
    Windows 10 Pro 64-bit
    Manufacturer/Model
    Custom
    CPU
    Intel i7-8700K 5 GHz
    Motherboard
    ASUS ROG Maximus XI Formula Z390
    Memory
    64 GB (4x16GB) G.SKILL TridentZ RGB DDR4 3600 MHz (F4-3600C18D-32GTZR)
    Graphics Card(s)
    ASUS ROG-STRIX-GTX1080TI-O11G-GAMING
    Sound Card
    Integrated Digital Audio (S/PDIF)
    Monitor(s) Displays
    2 x Samsung Odyssey G7 27"
    Screen Resolution
    2560x1440
    Hard Drives
    1TB Samsung 990 PRO M.2,
    4TB Samsung 990 PRO PRO M.2,
    8TB WD MyCloudEX2Ultra NAS
    PSU
    Seasonic Prime Titanium 850W
    Case
    Thermaltake Core P3
    Cooling
    Corsair Hydro H115i
    Keyboard
    Logitech wireless K800
    Mouse
    Logitech MX Master 3
    Internet Speed
    1 Gb/s Download and 35 Mb/s Upload
    Other Info
    Logitech Z625 speaker system,
    Logitech BRIO 4K Pro webcam,
    HP Color LaserJet Pro MFP M477fdn,
    APC SMART-UPS RT 1000 XL - SURT1000XLI,
    Galaxy S23 Plus phone
  • Operating System
    Windows 10 Pro
    Manufacturer/Model
    HP Envy Y0F94AV
    CPU
    i7-7500U @ 2.70 GHz
    Memory
    16 GB DDR4-2133
    Graphics card(s)
    NVIDIA GeForce 940MX
    Sound Card
    Conexant ISST Audio
    Monitor(s) Displays
    17.3" UHD IPS touch
    Screen Resolution
    3480 x 2160
    Hard Drives
    512 GB M.2 SSD
All is copacetic!
I finished creating the Boot USB Flash Drive. The folder list on the Flash drive is the same as that on the Original install CD.
I am trying to work up the courage to test it!
It is Vista Premium. If I had a real hard failure I would need to upgrade with two disks that I have to get back to Ultimate after installing a new hard drive,
Thanks for the excellent instructions Brink.
Frank C
 

My Computer

You're welcome Frank. :)

Yeah, it would be good idea to do a dry run with it to make sure.
 

My Computers

System One System Two

  • Operating System
    Windows 10 Pro 64-bit
    Manufacturer/Model
    Custom
    CPU
    Intel i7-8700K 5 GHz
    Motherboard
    ASUS ROG Maximus XI Formula Z390
    Memory
    64 GB (4x16GB) G.SKILL TridentZ RGB DDR4 3600 MHz (F4-3600C18D-32GTZR)
    Graphics Card(s)
    ASUS ROG-STRIX-GTX1080TI-O11G-GAMING
    Sound Card
    Integrated Digital Audio (S/PDIF)
    Monitor(s) Displays
    2 x Samsung Odyssey G7 27"
    Screen Resolution
    2560x1440
    Hard Drives
    1TB Samsung 990 PRO M.2,
    4TB Samsung 990 PRO PRO M.2,
    8TB WD MyCloudEX2Ultra NAS
    PSU
    Seasonic Prime Titanium 850W
    Case
    Thermaltake Core P3
    Cooling
    Corsair Hydro H115i
    Keyboard
    Logitech wireless K800
    Mouse
    Logitech MX Master 3
    Internet Speed
    1 Gb/s Download and 35 Mb/s Upload
    Other Info
    Logitech Z625 speaker system,
    Logitech BRIO 4K Pro webcam,
    HP Color LaserJet Pro MFP M477fdn,
    APC SMART-UPS RT 1000 XL - SURT1000XLI,
    Galaxy S23 Plus phone
  • Operating System
    Windows 10 Pro
    Manufacturer/Model
    HP Envy Y0F94AV
    CPU
    i7-7500U @ 2.70 GHz
    Memory
    16 GB DDR4-2133
    Graphics card(s)
    NVIDIA GeForce 940MX
    Sound Card
    Conexant ISST Audio
    Monitor(s) Displays
    17.3" UHD IPS touch
    Screen Resolution
    3480 x 2160
    Hard Drives
    512 GB M.2 SSD
No Joy
My attempt to use my newly created USB Bootable Flash drive failed with:
"BOOTMGR is missing"
I followed Dell's instructions in the user manual to change the boot sequence for the current boot. It did show the USB device as a boot choice, which I selected, then I got the error.
I did another boot without the USB device and entered setup (F2) I looked for "Enable Legacy USB storage detect in the BIOS". I did not see this option. I don't think this is my problem because the USB device was clearly selected.
Any advice?
Thanks
Frank C
 

My Computer

Frank,

Normally, you would want to leave your Windows hard drive listed first in the boot priority order in your BIOS settings.

Instead, you could boot to your boot menu (ex: F11) to select the USB flash drive to temporarily boot to for just that one instance. The key (ex: F11) you press at boot to enter the boot menu varies per motherboard brand and model, so you'll have to look at the boot screen or check the manual to see what key to actually press.
 

My Computers

System One System Two

  • Operating System
    Windows 10 Pro 64-bit
    Manufacturer/Model
    Custom
    CPU
    Intel i7-8700K 5 GHz
    Motherboard
    ASUS ROG Maximus XI Formula Z390
    Memory
    64 GB (4x16GB) G.SKILL TridentZ RGB DDR4 3600 MHz (F4-3600C18D-32GTZR)
    Graphics Card(s)
    ASUS ROG-STRIX-GTX1080TI-O11G-GAMING
    Sound Card
    Integrated Digital Audio (S/PDIF)
    Monitor(s) Displays
    2 x Samsung Odyssey G7 27"
    Screen Resolution
    2560x1440
    Hard Drives
    1TB Samsung 990 PRO M.2,
    4TB Samsung 990 PRO PRO M.2,
    8TB WD MyCloudEX2Ultra NAS
    PSU
    Seasonic Prime Titanium 850W
    Case
    Thermaltake Core P3
    Cooling
    Corsair Hydro H115i
    Keyboard
    Logitech wireless K800
    Mouse
    Logitech MX Master 3
    Internet Speed
    1 Gb/s Download and 35 Mb/s Upload
    Other Info
    Logitech Z625 speaker system,
    Logitech BRIO 4K Pro webcam,
    HP Color LaserJet Pro MFP M477fdn,
    APC SMART-UPS RT 1000 XL - SURT1000XLI,
    Galaxy S23 Plus phone
  • Operating System
    Windows 10 Pro
    Manufacturer/Model
    HP Envy Y0F94AV
    CPU
    i7-7500U @ 2.70 GHz
    Memory
    16 GB DDR4-2133
    Graphics card(s)
    NVIDIA GeForce 940MX
    Sound Card
    Conexant ISST Audio
    Monitor(s) Displays
    17.3" UHD IPS touch
    Screen Resolution
    3480 x 2160
    Hard Drives
    512 GB M.2 SSD
Thanks for the reply Brink,
I did not change the boot sequence. I did choose the USB device in the Boot Device Menu.
It did select the USB device but then failed with BOOTMRG is Missing.

I followed this from the Dell Users Manual:

Changing Boot Sequence for the Current Boot
You can use this feature, for example, to tell the computer to boot from the
CD drive so that you can run the Dell Diagnostics on the Drivers and Utilities
media, but you want the computer to boot from the hard drive when the
diagnostic tests are complete. You can also use this feature to restart your
computer to a USB device, such as a floppy drive, memory key, or CD-RW drive.
NOTE: If you are booting to a USB floppy drive, you must first set the floppy drive to
OFF in system setup (see "System Setup" on page 185).
1 If you are booting to a USB device, connect the USB device to a USB
connector.
2 Turn on (or restart) your computer.

3 When F2 = Setup, F12 = Boot Menu appears in the upper-right
corner of the screen, press <F12>.
If you wait too long and the operating system logo appears, continue to
wait until you see the Microsoft Windows desktop. Then, shut down your
computer and try again.
The Boot Device Menu appears, listing all available boot devices.
Each device has a number next to it.
4 At the bottom of the menu, enter the number of the device that is to be
used for the current boot only.
For example, if you are booting to a USB memory key, highlight USB
Flash Device and press <Enter>.
NOTE: To boot to a USB device, the device must be bootable. To ensure your
device is bootable, check the device documentation.

The screen clearly showed the USB device and I selected it. I didn't need to enter a device number.
I'll try to get a screen shot. I don't know if this can be done during boot.


Thanks
Frank C
 

My Computer

Frank,

Sounds like the USB drive was not made bootable.

You might start over with the tutorial to create the USB again in case you may have missed a step by mistake, or something went wrong somewhere the first time.
 

My Computers

System One System Two

  • Operating System
    Windows 10 Pro 64-bit
    Manufacturer/Model
    Custom
    CPU
    Intel i7-8700K 5 GHz
    Motherboard
    ASUS ROG Maximus XI Formula Z390
    Memory
    64 GB (4x16GB) G.SKILL TridentZ RGB DDR4 3600 MHz (F4-3600C18D-32GTZR)
    Graphics Card(s)
    ASUS ROG-STRIX-GTX1080TI-O11G-GAMING
    Sound Card
    Integrated Digital Audio (S/PDIF)
    Monitor(s) Displays
    2 x Samsung Odyssey G7 27"
    Screen Resolution
    2560x1440
    Hard Drives
    1TB Samsung 990 PRO M.2,
    4TB Samsung 990 PRO PRO M.2,
    8TB WD MyCloudEX2Ultra NAS
    PSU
    Seasonic Prime Titanium 850W
    Case
    Thermaltake Core P3
    Cooling
    Corsair Hydro H115i
    Keyboard
    Logitech wireless K800
    Mouse
    Logitech MX Master 3
    Internet Speed
    1 Gb/s Download and 35 Mb/s Upload
    Other Info
    Logitech Z625 speaker system,
    Logitech BRIO 4K Pro webcam,
    HP Color LaserJet Pro MFP M477fdn,
    APC SMART-UPS RT 1000 XL - SURT1000XLI,
    Galaxy S23 Plus phone
  • Operating System
    Windows 10 Pro
    Manufacturer/Model
    HP Envy Y0F94AV
    CPU
    i7-7500U @ 2.70 GHz
    Memory
    16 GB DDR4-2133
    Graphics card(s)
    NVIDIA GeForce 940MX
    Sound Card
    Conexant ISST Audio
    Monitor(s) Displays
    17.3" UHD IPS touch
    Screen Resolution
    3480 x 2160
    Hard Drives
    512 GB M.2 SSD
Success!
My newly created USB boot device works!
My final problem seemed to stem from incomplete or defective Copy and Paste (step 21 to 24) .
Instead of Copy and Paste I ran Robocopy from the Command Prompt:
Robocopy E:\ K:\ /MIR
where E: is the Installation disk drive and K: is the USB Flash drive
I was able to boot from the USB device. I did not do a complete install but I am certain that I could if I needed to.
Thanks for your patient guidance, Brink!
Frank C
 

My Computer

Great news Frank. :)
 

My Computers

System One System Two

  • Operating System
    Windows 10 Pro 64-bit
    Manufacturer/Model
    Custom
    CPU
    Intel i7-8700K 5 GHz
    Motherboard
    ASUS ROG Maximus XI Formula Z390
    Memory
    64 GB (4x16GB) G.SKILL TridentZ RGB DDR4 3600 MHz (F4-3600C18D-32GTZR)
    Graphics Card(s)
    ASUS ROG-STRIX-GTX1080TI-O11G-GAMING
    Sound Card
    Integrated Digital Audio (S/PDIF)
    Monitor(s) Displays
    2 x Samsung Odyssey G7 27"
    Screen Resolution
    2560x1440
    Hard Drives
    1TB Samsung 990 PRO M.2,
    4TB Samsung 990 PRO PRO M.2,
    8TB WD MyCloudEX2Ultra NAS
    PSU
    Seasonic Prime Titanium 850W
    Case
    Thermaltake Core P3
    Cooling
    Corsair Hydro H115i
    Keyboard
    Logitech wireless K800
    Mouse
    Logitech MX Master 3
    Internet Speed
    1 Gb/s Download and 35 Mb/s Upload
    Other Info
    Logitech Z625 speaker system,
    Logitech BRIO 4K Pro webcam,
    HP Color LaserJet Pro MFP M477fdn,
    APC SMART-UPS RT 1000 XL - SURT1000XLI,
    Galaxy S23 Plus phone
  • Operating System
    Windows 10 Pro
    Manufacturer/Model
    HP Envy Y0F94AV
    CPU
    i7-7500U @ 2.70 GHz
    Memory
    16 GB DDR4-2133
    Graphics card(s)
    NVIDIA GeForce 940MX
    Sound Card
    Conexant ISST Audio
    Monitor(s) Displays
    17.3" UHD IPS touch
    Screen Resolution
    3480 x 2160
    Hard Drives
    512 GB M.2 SSD
Hi, I just follow your step till step 11. then i close it because it takes about 2% for 30 minutes. but i can't find my usb disk - it's gone. I wonder if it because i didn't enter exit to cancel it so it turn like that. can you help me to find the usb disk back? i open disk managament, my another disk is in disk 0, and usb shows in disk 1, but it still not show up
Thanks!!!!
 
Last edited:

My Computer

Back
Top