How to Change or Disable the QoS Reserved Bandwidth Limit in Vista
By default, Vista can reserve up to 20 percent of the network bandwidth for QoS traffic handled by the QoS Packet Scheduler. One hundred percent of the network bandwidth is available to be shared by all programs unless a program (Ex: Windows Update) specifically requests priority bandwidth. This 20 percent reserved bandwidth is still available to other programs unless the requesting program (Ex: VoIP applications) is sending data. Vista can then restrict the best effort traffic to a minimum of 80 percent of the bandwidth to the other programs so that the high priority traffic can be accommodated. If the program that reserved the bandwidth is not sending sufficient data to use it, the unused part of the reserved bandwidth is available for other data flows on the same host.
This will show you how to change the percentage of reserved bandwidth to what you want it to be instead, or disable the reserved bandwidth.
This will show you how to change the percentage of reserved bandwidth to what you want it to be instead, or disable the reserved bandwidth.
Quality of Service (QoS) is a set of technologies for managing network traffic in a cost effective manner to enhance user experiences for home and enterprise environments. QoS technologies allow you to measure bandwidth, detect changing network conditions (such as congestion or availability of bandwidth), and prioritize or throttle traffic. For example, QoS technologies can be applied to prioritize traffic for latency-sensitive applications (such as voice or video) and to control the impact of latency-insensitive traffic (such as bulk data transfers).
For more about QOS, see:
For more about QOS, see:
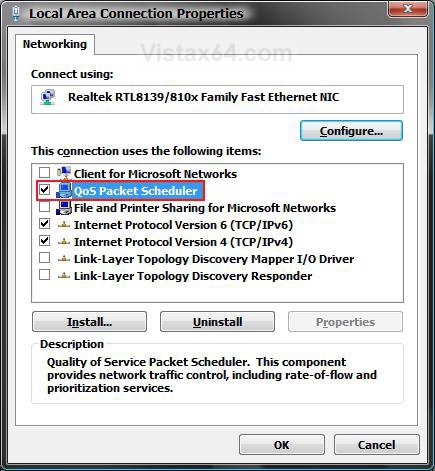
This only applies if you have the Qos Packet Scheduler checked in your Local Area Connection Network properties. (See Example below). It is enabled by default in Vista.
Disabling or lowering the reserved percentage to much can cause problems with applications that rely on it. For example, with streaming media or VoIP applications.
EXAMPLE: Local Area Connection Network Properties (LACN)
NOTE: To see this, open the Control Panel (Classic View) and click on the Networking and Sharing Center icon, Manage network connections in the upper left corner, right click on the LACN, and click Properties. Click Continue for UAC Prompt.
 METHOD ONE
NOTE: This method is only available for the Vista Business, Ultimate, and Enterprise editions. See Method Two or Method Three below for the Vista Home Basic and Home Premium editions.
1. Open the Local Group Policy Editor.
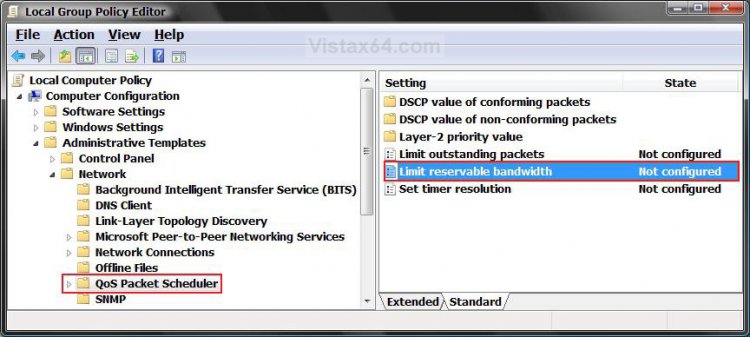
2. In the left pane, click on Computer Configuration, Administrative Templates, and Network, QoS Packet Scheduler.
(See screenshot below)
3. In the right pane, right click on Limit reservable bandwidth and click on Properties. (See screenshot above)
4. For Default Reserved Bandwidth
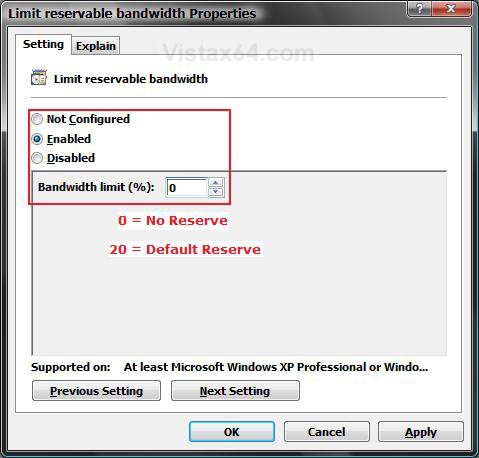
A) Dot Disabled or Not Configured and click on OK. (See screenshot below step 5B)
NOTE: If you disable this setting or do not configure it, the system uses the default value of 20 percent of the connection.
5. To Change the Reserved Bandwidth
A) Dot Enabled.
B) Next to Bandwidth Limit (%), type in a percentage to use from 0 to 100 and click on OK.
NOTE: If you change the percentage to 0, then this will disable the reserved bandwidth.
6. Close the Group Policy Object Editor window.
7. Restart the computer to apply changes.
 METHOD TWO
NOTE: This method will work for all Vista versions. To change the precentage to something other than 0 or 20, then see the METHOD THREE section below.
1. To Disable the Reserved Bandwidth
NOTE: This changes the reserved percentage to 0 and disables the reserved bandwidth.
A) Click on the download button below to download the file below.
Disable_Reserved.reg
B) Go to step 3.
2. To Restore the Default Reserved Bandwidth
NOTE: The default reserved bandwidth is 20 percent.
A) Click on the download button below to download the file below.
Restore_Default_Reserved.reg
3. Click on Save, and save the .reg file to the Desktop.
4. Right on click on the downloaded .reg file and click on Merge.
5. Click on Run, Continue (UAC), Yes, and then OK when prompted.
6. Restart the computer to apply the changes.
7. When done, you can delete the downloaded .reg file if you like.
 METHOD THREE
NOTE: This method will work for all Vista versions.
1. Open the Start Menu.
2. In the white line (Start Search) area, type regedit and press Enter.
3. If prompted by UAC, click on the Continue button.
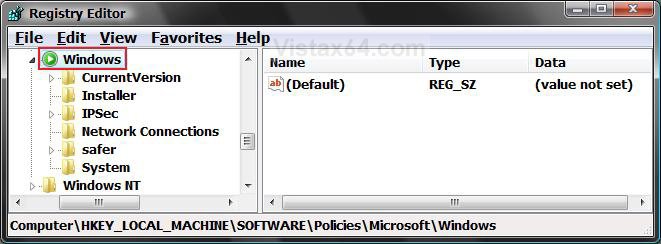
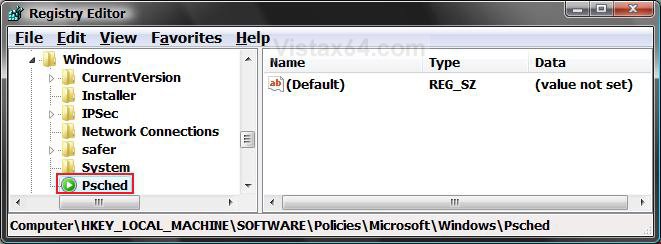
4. In regedit, go to: (See screenshot below)
HKEY_LOCAL_MACHINE\SOFTWARE\Policies\Microsoft\Windows
5. In the left pane, right click on Windows and click on New and Key.
6. Type Psched and press Enter. (See screenshot below)
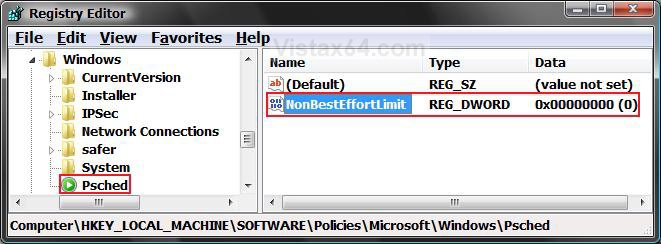
7. In the right pane, right click on a empty area and click on New and DWORD (32-bit) Value.
8. Type NonBestEffortLimit and press Enter. (See screenshot below)
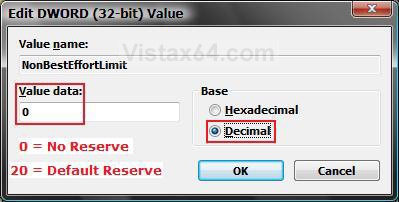
9. Right click on NonBestEffortLimit and click on Modify.
10. Type in a percentage to use from 0 to 100 to be used as the reserved bandwidth and click on OK.
NOTE: If you change the percentage to 0, then this will disable the reserved bandwidth. The default percentage is 20.
11. Close regedit.
12. Restart the computer to apply the changes.
That's it,Shawn
Related Tutorials
- How to Change the Maximum Download Sessions in Internet Explorer for Vista
- How to See and Flush the Contents of the DNS Resolver Cache in Vista
- How to Enable or Disable the Receive Window Auto Tuning Level in Vista
- How to Create a Local Area Network Connection Status Shortcut in Vista
- How to Create a Network Connections Shortcut in Vista
- How to Enable or Disable the Chimney Offload State in Vista
Attachments
Last edited:



 ... I'm a noob in this. With full bandwith I will be able to surf faster?
