Vista SP1 Slipstream Installation DVD

How to Create a Vista SP1 Slipstream Installation DVD

information   Information
This will show you how to create a Vista installation DVD with the Vista SP1 slipstreamed into it for any 32 and 64 bit version of Vista you want. This DVD will allow you to do a clean install of Vista with the SP1 all at once instead of installing Vista first then the SP1.
Note   Note
This Vista SP1 slipstream installation DVD will also allow you to run a Repair install on Vista with SP1 installed now. Before, you could not use a normal Vista installation DVD ro run a Repair install on Vista with SP1 installed since Vista with SP1 was a new version than what was on the Vista DVD.
Tip   Tip
If you have a Dell OEM computer, then see this link to help you possibly create a sliptream installation DVD from your Dell installation disc.
warning   Warning
You can only make a 64-bit Vista DVD in a installed 64-bit Vista, and only a 32-bit Vista DVD in a installed 32-bit Vista.


REQUIREMENTS:
Microsoft has issued a note to users, of “v-Lited” Windows Vista SP1 installs, having issues upgrading to SP2. Their advice? Reinstall Windows with genuine media. For more on this, see: Short: vLite screws up Windows Vista SP1 upgrade path - Within Windows


Here's How:
Note   Note
You will need to temporarily disable your antivirus program before you start this to prevent possible interference to the vLite program below. This program is safe, but could be mistaken as not by some antivirus programs and prevent you from creating the SP1 slipstream DVD.

1. Copy the Vista Installation DVD Contents to the Desktop
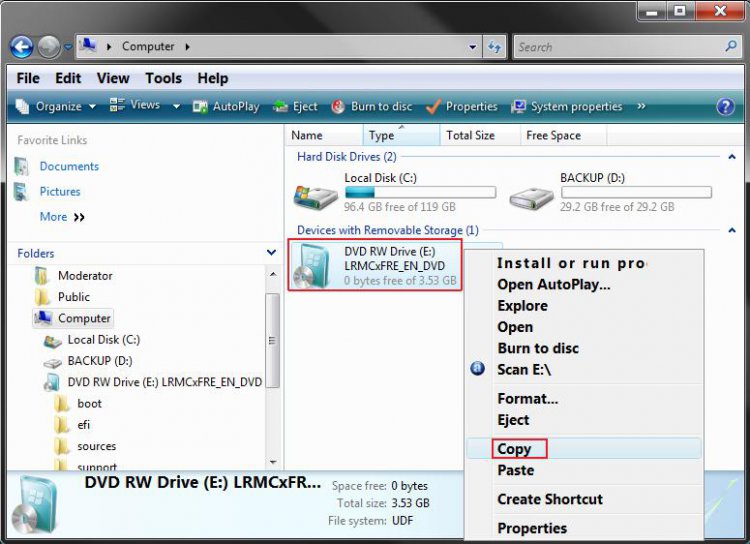
A) Place the retail or OEM (not Recovery) Vista installation DVD into the DVD drive.​
NOTE: If AutoPlay or the Vista install window pops-up, just close it.​
B) Open the Start Menu and click on Computer.​
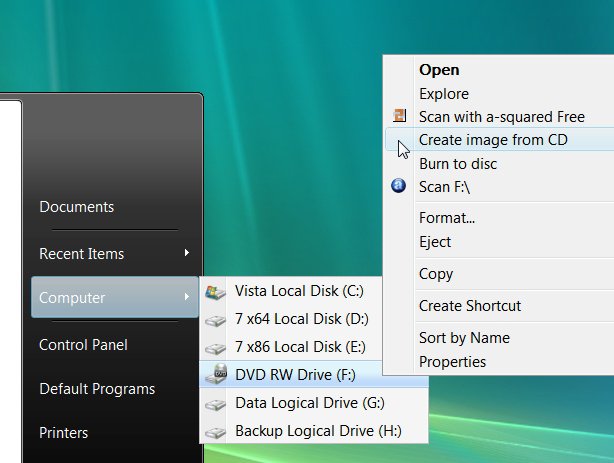
C) Right click on the DVD drive in Computer with the Vista installation DVD and click on Copy. (See screenshot below)​
Step1.jpg

D) Right click on a empty space on the desktop and click on Paste.​
NOTE: This may take a few minutes to finish copying all of the Vista installation DVD contents to the folder on the desktop.​

2. Download the SP1 Standalone Installer to the Desktop
NOTE: See Requirements at the top of the tutorial for the download links. You will need to select the same 32 bit or 64 bit version of the SP1 as the Vista installation DVD from step 1.​
A) Download and save the SP1 standalone installer to the desktop.​

3. Download and Install the vLite Program
NOTE: See Requirements at the top of the tutorial for the download link.​
A) Right click on the vLite program shortcut and click Run as Administrator.​
B) Click on Allow.​
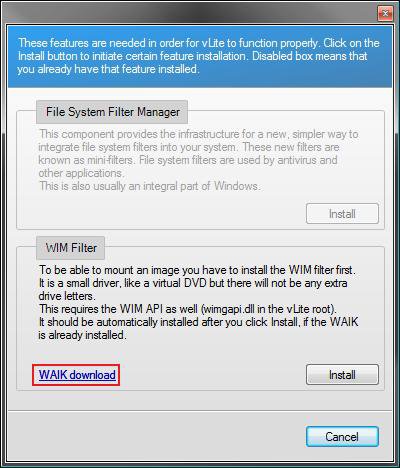
C) If this window pops-up, then click on the Install button(s) for the missing features needed by vLite. (See screenshot below)​
NOTE: If you see the WAIK Download link, then you will need to click on the Install button to download the 1.34GB ISO WAIK file first. Next, follow the instructions at the download link:​
  • Click the Download button on this page to start the download.
  • Click on Save, and save the .iso file to your desktop.
  • Burn the saved .iso file to a DVD. You can use ISO Recorder to do this. This link will show you how to use ISO Recorder.
  • Run the DVD to install WAIK.
WARNING: There is a glitch in the vLite 1.2 version where you may receive an error about WAIK when trying to run vLite. WAIK is not always properly recognized in Vista 32 bit. You may need to manually copy and paste the wimgapi.dll file from WAIK into the root vLite folder (main folder) in C:\Programs for it to work properly.​
Step2.jpg


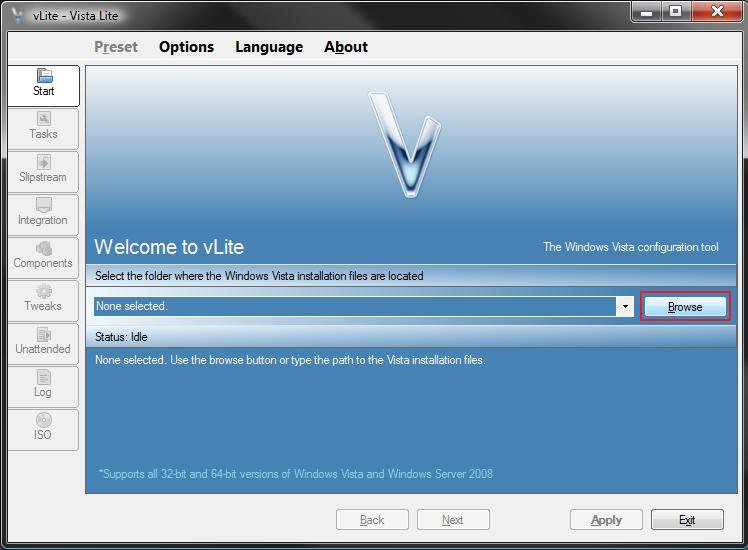
4. Click on the Browse button. (See screenshot below)​
Step3.jpg

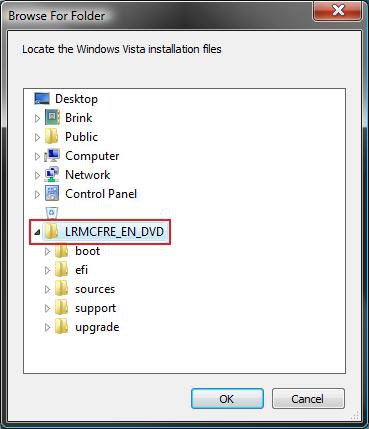
5. Click on the Vista folder (created from step 1) on the desktop and click on the LRMCFRE_EN_DVD folder, then click OK. (See screenshot below)​
NOTE: You may have a different name than LRMCFRE_EN_DVD based on your type of Vista installation DVD, but it will be the one right under Vista.​
Step4.jpg

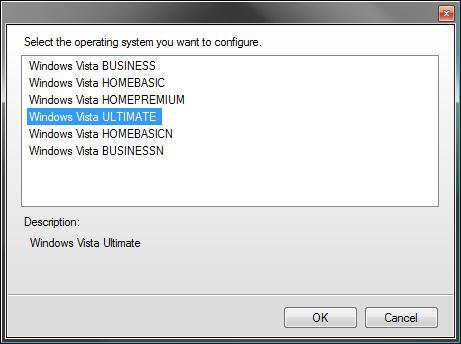
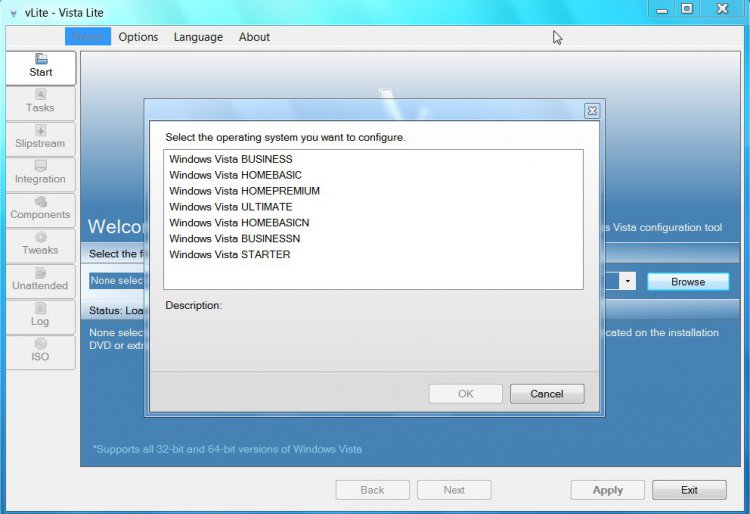
6. Click on the Vista edition that you want to use for the Vista SP1 slipstream DVD to highlight it and click OK. (See screenshot below)​
NOTE: You can only have one Vista edition per slipstream DVD. If you want to have more than one Vista edition, then you must repeat this tutorial for each individual Vista edition for their own DVD.​
Step5.jpg

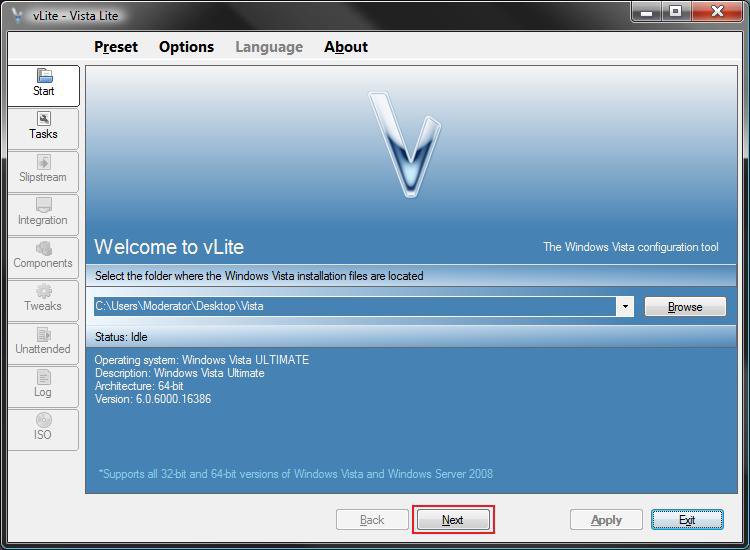
7. Click on the Next button. (See screenshot below)​
Step6.jpg

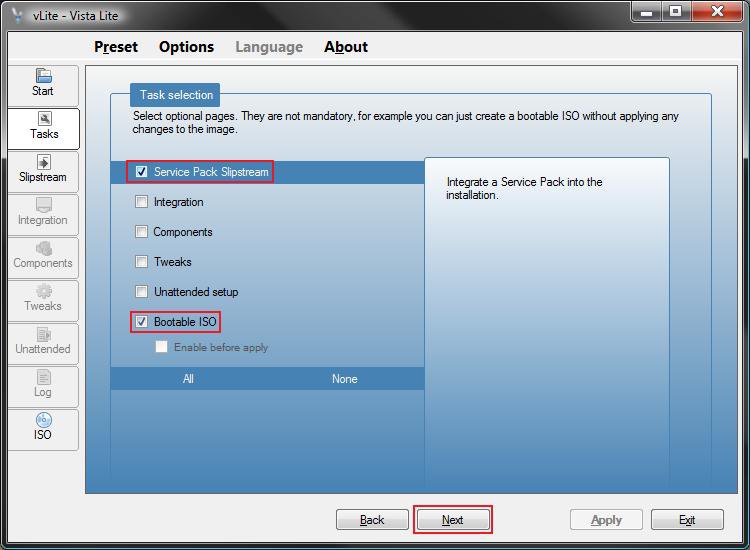
8. Check both the Service Pack Slipstream and Bootable ISO boxes and click on the Next button. (See screenshot below)​
Step7.jpg

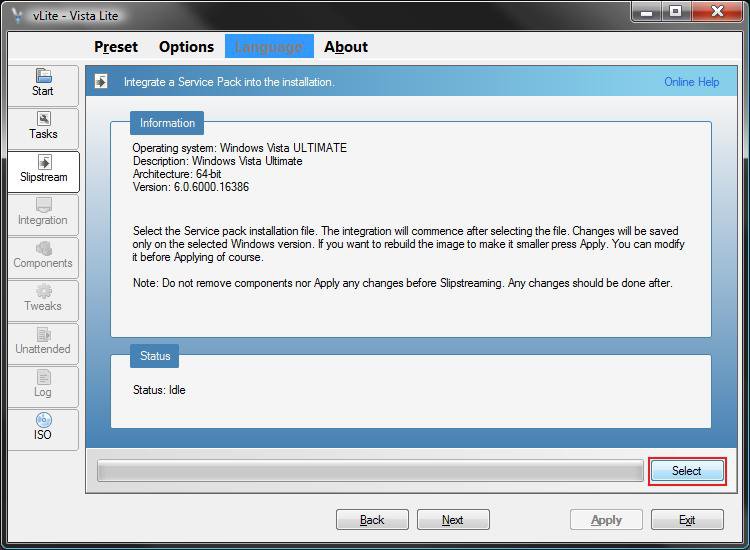
9. Click on the Select button. (See screenshot below)​
Step8.jpg

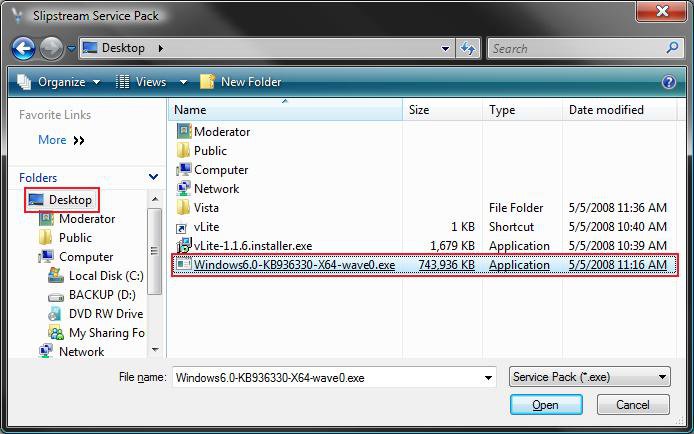
10. Select the SP1 standalone program (from step 2) on the desktop and click on the Open button. (See screenshot below)​
Step9.jpg

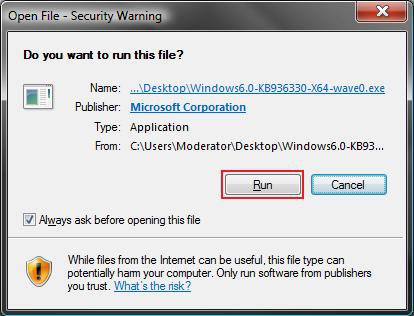
11. Click on Run when this window pops-up in a few seconds. (See screenshot below)​
NOTE: This runs the SP1 installer program for the vLite program only. It will not install the SP1 on your computer.​
Step10.jpg

12. This will take around 60 to 120 minutes or so to complete this part. Some older slower systems may take a bit longer. (See screenshot below)​
Enjoy your break. ;)
NOTE: In the Status box, you will see Preparing first, Extracting second, Integrating third, then this below until it is finished with this part. It will seem like it is stuck about 60% of the way, but it is not.​
Step11.jpg

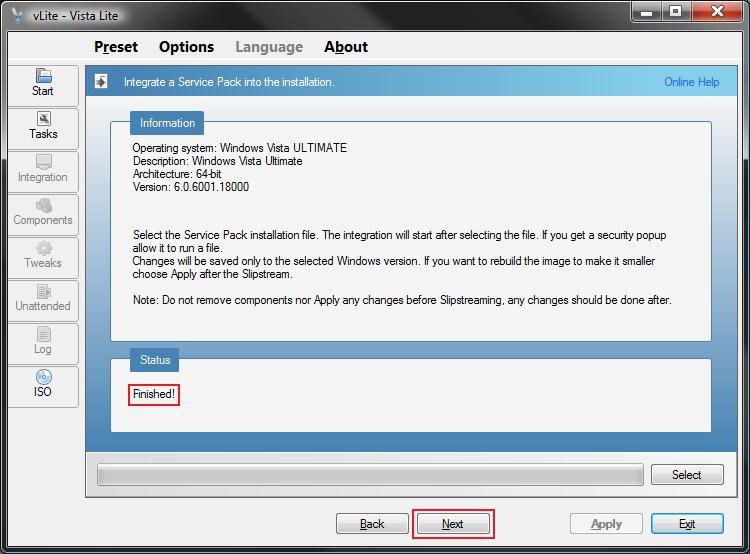
13. When Finished, click on Next. (See screenshot below)​
NOTE: If this fails, then verify that you are using the same 32 bit or 64 bit versions of the Vista SP1 and Vista Installation DVD files. If they are not the same, it will fail.​
Step12.jpg

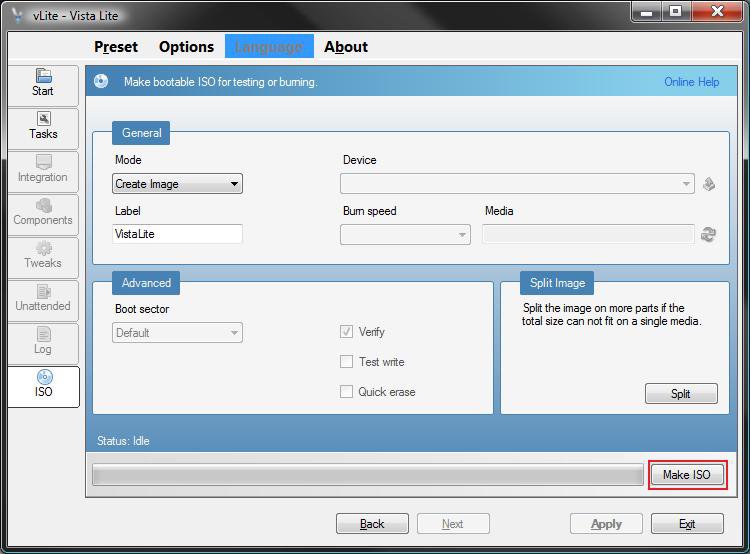
14. Under the General section, make sure that Create Image is selected and click on the Make ISO button. (See screenshot below)​
Step13.jpg

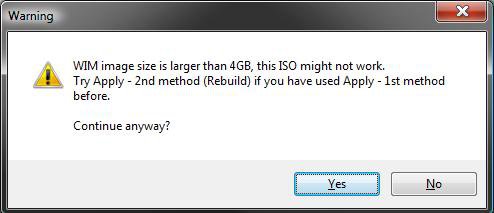
15. If the Created Image is over 4 GB
A) If this window pops-up on you with a similar message after you click on the Make ISO button (from step 14), then click on No and continue to step 16. (See screenshot below)​
NOTE: If you do not get the option to make the ISO image smaller, then see:
B) If not, then go to step 19 and skip steps 16, 17, and 18.​
Step14.jpg


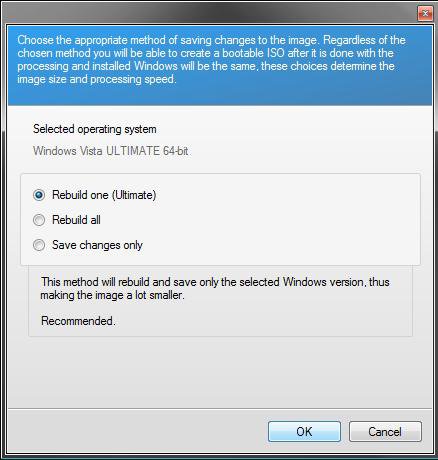
16. Dot Rebuild one (Vista edition from step 5) and click OK. (See screenshot below)​
Step15.jpg

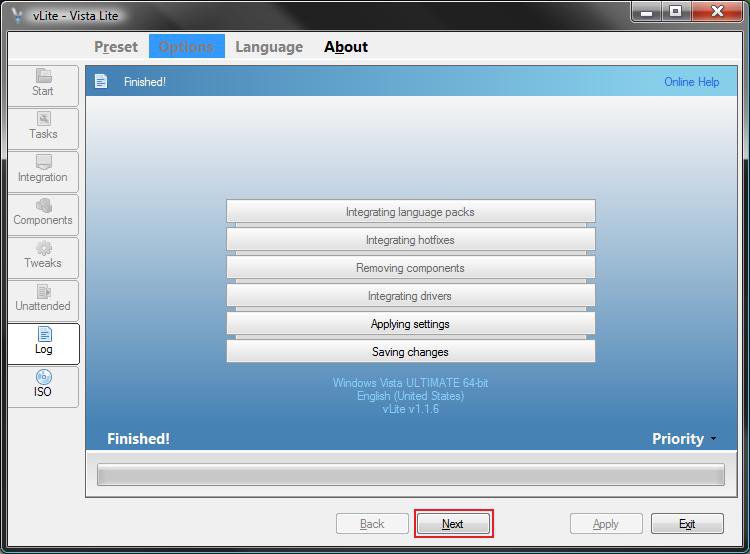
17. When finished, click on the Next button. (See screenshot below)​
NOTE: This will take a little bit to finish.​
Step16.jpg

18. Under the General section, make sure that Create Image is selected and click on the Make ISO button. (See screenshot below)​
NOTE: After the Vista and SP1 image file has been rebuilt to make it smaller, you will return to the same screen in step 14.​
Step13.jpg

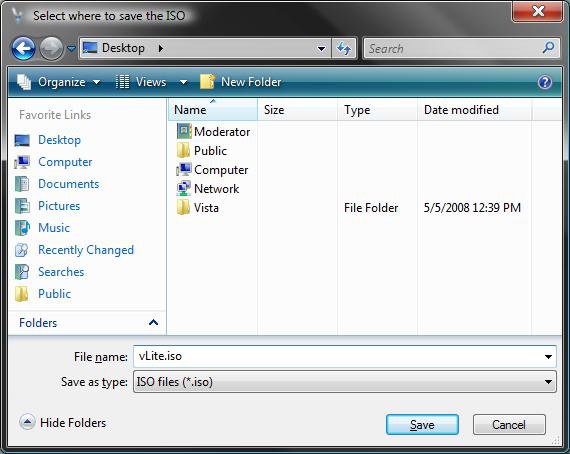
19. Select the Desktop and click on the Save button. (See screenshot below)​
NOTE: This is where the ISO file will be saved when it is finished being created.​
Step17.jpg

20. When it is finished creating the ISO file, place a blank unformated DVD into the DVD drive.​
NOTE: If AutoPlay pops-up asking you to format the DVD, just close it.​
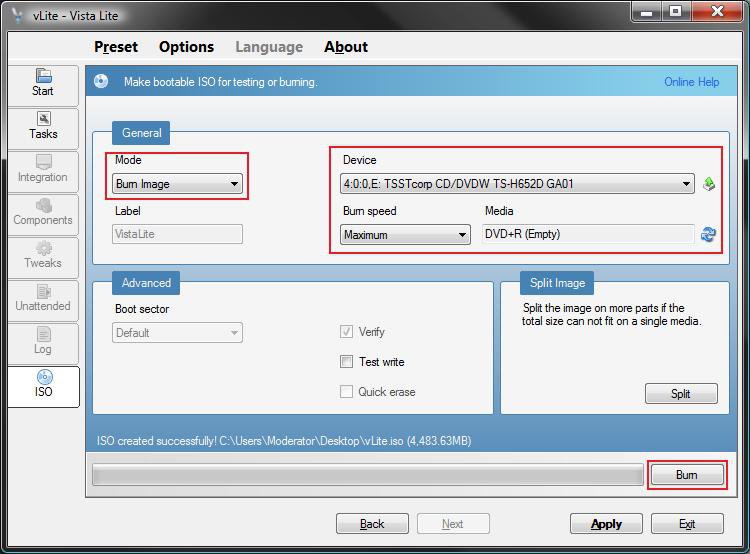
21. Under the General section, make sure that Burn Image is selected and that you have your DVD drive selected under Device. Click on the Burn button. (See screenshot below)​
Step18.jpg

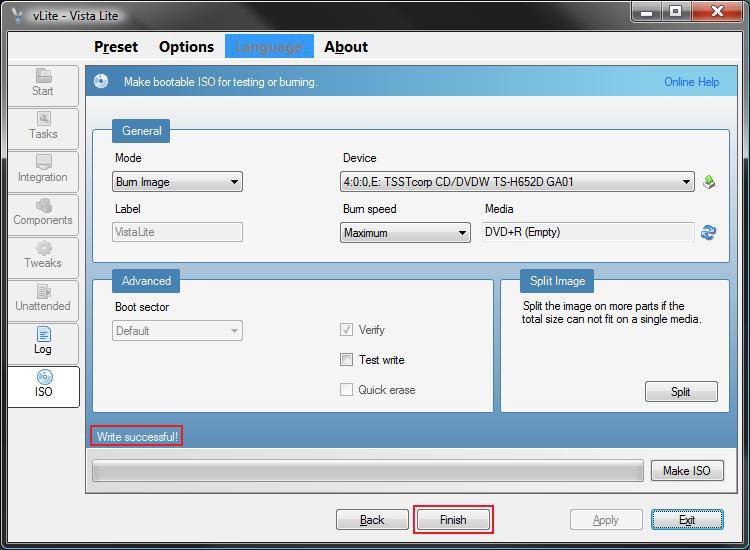
22. When it is finished making the Vista SP1 Slipstream Installation DVD it will say Write Successful, then click on the Finish or Exit button. (See screenshot below)​
NOTE: It will take a few minutes to finish this. When you click Finish, it will close vLite.​
Step19.jpg

23. Remove your new Vista SP1 Slipstream Installation DVD from the DVD drive.​
NOTE: You will use this DVD the same way you did the retail Vista installation DVD.​
24. Do not forget to enable your antivirus program again.​
That's it, your done. Finally. LOL ;)
Shawn


Attachments

  • thumb_vista_install_logo.jpg
    thumb_vista_install_logo.jpg
    2.7 KB · Views: 464
Last edited by a moderator:
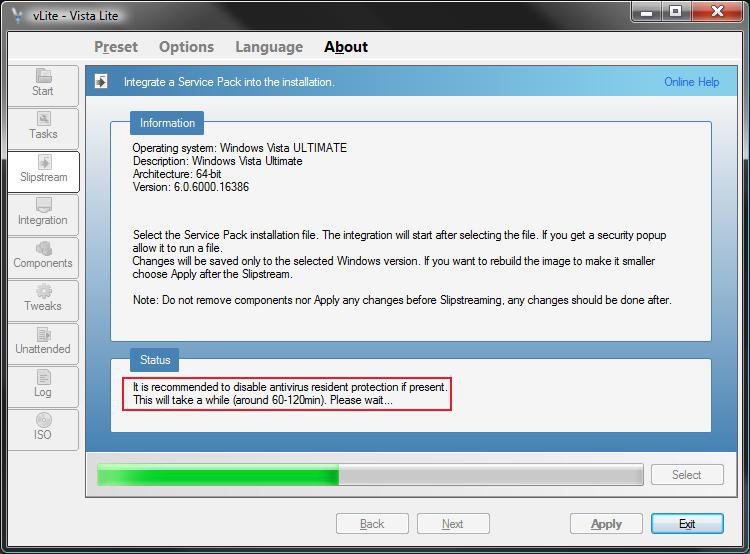
It failed when at step 12. I was sure my system is using 32 bit, and the standalone is also 32bit. Does the language affect it?
 
Last edited:

My Computer

System One

  • Manufacturer/Model
    Acer Extensa 5620
    CPU
    ACPI x86-based PC
    Motherboard
    Intel Core 2 Duo T5500 1.83Ghz x64 Family 6 Mdl 15 Steppin13
    Memory
    2.00 GB
    Graphics card(s)
    Mobile Intel 965 Express Chipset Family
    Sound Card
    RealTeck High Defination Audio
    Monitor(s) Displays
    Generic PnP Monitor
    Screen Resolution
    1280 x 800
    Hard Drives
    Hitachi HTS54512K9SA00 ATA device
    Mouse
    HID-compliant mouse / Synaptics PS/2 Port TouchPad
    Keyboard
    Enhanced (101 -102-key)
    Internet Speed
    3MBps download, 384kBps upload
I have been searching on where to download the Windows Vista Home Premium SP1 trial where I can upgrade from my Windows Vista Home Basic. Even though I have the key, I cannot upgrade from it using the disc I have. At last I understood why and was very puzzled what should I do since I borrowed this disc from my friend. Just asking, is it possible to upgrade when I use UltraISO to mount the .iso file to a virtual disc? Thank you, and Very nice tutorial =)

-SomeH0w~©

Hmmm...here's the service pack for Vista - Download details: Windows Vista Service Pack 1 Five Language Standalone (KB936330)

As to your install problems, I say purchase a copy of Vista. Using your friends disk isn't going to help you should either one of your need to reinstall Vista again. That of course assumes you can get his copy activated on your machine.

Also, for some reason, some slipstreamed, and even none slipstreamed disks will not offer the "upgrade" option, so you'll have to do a clean install anyway.

Good luck
 

My Computer

System One

  • Manufacturer/Model
    Custom Built
    CPU
    Intel Core 2 Quad Q6600 2.4GHz
    Motherboard
    Intel D975XBX2
    Memory
    Corsair TWIN2X4096-PC8500 (2x2GHz)
    Graphics card(s)
    ATI Radeon HD 4890 (1GHz)
    Sound Card
    X-Fi Titanium - Fatality Pro Series
    Monitor(s) Displays
    hp w2207h (22" widescreen)
    Screen Resolution
    1680 x 1050
    Hard Drives
    One 750GB, 2x500GB Western Digital Caviar Black Hard Drives (32meg)
    PSU
    Antec Neo HE 550
    Case
    Antec P182
    Cooling
    Zalman CNPS9500 AT
    Mouse
    Logitech MX Revolution
    Keyboard
    Logitech Wireless Wave
    Internet Speed
    "High" Speed DSL? Is that like low speed FIOS?
    Other Info
    Q6600 B3 Revision OC to 3.0GHz
Shawn,

First of all, let me wish you and the Vista Forums team a happy and successful New Year.

I am trying to create a Vista SP1 Slipstream Installation DVD according to your tutorial.

Step 3

1 - vLite and WAIK programs are installed.
2 - The file wimgapi.dll Has been copied to the main vLite folder.
3 - On the vLite first screen, when I browsed and clicked on the Vista folder on the desktop, I didn't find the LRMCFRE_EN_DVD folder. In fact I had :
> VISTA_32_PREMIUM
> BOOT
> EFI
> SOURCES
> SUPPORT
> UPGRADE
Note : My Vista DVD is an OEM one provided by Dell with the computer.
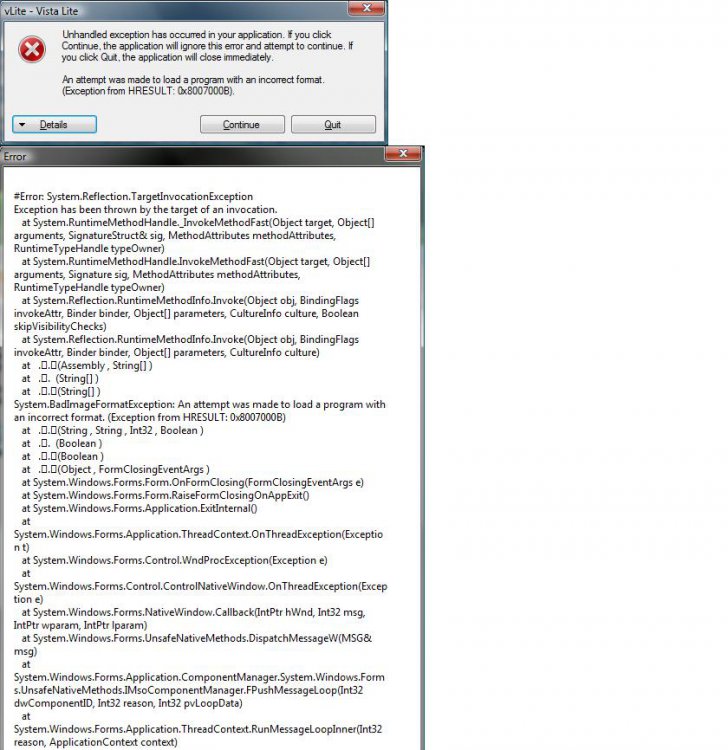
4 - I tried to click on VISTA_32_PREMIUM, then I got a message which said in summary (translated from french) : "Attempt to load of a program of incorrect format (Exception of HRESULT : 0x8007000B). If you click on continue, the program will attempt to continue".
5 - Is this related to my Vista DVD which is not convenient ?
- Should I click on the VISTA_32_PREMIUM folder instead of LRMCFRE_EN_DVD folder and continue, which I didn't dare to do until now ?
- May I rename the VISTA_32_PREMIUM folder in LRMCFRE_EN_DVD ?
- Or anything else ?

Thank you for your advice.

Regards.
mminos
 

My Computer

Hi Mminos,

Sorry, but this will not work with a OEM recovery installation disc. :(

It will only work with a retail version.
 

My Computers

System One System Two

  • Operating System
    Windows 10 Pro 64-bit
    Manufacturer/Model
    Custom
    CPU
    Intel i7-8700K 5 GHz
    Motherboard
    ASUS ROG Maximus XI Formula Z390
    Memory
    64 GB (4x16GB) G.SKILL TridentZ RGB DDR4 3600 MHz (F4-3600C18D-32GTZR)
    Graphics card(s)
    ASUS ROG-STRIX-GTX1080TI-O11G-GAMING
    Sound Card
    Integrated Digital Audio (S/PDIF)
    Monitor(s) Displays
    2 x Samsung Odyssey G7 27"
    Screen Resolution
    2560x1440
    Hard Drives
    1TB Samsung 990 PRO M.2, 4TB Samsung 990 PRO PRO M.2, 8TB WD MyCloudEX2Ultra NAS
    PSU
    Seasonic Prime Titanium 850W
    Case
    Thermaltake Core P3
    Cooling
    Corsair Hydro H115i
    Mouse
    Logitech MX Master 3
    Keyboard
    Logitech wireless K800
    Internet Speed
    1 Gb/s Download and 35 Mb/s Upload
    Other Info
    Logitech Z625 speaker system, Logitech BRIO 4K Pro webcam, HP Color LaserJet Pro MFP M477fdn, APC SMART-UPS RT 1000 XL - SURT1000XLI, Galaxy S23 Plus phone
  • Operating System
    Windows 10 Pro
    Manufacturer/Model
    HP Envy Y0F94AV
    CPU
    i7-7500U @ 2.70 GHz
    Memory
    16 GB DDR4-2133
    Sound Card
    Conexant ISST Audio
    Monitor(s) Displays
    17.3" UHD IPS touch
    Screen Resolution
    3480 x 2160
    Hard Drives
    512 GB M.2 SSD
HI mminos,

Shawn is right, it won't work on a "recovery" disk.

However, some DELL disks are modified Vista install dvd's with a silent install key and 300mb of Dell apps. added in - so they are actually installation discs rather than just a factory image.

If you have one of those, it can be done.

Haven't done it myself, but I know people have vlited these to remove the Dell bloatware.

Post a screenshot of the files on your desktop. Also try double clicking the VISTA_32_PREMIUM folder and post a screeshot of what's inside that.

If you do have the right kind of dvd, we'll try and work through it.

SIW2
 

My Computers

System One System Two

  • Operating System
    Vista
    CPU
    Intel E8400
    Motherboard
    ASRock1333-GLAN R2.0
    Memory
    4gb DDR2 800
    Graphics card(s)
    nvidia 9500GT 1gb
  • Operating System
    win7/vista
    CPU
    intel i5-8400
    Motherboard
    gigabyte b365m ds3h
    Memory
    ballistix 2x8gb 3200
SIW2

Thank you for your message.

I am sorry but I don't know how to make a screenshot.
What I am able to do is to describe as precisely as possible what the contents are.

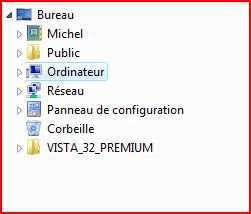
1 - Desktop

> Desktop (root)
>>> Michel (my forname)
>>> Public
>>> Computer
>>> Networks
>>> Control panel
>>> Basket
>>> VISTA_32_PREMIUM

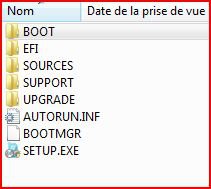
2 - When I clik on VISTA_32_PREMIUM, I get :

>>> BOOT
>>> EFI
>>> SOURCES
>>> SUPPORT
>>> UPGRADE
>>> AUTORUN.INF
>>> BOOTMGR
>>> SETUP.EXE

The first five items are folders, the last three files.

Thank you for help.
mminos
 
Last edited:

My Computer

Hi,

Step 8 onward in this tutorial show you how to post a .jpeg . To get to the screen in step 8, click the Advanced button at the bottom of this thread page.

http://www.vistax64.com/tutorials/148532-how-use-snipping-tool-vista.html

From your description , it seems you might have the right kind of dvd.

You could just tell vlite to go ahead and pick up the VISTA_32_PREMIUM folder - with any luck , it will load up.

Don't see how it could do any harm to try.

Do you have a product key on the machine, which you are planning to use when installing ?

Check to see if it is the same as the one already installed.


This direct download of produkey x86 will fined the product key already installed.

http://www.nirsoft.net/utils/produkey.zip

( Here's a link to Nir Sofer's site in case you are interested in finding out about it and his other free tools. ProduKey - Recover lost product key (CD-Key) of Windows/MS-Office/SQL Server )

Hope it helps

SIW2
 

My Computers

System One System Two

  • Operating System
    Vista
    CPU
    Intel E8400
    Motherboard
    ASRock1333-GLAN R2.0
    Memory
    4gb DDR2 800
    Graphics card(s)
    nvidia 9500GT 1gb
  • Operating System
    win7/vista
    CPU
    intel i5-8400
    Motherboard
    gigabyte b365m ds3h
    Memory
    ballistix 2x8gb 3200
SIW2

1 - It seemed that I succeded, I hope, to use the snipping tool. here are the pictures of my desktop and the VISTA_32_PREMIUM folder :

Capture Bureau.JPG

Capture VISTA_32_Premium.JPG

I don't if that changes your advice and if I can go ahead in the Vista SP1 Slipstream Installation DVD.

2 - I have just used the produkey program. The product key of the Vista program installed in my computer is not the same as the one on the label on the computer case. Is that a source of potential problems ?

Regards.
mminos
 

My Computer

Hi mminos,

The product key on the the label is perfectly valid - you have already paid for it. You can use that one but you might find it won't activate automatically and you will need to ring the manufacturer to activate it. It depends on the manufacturer. My guess is that with Dell , it will activate straight away.

It is not usually possible to use the one on the Hard drive on it's
own - you would need to extract the oem activation code as well and reinsert both after the installation . It is possible to do this , although you need a flash drive to do it.

Either way is OK.

I would rename the VISTA_32_PREMIUM folder as LRMCFRE_EN_DVD and follow the tutorial.

Let us know how it goes.

SIW2
 

My Computers

System One System Two

  • Operating System
    Vista
    CPU
    Intel E8400
    Motherboard
    ASRock1333-GLAN R2.0
    Memory
    4gb DDR2 800
    Graphics card(s)
    nvidia 9500GT 1gb
  • Operating System
    win7/vista
    CPU
    intel i5-8400
    Motherboard
    gigabyte b365m ds3h
    Memory
    ballistix 2x8gb 3200
Hi SIW2,

Point 5

I tried to start vLite by browsing on the Vista folder renamed as LRMCFRE_EN_DVD. I clicked on continue in the warning windows. Nothing happened except the status line which reported "cleaning".

I waited 40 mn without any change.

So, I think the process doesn't work with my Vista OEM DVD.

As I am still looking for a solution in case of a major problem preventing me to open Vista on my computer and as I understand that creating a Recovery Disk is not suitable in my case, I thought the following :

I recently bought a Dell laptop computer, similar to mine, to my Granddaughter. It has Vista Premium in it but with SP1. Then she has a Vista OEM DVD including SP1 of course.

I made a copy of this DVD with the Roxio program.

Do you think this copy would be convenient to start a repair in case of necessity ?

Thank you for your help.
mminos
 

My Computer

Hi mminos,

I think that may work - depends on two things:

Whether the new Dell dvd with SP1 has the option to do an Upgrade install - this is what you would be doing if you did a repair install - it probably does.

If you wish to use it in the future to do a clean install , or a startup repair, then the copy you made needs to be bootable.

I do not know how you used Roxio to do the copy.

I would have used the free isorecorder. You don't see anything when it is installed - you will see it in your right click menu.

Put the dvd in the drive - right click the drive , click Create iso image file.

When it has created the image on your computer, replace the dvd with a recordable one (do not format it - if autoplay shows up, just close it ).

Right click on the image isorecorder has created and burn it to the dvd .

ISO Recorder v3

SIW2
 

My Computers

System One System Two

  • Operating System
    Vista
    CPU
    Intel E8400
    Motherboard
    ASRock1333-GLAN R2.0
    Memory
    4gb DDR2 800
    Graphics card(s)
    nvidia 9500GT 1gb
  • Operating System
    win7/vista
    CPU
    intel i5-8400
    Motherboard
    gigabyte b365m ds3h
    Memory
    ballistix 2x8gb 3200
Hi SIW2,

1 - When I open the DVD, there is an UPGRADE folder. Is it the device you refer as "option to do an UPGRADE install" ?

2 - When I right click the drive, there is no "Create iso image file" in the context menu.

What do you think of that ?

Thanks.
mminos
 

My Computer

My Computers

System One System Two

  • Operating System
    Vista
    CPU
    Intel E8400
    Motherboard
    ASRock1333-GLAN R2.0
    Memory
    4gb DDR2 800
    Graphics card(s)
    nvidia 9500GT 1gb
  • Operating System
    win7/vista
    CPU
    intel i5-8400
    Motherboard
    gigabyte b365m ds3h
    Memory
    ballistix 2x8gb 3200
Iforgot,

You will not see step 16 unless the created image was over 4 GB and you got the pop-up message in step 15. That's all. ;)

nLite is the version of this program for XP.

Thank you for letting us know that it will work on a OEM Vista as well. I look forward to seeing your results.

Shawn

I've tried to install this, with vlite 1.1.6 as seen on the screenshots and 1.2 BOTH times i get upto step 16. I get the error that the file is over 4 gig (its more like 9.5!) and I can only create the iso file (resulting in the 9.5 gig) I can't get it down to a SINGLE 4.5 gig file . Suggestions (other then a split image). I am unsure how it will ( a split image) when you do I clean install how it will work (again suggestions welcomed!)
 

My Computer

System One

  • CPU
    Intel Core 2 Quad Q9300 @2.50 GHz
    Motherboard
    Gigabyte EP35-DS3P
    Memory
    4 Gig (don't remeber make)
    Graphics card(s)
    Nvidia GeForce 8600 GT (1 Gig)
    Sound Card
    Standard
    Monitor(s) Displays
    19" Chimei (Cheapy yes I know) and secondary 15" Samsung Syncmaster 151n (both flay
    Hard Drives
    1. 80 gig 2. 250 gig 3. 500 gig - External
    PSU
    650w
    Case
    MGE XG Dragon Aluminum Case - Blue
    Cooling
    2x 80mm case fans
    Mouse
    Logitech G5
    Keyboard
    Logitech G15
Hello ShenLun, and welcome to Vista Forums.

Wow, that's large. Did you add anything additional to the slipstream? Have you already tried the NOTE under step 15 to see if that can help shrink the ISO?

Hope this helps for now,
Shawn
 

My Computers

System One System Two

  • Operating System
    Windows 10 Pro 64-bit
    Manufacturer/Model
    Custom
    CPU
    Intel i7-8700K 5 GHz
    Motherboard
    ASUS ROG Maximus XI Formula Z390
    Memory
    64 GB (4x16GB) G.SKILL TridentZ RGB DDR4 3600 MHz (F4-3600C18D-32GTZR)
    Graphics card(s)
    ASUS ROG-STRIX-GTX1080TI-O11G-GAMING
    Sound Card
    Integrated Digital Audio (S/PDIF)
    Monitor(s) Displays
    2 x Samsung Odyssey G7 27"
    Screen Resolution
    2560x1440
    Hard Drives
    1TB Samsung 990 PRO M.2, 4TB Samsung 990 PRO PRO M.2, 8TB WD MyCloudEX2Ultra NAS
    PSU
    Seasonic Prime Titanium 850W
    Case
    Thermaltake Core P3
    Cooling
    Corsair Hydro H115i
    Mouse
    Logitech MX Master 3
    Keyboard
    Logitech wireless K800
    Internet Speed
    1 Gb/s Download and 35 Mb/s Upload
    Other Info
    Logitech Z625 speaker system, Logitech BRIO 4K Pro webcam, HP Color LaserJet Pro MFP M477fdn, APC SMART-UPS RT 1000 XL - SURT1000XLI, Galaxy S23 Plus phone
  • Operating System
    Windows 10 Pro
    Manufacturer/Model
    HP Envy Y0F94AV
    CPU
    i7-7500U @ 2.70 GHz
    Memory
    16 GB DDR4-2133
    Sound Card
    Conexant ISST Audio
    Monitor(s) Displays
    17.3" UHD IPS touch
    Screen Resolution
    3480 x 2160
    Hard Drives
    512 GB M.2 SSD
Iforgot,

You will not see step 16 unless the created image was over 4 GB and you got the pop-up message in step 15. That's all. ;)

nLite is the version of this program for XP.

Thank you for letting us know that it will work on a OEM Vista as well. I look forward to seeing your results.

Shawn

I've tried to install this, with vlite 1.1.6 as seen on the screenshots and 1.2 BOTH times i get upto step 16. I get the error that the file is over 4 gig (its more like 9.5!) and I can only create the iso file (resulting in the 9.5 gig) I can't get it down to a SINGLE 4.5 gig file . Suggestions (other then a split image). I am unsure how it will ( a split image) when you do I clean install how it will work (again suggestions welcomed!)


I can't even get to the rebuild screen. As soon as I get the message that the file is over 4 gig Yes/No to continue I click No as destructed it throws me back to step 14.

Trying the tutorial thingy i saw at the top of the thread. Thanks in advance for addtional help

Scott
 

My Computer

System One

  • CPU
    Intel Core 2 Quad Q9300 @2.50 GHz
    Motherboard
    Gigabyte EP35-DS3P
    Memory
    4 Gig (don't remeber make)
    Graphics card(s)
    Nvidia GeForce 8600 GT (1 Gig)
    Sound Card
    Standard
    Monitor(s) Displays
    19" Chimei (Cheapy yes I know) and secondary 15" Samsung Syncmaster 151n (both flay
    Hard Drives
    1. 80 gig 2. 250 gig 3. 500 gig - External
    PSU
    650w
    Case
    MGE XG Dragon Aluminum Case - Blue
    Cooling
    2x 80mm case fans
    Mouse
    Logitech G5
    Keyboard
    Logitech G15
I'm trying to create the Slipstream installation DVD, but I can't get past Step 5. After I point vLite to the Vista DVD folder I get this error (see attachment).

Nevermind I found the problem (copied wrong wimgapi.dll).
 

Attachments

  • slipstream error.jpg
    slipstream error.jpg
    104.4 KB · Views: 465
Last edited:

My Computer

My Computers

System One System Two

  • Operating System
    Vista
    CPU
    Intel E8400
    Motherboard
    ASRock1333-GLAN R2.0
    Memory
    4gb DDR2 800
    Graphics card(s)
    nvidia 9500GT 1gb
  • Operating System
    win7/vista
    CPU
    intel i5-8400
    Motherboard
    gigabyte b365m ds3h
    Memory
    ballistix 2x8gb 3200
Hi,

For those with Dell discs, deleting the $OEM$ folder from inside the Sources folder allows vLite to pick up the files and create a bootable iso while removing some of the oem apps..
Note   Note
You only need to delete the $OEM$ folder if vlite complains.

You may find vlite will happily pick up the LRMCFRE_EN_DVD folder that you copied onto your desktop.

If it does not, then close vlite, remove the $OEM$ file from the
LRMCFRE_EN_DVD folder, open vlite again and it should pick it up fine.

DELL2009-01-21_190218.jpg
I didn't slipstream SP1 that way, but other vlite functions seem to operate fine.
32A2009-01-21_024254.jpg
You can only use this on the same machine as it is closely tied to the hardware configuration.

The silent product key install will continue as before.


For Dell install dvd's, it is also possible to delete the PID.TXT file from the sources folder. This will remove the product key and activation details. You will then be asked for a product key during the installation.

You will need a valid product key, of course, and this would only be useful if you wanted to install a different Edition - the one you will be entering the key for.

You would also need to select that Edition when asked by vlite.

If you wish to keep the installation as is - just with SP1 slipstreamed in , then of course try it without deleting anything.

Hope it helps

If anybody has a Dell machine and would like to try it, please let us know the results.

SIW2
 

My Computers

System One System Two

  • Operating System
    Vista
    CPU
    Intel E8400
    Motherboard
    ASRock1333-GLAN R2.0
    Memory
    4gb DDR2 800
    Graphics card(s)
    nvidia 9500GT 1gb
  • Operating System
    win7/vista
    CPU
    intel i5-8400
    Motherboard
    gigabyte b365m ds3h
    Memory
    ballistix 2x8gb 3200
Hi SIW2

I followed your advice, i.e. removing the folder $OEM$ from my Dell Vista Installation disk.
Then I went through the process. It went superbly well and at the end I got my Vista SP1 Slipstream Installation DVD. :D

Thank you so much for your help.
Thank you too to Shawn Brink for his superb tutorial.

Regards. ;)
mminos
 

My Computer

Back
Top