How to Disable or Enable Low Disk Space Warning in Windows
When your media device gets low on space, Vista will give you a Low Disk Space warning. This is to warn you to either clear space or get a bigger storage device soon.
This will show you how to enable or disable the Low Disk Space Warning for all drives in Vista.
Low Disk Space warning is enabled by default.
You must be logged in as an administrator to be able to do the steps in this tutorial.
This will show you how to enable or disable the Low Disk Space Warning for all drives in Vista.
Low Disk Space warning is enabled by default.
You must be logged in as an administrator to be able to do the steps in this tutorial.
- This is not the same as the XP way.
- This will not work on a protected OEM recovery partition.
You could lose data, possibly everything, on the hard drive if you run out of space on it. I would recommend backing up your data and getting a bigger hard drive soon, or make more room on the drive by uninstalling stuff you do not need anymore.
This is not the same as a Low Memory error. A Low Memory error is usually due to the page file being turned off, or it's Min and Max size set to low.
This is not the same as a Low Memory error. A Low Memory error is usually due to the page file being turned off, or it's Min and Max size set to low.
 METHOD ONE
NOTE: This option only affects the single hard drive. By removing or hiding the hard drive letter, there will be no drive letter associated to this partition or drive. Vista will no longer see the partition as anything useful to it and will stop giving you the Low Disk Space warning for only this partition or drive.
1. For how, see step 8 here: How to Show or Remove Drive Letters from Displaying in Vista
 METHOD TWO
NOTE: This will disable or enable the Low Disk Space warning for all drives.
1. Open the Start Menu.
2. In the white line (Start Search) area, type regedit and press Enter.
3. Click on Continue in the UAC prompt.
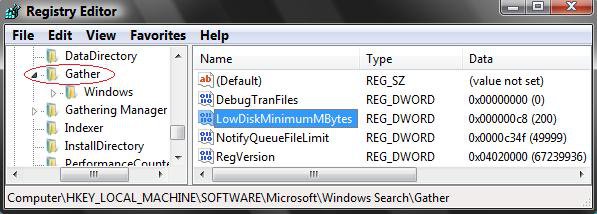
4. In regedit, go to: (See screenshot below)
HKEY_LOCAL_MACHINE\Software\Microsoft\Windows Search\Gather
5. In the right pane, double click on LowDiskMinimumMBytes to modify it, and do step 6 or 7 below for what you want to do. (See screenshot above)
6. To Disable the Low Disk Space Warning
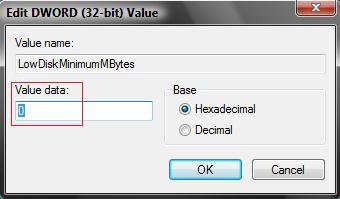
A) Type 0 (number), click on OK, and go to step 8 below. (See screenshot below step 7A)
7. To Enable the Low Disk Space Warning
NOTE: This is the default setting.
A) Type c8 (Vista) or 1 (Windows 7/8), click on OK, and go to step 8 below. (See screenshot below)
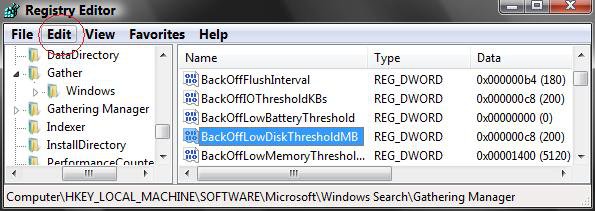
8. In regedit, go to: (See screenshot below step 10)
HKEY_LOCAL_MACHINE\Software\Microsoft\Windows Search\Gathering Manager
9. In the left pane, click on Gathering Manager to highlight in blue.
10. You will need to take ownership of Gathering Manager and "Allow" your user account "Full control" of it before continuing.
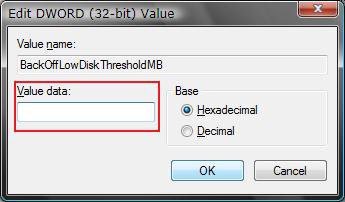
11. In the right pane of Gathering Manager, double click on BackOffLowDiskThresholdMB to modify it, and do step 12 or 13 below for what you want to do.. (See screenshot above)
12. To Disable the Low Disk Space Warning
A) Make it empty, and click on OK. (See screenshot below step 13A)
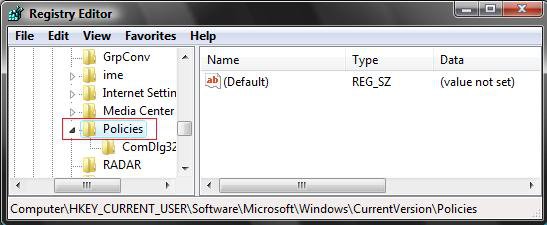
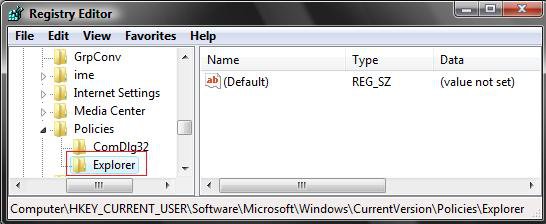
B) In regedit, go to: (See screenshot below)
NOTE: If the Explorer key is not there, then right click on the Policies key in the left pane, click on New and Key, type Explorer, and press Enter.
HKEY_CURRENT_USER\Software\Microsoft\Windows\CurrentVersion\Policies\Explorer
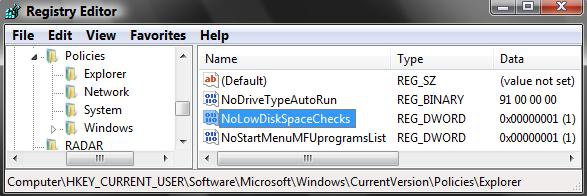
C) In the right pane of Explorer, double click on NoLowDiskSpaceChecks to modify it. (see screenshots below)
NOTE: If the NoLowDiskSpaceChecks DWORD is not there, then right click on an empty space in the right pane, click on New and DWORD (32-bit) value, type NoLowDiskSpaceChecks, and press Enter.
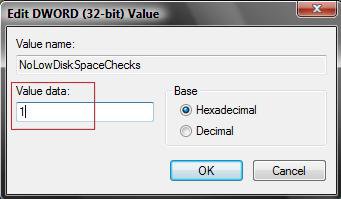
D) Type 1 and click on OK. (See screenshot below)
13. To Enable the Low Disk Space Warning
NOTE: This is the default setting.
A) Type c8 (Vista) or 258 (Windows 7/8), and click on OK. (See screenshot below)
B) In regedit, go to: (See screenshot below step 12C)
HKEY_CURRENT_USER\Software\Microsoft\Windows\CurrentVersion\Policies\Explorer
C) In the right pane, double click on NoLowDiskSpaceChecks to modify it.
D) Type 0 (number) and click on OK. (See screenshot above)
14. When finished. close regedit.
That's it,
Shawn
Related Tutorials
- How to Increase Hard Drive Performance in Vista
- How to Compress and Decompress a Folder or File with NTFS Compression in Vista
- How to Change Windows Defender Notification Options
- How to Turn UAC On or Off in Vista
- How to Disable or Enable the Security Center Alert Warning Notification in Vista
- How to Turn Pop-up Descriptions On or Off in Vista
- How to Change How Long a Notification Dialog Box Will Stay Open in Vista
- How to Shrink and Create a Partition with Disk Management in Vista
- How to Delete and Extend a Partition with Disk Management in Vista
- How to Change a Drive Icon in Vista
- How to Show or Remove Drive Letters from Displaying in Vista
- How to Rename a Drive in Vista
- How to Add, Change, or Remove a Drive Letter in Vista
- How to Enable or Disable Notification Area Balloon Tips in Vista
- How to Restrict or Unrestict Drive Access in Vista
- How to Hide or Unhide a Drive in Vista
- How to Create a Drive Shortcut in Vista
Attachments
Last edited by a moderator:

