How to Change the Windows Explorer Columns and Sort Order in Vista
This will show you how to add, remove, move, change the width, and change the sort order of Windows Explorer columns to how you want them.
- To apply these changes to all of the same folder type templates, see the last section of this tutorial below. External devices will not retain their folder view settings when turned off or disconnected from the computer.
- If Vista does not remember the folder view settings you make below to the window for when it was last closed, then see: How to Reset Windows Explorer Folder View Settings to Make Vista Remember
 OPTION ONE
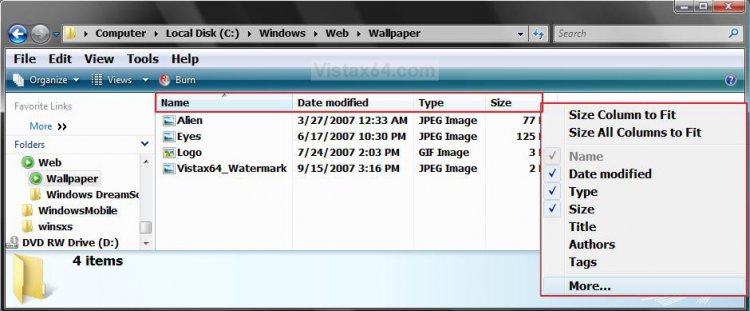
1. Click on View on the menu bar and click on Choose Details, or right click on the column bar and click on More. (See screenshots below)
2. To Add a Column
A) Check a column name, or click More to see more column names to check.
B) Click on OK to apply if you clicked om More.
3. To Remove a Column
A) Uncheck a column name, or click More to see more column names to uncheck.
B) Click on OK to apply if you clicked on More.
 OPTION TWO
METHOD ONE:
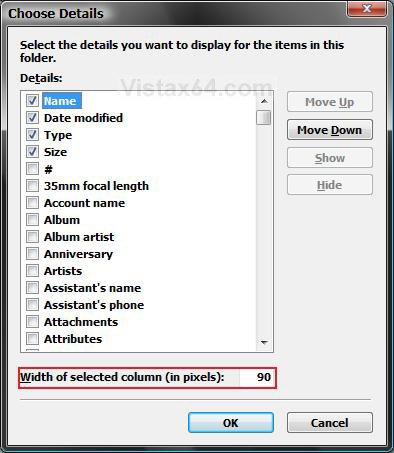
1. Click on View on the menu bar and click Choose Details, or right click on the column bar and click on More. (See screenshots above)
2. To Move the Column to the Left
A) Highlight a selected (checked) column name and click on Move Up.
B) Click on OK to apply.
3. To Move the Column to the Right
A) Highlight a selected (checked) column name and click on Move Down.
B) Click on OK to apply.
METHOD TWO:
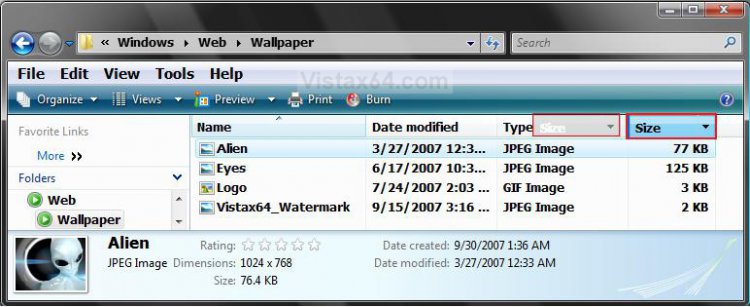
1. Right click on a column name and hold the mouse button down. (See screenshot below)
2. Drag the column into a column you want it to go to the left of, then let go of the mouse button to drop it.
 OPTION THREE
METHOD ONE:
1. Click on View on the Menu bar and click Choose Details, or right click on the column bar and click on More. (See screenshot below)
2. Select a column name that you want to change the width for to highlight it.
3. Type in a width number in pixels next to Width of selected column (in pixels) at the bottom.
NOTE: Repeat steps 2 and 3 for anymore columns that you wish to change the width of. 80 pixels is as low as Vista will allow you to go.
4. Click on OK.
METHOD TWO:
NOTE: This only works if you have Details selected in View or Views.
1. Move the pointer over the line between the column names until it turns into a cross with double horizontal arrows.
2. Left click on the line and hold.
3. Drag the column line to the width you want it to be.
4. Let go of the left mouse button.
METHOD THREE:
NOTE: This will size the column(s) to allow what is under them to fit between the column lines.
1. To Size a Column to Fit
A) Right click on a column name and click on Size a Column to Fit. (See screenshot below)
OR
B) Move the pointer over the line between the left column that you want to "Size to fit" and the one to the right of it until it turns into a cross with double horizontal arrows, then double click the left mouse button.
2. To Size All Columns to Fit
A) Right click on the column bar and click on Size All Columns to Fit.
 OPTION FOUR
METHOD ONE:
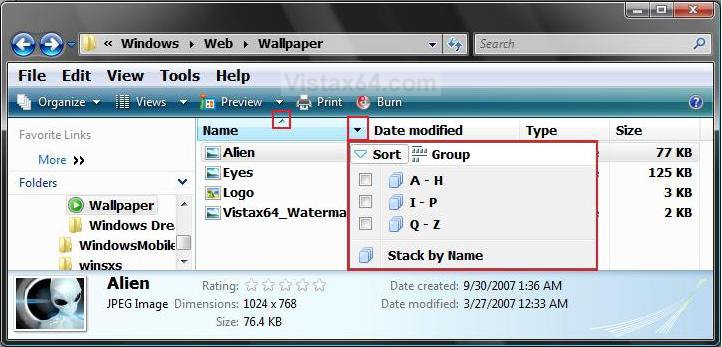
1. Click on a column name bar to change the sort order of the files and folders in the window to be sorted by that column type. (See screenshot below in Method Two)
NOTE: Notice that the arrow in the middle of a column name indicates which column is being used to sort the window by.
2. Click on the column name bar to cycle through the sort orders for it until you see the one you like.
METHOD TWO:
1. Click on the drop down arrow to the right of the column you want the window to be sorted by. (See screenshot below)
NOTE: Notice that the arrow in the middle of a column name indicates which column is being used to sort the window by.
2. Click on the sort order option you want.
NOTE: Each column name has different options to select from.
METHOD THREE:
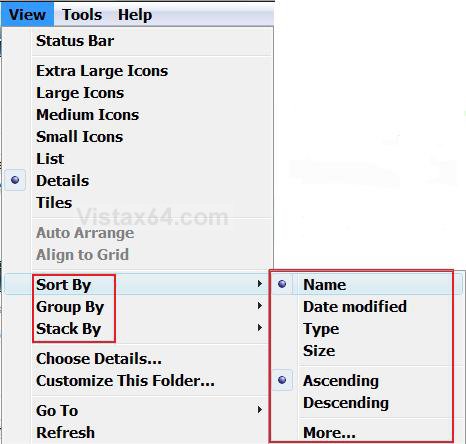
1. Click on View on the Menu Bar, or right click on a empty area in the Windows Explorer window. (See screenshot above)
2. Click on Sort By, Group By, or Stack By.
A) Choose the sort order you want the window to be sorted by.
NOTE: If you click More, you will be taken to the Choose Details windows.
 OPTION FIVE
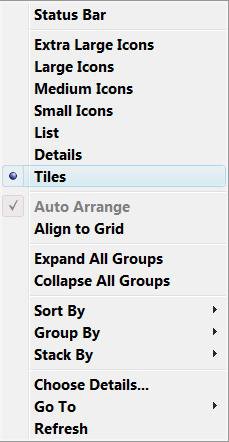
1. Click on View on the Menu Bar, or right click on a empty area in the Windows Explorer window. (See screenshot above Method Three in OPTION FOUR)
A) Click on Extra Large Icons, Large Icons, Medium Icons, Small Icons, List, Details, or Tiles. (See screenshot below)
OR
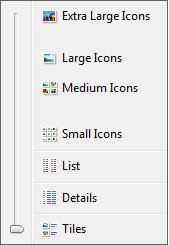
2. Click on Views on the toolbar
A) Click on Extra Large Icons, Large Icons, Medium Icons, Small Icons, List, Details, or Tiles. (See screenshot below)
OR
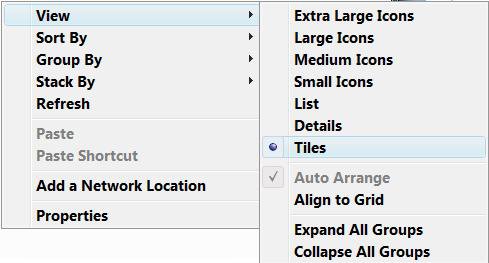
3. Right click on a empty area in the Windows Explorer window, and click View.
A) Click on Extra Large Icons, Large Icons, Medium Icons, Small Icons, List, Details, or Tiles. (See screenshot below)
How to Apply the Changes to All the Same Folder Type Templates
NOTE: This is to apply the changes made to all windows of the same folder template as the current window.
WARNING: This must be done from within the window that you are changing, or it will not work.
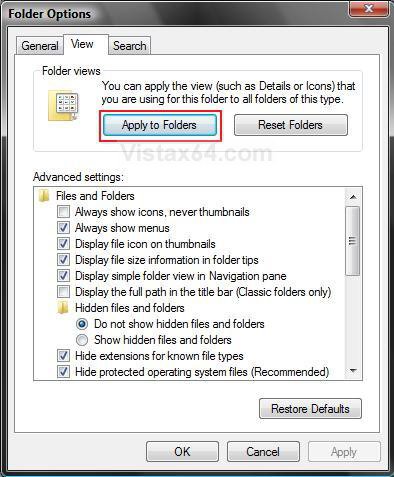
1. Click on Tools on the Menu bar and click on Folder Options.
2. Click on the View tab. (See screeshot below step 7)
3. Check Remember each folder's view settings.
NOTE: If unchecked, Vista will ignore custom view settings for every folder and have every folder open using default settings instead. Only, uncheck this setting to force all folders to stop using display settings you have specified.
4. Click on Apply.
5. Click on the Apply to Folders button.
7. Click on OK. (See screenshot above)
NOTE: This is to apply the changes made to all windows of the same folder template as the current window.
WARNING: This must be done from within the window that you are changing, or it will not work.
1. Click on Tools on the Menu bar and click on Folder Options.
2. Click on the View tab. (See screeshot below step 7)
3. Check Remember each folder's view settings.
NOTE: If unchecked, Vista will ignore custom view settings for every folder and have every folder open using default settings instead. Only, uncheck this setting to force all folders to stop using display settings you have specified.
4. Click on Apply.
5. Click on the Apply to Folders button.
6. Click on Yes to the confirmation prompt. (See screenshot below)7. Click on OK. (See screenshot above)
That's it,
Shawn
Related Tutorials
- How to Reset Windows Explorer Folder View Settings to Make Vista Remember
- How to Change a Windows Explorer Folder Type Template in Vista
- How to Change a Default Open Window Size for a Shortcut in Vista
- How to Change Windows Explorer Default Open Location
- How to Use the Windows Explorer Address Bar in Vista
- How to Enable or Disable the Menu Bar in Vista
- How to Turn the Preview Pane On or Off in Vista
- How to Turn the Navigation Pane On or Off in Vista
- How to Change the Sort Order for Numbers in File and Folder Names in Vista
- How to Enable or Disable Auto-Hide for Vista Explorer Full Screen F11
- How to Hide or Show File Names in Vista
- How to Enable or Disable Full Row Select in Vista Windows Explorer
- How to Disable Auto Arrange in Vista Windows Explorer to have Free Sorting
Attachments
Last edited by a moderator:

