How to Create and Setup a Signature in Windows Mail
You can use the Signatures tab in the Windows Mail Options dialog box to create and modify custom signatures for your messages. Signatures can contain your name, e‑mail address, phone number, and any other information that you want to include at the bottom of your e‑mail messages.
To backup everything in Windows Mail, see the How to Backup and Reset Windows Mail section here: How to Fix Most Problems with Vista's "Windows Mail"
- When your signature is a HTML file and the original message is in plain text vs an HTML message, you willl need to click on Tools and Send in Windows Mail. Next, uncheck the Reply to messages using the format they were sent box and click on OK. This will allow your HTML signature to be added to a HTML message when replying to or forwarding a plain text message.
- There is only a 4 kb size limit on a signature file. Anything bigger and you will get this error message:
Warning: Your signature file is too large.
Here's How:
1. Open Windows Mail.
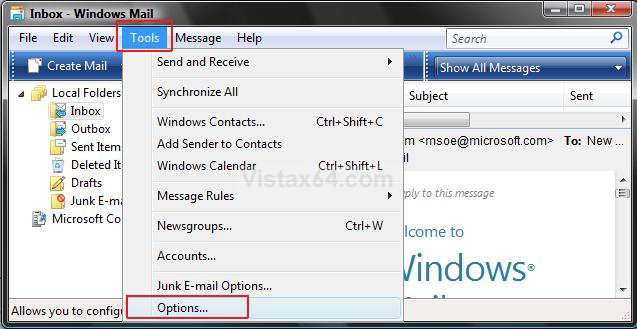
2. Click on Tools and then click Options. (See screenshot below)
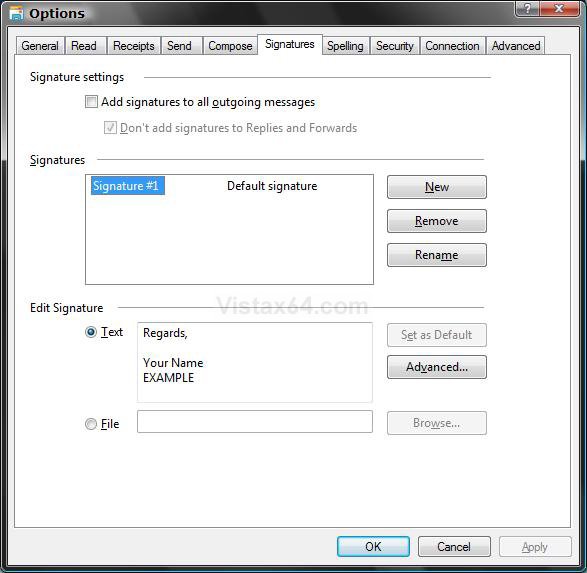
3. Click the Signatures tab. (See screenshot below)
4. To Use Signatures on All E‑mail Messages
A) Check Add signatures to all outgoing messages. (See screenshot below)
NOTE: This will automatically include the default signature in all of your messages.
B) To Include Replies and Forwards - Uncheck Don't add signatures to Replies and Forwards.
5. Click on New.
6. To Create a Simple Text Signature
A) Dot Text under the Edit Signature section. (See screenshot above)
B) Type your signature in the Text box.
C) Click on Apply.
D) Give this signature a name by highlighting the signature under Signatures and click on Rename.
E) Type in a name and press Enter.
F) Go to step 8.
7. To Create and Add a File Based Signature
If you want to create a signature containing custom fonts, links, or images; design the signature using Windows Mail. For an alternative way to add a .htm file as your signature, see: Windows Mail Signatures
The htm signature file cannot be over 4KB in size. Only the code between the body tags is used in a signature. If you are going to include a image file in the signature, then you may want to link the image file from a online image hosting service, like the free ImageShack or Photobucket instead of from your computer.
The 4KB size is easily exceeded when Microsoft Word is used to generate the html code. The style section of a Word htm file alone can exceed 4KB. It would be best to use Windows Mail and Notepad instead to create the htm file.
If you keep getting a red X image marker when you attach the image from your computer, then double check to make sure that the link is correct. For example:
src="C:\Users\Ryan\Documents\Gunn & Associates\Signature\signature.htm.htm"
This link has & and .htm.htm.
<IMG src="http://IMAGE.jpg"> is not a correct link.
You could also use a online image hosting service like ImageShack or Photobucket to store the image to link to instead of attaching the image from your computer.
A) Click on Create Mail in Windows Mail. (See screenshot below step 2)
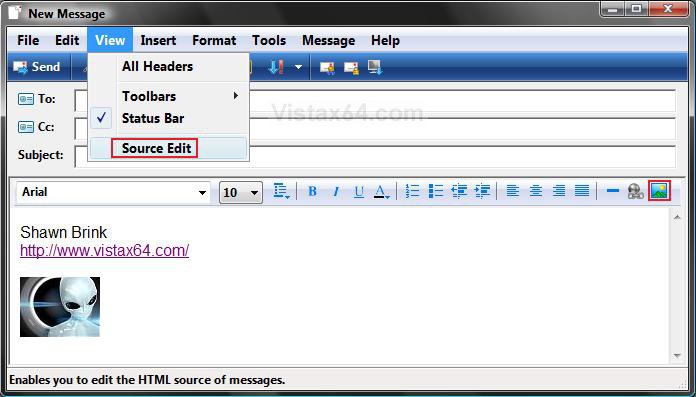
B) Leave the address fields blank, and add what you want for the signature in the body. (See screenshot below)
NOTE: It is best to create the signature from scratch here and not Copy and Paste it from another source to avoid problems with it not working.
C) When done, click on View, and click on Source Edit to check it. (See screenshot below)
NOTE: You can click on Insert and Picture to insert a image file from your computer, or link the image file from somewhere like ImageShack to save space in the signature file.
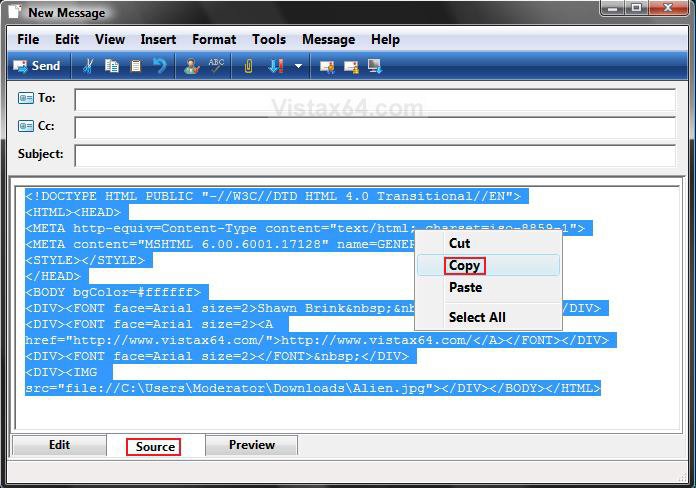
D) Click on the Source button at the bottom. (See screenshot below)
E) Highlight the source code, then right click on it and click Copy. (See screenshot below)
F) Open Notepad.
NOTE: To open Notepad, open the Start menu, then in the white line (Start Search) area, type notepad.exe and press Enter.
G) Right click inside of notepad and click Paste. (See screenshot below)
H) Click on File on the menu bar, then click on Save As.
I) Navigate to where you want to save the signature file. (See screenshot below)
J) Type in a name for the signature file with a .htm file extension, then click Save to save it to the selected location. (See screenshot below)
NOTE: For example, type: Signature.htm
K) Dot File under the Edit Signature section, then click the Browse button. (See screenshot below step 5)
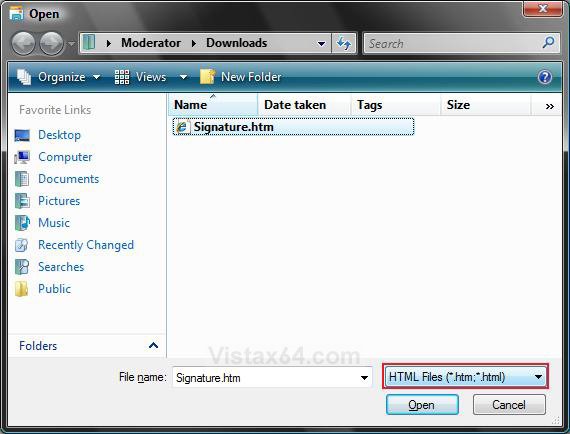
L) Navigate to the saved signature file location and click Open. (See screenshot below)
NOTE: You will need to change the file type, at the bottom right corner, to the file type .HTM for the signature. Click on the drop down arrow and select the file type.
M) Click on Apply. (See screenshot below step 5)
N) Give this signature a name by highlighting the signature under Signatures and click Rename. (See screenshot below step 5)
O) Type in a name and press Enter. (See screenshot below step 5)
P) In Windows Mail main window, click on Tools and then click Options. (See screenshot below step 2)
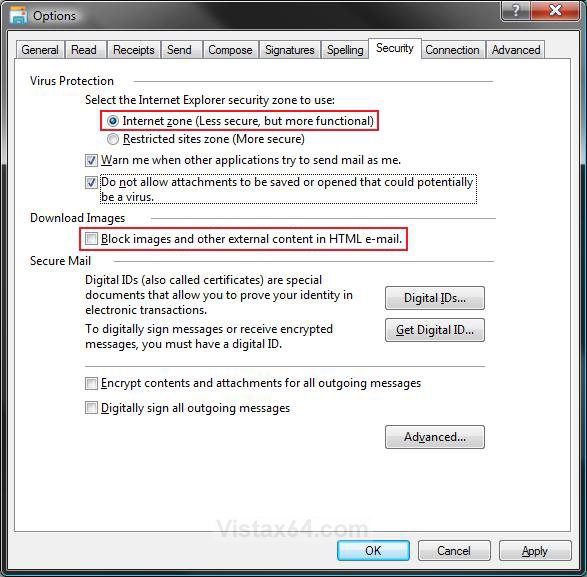
Q) Click the Security tab. (See screenshot below step 7R)
R) Dot Internet zone and uncheck the Block images and other external content in HTML e-mail box.
NOTE: This will allow a image you have in your signature to be seen in your Windows Mail if you have the image linked to somewhere like ImageShack.
S) Click on OK. (See screenshot above)
8. How to Set a Signature as Default
When using multiple signatures, you can choose which signature will be used by default.
A) Highlight the signature under Signatures and click on Set as Default. (See screenshot below step 5)
B) Go to step 10.
9. How to Choose Specific Signatures for Different E‑mail and Newsgroup Accounts
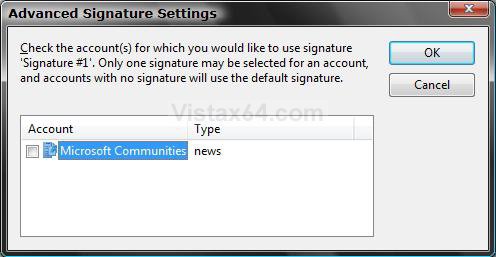
A) Highlight the signature under Signatures and click on Advanced. (See screenshot below step 5)
B) Check the e-mail or newsgroup account(s) you want to apply the signature to. (See screenshot below)
C) Click on OK.
10. Click on OK. (See screenshot below step 5)
That's it,Shawn
Attachments
Last edited by a moderator:

