How to Enable or Disable the Menu Bar in Vista Windows Explorer
This is the toolbar at the top of a Windows Explorer window with menus. By default, Vista has the Menu bar disabled.
The Menu bar includes the File, Edit, View, Favorites (In IE7), Tools, and Help menus.
The Menu bar includes the File, Edit, View, Favorites (In IE7), Tools, and Help menus.
- To enable or disable the Menu bar in IE8 and IE9, right click on a empty area of the toolbar and click on Menu Bar to check (enable) or uncheck (disable) it.
- To for how to have the Menu bar "always" turned on in Internet Explorer 9, see: How to Always Have the Internet Explorer 9 Menu Bar Turned On or Off by Default
EXAMPLE: Menu Toolbar Disabled
 METHOD ONE
NOTE: This will only temporarily show the Menu bar in Windows Explorer. It will go away as soon as you click on something other than the menu. To turn it on all the time, see the methods below.
1. Press the Alt key to just see the Menu bar to click on a menu item to open it.
OR
2. Press the Alt + (underlined letter) keys to open the menu item with that underlined first letter.
 METHOD TWO
1. Open a Windows Explorer window.
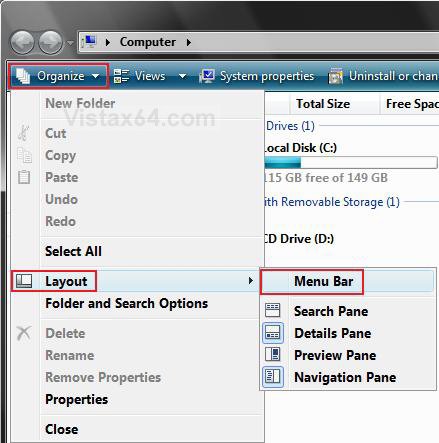
2. Click on Organize and Layout. (See screenshot below)
3. To Enable the Menu Bar
A) Click on Menu Bar to check it.
4. To Disable the Menu Bar
A) Click on Menu Bar to uncheck it.
 METHOD THREE
1. Open Folder Options.
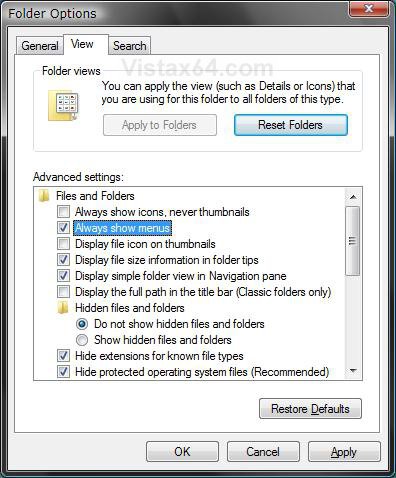
2. Click on the View tab. (See screenshot below)
3. To Enable the Menu Bar
A) Check Always show menus.
B) Go to step 5.
4. To Disable the Menu Bar
A) Uncheck Always show menus.
5. Click on OK.
 METHOD FOUR
1. To Add the Menu Bar
A) Click on the download button below to download the file below.
Add_Menu_Bar.reg
B) Go to step 3.
2. To Remove the Menu Bar
A) Click on the download button below to download the file below.
Remove_Menu_Bar.reg
3. Click on Save, and save the .reg file to the Desktop.
4. Right click on the downloaded .reg file and click Merge.
5. Click on Run, Continue (UAC), Yes, and then OK when prompted.
7. Log off and log on, or restart the computer to apply the changes.
8. When done, you can delete the downloaded .reg file if you like.
 METHOD FIVE
1. Open the Start Menu.
2. In the white line (Start Search) area, type regedit and press Enter.
3. Click on Continue in the UAC prompt.
4. In regedit, navigate to the location below.
Code:
HKEY_CURRENT_USER\Software\Microsoft\Windows\CurrentVersion\Explorer\Advanced
5. To Add the Menu Bar
A) In the right pane, right on AlwaysShowMenus and click on Modify.
B) Type 1 and click on OK.
C) Go to step 7.
6. To Remove the Menu Bar
A) In the right pane, right on AlwaysShowMenus and click on Modify.
B) Type 0 (number zero) and click on OK.
7. Close regedit.
8. Log off and log on, or restart the computer to apply the changes.
That's it,Shawn
Related Tutorials
- How to Underline Keyboard Shortcuts in Vista
- How to Speed up the Menu Show Delay Time in Vista
- How to Change the Menu to Appear to the Left or Right of a Click in Vista
- How to Put the Menu Bar Always on Top in Internet Explorer
- How to Change the Windows Explorer Columns and Sort Order in Vista
- How to Turn the Preview Pane On or Off in Vista
- How to Enable or Disable the Preview Pane in Vista
- How to Turn the Navigation Pane On or Off in Vista
- How to Restore or Remove File from Windows Explorer Menu Bar
- How to Always Have the Internet Explorer 9 Menu Bar Turned on by Default
- How to Disable Auto Arrange in Vista Windows Explorer to have Free Sorting
Attachments
Last edited:


