How to Open a Folder in the Same or Separate New Window in Vista
This will show you how to have a folder temporarily or always open in the same or separate new Windows Explorer window in Vista.
 OPTION ONE
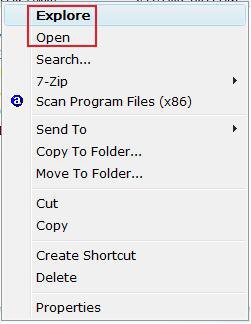
NOTE: Explore (same window) is the default always action. To change the default option in the context menu to Explore (same window) or Open (separate window), see OPTION TWO below for how.
1. Open a Windows Explorer window.
2. Turn on the Navigation Pane.
3. Right click on a folder. (See screenshot below step 5)
4. To Open the Folder in the Same Window
A) Click on Explore.
NOTE: If Open is bolded instead, then turn on the Navigation Pane from step 2. You can also just click or double click on the folder to open it in the same window.
5. To Open the Folder in it's Own Separate New Window
A) Click on Open.
 OPTION TWO
NOTE: Open in the Same Window (Explore) is the default setting. This will show you how to have Explore (same window) or Open (separate) in the context menu set as the default option for OPTION ONE above.
1. Open a Windows Explorer window.
2. Open Folder Options.
3. To Always Open the Folder in the Same Window
NOTE: Sets Explore as default in context menu.
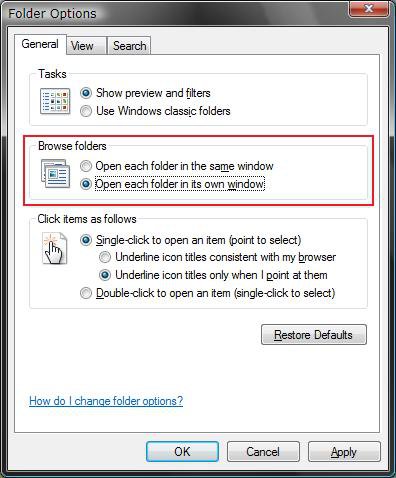
A) Dot Open each folder in the same window. (See screenshot below step 4)
B) Click on OK.
NOTE: You can now just click on the folder, or right click on the folder and click on Explore, to always open it in the same window.
C) Go to step 5.
4. To Always Open the Folder in it's Own Separate New Window
NOTE: Sets Open as default in context menu.
A) Dot Open each folder in its own window. (See screenshot below)
B) Click on OK.
C) Turn off the Navigation Pane in the Windows Explorer window.
WARNING: This will not work unless you do this.
NOTE: You can now just click on the folder, or right click on the folder and click on Open, to always open it in a separate window.
5. Close Folder Options and the Windows Explorer window when done.
 OPTION THREE
1. Open the Start Menu, then type regedit in the search box and press enter.
2. If prompted by UAC, then click on Continue (if admininstrator) or type in administrator's password (if standard user).
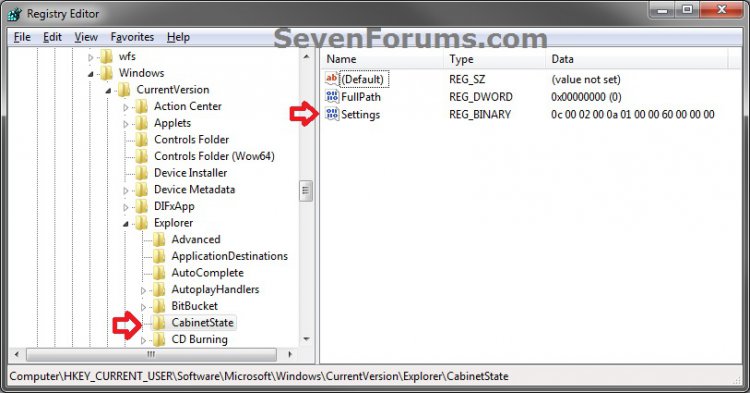
3. In Registry Editor, navigate to the location below. (see screenshot below)
Code:
[/INDENT]
[INDENT]HKEY_CURRENT_USER\Software\Microsoft\Windows\CurrentVersion\Explorer\CabinetState[/INDENT]
[INDENT]
4. In the right pane of CabinetState, right click on Settings and click on Modify. (see screenshot above)
5. To Always Open each Folder in the Same Window
NOTE: This is the default setting.
A) Using your right arrow key, move the cursor over to the right of the 5th "Value data" (2A), press the Backspace key, type in 0A (number 0), and click on OK. (see screenshots below)
B) Go to step 7.
6. To Always Open each Folder in it's Own Separate New Window
NOTE: This also sets Open in the folder or drive context menu to behave the same as the Open in new window context menu item.
A) Using your right arrow key, move the cursor over to the right of the 5th "Value data" (0A), press the Backspace key, type in 2A, and click on OK. (see screenshots below)
7. Close regedit.
That's it,Shawn
Related Tutorials
- How to Change the Menu to Appear to the Left or Right of a Click in Vista
- How to Change the Advanced Appearance Settings in Vista
- How to Change the Visual Effects Options for Appearance and Performance in Vista
- How to Change a Default Open Window Size for a Shortcut in Vista
- How to Select Files Using Check Boxes in a Explorer Window in Vista
- How to See the Folder Size in Vista
- How to Pin a Folder to the Start Menu in Vista
- How to Copy the Full Path of a File or Folder in Vista
Attachments
Last edited by a moderator:


