How to Change the Internet Time Synchronization Update Interval in Windows
This tutorial will show you how to change the Internet Time Synchronization Update Interval to be updated more often in Vista, Windows 7, and Windows 8.
This could be used as a workaround if your system clock is constantly out of sync or slow, even though it says the sync was successful.
This could be used as a workaround if your system clock is constantly out of sync or slow, even though it says the sync was successful.
- Windows gets the initial time from the BIOS, check to see if the time and date is correct in it if the time is always incorrect.
- If the system clock loses track of the time when you shut down the computer, then this could be the CMOS battery on your motherboard getting weak and dying. You will just need to replace the battery. This is usually a lithium button cell, type CR2032.
- A slow system clock while running is usually due to interference from some other program. This can sometimes be the antivirus or firewall program. You can test this by not running the suspect program for a few days to see if the time is accurate again. If it is the program, then you will either need to adjust it's settings to prevent the interference or find a different program to use instead that does not interfere.
- For how to do Internet Time Synchronization after you finish this tutorial, see How to Use Internet Time Synchronization in Windows.
Do not change the query interval to less than every 4 seconds to avoid possibly getting your computer's IP address banned by the time server.
See: NIST Internet Time Servers
See: NIST Internet Time Servers
FIRST:
1. Try changing the time server to another one that may Synchronize without any errors. See the Warning in the link below to.
Here's How:
1. Press the Windows+R keys to open the Run dialog, type regedit, and press Enter.
2. If prompted by UAC, then click on Continue (Vista) or Yes (Windows 7/8).
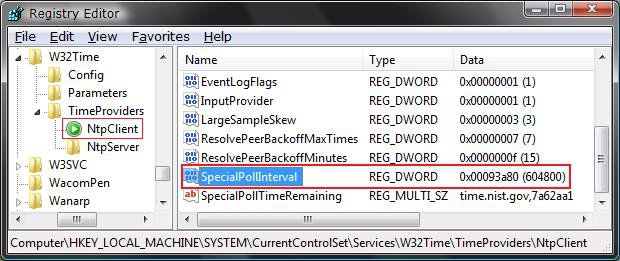
3. In regedit, navigate to the location below. (see screenshot below)
HKEY_LOCAL_MACHINE\SYSTEM\CurrentControlSet\Services\w32Time\TimeProviders\NtpClient
4. In the right pane, right click on SpecialPollInterval and click on Modify. (see screenshot above)
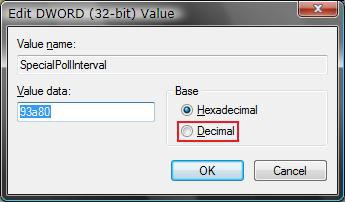
5. Select (dot) Decimal. (see screenshot below)
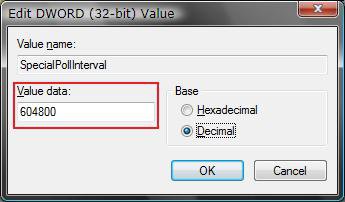
6. Type in how often you want it to update the time in seconds, and click on OK. (see screenshot below)
NOTE: The default time is every 604800 seconds (7 days). For every day, use 86400 seconds. (60 seconds X 60 minutes X 24 hours X 1 day)
Do not change the query interval to less than every 4 seconds to avoid possibly getting your computer's IP address banned by the time server.
See: NIST Internet Time Servers
See: NIST Internet Time Servers
7. Close regedit.
That's it,Shawn
Related Tutorials
- How to Use Internet Time Synchronization Windows
- How to See the Date and Time on the Taskbar in Vista
- How to Set the Clock to Military 24 Hour Time in Vista
- How to Add Additional Time Zone Clocks in Vista
- How to Change the Date and Time in Vista
- How to Change the Time Zone in Vista
- How to Change the Date Format in Vista
- How to Change the Date and Time in Windows 7
- How to Change the Date and Time in Windows 8 and Windows 8.1
- How to Turn On or Off Internet Time Synchronization in Windows 8 and 8.1
Attachments
Last edited:


