How to Change the Logon Screen Saver Wait Time in Vista
When you enter a logon screen and do not click on a user and just let it sit, in 10 minutes (wait time) you will see the default logon screen saver. This will show you how to change the logon screen saver wait time to what you want instead.
Here's How:
1. Open the Start Menu.
2. In the white line (Start Search) area, type regedit and press Enter.
3. Click on Continue in the UAC prompt.
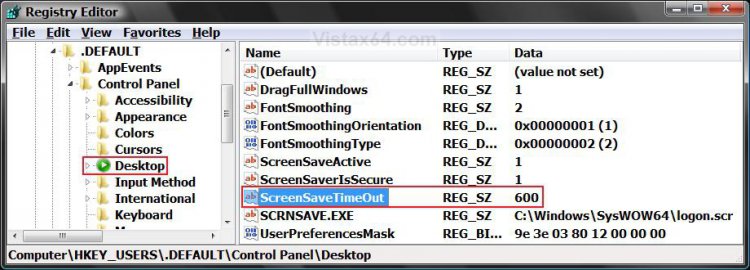
4. In regedit, go to: (See screenshot below)
HKEY_USERS\.DEFAULT\Control Panel\Desktop
5. In the right pane, right click on ScreenSaveTimeOut and click Modify. (See screenshot above)
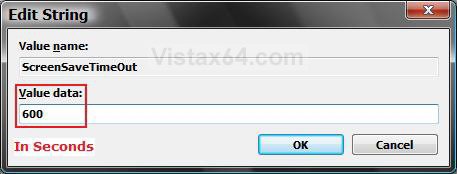
6. Type in how long you want the wait time to be for in seconds and click on OK.
NOTE: The default time is 600 seconds (10 minutes). Just multiply how many minutes by 60 for the amount of seconds to enter.
7. Close regedit.
That's it,
Shawn
Related Tutorials
- How to Change the Logon Screen in Vista
- How to Use and Change a Screen Saver in Vista
- How to Enable the Hidden Aurora Boot Screen in Vista
- How to Change the Default Boot Screen in Vista SP1
- How to Display a Logon Message Title and Text in Vista
- How to Logon Automatically at Startup in Vista
- How to Enable or Disable Secure Logon in Vista
- How to Add or Remove the Screen Saver Option in Vista
- How to Specify a Default Screen Saver for Users in Vista
- How to Enable or Disable the Log On Screen Saver in Vista
- How to Changed the Return to Sleep Timeout for a Unattended Wake Up in Vista
Attachments
Last edited:


