How to Change the Display DPI Scale in Vista
This will show you how to change the DPI (Dots per Inch) Scale to allow all items on your display screen to be smaller or larger.
If you set the DPI higher than 96, and you are running Windows Aero, the text and other items on the screen might appear blurry in some programs that are not designed for high–DPI display in Vista. If this is a problem you are having, you can help avoid this issue by using Windows XP–style DPI scaling. (See step 4C below)
Do not set the DPI to high or everything will extend way past the display screen, making them distorted and unreadable. If this happens, then boot into Safe Mode and change the DPI scaling to a smaller number.
 OPTION ONE
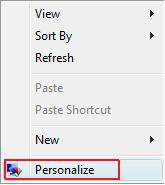
1. Right click on a empty area of your desktop and click on Personalize. (See screenshot below)
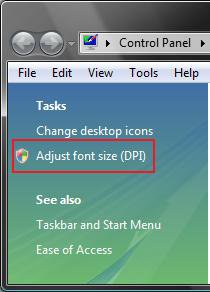
2. In left pane, click on Adjust font size (DPI). (See screenshot below)
3. Click on Continue in the UAC prompt.
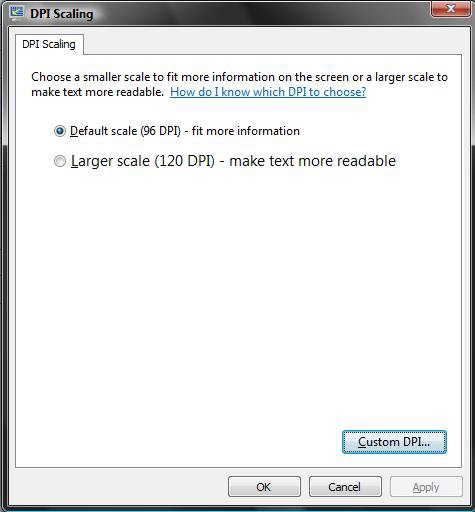
4. In the DPI Scaling dialog box, do one of the following: (See screenshot below)
NOTE: If this is to big to see your options, then boot into Safe Mode and change the DPI scaling to a smaller number.
A) To Increase the Size of Items on the Screen
- Dot Larger scale (120 DPI)–make text more readable and click on OK. (See screenshot above)
B) To Decrease the Size of Items on the Screen
- Dot Default scale (96 DPI)–fit more information and click on OK. (See screenshot above)
C) To Create a Custom DPI Size
- Click the Custom DPI button. (See screenshot above)
NOTE: You will not be able to go lower than 96 pixels per inch or 100% in Custom DPI.
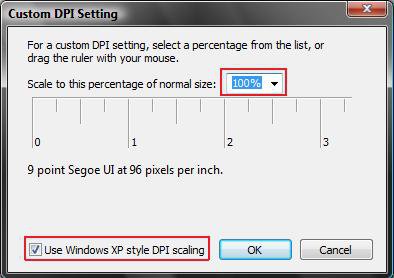
- Enter the percentage you want the DPI size to be in the Scale to this percentage of normal size: list. (See screenshot below) NOTE: You can also click and hold on the Inch Scale below this and move it to change the percentage.
- Check the Use Windows XP style DPI scaling to make text and items clearer in programs that are not designed for higher DPI settings than 96.
- Click on OK twice.
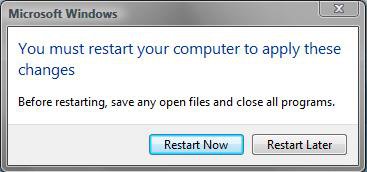
5. Click the Restart Now button to restart the computer to apply the changes. (See screenshot below)
 OPTION TWO
NOTE: This can be handy if you accidentally set the DPI to large and everything is extended way past the display screen, making them distorted and unreadable. You can also boot into Safe Mode and change the DPI scaling back to a smaller number using a option above.
1. Click on the download button below to download the file below.
Restore_Default_96_DPI.reg
2. Save the .reg file to the desktop.
3. Right click on the downloaded .reg file and click on Merge.
4. Click on Run, Continue (UAC), Yes, and OK when prompted.
5. Log off and Log on, or restart the computer to apply changes.
6. When done, you can delete the downloaded .reg file if you like.
That's it,Shawn
Related Tutorials
- How to Change the Advanced Appearance Settings in Vista
- How to Change the Visual Effects Options for Appearance and Performance in Vista
- How to Change the ClearType Font Settings in Vista
- How to Change the Screen Resolution in Vista
- How to Change the Screen Refresh Rate in Vista
- How to Change the Default Vista Fonts
- How to Move a Offscreen Window Back to the Desktop in Vista
- How to Disable or Enable the Transient Multimon Manager (TMM) in Vista
- How to Enable or Disable Changing Display Settings in Vista
- How to Add or Remove "DPI Scaling" from Desktop Context Menu in Vista
Attachments
Last edited:

