How to Change the Width of Window Borders in Vista
This will show you how to change the width of all of the window borders to what you want them to be in Vista.
EXAMPLE: Default window borders size (4)
EXAMPLE: Thicker window borders size
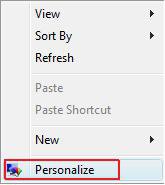
Here's How:1. Right click on a empty area of your desktop and click on Personalize. (See screenshot below)
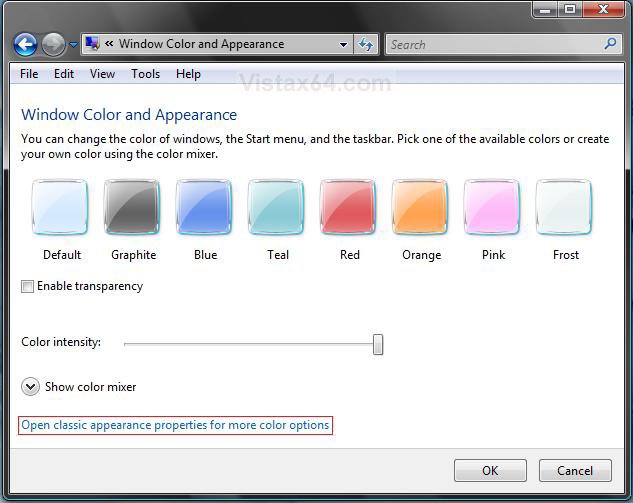
2. Click on Window Color and Appearace. (See screenshot below)
3. Click Open classic appearance properties for more color options. (See screenshot below)
NOTE: If the color scheme Windows Aero or Windows Vista Standard (Vista Home Basic) is not running, then you will not see this screen, but see the screen in step 4 instead.
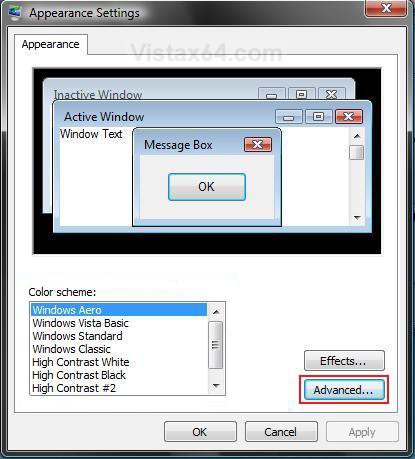
4. Click on the Advanced button. (See screenshot below)
NOTE: The Windows Aero color scheme is not available for the Vista Home Basic edition. 

The Vista Home Basic edition will have the Windows Vista Standard color scheme instead.
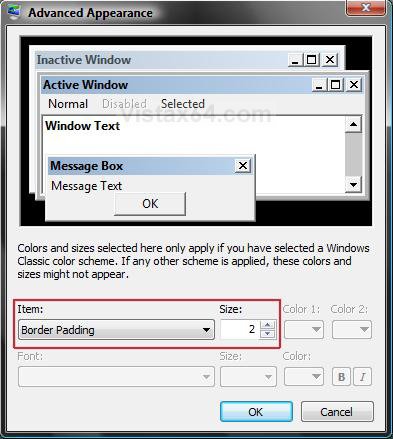
5. Select Border Padding from the Items: drop down list box. (See screenshot below)
NOTE: You can also change the Inactive Window Border and Active Window Border size to if you like.
6. Increase or decrease the number from the Size: box for how thick or thin you want the windows border to be. (See screenshot below)
NOTE: The higher the Size: number is, the thicker the border will be.
7. Click on OK.
8. Click on OK to apply the changes. (See screenshot below step 4)
That's it,Shawn
Related Tutorials
- How to Change the Advanced Appearance Settings in Vista
- How to Change the Visual Effects Options for Appearance and Performance in Vista
- How to Open and Change Folder Options in Vista
- How to Open Each Folder in the Same or it's Own Separate Window in Vista
- How to Change a Default Open Window Size for a Shortcut in Vista
- How to Change the ClearType Font Settings in Vista
Attachments
Last edited:


