How to Create and Use a Contact Group in Vista
A contact group is a collection of contacts that simplifies the process of sending e‑mail to groups of people. This will show you how to create and fully use a Contact Group in Vista and Windows Mail.
By addressing a message to a contact group, you save time by not having to add an address to the message for each recipient. You can send the message to everyone in the contact group at once. Contact groups are designed to be used with Windows Mail, and are sometimes called mailing lists. For more information, see: Windows Help and How-to: Managing Your Contacts and Windows Help and How-to: Organize and Find Contacts
By addressing a message to a contact group, you save time by not having to add an address to the message for each recipient. You can send the message to everyone in the contact group at once. Contact groups are designed to be used with Windows Mail, and are sometimes called mailing lists. For more information, see: Windows Help and How-to: Managing Your Contacts and Windows Help and How-to: Organize and Find Contacts
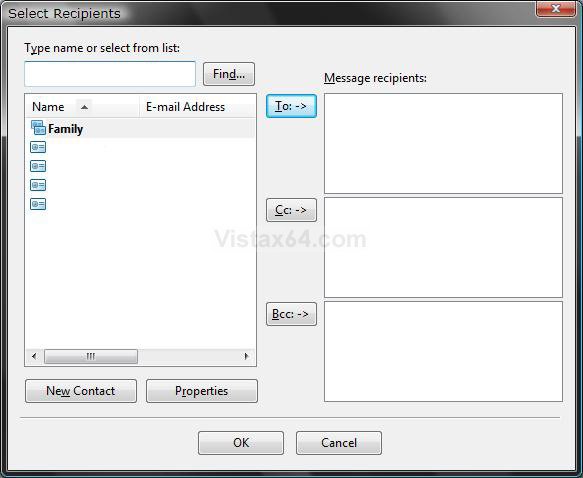
If you put normal contacts into separate folders within the Contacts folder to separate them into groups, they will still all be listed when you click on To:, Cc:, or Bcc: in a compose email message window. A Contact Group will only be listed once here. See the screenshot in SECTION TWO below step 8.
When using contact groups, keep in mind that they do not hide the e‑mail addresses of the recipients. When you send a message to a contact group, all the recipients will be able to see the names and e‑mail addresses of the other recipients unless you use Bcc.
- The default program used to open Contacts is located at: C:\Program Files\Windows Mail\wab.exe
- The Contacts folder location is at: C:\Users\(your username)\Contacts
NOTE: Contacts are treated just like any other file on your computer and can be moved and saved to backup the same way. (EX: To DVD or 2nd drive)
 SECTION ONE
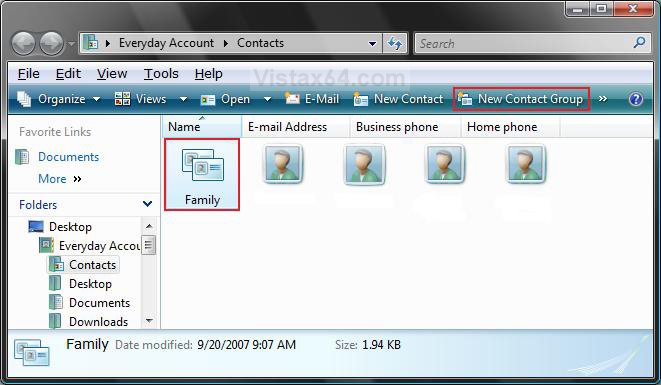
1. Open the Contacts folder.
NOTE: See tip above for location.
2. Click on New Contact Group. (See screenshot below)
NOTE: To modify an existing Contact group list, just double click on it. To create a single Contact, click on New Contact instead.
A) If you do not see the New Contact Group toolbar button, then to restore it see: How to Restore the Missing "New Contact" and "New Contact Group" Button in Vista Contacts Folder
B) To change the columns or sorting order, see: How to Change the Windows Explorer Columns in Vista
C) You can also organize the Contacts and Contact Groups into different folders. Just create a new folder and add the contacts into it.
NOTE: They will still all be listed separately in the TO: area in a email compose window. (See screenshot below step 8 in SECTION TWO)
3. To Delete a Contact or Contact Group
A) Right click on the contact and click on Delete.
NOTE: If this does not work for some reason, then you can drag and drop the contact into the Recycle Bin as a workaround.
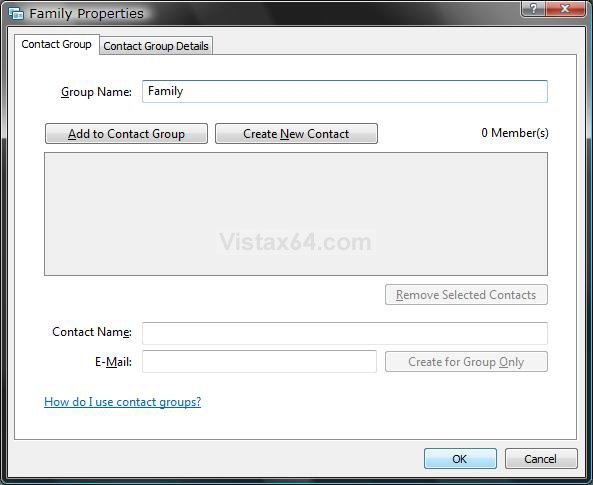
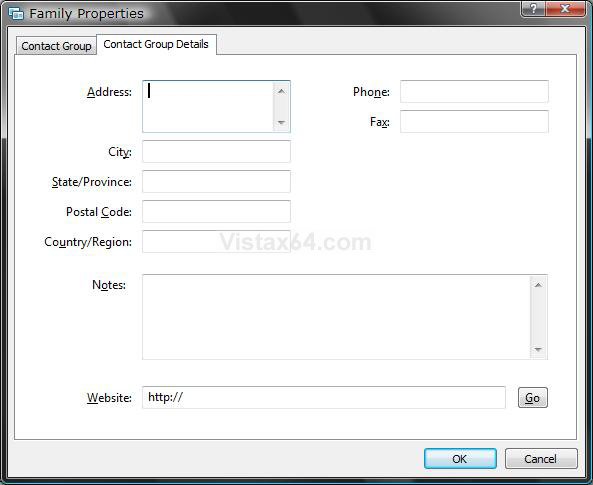
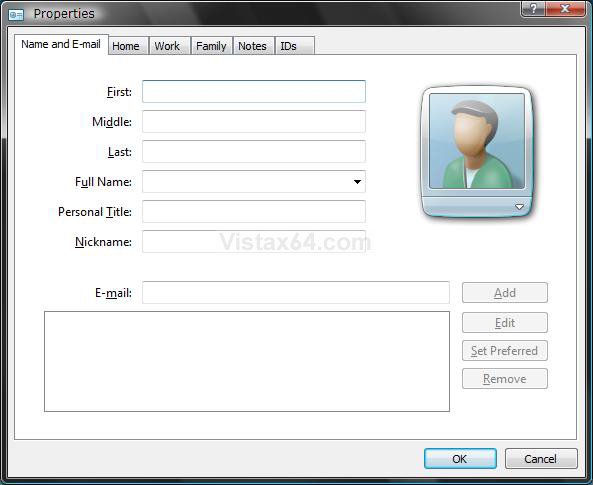
4. Type a name and any details for the group of contacts. (See screenshots below)
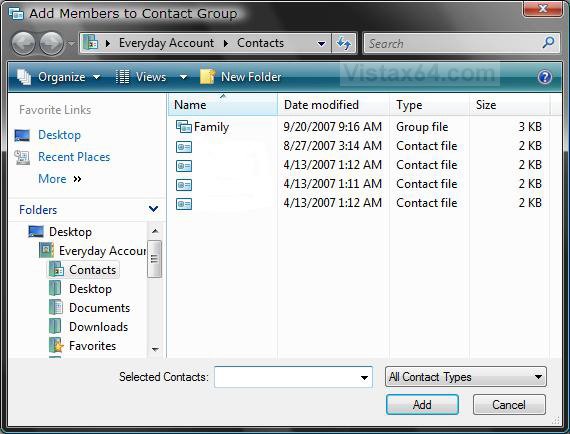
5. To Add Contacts to the Contact Group
A) Click on the Add to Contact Group button. (See screenshot above)
B) Select a existing contact and click on Add. (See screenshot below)
NOTE: This only copies the existing contact into the contact group. It does not remove or delete it.
C) Repeat until you have all of the contacts you want added to the group.
NOTE: If you delete a existing individual contact, it will also be removed from any Contact Group(s) that you added it to. The only way to prevent the contact from being removed from the Contact Group is to do step 6 below and use the Create for Group Only option.
6. To Create a New Contact for the Contact Group
A) Click on the Create New Contact button. (See screenshots below step 3)
NOTE: This will also add the new Contact as a normal contact in the Contacts folder. To add new people to the contact group without also adding them to your individual contacts, type the appropriate information in the Contact Name and E‑Mail boxes, and then click Create for Group Only.
B) Type in the contacts information and click on OK when done. (See screenshot below)
7. Click on OK when done.
 SECTION TWO
1. Open Windows Mail.
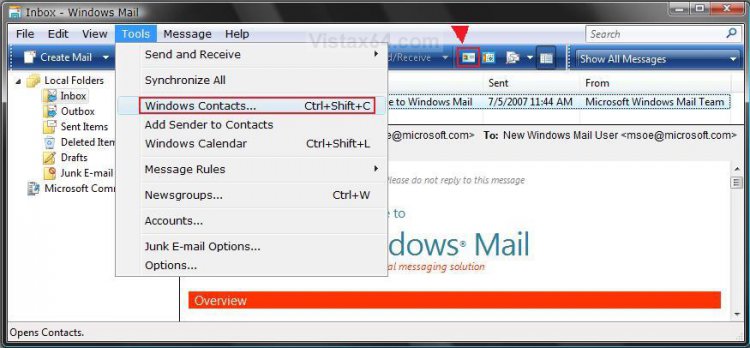
2. Click the Contacts icon (button) on Windows Mail toolbar, or click Tools and click Windows Contacts. (See screenshot below)
NOTE: You can also click on Create Mail on the toolbar and go to step 5 to select a Contact Group to send a new message to.
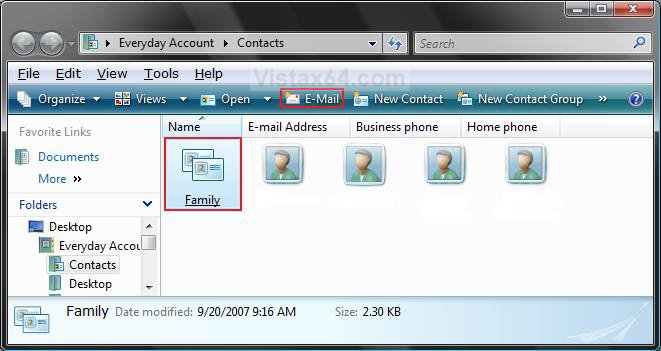
3. Click on a contact group you want to use to highlight it. (See screenshot below)
NOTE: This email will be sent to everyone in the contact group. To pick and choose who you want to send to from the contact group, see step 9 and 10 below.
4. Click on the E-Mail icon (button) on the tool bar to open a compose an e-mail window with that contact in the To: field.
NOTE: To change the columns or sorting order, see: How to Change the Windows Explorer Columns in Vista
5. To Add a Contact or Contact Group
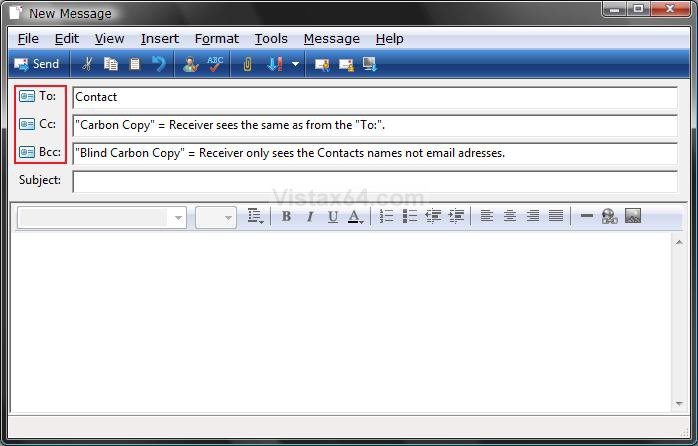
A) Click on one of the recipient buttons To: , Cc: , or Bcc: (See screenshot below)
NOTE: You can use Bcc: to send to the group without revealing their addresses. Just put your address in the To: field and the group in the Bcc: field.
6. Select the contact or contact group, and click on the recipient button To: , Cc: , or Bcc: that you want to add it to in the compose message window.
(See screenshot below step 8)
7. Repeat step 6 until you have all of the contacts you want to send this email to listed in any of the recipient boxes.
8. Click on OK when done.
NOTE: To change the sorting order of the contacts, click on a column name until you have it listed in the order you want. For example: If you click on the Name column, it will change from Ascending or Descending alphabetic order and from (First Name, Last Name) to (Last Name, First Name) order.
9. To Pick and Choose who to Send To from the Contact Group
NOTE: Have a compose email window open with a selected contact group, then:
A) Close the compose email window.
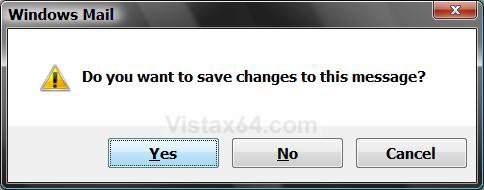
B) Click on Yes to save the email to the Drafts folder. (See screenshot below)
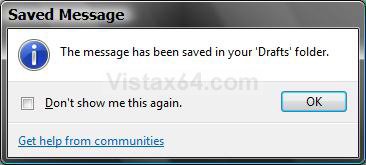
C) Click on OK. (See screenshot below)
D) Click on the Drafts folder and then open this email message.
NOTE: Double click the email or right click it and click Open.
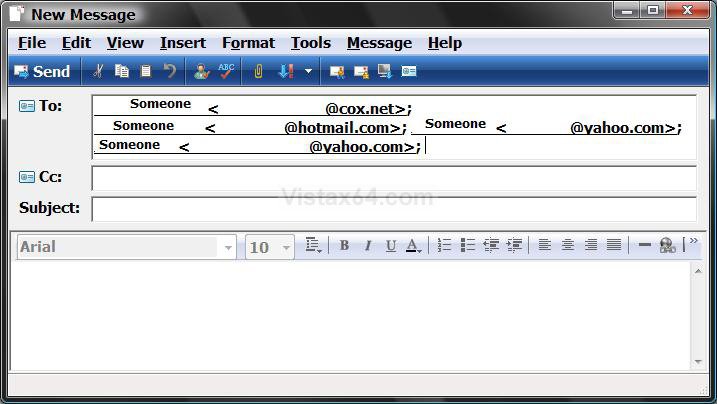
E) You can now delete the contacts in the group you do not want to send the email to. (See screenshot below)
10. To Pick a Single Contact to Send To from the Contact Group
A) Open Contacts and select and open a Contact Group.
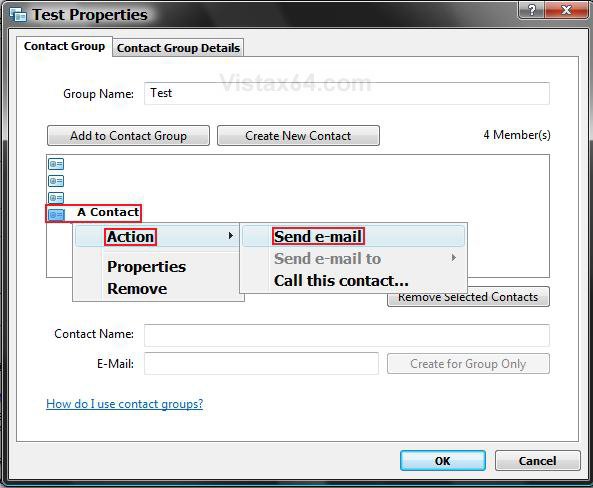
B) Right click on any one contact and click on Action and Send e-mail. (See screenshot below)
NOTE: This will open a compose message window with the selected contact in the TO: field.
11. Send your email when ready.
That's it,Shawn
Related Tutorials
- How to Fix Most Problems with Vista's "Windows Mail"
- How to Change a Windows Explorer Folder Type Template in Vista
- How to Change the Windows Explorer Columns in Vista
- How to Add the Bcc Recipient to the Windows Mail Compose Message Window
- How to Create a New E-mail to a Common Contact Shortcut in Vista
- How to Restore the Missing "New Contact" and "New Contact Group" Button in Vista Contacts Folder
- How to Import Vista and Windows 7 Contacts and Contact Groups into Windows Live Mail
Attachments
Last edited:



 (sorry vista fans!).