How to Use the Indexing Options in Vista
This will show you how to open the Indexing Options to include or exclude a file to be indexed, change the saved Index data location, rebuild the Index, and restore the default Index settings.
The Search Index needs to be enabled for these settings to be active. By default it is enabled.
 OPTION ONE
1. Open the Control Panel. (Classic View)
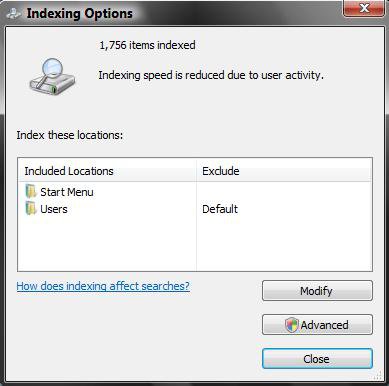
2. Click on the Indexing Options icon.
3. Click on Modify. (See screenshot below)
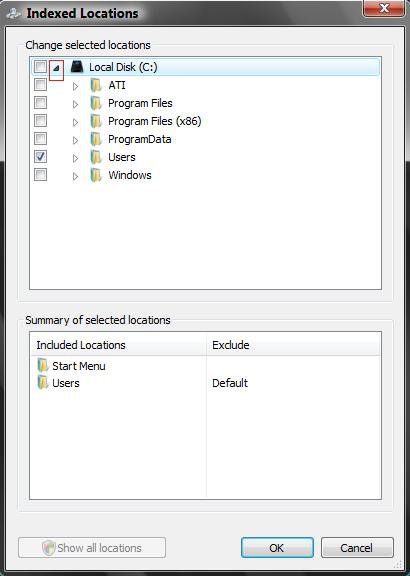
4. Click on Show all locations if it is not grayed out. (See screenshot below)
5. Click the little arrow next to the check box for the drive letter to drop down all the folders for that hard drive.
6. Check or Uncheck the folders on your hard drive or other devices listed that you want included in the index.
NOTE: The more you add, the longer the search will take.
7. Click on OK when done. (See screenshot below step 5)
8. Click on the Advanced button. (See screenshot below step 3)
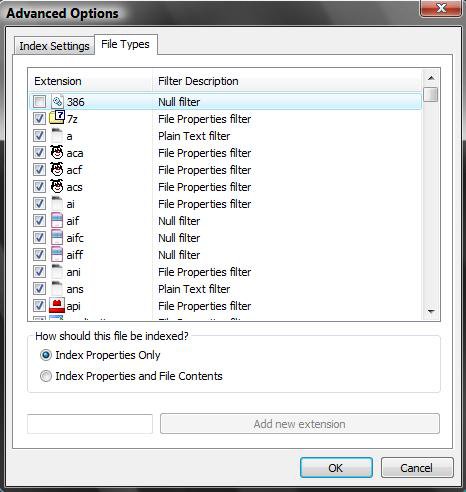
9. Click on the File Types tab. (See screenshot below)
10. Check or Uncheck the file types you want included in the index.
NOTE: The more you add, the longer the search will take.
11. Choose the option you want for "How Should this file be indexed?".
12. Click on OK when done.
13. Click on Close in the Indexing Options window. (See screenshot below step 3)
 OPTION TWO
1. Click on the Indexing Options icon. (In the Control Panel Classic View)
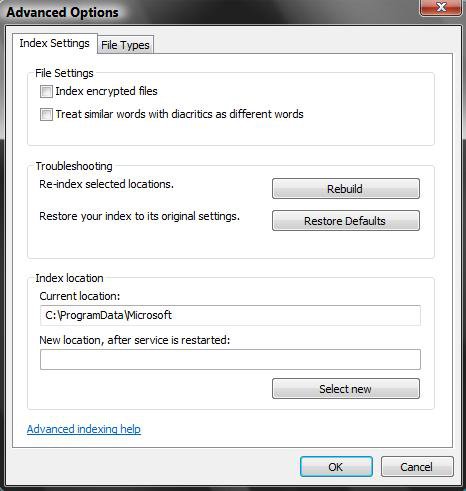
2. Click on the Advanced button. (See screenshot in OPTION ONE below step 3)
3. Go to the Index Location section. (See screenshot below step 5)
4. Either type in the full path of the new location, or click Select New button and navigate to the new location.
5. Click on OK to apply.
 OPTION THREE
1. Click on the Rebuild button. (See screenshot above)
NOTE: Rebuilding the Index will get rid of search results that still show files you deleted by making a new index list. Think of it has the ultimate Update button.
 OPTION FOUR
NOTE: This will reset all of Indexing settings and search results data back to the default clean state.
1. Click on the Restore Defaults button. (See screenshot above OPTION THREE)
2. Click OK.
3. Your computer will restart.
4. Wait until it has completed.
That's it,Shawn
Related Tutorials
- How to Enable or Disable Search Index in Vista
- How to Fix the Start Error For Windows Search Service to Enable the Index in Vista
- How to Open and Change Search Options in Vista
- How to Use Advanced Search Options in Vista
- How to Create a Search Desktop Shortcut on Vista
- How to Use the Find Window to Find Text on a Page
- How to Restore the Search Context Menu Item after Installing the Vista SP1
- How to Restore the Start Menu Search Button after Installing the Vista SP1
Attachments
Last edited by a moderator:

