How to Use the Memory Diagnostics Tool in Vista
This will show you how to open and use the Memory Diagnostics Tool to allow you to check your computer for problems with the RAM memory. For more information, see: Microsoft Online Crash Analysis: Windows Memory Diagnostic Users Guide
If you had changed your boot screen, then you will need to temporarily uncheck the No GUI boot to be able to see what is happening when the Memory Diagnostics Tool is running at boot up. For how, see: How to Enable or Replace the Hidden Aurora Boot Screen in Vista
Here's How:
1. Run from within Vista
A)Open the Control Panel (Classic View), then click on the Administrative Tools icon and click Memory Diagnostics Tool.
OR
B) Open the Start menu, then type MdSched in the search boxand press Enter.
C) Click on Continue in the UAC prompt.
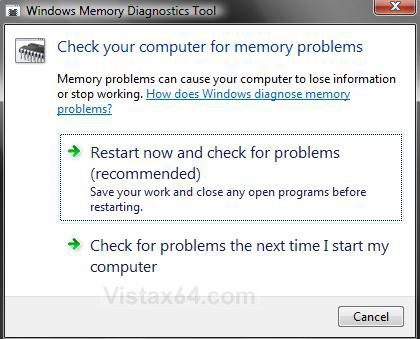
D) Click on the choice you want to do. (See screenshot below)
E) Restart the computer to run the test.
F) It will take a while to finish. (5 minutes or so)
G) Go to step 4.
2. Run from Windows Boot Manager
A) Boot into the Advanced Boot Options screen.
B) Press Esc on your keyboard while you’re in the Advanced Boot Options screen.
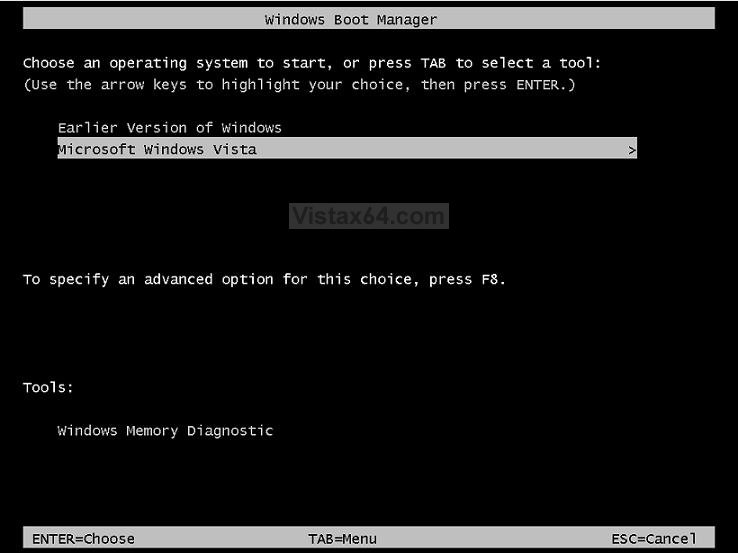
C) Press Tab on your keyboard to move to the Tools section of the boot manager screen. (See screenshot below)
NOTE: This will highlight Windows Memory Diagnostics.
D) Press Enter to start the Memory Diagnostics.
E) Go to step 4.
3. Run from System Recovery Options
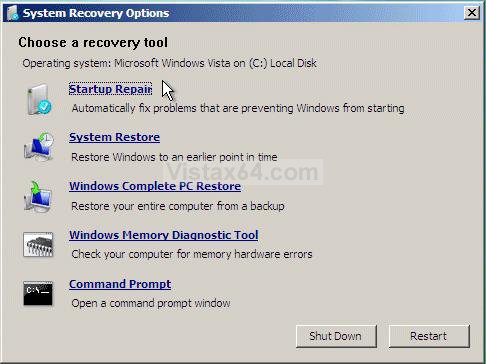
A) Boot into the System Recovery Options screen.
B) Click on the Windows Memory Diagnostic Tool option. (See screenshot below)
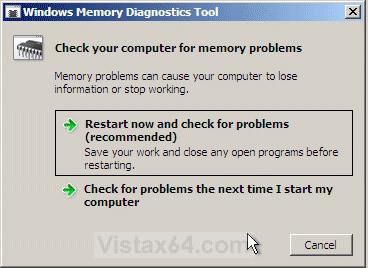
C) Click on Restart now and check for problems and wait for your computer to restart. (See screenshot below)
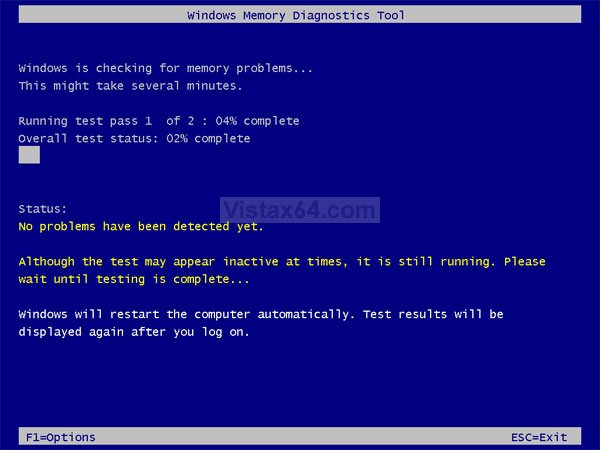
4. When the computer restarts you will see this. (See screenshot below step 6)
5. Press ESC to exit the Memory Diagnostics Tool.
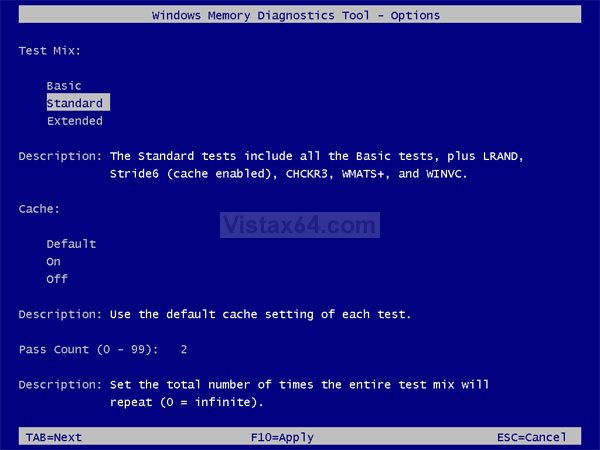
6. Press F1 to make any changes to the test options.
7. Press the TAB key to switch between option categories and the arrow keys to select the particular option. (See screenshot below)
8. Press F10 to apply any changes in the options.
9. Press ESC to cancel any changes not applied and return to the screenshot under step 6.
10. When the tests are complete, the tool will automatically reboot your computer, and the next time you log on to Vista the results of the test will be displayed as below only if problems were found now.
NOTE: If errors are found, the Windows Memory Diagnostics Tool will attempt to determine which particular memory module in your computer is causing these errors. If that information is available, it will be stated in the results. If bad memory is found then you will need to remove that memory and replace it.
11. You can also read the Memory Diagnostic Tool system log in Event Viewer.
That's it,
Shawn
Related Tutorials
- How to Repair and Verify the Integrity of Vista System Files with System File Checker
- How to Troubleshoot the Computer with Reliability Monitor in Vista
- How to Generate a System Health Report in Vista
- How to Do a Startup Repair in Vista
- How to Run Check Disk at Startup in Vista
- How to Use the DirectX Diagnostic Tool in Vista
- How to Boot Up in and Use Advanced Boot Options in Vista
- How to Use the Resource Monitor in Vista
- How to Turn DEP On or Off for a Program
- How to Do a System Restore in Vista
- How To Perform a Repair Installation For Vista
- How to Check and Change the Startup Programs in Vista
- How to Get Out of Reduced Functionality Mode in Vista
- How to Start Vista in Safe Mode
- How to Change the Virtual Memory Paging File in Vista
- How to Create a Vista Recovery Disc
- How to Read the Event Viewer Log for Memory Diagnostics Tool
Attachments
Last edited by a moderator:

