How to Change a Icon in the Control Panel in Vista
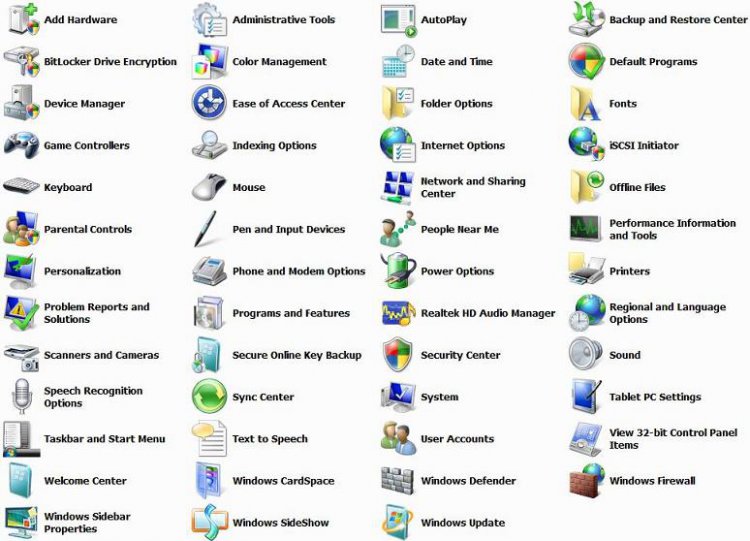
This will show you how to change most of the classic view Control Panel icons listed below to whatever you want them to be.
To change the icons back to their default (original) icons, see the post below for a list of the original default paths, and then follow these same steps.
See: Control Panel Icons
See: Control Panel Icons
The icons you decide to use must be a 256x256 .ico icon file (not .PNG) to be used in Vista without any viewing problems with a larger size. A PNG file must be converted to a 256x256 ICO file before it can be used. To convert a PNG to ICO you must use a program such as this free 30 day trial program called Axialis IconWorkshop: Axialis IconWorkshop Download Page . Here's a good location for some icons: deviantArt: Dock Icons
For a common Control Panel Problem, see: Microsoft Help and Support: Icons are missing from Control Panel, or you cannot start Control Panel, the Welcome Center, or games in Windows Vista
EXAMPLE: Default Classic Control Panel Icons
 OPTION ONE
1. Open the Start Menu.
2. In the white line (Start Search) area, type regedit and press Enter.
3. Click on the Continue button in the UAC prompt.
4. Go to the registry key location (Icon Locations below) in regedit for the icon you want to change.
Icon Locations:
HKEY_CLASSES_ROOT\CLSID\{add location here from below}
[TABLE=class:-grid,-width:-700][TR][TD]Control Panel Icon
[/TD]
[TD]
CLSID Location
[/TD][/TR]
[TR][TD]
Add Hardware
[/TD]
[TD]
{7A979262-40CE-46ff-AEEE-7884AC3B6136}\DefaultIcon
[/TD][/TR]
[TR][TD]
Administrative Tools
[/TD]
[TD]
{D20EA4E1-3957-11d2-A40B-OC5020524153}\DefaultIcon
[/TD][/TR]
[TR][TD]
Default Programs
[/TD]
[TD]
{17cd9488-1228-4b2f-88ce-4298e93e0966}\DefaultIcon
[/TD][/TR]
[TR][TD]
Device Manager
[/TD]
[TD]
{74246bfc-4c96-11d0-9bef-0020afgb0b7a}\DefaultIcon
[/TD][/TR]
[TR][TD]
Ease of Access Center
[/TD]
[TD]
{D555645E-D4F8-4c29-A827-D93C859C4F2A}\DefaultIcon
[/TD][/TR]
[TR][TD]
Folder Options
[/TD]
[TD]
{6DFD7C5C-2451-11d3-A299-00C04F8EF6AF}\DefaultIcon
[/TD][/TR]
[TR][TD]
Fonts
[/TD]
[TD]
{D20EA4E1-3957-11d2-A40b-OC5020524152}\DefaultIcon
[/TD][/TR]
[TR][TD]
Network and Sharing Center
[/TD]
[TD]
{8E908FC9-BECC-40f6-915B-F4CAOE70D03D}\DefaultIcon
[/TD][/TR]
[TR][TD]
Parental Controls
[/TD]
[TD]
{96AE8D84-A250-4520-95A5-A46A7E3C548B}\DefaultIcon
[/TD][/TR]
[TR][TD]
Personalization
[/TD]
[TD]
{ED834ED6-485A-4bfe-8F11-A626DCB6A921}\DefaultIcon
[/TD][/TR]
[TR][TD]
Printers
[/TD]
[TD]
{2227A280-3AEA-1069-A2DE-08002B30309D}\DefaultIcon
[/TD][/TR]
[TR][TD]
Programs and Features
[/TD]
[TD]
{7b81be6a-ce2b-4676-a29e-eb907a5126c5}\DefaultIcon
[/TD][/TR]
[TR][TD]
iSCSI Initiator
[/TD]
[TD]
{A304259D-52B8-4526-8B1A-A1D6CECC8243}\DefaultIcon
[/TD][/TR]
[TR][TD]
Sync Center
[/TD]
[TD]
{9C73F5E5-7AE7-4E32-A8E8-8D23B85255BF}\DefaultIcon
[/TD][/TR]
[TR][TD]
System
[/TD]
[TD]
{BB06C0E4-D293-4f75-8A90-CB05B6A77EEE}\DefaultIcon
[/TD][/TR]
[TR][TD]
Taskbar and Start Menu
[/TD]
[TD]
{0DF44EAA-FF21-4412-828E-260A8728E7F1}\DefaultIcon
[/TD][/TR]
[TR][TD]
Welcome Center
[/TD]
[TD]
{CB1B7F8C-C50A-4176-B604-9E24DEE8D4D1}\DefaultIcon
[/TD][/TR]
[TR][TD]
Windows Anytime Update
[/TD]
[TD]
{BE122A0E-4503-11DA-8BDE-F66BAD1E3F3A}\DefaultIcon
[/TD][/TR]
[TR][TD]
Windows Cardspace
[/TD]
[TD]
{78CB147A-98EA-4AA6-B0DF-C8681F69341C}\DefaultIcon
[/TD][/TR]
[TR][TD]
Windows Firewall
[/TD]
[TD]
{4026492F-2F69-46B8-B9BF-5654FC07E423}\DefaultIcon
[/TD][/TR]
[TR][TD]
Windows Sidebar
[/TD]
[TD]
{37efd44d-ef8d-41b1-940d-96973a50e9eo}\DefaultIcon
[/TD][/TR][/TABLE]
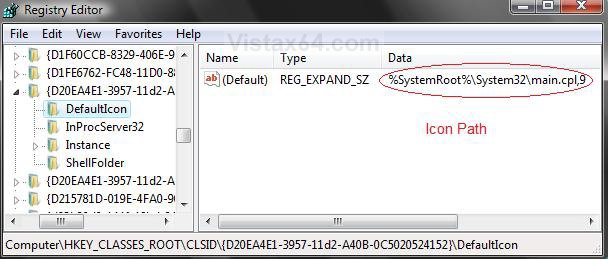
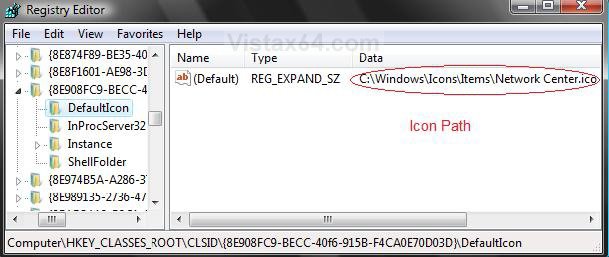
5. In the right pane, right click on (Default) and on Modify. (See example screenshots below)
Example Original Path:
Example New Path:
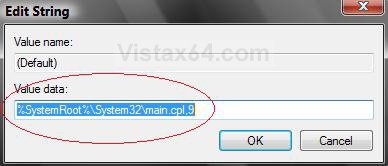
6. Type in your new Icon's full file path. (See screenshots below step 7)
EX: C:\(where ever you saved the icon)
7. Click on OK to apply.
NOTE: Now look in your Control Panel and you will see the icon has been replaced with the one you added.
 OPTION TWO
1. Open the Start Menu.
2. In the white line (Start Search) area, type regedit and press Enter.
3. Click on the Continue button in the UAC prompt.
4. Go to the registry key location (Icon Locations below) in regedit for the icon you want to change.
Icon Locations:
HKEY_CLASSES_ROOT\CLSID\{add location here from below}
[TABLE=class:-grid,-width:-700][TR][TD]Control Panel Icon
[/TD]
[TD]
CLSID Location
[/TD][/TR]
[TR][TD]
Autoplay
[/TD]
[TD]
{9C60DE1E-E5FC-4of4-A487-460851A8D915}\DefaultIcon
[/TD][/TR]
[TR][TD]
Backup and Restore Center
[/TD]
[TD]
{335a31dd-f04b-4d76-a925-d6b47cf360df}\DefaultIcon
[/TD][/TR]
[TR][TD]
Color Management
[/TD]
[TD]
{B2C761C6-29BC-4f19-9251-E6195265BAF1}\DefaultIcon
[/TD][/TR]
[TR][TD]
Performance Information and Tools
[/TD]
[TD]
{78F3955E-3B90-4184-BD14-5397C15F1EFC}\DefaultIcon
[/TD][/TR]
[TR][TD]
Power Options
[/TD]
[TD]
{025A5937-A6BE-4686-A844-36FE4BEC8B6D}\DefaulIcon
[/TD][/TR]
[TR][TD]
Problem Reports and Solutions
[/TD]
[TD]
{FCFEECAE-EE1B-4849-AE50-685DCF7717EC}\DefaultIcon
[/TD][/TR]
[TR][TD]
Scanners and Cameras
[/TD]
[TD]
{00f2886f-cd64-4fc9-8ec5-30efbcdbe8c3}\DefaultIcon
[/TD][/TR]
[TR][TD]
Speech Recognition
[/TD]
[TD]
{58E3C745-D971-4081-9034-86E34B30836A}\DefaultIcon
[/TD][/TR]
[TR][TD]
User Accounts
[/TD]
[TD]
{60632754-c523-4b62-b45c-4172da012619}\DefaultIcon
[/TD][/TR]
[TR][TD]
Windows Defender
[/TD]
[TD]
{D8559EB9-20C0-410E-BEDA-7ED416AECC2A}\DefaultIcon
[/TD][/TR]
[TR][TD]
Windows Sideshow
[/TD]
[TD]
{E95A4861-D57A-4be1-AD0F-35267E261739}\DefaultIcon
[/TD][/TR]
[TR][TD]
Windows Update
[/TD]
[TD]
{36eef7db-88ad-4e81-ad49-0e313f0c35f8}\DefaultIcon
[/TD][/TR][/TABLE]
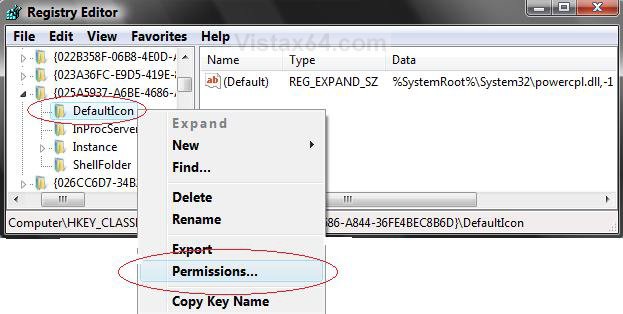
5. Right click on DefaultIcon (in left pane) and click on Properties. (See screenshot below)
NOTE: We will have to take ownership of the registry key DefaultIcon (in left pane) to do this.
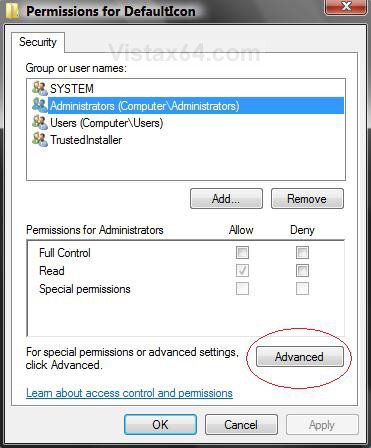
6. Here's the window to start taking ownership. (See screenshot below) Open another tab or window in IE and go to How to Take Ownership of an Item in Vista and follow instructions for method two step 3.
7. When you have taken ownership. Right click on (Default) in the right pane and click on Modify. (See screenshot below step 5)
8. Type in your new icon's full file path and press OK. (See screenshot below)
NOTE: Your Icon has been changed in Control Panel. If not, then you didn't take ownership of DefaultIcon and you will need to repeat these steps.
That's it,
Shawn
Related Tutorials
- How to Change a Folder Icon in Vista
- How to Change a Shortcut Folder or File Icon in Vista
- How to Change the Open Folder Icon in Vista
- How to Change a Folder Preview Picture in Vista
- How to Change a Drive Icon in Vista
- How to Restore and Change a Desktop Icon in Vista
- How to Change the Desktop Control Panel Icon in Vista
- How to Rebuild the Icon Cache in Vista
- How to Hide a Control Panel Icon in Vista
- How to Only Show Specified Control Panel Icons in Vista
- How to Enable or Disable the Control Panel in Vista
- How to Create a Power Options Shortcut in Vista
- How to Add User Accounts Netplwiz to the Control Panel in Vista
- How to Add or Remove Local Group Policy Editor from the Vista Control Panel
- How to Add or Remove Registry Editor from the Vista Control Panel
- How to Add User Accounts Netplwiz to the Control Panel in Vista
- How to Force Control Panel Home or Classic View in Vista
- How to Change a File Extension Type Icon in Vista
- How to Change the Vista Default Folder Icon
Attachments
Last edited by a moderator:

