How to Add a Delete Button to the Vista Windows Explorer Toolbar
By default Vista does not have a Delete button on the Windows Explorer toolbar.
This will show you how to add or remove a Delete button to the Vista Explorer toolbar. If added, the Delete button will be available for all files and folders with the All Items, Contacts, Pictures and Videos, Documents, and Music folder templates in Windows Explorer.
This will show you how to add or remove a Delete button to the Vista Explorer toolbar. If added, the Delete button will be available for all files and folders with the All Items, Contacts, Pictures and Videos, Documents, and Music folder templates in Windows Explorer.
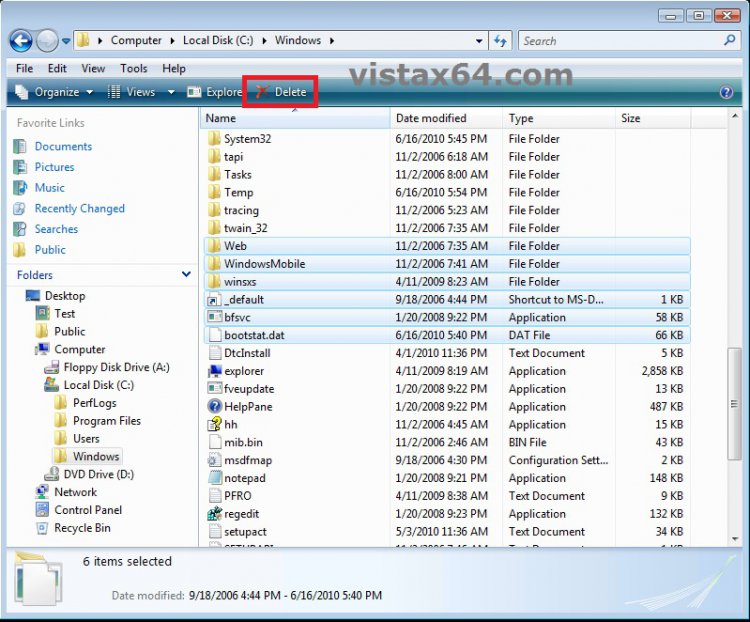
When you select one or more files or folders and click on the Delete button on the toolbar, these files and folders will be moved to the Recycle Bin.
You must be logged in as an administrator to be able to add a Delete button.
Do not use this in Windows 7. It is only for Vista.
Do not use this in Windows 7. It is only for Vista.
EXAMPLE: Delete Button Added to Vista Windows Explorer Toolbar
 OPTION ONE
1. Open the Start Menu, then type regedit in the search box and press enter.
2. In regedit, navigate to each location below. (see left screenshot below)
Code:
HKEY_LOCAL_MACHINE\SOFTWARE\Microsoft\Windows\CurrentVersion\Explorer\FolderTypes
3. If prompted by UAC, then click on Continue.
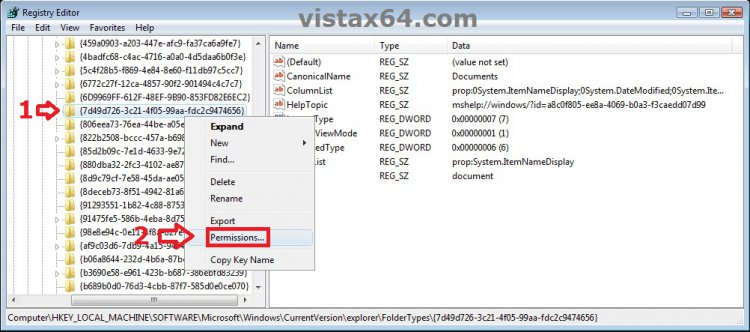
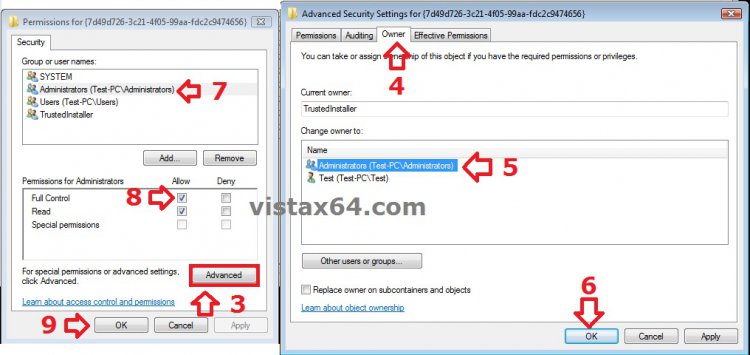
4. In the left pane under FolderTypes, right click on a {long number} key below and click on Permissions. Take ownership (step 3 in Option Two of Method TWO at this link) of this key, and Allow your administrator user account Full Control of the key. Repeat this for each {long number} key below. (see screenshots below)
NOTE: The screenshots below are numbered in order to help make doing this step easier to do.
- {5c4f28b5-f869-4e84-8e60-f11db97c5cc7}
- {7d49d726-3c21-4f05-99aa-fdc2c9474656}
- {af9c03d6-7db9-4a15-9464-13bf9fb69a2a}
- {de2b70ec-9bf7-4a93-bd3d-243f7881d492}
- {b3690e58-e961-423b-b687-386ebfd83239}
- {0b7467fb-84ba-4aae-a09b-15b71097af9e}
5. When finished, you can close regedit.
6. Click on the Download button below to download the file below.
Add_Delete_Toolbar_Button_to_Windows_Explorer.reg
7. Click on Save, and save the .reg file to the desktop.
8. Right click on the downloaded .reg file and click on Merge.
9. Click on Run, Yes, Yes, and OK when prompted.
NOTE: If you get a error about not being able to import all of the REG file, then you may have missed doing step 4 completely for one of the {long number} keys.
10. When done, you can delete the downloaded .reg file if you like.
11. If open, close and reopen Windows Explorer to see the Delete button on the toolbar when you select a file or folder.
 OPTION TWO
1. Click on the Download button below to download the file below.
Remove_Delete_Toolbar_Button_from_Windows_Explorer.reg
2. Click on Save, and save the .reg file to the desktop.
3. Right click on the downloaded .reg file and click on Merge.
4. Click on Run, Yes, Yes, and OK when prompted.
5. When done, you can delete the downloaded .reg file if you like.
6. If open, close and reopen Windows Explorer to see that the Delete button has been removed from the toolbar.
That's it,Shawn
Attachments
Last edited by a moderator:


