How to Open Local Users and Groups in Vista
This will show you how to open Local Users and Groups so you can secure and manage user accounts and groups that are stored locally on your Vista computer.
By using Local Users and Groups, you can limit the ability of users and groups to perform certain actions by assigning rights and permissions to them. A right authorizes a user to perform certain actions on a computer, such as backing up files and folders or shutting down a computer. A permission is a rule that is associated with an object (usually a file, folder, or printer), and it regulates which users can have access to the object and in what manner.
By using Local Users and Groups, you can limit the ability of users and groups to perform certain actions by assigning rights and permissions to them. A right authorizes a user to perform certain actions on a computer, such as backing up files and folders or shutting down a computer. A permission is a rule that is associated with an object (usually a file, folder, or printer), and it regulates which users can have access to the object and in what manner.
Here is a brief explanation of what the Users and Groups folders are for. For more detailed information about Local Users and Groups, click on the blue ? on the toolbar in the Local Users and Groups window.
- Users - The Users folder displays default user accounts as well as the user accounts that you create. These default user accounts are created automatically when you install the operating system. The following table describes each default user account that appears in Local Users and Groups.
- Groups - The Groups folder displays the default local groups as well as the local groups that you create. Default local groups are created automatically when you install the operating system. Belonging to a local group gives a user the rights and abilities to perform various tasks on the local computer.
- You will need to be an administrator to open the Local Security Policy Editor.
- The Local Security Group Policy Editor will only be available in the Vista Business, Ultimate, and Enterpise editions. You will not have the Local Security Policy Editor available in the Vista Home Basic and Home Premium editions.
EXAMPLE: Local Users and Groups Manager
 OPTION ONE
1. Open the Start menu, and type lusrmgr.msc in the search line and press Enter.
NOTE: This file is located at C:\Windows\System32\lusrmgr.msc.
2. If prompted by UAC, click on Continue.
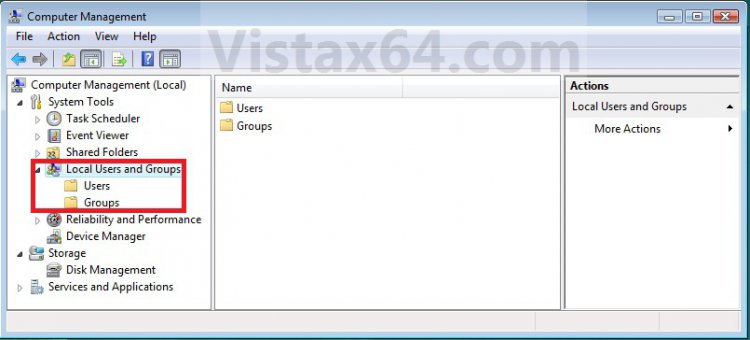
3. You can now set and manage the Local Users and Groups settings on your computer to how you want them. (See example screenshots at the top of the tutorial)
 OPTION TWO
1. Open the Control Panel (Classic view), and click on the Administrative Tools icon.
2. Close the Control Panel window.
3. In Administrative Tools, click on the Computer Management icon.
4. If prompted by UAC, click on Continue.
5. Close the Administrative Tools window.
6. In the left pane of Computer Management, double click on Local Users and Groups. (See screenshot below)
7. You can now set and manage the Local Users and Groups settings on your computer to how you want them. (See screenshot above)
 OPTION THREE
1. Open the Start Menu.
2. In the white line (Start Search) area, type netplwiz and press Enter.
3. If prompted by UAC, click on Continue.
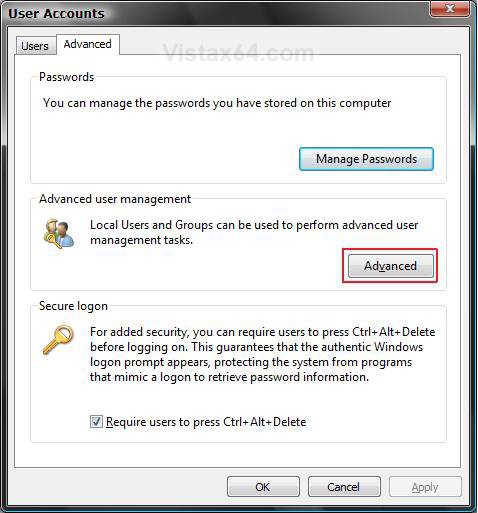
4. Click on the Advanced tab, then the Advanced button. (See screenshot below)
5. You can now set and manage the Local Users and Groups settings on your computer to how you want them. (See example screenshots at the top of the tutorial)
That's it,Shawn
Attachments
Last edited:


