How to Change the Border for Thumbnail Previews in Vista
This will show you how to change the border for all Windows Explorer thumbnail preview images in Vista to either have a drop shadow, photo, video sprockets, or no border.
You will need to click on View or Views, on Windows Explorer window Menu bar, and have it set to either Medium Icons, Large Icons, or Extra Large Icons to see a thumbnail preview of the file image as the icon.
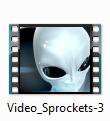
EXAMPLE: Available Thumbnail Preview Image Borders
NOTE: The default border for thumbnails in Windows Explorer is the Photo_Border-2 image below.


 OPTION ONE
1. For No Border
A) Click on the download button below to download the file below.
No_Border-0.reg
B) Go to step 5.
2. For a Drop Shadow Border
A) Click on the download button below to download the file below.
Drop_Shadow-1.reg
B) Go to step 5.
3. For a Photo Shadow Border
A) Click on the download button below to download the file below.
Photo_Border-2.reg
B) Go to step 5.
4. For a Video Sprockets Border -
A) Click on the download button below to download the file below.
Video_Sprockets-3.reg
5. Click on Save, and save the .reg file to the Desktop.
6. Right click on the downloaded .reg file and click on Merge.
7. Click on Run, Continue (UAC), Yes, and then OK when prompted.
8. When done, you can delete the downloaded .reg file if you like.
9. You may need to refresh (F5) the window or desktop to see the border change.
 OPTION TWO
1. Open the Start Menu.
2. In the white line (Start Search) area, type regedit and press Enter.
3. If prompted by UAC, then click on Continue.
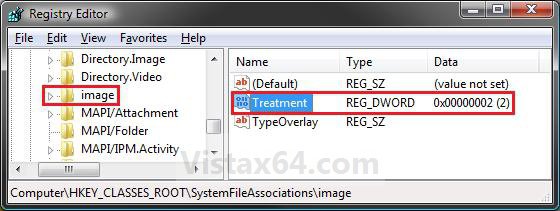
4. In regedit, navigate to the locaton below. (See screenshot below)
HKEY_CLASSES_ROOT\SystemFileAssociations\image
5. In the right pane of the registry, right click on Treatment and click on Modify. (See screenshot above)
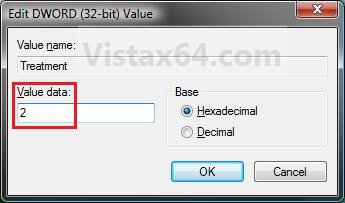
6. Type in the value data number in the table below for the border that you want for all Windows Explorer thumbnail images to have, then click on OK. (See screenshot below table)
See the example at the top of the tutorial to see what each border looks like.
[TABLE=class:-grid,-width:-300][TR][TD]Number
[/TD]
[TD]
Border
[/TD][/TR]
[TR][TD]
0
[/TD]
[TD]
No Border
[/TD][/TR]
[TR][TD]
1
[/TD]
[TD]
Drop Shadow
[/TD][/TR]
[TR][TD]
2
[/TD]
[TD]
Photo
[/TD][/TR]
[TR][TD]
3
[/TD]
[TD]
Video Sprockets
[/TD][/TR][/TABLE]
7. Close regedit.
8. You may need to refresh (F5) the window or desktop to see the border change.
That's it,Shawn
Attachments
Last edited by a moderator:


