How to Enable or Disable Create Vista System Restore Point when a Application is Installed
This will show you how to enable or disable System Restore from creating a restore point automatically when you install a application on your computer.
System Restore enables users, in the event of a problem, to restore their computers to a previous state without losing personal data files. By default, the Windows Installer automatically creates a System Restore point each time an application is installed, so that users can restore their computer to the state it was in before installing the application.
System Restore will need to be turned on for Vista to be able to create a restore point.
 OPTION ONE
NOTE: This method is only available for the Vista Business, Ultimate, and Enterprise editions. See OPTION TWO or THREE below for the Vista Basic and Home Premium editions.
1. Open the Local Group Policy Editor.
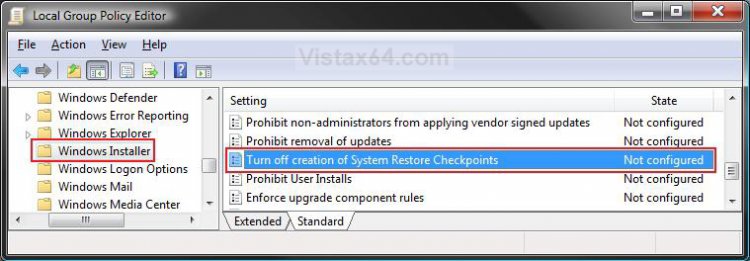
2. In the left pane, click on Computer Configuration, Administrative Templates, Windows Components, and Windows Installer. (See screenshot below)
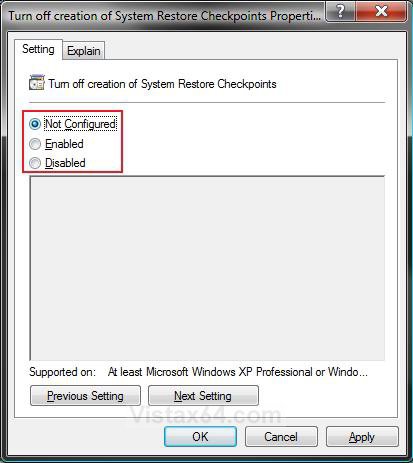
3. In the right pane, right click on Turn off creation of System Restore Checkpoints and click on Properties. (See screenshot above)
4. To Enable Create System Restore Point for Application Install
A) Select (dot) Disabled or Not Configured and click on OK. (See screenshot below step 5A)
B) Go to step 6.
5. To Disable Create System Restore Point for Application Install
A) Select (dot) Enabled and click on OK.
6. Close the Local Group Policy Editor window. Your done.
 OPTION TWO
NOTE: This method will work for all Vista editions.
1. To Enable Create System Restore Point for Application Install
A) Click on the Download button below to download the file below.
Enable_SR_Application_Install.reg
B) Go to step 3.
2. To Disable Create System Restore Point for Application Install
A) Click on the Download button below to download the file below.
Disable_SR_Application_Install.reg
3. Click on Save, and save the .reg file to the Desktop.
4. Right click on the downloaded .reg file and click on Merge.
5. Click on Run, Continue (UAC), Yes, and then OK when prompted.
6. When done, you can delete the downloaded .reg file if you like.
7. Log off and log on, or restart the computer to apply.
 OPTION THREE
NOTE: This method will work for all Vista editions.
1. Open the Start Menu.
2. In the white line (Start Search) area, type regedit and press Enter.
3. Click on the Continue button in the UAC prompt.
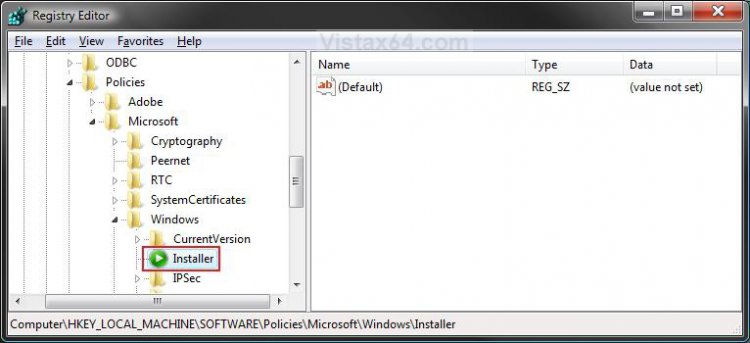
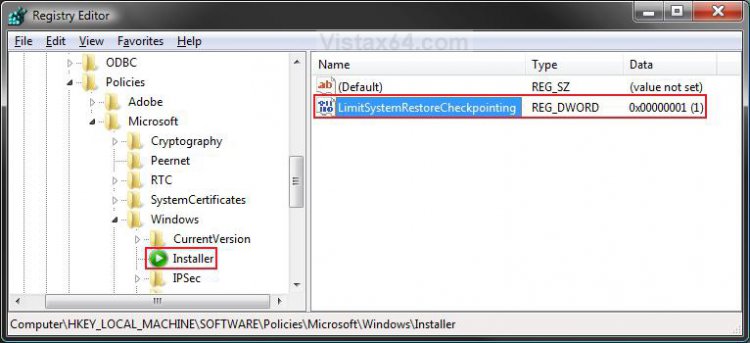
4. In regedit, go to: (See screenshot below)
NOTE: If you do not have Installer, then right click on Windows and click on New and Key. Type Installer and press Enter.
HKEY_LOCAL_MACHINE\SOFTWARE\Policies\Microsoft\Windows\Installer
5. To Disable Create System Restore Point for Application Install
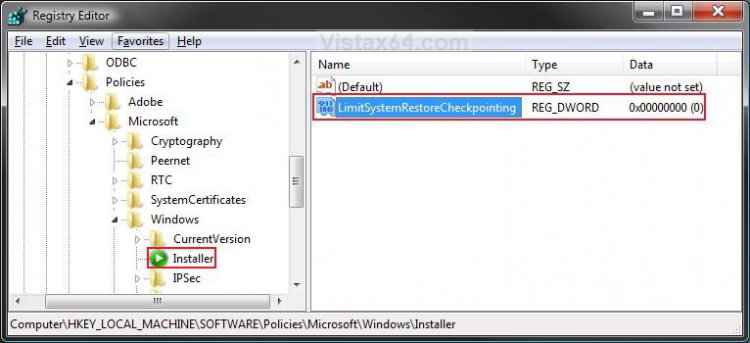
A) In the right pane, right click on a empty area and click on New and DWORD (32-bit) Value. Type LimitSystemRestoreCheckpointing and press Enter. (See screenshot below)
B) Right click on LimitSystemRestoreCheckpointing and click on Modify.
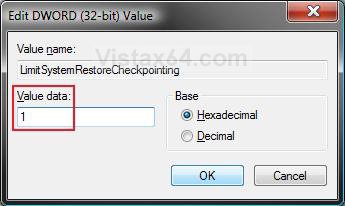
C) Type 1 and click on OK. (See screenshot below)
D) The registry will now look like this. (See screenshot below)
E) Go to step 7.
6. To Enable Create System Restore Point for Application Install
A) In the right pane, right click on LimitSystemRestoreCheckpointing and click on Delete. (See screenshot above)
B) Click on Yes to confirm the deletion.
7. Log off and log on, or restart the computer to apply.
That's it,Shawn
Related Tutorials
- How to Create a System Restore Shortcut in Vista
- How to Create a Create System Restore Point Shortcut in Vista
- How to Create a System Restore Point in Vista
- How to Undo the Last System Restore in Vista
- How to Do a System Restore in Vista
- How to Turn System Restore On or Off in Vista
- How to Use Disk Cleanup in Vista
- How to Stop System Restore Points from being Deleted in Vista when Dual Booting with XP
- How to Change the Automatic System Restore Point Settings in Vista Task Scheduler
- How to Change the System Restore Disk Space Usage in Vista
- How to Enable or Disable Create Vista System Restore Point when New Device Driver is Installed
Attachments
Last edited:

