How to Set Vista Account Lockout when a User Fails to Logon
This will allow you to set Vista to lockout user accounts at logon when a user fails to have a valid logon for how many attempts you specify until how many minutes you specify until they can try logging on again, or until a administrator unlocks the user account. By default, this is not enabled in Vista.
Failed password attempts against workstations or member servers that have been locked using either CTRL+ALT+DELETE or password protected screen savers count as failed logon attempts. If this applies to you, be sure to allow for this in the Account lockout threshold amount below.
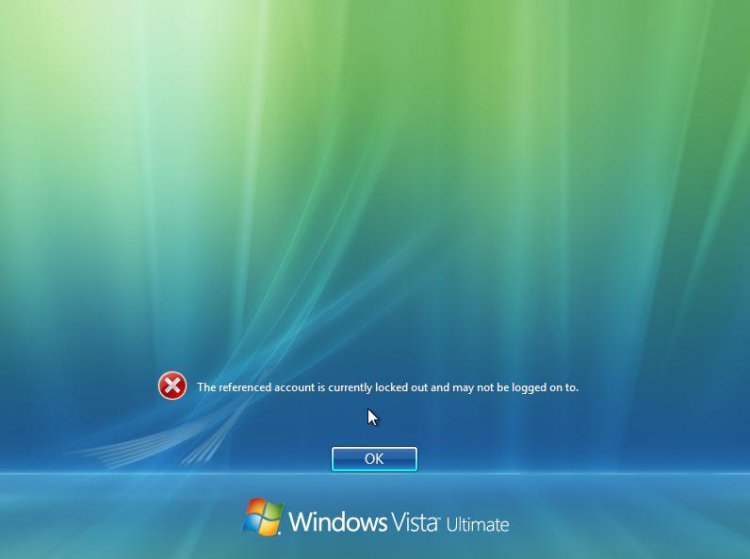
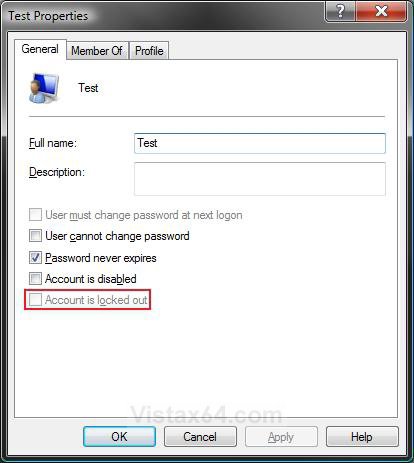
EXAMPLE: A User Account Locked Out at Logon
 METHOD ONE
NOTE: The Vista Home Basic and Home Premium editions do not have this feature. See METHOD TWO below for how with these editions instead.
1. Open the Local Security Policy editor.
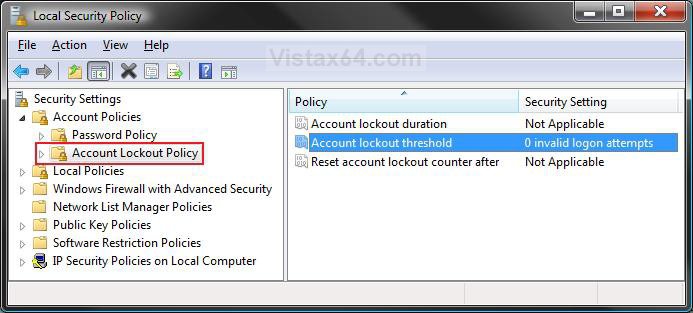
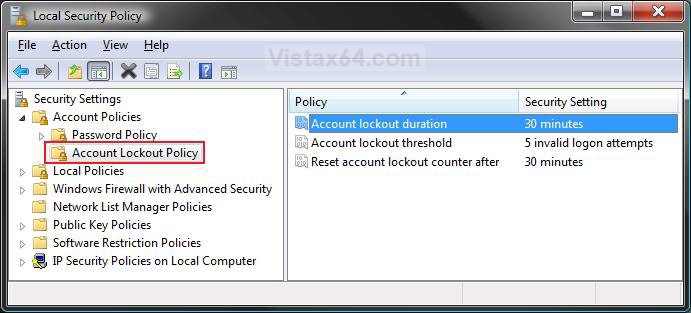
2. In the left pane, under Security Settings, click on the arrow next to Account Policies to expand it. (See screenshot below step 3)
3. In the left pane, click on the Account Lockout Policy folder.
4. To Set the Number of Failed Logon Attempts Allowed
NOTE: This must be set to a number other than the default 0 (number zero) to enable Account Lockout and to be able to set or change steps 5 and 6.
A) In the right pane, right click on Account lockout threshold and click on Properties. (See screenshot above)
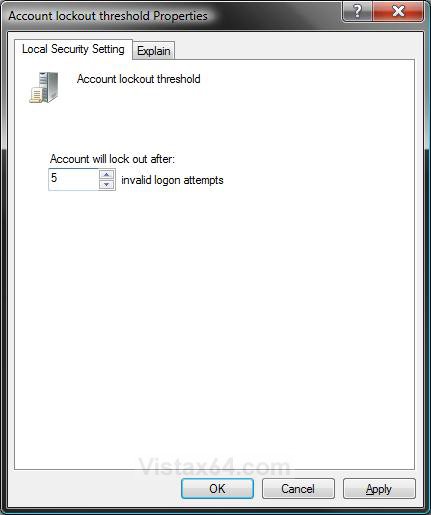
B) Type in a number between 0 and 999 failed attempts you want allowed and click on OK. (See screenshot below)
NOTE: Typing in the number 0 will disable Account Lockout and set steps 5 and 6 back to the default setting of Not Applicable.
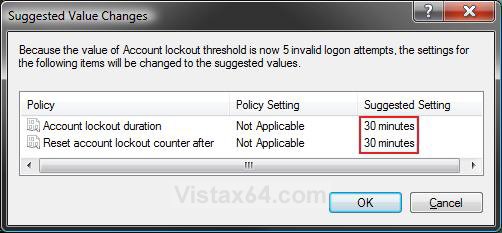
C) Click on OK in the Suggested Value Changes window. (See screenshot below)
NOTE: You will not see this window unless you are changing the number of attempts from step 6B from 0 or to 0. You can still manually change these Suggested Settings for steps 5 and 6 below if you do not want them set at 30 minutes.
D) The setting will now look similar to this. (See screenshot below)
5. To Set or Change the Account Lockout Duration
NOTE: This setting determines the number of minutes a locked out account remains locked out before it is automatically unlocked. Step 4B above must be set to a number other than 0 (zero) to be able to change this setting.
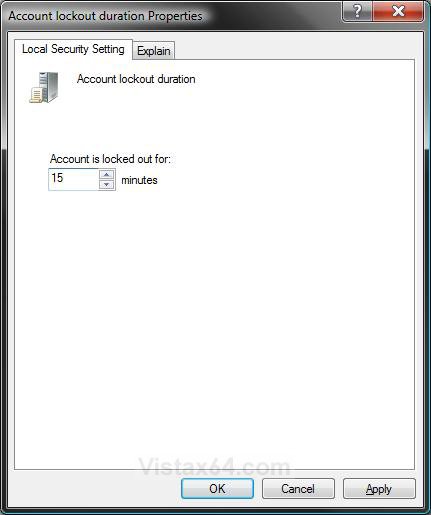
A) In the right pane, right click on Account lockout duration and click on Properties. (See screenshot above)
B) Type in a number between 0 and 99,999 minutes you want before unlock and click on OK. (See screenshot below)
NOTE: If you set the account lockout duration to the number 0, the account will be locked out until an administrator explicitly unlocks it using step 8. If you set the account lockout duration to a number other than 0, then it must be greater than or equal to the reset time in step 6.
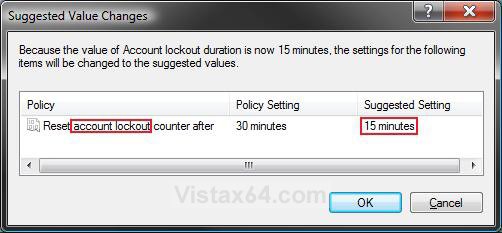
C) Click on OK in the Suggested Value Changes window. (See screenshot below)
NOTE: You will not see this window unless you are changing the number of minutes to a number lower than what they are set for in step 6. You can still manually change these Suggested Settings for step 6 below if you do not want it set as the same as step 5B.
6. To Set or Change the Reset Account Lockout Counter
NOTE: This setting determines the number of minutes that must elapse after a failed logon attempt before the failed logon attempt counter is reset to 0 failed logon attempts. Step 4B above must be set to a number other than 0 (zero) to be able to change this setting.
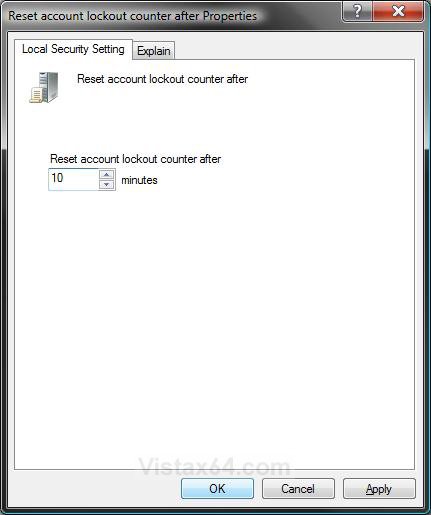
A) In the right pane, right click on Reset account lockout counter after and click on Properties. (See screenshot below step 3 or 4D)
B) Type in a number between 1 and 99,999 minutes you want before counter reset and click on OK. (See screenshot below)
NOTE: This must be less than or equal to the minutes set for the Account lockout duration in step 5B.
7. When done, close the Local Security Policy window. (See screenshot below step 3 or 4D)
8. How to Unlock a User Account Manually from a Administrator Account
NOTE: A Administrator account can manually unlock a user account that is locked out at any time. This will be the only way to unlock a user account if you set step 5B to 0 (number) minutes.
A) Open the Local Users and Groups manager.
B) In the left pane, click on Users. (See screenshot below)
C) In the middle pane, right click on the locked out user account you want to unlock and click on Properties.
D) Uncheck the Account is locked out box and click on OK. (See screenshot below)
E) When done, close the Local Users and Groups window. (See screenshot below step 8C)
 METHOD TWO
NOTE: You can do this method in all versions of Vista.
1. Open a elevated command prompt.
2. To See the Current Account Lockout Settings
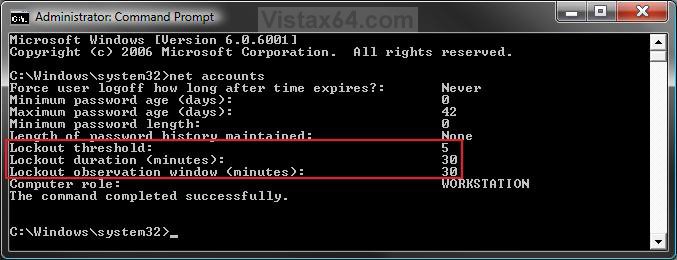
A) In the command prompt, type net accounts and press Enter. (See screenshot below)
NOTE: The listed items boxed in red is the current status of the Account Lockout settings.
3. To Set the Number of Failed Logon Attempts Allowed
NOTE: The Lockout threshold setting must be set to a number other than the default 0 (number zero) to enable Account Lockout and to be able to set or change steps 4 and 5. Typing in the number 0 in 3A will disable Account Lockout.
A) In the command prompt, type net accounts /lockoutthreshold:X and press Enter.
NOTE: Substitute X for a number between 0 and 999 failed attempts you want allowed.
For example: net accounts /lockoutthreshold:30
4. To Set or Change the Account Lockout Duration
NOTE: This Lockout duration <minutes> setting determines the number of minutes a locked out account remains locked out before it is automatically unlocked. Step 3A above must be set to a number other than 0 (zero) to be able to change this setting.
A) In the command prompt, type net accounts /lockoutduration:X and press Enter.
NOTE: Substitute X for a number between 0 and 99,999 minutes you want before unlock.
For example: net accounts /lockoutduration:30
WARNING: If you set the account lockout duration to the number 0, the account will be locked out until an administrator explicitly unlocks it using step 8 in METHOD ONE. Do not set this to 0 if you have the Vista Home Basic or Home Premium editions. You will not be able to use step 8 in METHOD ONE. If you set the account lockout duration to a number other than 0, then it must be greater than or equal to the reset time in step 5.
5. To Set or Change the Reset Account Lockout Counter
NOTE: The Lockout observation window <minutes> setting determines the number of minutes that must elapse after a failed logon attempt before the failed logon attempt counter is reset to 0 failed logon attempts. Step 6B above must be set to a number other than 0 (zero) to be able to change this setting.
A) In the command prompt, type net accounts /lockoutwindow:X and press Enter.
NOTE: Substitute X for a number between 1 and 99,999 minutes you want before counter reset.
For example: net accounts /lockoutwindow:30
WARNING: This must be less than or equal to the minutes set for the Account lockout duration in step 4A.
6. Close the command prompt. (See screenshot below step 2A)
NOTE: If you get a error while doing steps 3, 4, or 5, then check to make sure that you have followed the WARNING in each step.
That's it,Shawn
Related Tutorials
- How to Display Information About Previous Logons During User Logon in Vista
- How to Make Vista Require a Username and Password at Logon
- How to Change or Stop Password Expiration in Vista
- How to Display a Logon Message Title and Text in Vista
- How to Change the Number of Logon Entries Allowed to be Saved in the Logon Cache in Vista
- How to Logon Automatically at Startup in Vista
- How to Enable or Disable Secure Logon in Vista
Attachments
Last edited:

