Compatibility Properties Tab - Restore or Remove

How to Restore or Remove the "Compatibilty" Tab in Vista

information   Information
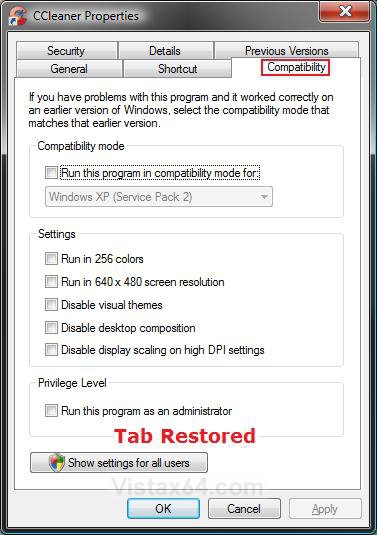
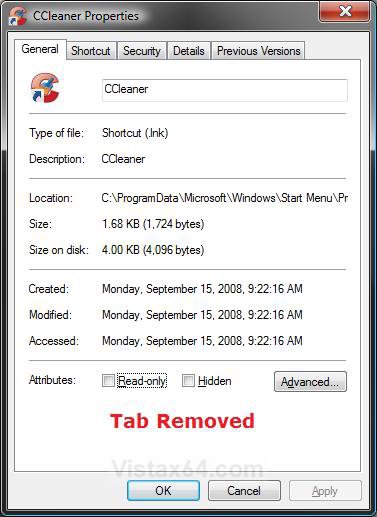
This will show you how to restore or remove the Compatibility tab in the Properties window of all folders, files, shortcuts, and drives for all users on the computer. By default, the Compatibility tab is displayed in Properties.
Note   Note
If the methods below do not help in restoring the Compatibility tab, then run the sfc /scannow command to repair the C:\Windows\System32\wer.dll and C:\Windows\System32\faultrep.dll files.

EXAMPLE: Compatibility tab Before and After removed from Properties
Tab_Restored.jpgTab_Removed.jpg


METHOD ONE
Through Local Group Policy Editor

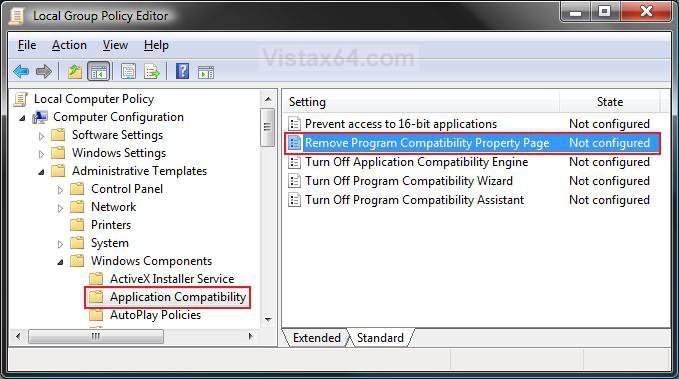
2. In the left pane, click on Computer Configuration, Administrative Templates, Windows Components, and Application Compatibility. (See screenshot below)​
Group_Policy.jpg

3. In the right pane, right click on Remove Program Compatibility Property Page and click on Properties. (See screenshot above)​
4. To Restore the Compatiblity Tab
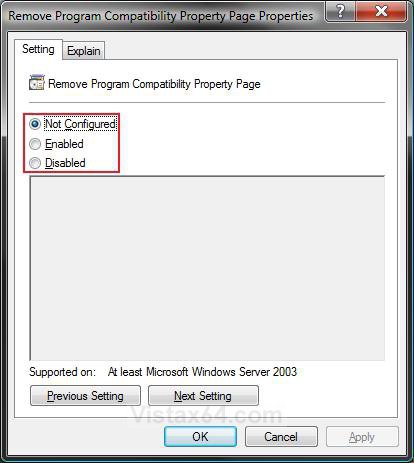
A) Select (dot) Disabled or Not Configured and click on OK. (See screenshot below step 5A)​
B) Go to step 6.​

5. To Remove the Compatiblity Tab -
A) Select (dot) Enabled and click on OK.​
Properties.jpg

6. Close the Local Group Policy Editor window. Your done.​


METHOD TWO
Using a REG File Download

1. To Restore the Compatiblity Tab
A) Click on the Download button below to download the file below.​
Restore_Compatibility_Tab.reg
download

B) Go to step 3.​

2. To Remove the Compatiblity Tab
A) Click on the Download button below to download the file below.​
Remove_Compatibility_Tab.reg
download

3. Click on Save, and save the .reg file to the Desktop.​
4. Right click on the downloaded .reg file and click on Merge.​
5. Click on Run, Continue (UAC), Yes, and then OK when prompted.​
6. When done, you can delete the downloaded .reg file if you like.​


METHOD THREE
Manually in Registry Editor

1. Open the Start Menu, then type regedit in the search box and press Enter.​
2. If promped by UAC, then click on Continue (Vista) or Yes (Windows 7).​
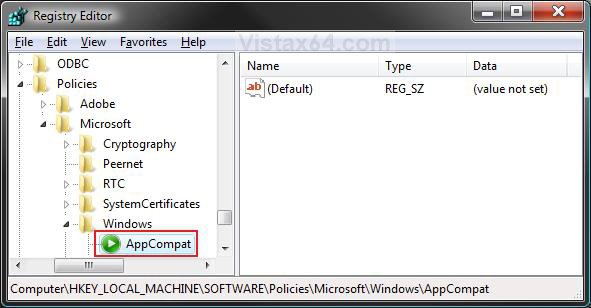
3. In regedit, navigate to the location below. (See screenshot below)​
NOTE: If AppCompat is not there, then right click on Windows and click on New and Key. Type AppCompat and press Enter.​
HKEY_LOCAL_MACHINE\SOFTWARE\Policies\Microsoft\Windows\AppCompat
Reg1.jpg

4. To Remove the Compatiblity Tab
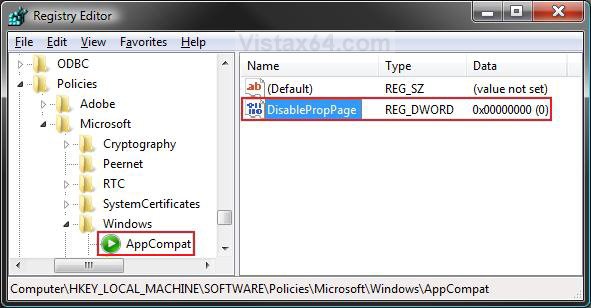
A) In the right pane, right click on a empty area and click on New and DWORD (32-bit) Value. (See screenshot above)​
B) Type DisablePropPage and press Enter. (See screenshot below)​
C) Right click on DisablePropPage and click on Modify.​
Reg2.jpg

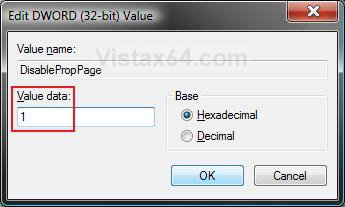
D) Type 1 and click on OK. (See screenshot below)​
Modify.jpg

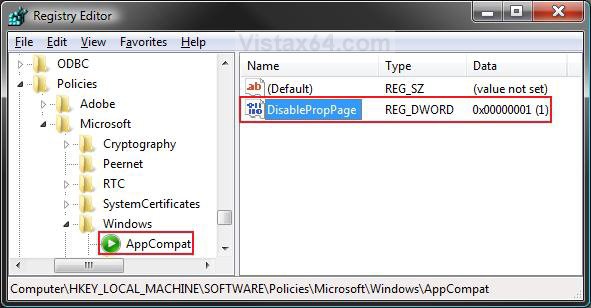
E) The registry will now look like this. (See screenshot below)​
F) Go to step 6.​
Reg3.jpg

5. To Restore the Compatiblity Tab
A) In the right pane, right click on DisablePropPage and click on Delete. (See screenshot above)​
B) Click on Yes to confirm the deletion.​

6. Close regedit.​
That's it,
Shawn


Attachments

Last edited:
I followed both Method 2 and Method 3 and compatability tabs were not restored in my Windows Media Player or Windows DVD Maker (I don't know where else to look for compatability tabs). I need the compatability tabs to be there so I can change the audio filters. My problem is that I can burn a video dvd that will play in my dvd player, but no audio plays. If I play the dvd on the pc it plays audio. I have burned dvds in WMP, WDM and my sony and canon programs. Only the WDM dvd played video only in other dvd player, the others didn't work at all. I am using DVD+R discs. I do not have any extra codecs programs (although I did add the Vista Codecs 64x Package). It is probably obvious to you, but I do not know much about computers, I only follow instructions online. Please advise me. Thank you.
 

My Computer

System One

  • Manufacturer/Model
    Gateway
Hello Slh134, and welcome to Vista Forums.

Compatibility Mode is for 3rd party programs and not for Windows system files like WMP or WDM. The options for Compatibilty Mode are grayed out for system files, so you would not be able to change them anyways. :(

You should go ahead and post your issue with the codecs, playing video and audio in the Media Center forum area to see if we may be able to help better with it.
 

My Computers

System One System Two

  • Operating System
    Windows 10 Pro 64-bit
    Manufacturer/Model
    Custom
    CPU
    Intel i7-8700K 5 GHz
    Motherboard
    ASUS ROG Maximus XI Formula Z390
    Memory
    64 GB (4x16GB) G.SKILL TridentZ RGB DDR4 3600 MHz (F4-3600C18D-32GTZR)
    Graphics card(s)
    ASUS ROG-STRIX-GTX1080TI-O11G-GAMING
    Sound Card
    Integrated Digital Audio (S/PDIF)
    Monitor(s) Displays
    2 x Samsung Odyssey G7 27"
    Screen Resolution
    2560x1440
    Hard Drives
    1TB Samsung 990 PRO M.2, 4TB Samsung 990 PRO PRO M.2, 8TB WD MyCloudEX2Ultra NAS
    PSU
    Seasonic Prime Titanium 850W
    Case
    Thermaltake Core P3
    Cooling
    Corsair Hydro H115i
    Mouse
    Logitech MX Master 3
    Keyboard
    Logitech wireless K800
    Internet Speed
    1 Gb/s Download and 35 Mb/s Upload
    Other Info
    Logitech Z625 speaker system, Logitech BRIO 4K Pro webcam, HP Color LaserJet Pro MFP M477fdn, APC SMART-UPS RT 1000 XL - SURT1000XLI, Galaxy S23 Plus phone
  • Operating System
    Windows 10 Pro
    Manufacturer/Model
    HP Envy Y0F94AV
    CPU
    i7-7500U @ 2.70 GHz
    Memory
    16 GB DDR4-2133
    Sound Card
    Conexant ISST Audio
    Monitor(s) Displays
    17.3" UHD IPS touch
    Screen Resolution
    3480 x 2160
    Hard Drives
    512 GB M.2 SSD
Back
Top