How to Join or Unjoin Vista Microsoft SpyNet for Windows Defender
This will show you how to Join or unjoin Microsoft SpyNet for reports sent to Microsoft from Windows Defender about spyware and potentially unwanted software to help Microsoft identify potential threats and improve how Windows Defender works. By default, you are not joined up.
For more information about this, see: Windows Defender: Privacy Policy
For more information about this, see: Windows Defender: Privacy Policy
The online Microsoft SpyNet community is a voluntary, worldwide community of Windows Defender users. Through Microsoft SpyNet, users can report spyware and other forms of potentially unwanted software to Microsoft. If you choose to join, reports about spyware and potentially unwanted software are sent to Microsoft. The type of information that is sent in reports depends on your level of Microsoft SpyNet membership.
The online Microsoft SpyNet community also helps you see how other people respond to software that has not yet been classified for risks. If you choose to be notified about this software, seeing if other members of the community permit or deny the software or changes made by the software can help you decide what to do. In turn, if you participate, your choices are added to the community ratings to help other people decide what to do. You can choose to be notified about software that has not yet been classified for risks by using the options provided in Windows Defender or by joining Microsoft SpyNet with an advanced membership.
The online Microsoft SpyNet community also helps you see how other people respond to software that has not yet been classified for risks. If you choose to be notified about this software, seeing if other members of the community permit or deny the software or changes made by the software can help you decide what to do. In turn, if you participate, your choices are added to the community ratings to help other people decide what to do. You can choose to be notified about software that has not yet been classified for risks by using the options provided in Windows Defender or by joining Microsoft SpyNet with an advanced membership.
Here's How:
1. Open the Control Panel. (Classic View)
2. Click on the Windows Defender icon.
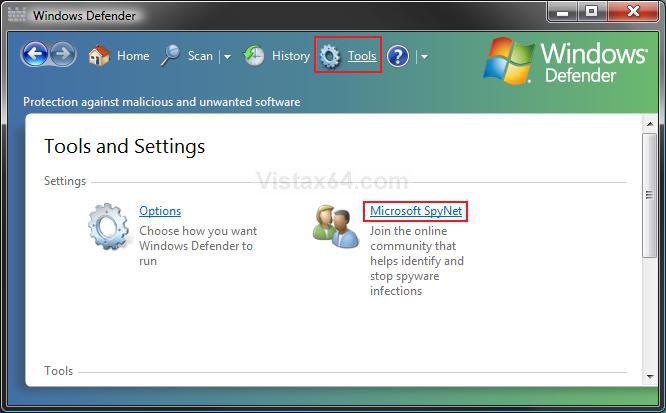
3. Click on the Tools toolbar icon. (See screenshot below)
4. Click on the Microsoft SpyNet link.
5. To Join Microsoft SpyNet
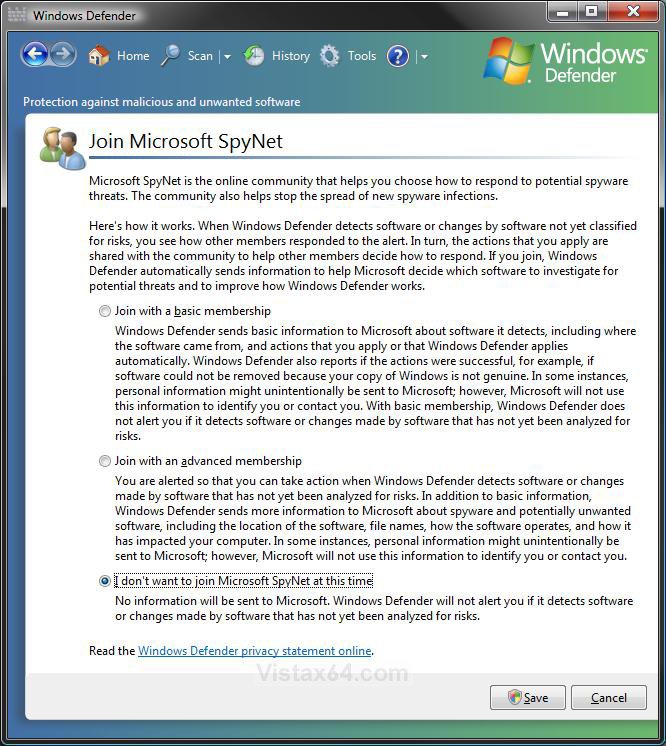
A) Dot the Join with a basic membership or Join with an advanced membership option. (See screenshot below step 7)
B) Go to step 7.
6. To Unjoin Microsoft SpyNet
A) Dot I don't want to join Microsoft SpyNet at this time.
NOTE: This is the default setting.
7. Click on the Save button.
8. Click on Continue in the UAC prompt.
9. Close Windows Defender.
That's it,Shawn
Related Tutorials
Attachments
Last edited:


