How to Change the Network Idle Session Time to Automatically Disconnect in Vista
This will show you how to change how long a Network (LAN) session to your computer can remain idle for in minutes before your computer automatically disconnects them, or to turn off autodisconnect.
This is not for a internet connection. It is for the other computers connected to your computer by a Local Area Network (LAN) on the same workgroup or domain.
After the set idle time, the users will be disconnected automatically from the local area network (LAN) session connection to your computer and they will have to log on again to access the allowed files on your computer. This will include mapped drives.
 OPTION ONE
1. Open a elevated command prompt.
2. To Verify and See what the Current Idle Session Time (min) is
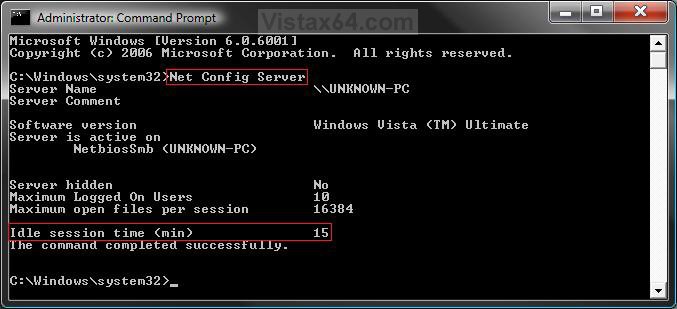
A) In the command prompt, type Net Config Server and press Enter. (See screenshot below)
B) To the right of Idle session time (min), you will see the amount of idle minutes set to autodisconnect.
NOTE: The default time is 15 minutes.
3. To Change the Idle Session Time (min) to Autodisconnect
A) In the elevated command prompt, type in bold below and press Enter. (See screenshot below)
NOTE: Replace XX with a value of -1 to 65535 minutes. For 30 minutes, you would type:
net config server /autodisconnect:30
WARNING: -1 is to never autodisconnect, and 0 (number zero) will cause an almost instant autodisconnect.
net config server /autodisconnect:XX
B) You will get a The command completed successfully message afterwards.
4. Close the elevated command prompt window.
5. Restart the computer to apply.
NOTE: You can verify the changes in step 2 above.
 OPTION TWO
1. Open the Start Menu.
2. In the white line (Start Search) area, type regedit and press Enter.
3. Click on Continue in the UAC prompt.
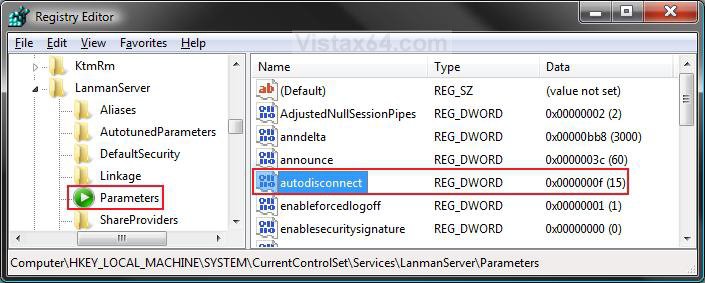
4. In regedit, go to: (See screenshot below step 5)
HKEY_LOCAL_MACHINE\SYSTEM\CurrentControlSet\Services\LanmanServer\Parameters
5. In the right pane, right click on autodisconnect and click on Modify.
NOTE: If autodisconnect is not here, then in the right pane, right click on a empty area and click on New and DWORD (32-bit) Value and type autodisconnect and press Enter.
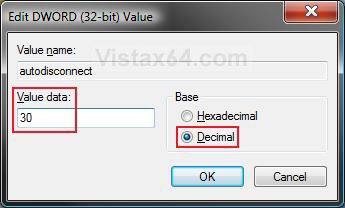
6. Dot Decimal, and type in from 0 (number zero) to 65535 minutes for the idle time you want set and click on OK. (See screenshot below)
NOTE: The default time is 15 minutes. You cannot enter -1 in the registry to never autodisconnect, instead you will have to use METHOD ONE if this is what you wanted to do.
WARNING: Entering 0 (number zero) will cause an almost instant autodisconnect.
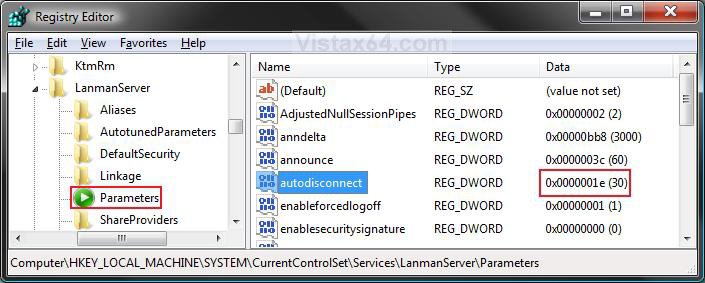
7. The registry will now look similar to this with autodisconnect set to 30 minutes. (See screenshot below)
8. Close regedit.
9. Restart the computer to apply changes.
NOTE: You can verify the changes in OPTION ONE (step 2) above.
That's it,Shawn
Related Tutorials
- How to Turn Network Discovery On or Off in Vista
- How to Change the Network Location Type in Vista
- How to Change the Workgroup Name in Vista
- How to Change the Computer Name in Vista
- How to Disconnect a Network User Connection in Vista
- How to View and Browse a Computer or Device on a Network in Vista
- How to Enable Simple File Sharing in Vista
- How to Hide or Unhide Your Vista Computer Name in a Network
Attachments
Last edited:


