How to Setup a Shared Printer for XP, Vista, and Windows 7
This tutorial will step you through the process of sharing a printer on XP, Vista and Windows 7.
This has been successful on an XP Home Edition Computer with a Canon MP150, 190 and a wireless Vista Home Premium x86/x64, multiple Windows 7 x64 and a XP notebook and desktop. All computers sharing need to be on the same workgroup and network.
This has been successful on an XP Home Edition Computer with a Canon MP150, 190 and a wireless Vista Home Premium x86/x64, multiple Windows 7 x64 and a XP notebook and desktop. All computers sharing need to be on the same workgroup and network.
Printer sharing needs to be enabled on the Host computer.
Only use this method if USB or other corded connections are not acceptable. This is a supplement to normal printer connections. Please ask for help by posting a reply at the bottom. I myself will reply or another member of the Vista x64 community.
1. On your network, look at the computer name for the computer you wish to connect to (Host) and click in to it. You should be able to see the name of the printer you wish to connect. You will need these 2 names for step number 7/8.

2. Now click on the Printers icon in the control panel.
3. Right click on a blank portion of the screen, select add printer and a menu will pop up.
4. Choose the add local printer option.

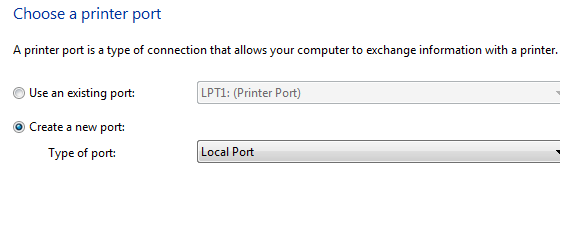
5. Now choose 'Create New Port'.

6. Click Next.
7. Another popup screen will open. This is where you need the computer and printer name.
8. Enter the following into the box \\computername\printername

9. Click OK
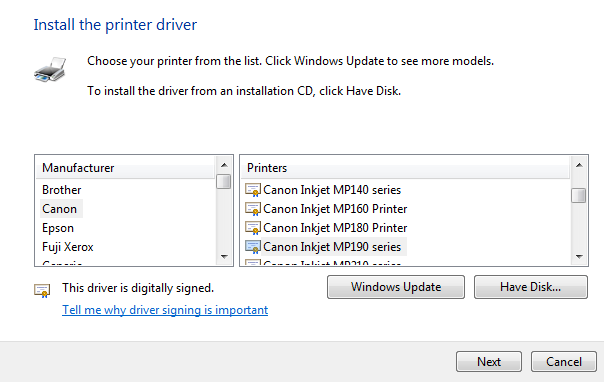
10. It will now prompt you to pick your printer firmware. Select your model.

11. Click Next. It will now ask to either use the installed driver, or replace the current driver. Pick what you wish.
You may need to install Vista Drivers for your Printer if its shared from a XP machine or XP drivers if its shared from a Vista machine before your printer may work correctly
12. Click Next. Type in a printer name. And either select, or unselect the 'Set as Default Printer Option.
13. It will now install the printer.
14. You have now successfully added a printer. You can now test a print sheet.
This information has been proven to work, as this is how I set up my printer. This should be a fairly straight forward tutorial.
The host computer must be ON to print, along with the computer that is sending the document. Remember the printer also must be on to print.
Hope this works for you,
Extensa
UPDATE: The tutorial has been revised and will work on Windows 7.
Attachments
Last edited by a moderator:


 .
.