How to Set a Default User Logon Picture for All Users in Vista, Windows 7, and Windows 8
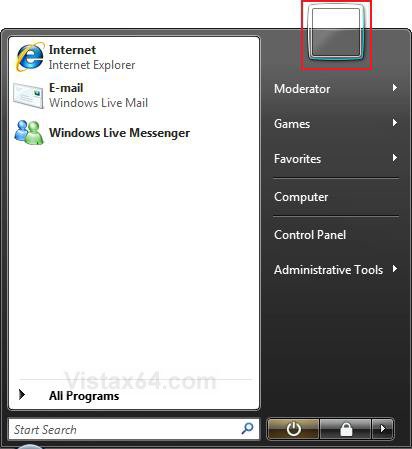
This tutorial will show you how to set a default user logon picture that cannot be changed for all users in Vista, Windows 7, Windows 8, and Windows 8.1.
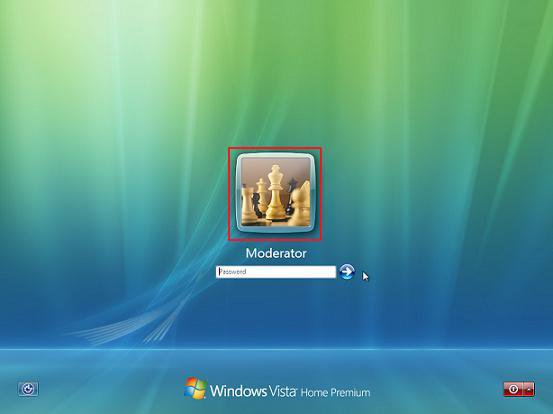
This will not work if you have it set to where a user must enter both a user name and password at log on instead of just selecting a user icon as in the example screenshot below.
EXAMPLE: Logon Screen with a User Logon Display Picture
 STEP ONE
You can select to use any BMP, DIB, RLE, GIF, JPG, or PNG image file for the display picture. The image can only be up to 128 x 128 pixels in size to prevent it from being automatically cropped to fit the user display box. If it is bigger than this, just resize it. Otherwise, your image may be cut off or not centered properly.
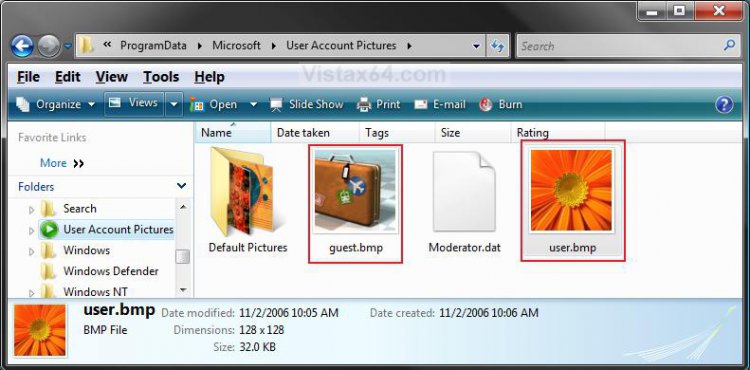
These are the images used for the default user (standard and administrator) and guest logon display picture for the user accounts. ProgramData is a hidden system file.
For: Vista, Windows 7, and Windows 8
[TABLE=class:-grid,-width:-600][TR][TD]
Accounts
[/TD]
[TD]
Default Picture Location
[/TD][/TR]
[TR][TD]
Guest
[/TD]
[TD]
C:\ProgramData\Microsoft\User Account Pictures\guest.bmp
[/TD][/TR]
[TR][TD]
Standard
[/TD]
[TD]
C:\ProgramData\Microsoft\User Account Pictures\user.bmp
[/TD][/TR]
[TR][TD]
Administrator
[/TD]
[TD]
C:\ProgramData\Microsoft\User Account Pictures\user.bmp
[/TD][/TR][/TABLE]
For: Windows 8.1
[TABLE=class:-grid,-width:-600][TR][TD]
Accounts
[/TD]
[TD]
Default Picture Location
[/TD][/TR]
[TR][TD]
Guest
[/TD]
[TD]
C:\ProgramData\Microsoft\Default Account Pictures\guest.bmp
[/TD][/TR]
[TR][TD]
Standard
[/TD]
[TD]
C:\ProgramData\Microsoft\Default Account Pictures\user.bmp
[/TD][/TR]
[TR][TD]
Administrator
[/TD]
[TD]
C:\ProgramData\Microsoft\Default Account Pictures\user.bmp
[/TD][/TR][/TABLE]
1. Name the image that you want to use to user.bmp and/or guest.bmp for the account type you want it as the default for.
2. Make sure that you have Show hidden files and folders selected in Folder Options.
3. In explorer, navigate to the location below. (See screenshot below)
(Vista, Windows 7, and Windows 8)
C:\ProgramData\Microsoft\User Account Pictures
OR
(Vista, Windows 7, and Windows 8)
C:\ProgramData\Microsoft\Default Account Pictures
A) For the default logon picture you want to change, right click on user.bmp or guest.bmp, and click Rename.
B) Rename them to user.bmp.bak and/or guest.bmp.bak, press Enter, then click Yes, Continue, and Continue.
C) Right click on the image from step 1 and click on Copy, click on an empty area in this window, and click Paste.
NOTE: To undo this, delete the new image from step 4C and remove the .bak off the name of user.bmp.bak and/or guest.bmp.bak to restore the default images given by Vista.
4. Close this window when done.
5. Select Do not show hidden files and folders in Folder Options.
 STEP TWO
WARNING: You must change the default images in the STEP ONE section above first to what you want to be used by all user accounts, then use either METHOD ONE, METHOD TWO, or METHOD THREE below to apply the image.
 Method One
NOTE: This method is only available in the Vista Business, Ultimate, and Enterprise editions or Windows 7 Professional, Ultimate, and Enterprise editions.. See Method Two or Method Three below for all other editions.
1. Open the Local Group Policy Editor.
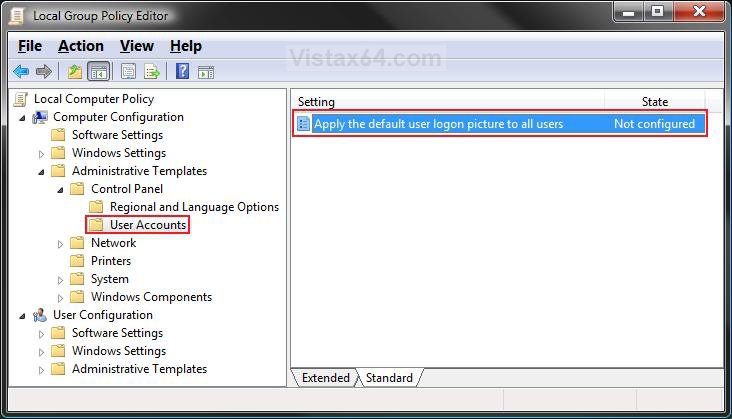
2. In the left pane, click on Computer Configuration, Administrative Templates, Control Panel, and User Accounts (See screenshot below)
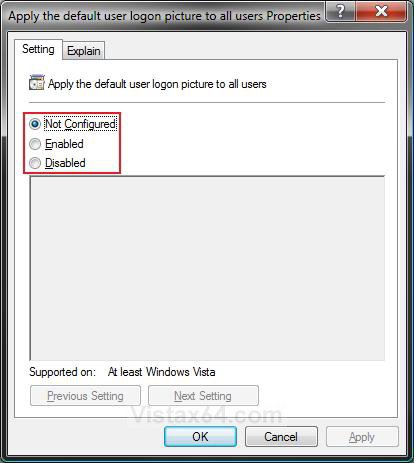
3. In the right pane, right click on Apply the default user logon picture to all users and click on Properties. (See screenshot above)
4. To Unset Default Logon Pictures for All Users
A) Dot Disabled or Not Configured and click on OK. (See screenshot below step 5A)
B) Go to step 6.
5. To Set Default Logon Pictures for All Users
A) Dot Enabled and click on OK.
6. Close Local Group Policy Editor window.
7. Log off and log on to see the change for the user logon display picture.
 Method Two
NOTE: This method will work for all Vista editions.
1. To Set Default Logon Pictures for All Users
A) Click on the Download button to download the file below.
Set_Default_Logon_Picture.reg
B) Go to step 3.
2. To Unset Default Logon Pictures for All Users
A) Click on the Download button to download the file below.
Unset_Default_Logon_Picture.reg
3. Save the .reg file to your Desktop.
4. Double click/tap on the downloaded .reg file to merge it.
5. Click/tap on Run, Continue (UAC) or Yes (UAC-Windows 7/8), Yes, and then OK when prompted.
6. When done, you can delete the .reg file (On Desktop).
7. Log off and log on, or restart the computer to apply and see changes.
 Method Three
NOTE: This method will work for all Vista editions.
1. Press the Windows + R keys to open the Run dialog, type regedit, and press Enter.
2. If prompted by UAC, then click on the Continue (Vista) or Yes (Windows 7/8).
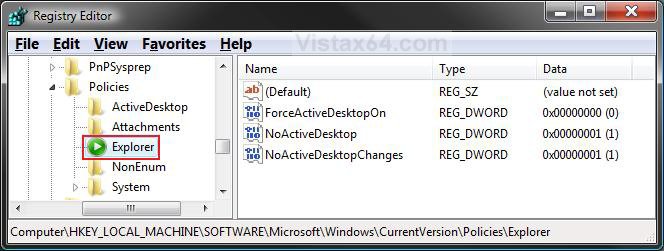
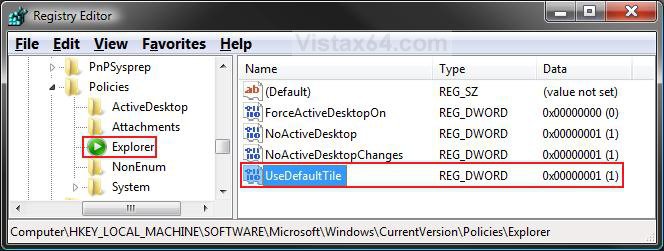
3. In regedit, go to: (See screenshot below)
HKEY_LOCAL_MACHINE\SOFTWARE\Microsoft\Windows\CurrentVersion\Policies\Explorer
4. To Set Default Logon Pictures for All Users
A) In the right pane, right click on a empty area and click on New and DWORD (32-bit) Value. (See screenshot above)
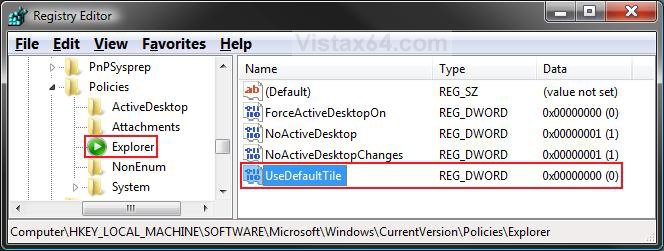
B) Type UseDefaultTile and press Enter.
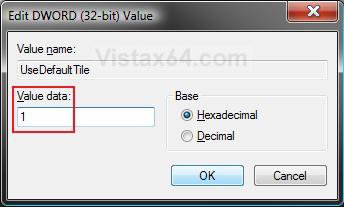
C) Right click on UseDefaultTile and click on Modify. (See screenshot below)
D) Type 1 and click on OK. (See screenshot below)
E) The registry will now look like this. (See screenshot below)
F) Go to step 6.
5. To Unset Default Logon Pictures for All Users
A) In the right pane, right click on UseDefaultTile and click on Delete. (See screenshot above)
B) Click on Yes to confirm deletion.
6. Close regedit.
7. Log off and log on, or restart the computer to apply and see changes.
That's it,
Shawn
Related Tutorials
- How to Create a New User Account in Vista
- How to Change a User Account Display Picture in Vista
- How to Change Your User Account Logon Picture in Windows 7
- How to Change your User Account Picture in Windows 8 and 8.1
- How to Delete Recent Account Pictures in Windows 8 and 8.1
- How to Create an "Account Picture" Shortcut in Windows 8.1
- How to Turn the Guest Account On or Off in Vista
- How to Change the Logon Screen in Vista
- How to Display a Logon Message Title and Text in Vista
- How to Change the Registered Owner and Organization Information in Vista
- How to Add a Logo and Support Information to Vista
- How to Display Information About Previous Logons During User Logon in Vista
Attachments
Last edited:

