How to Set the Processor Affinity for a Application in Vista
By default, Vista set processes to run on all available processors (CPUs). If you have multiple processors or a multi-core processor, then you can use Process Affinity to control what processor(s) a application runs on. This will show you how to change the Processor Affinity for an application (process).
WHY:
Like setting the CPU Priority, you can set the Processor Affinity to have a application (Ex: Anti-Spyware scan) to use only one CPU while you have another application (Ex: Internet Explorer) running on just the other CPU to allow maximum usage of the CPU assigned to each application.
WHY:
Like setting the CPU Priority, you can set the Processor Affinity to have a application (Ex: Anti-Spyware scan) to use only one CPU while you have another application (Ex: Internet Explorer) running on just the other CPU to allow maximum usage of the CPU assigned to each application.
- If the installed application supports Symmetric Multiprocessing (SMP) or HyperThreading (HT), then Vista will help automatically adjust the application's usage of each processor for the best performance. You will not gain much, if anything, from manually changing the processor affinity for these applications.
- The Processor Affinity setting you make for a application will only last as long as the application is open. If you close the application or restart the computer, then the Processor Affinity will return to the default of using all CPUs automatically for that application.
COMMON PROBLEM:
You may discover that certain older applications, that are not multiprocessor (SMP or HT) aware, ran fine on systems with one single core CPU are now not running properly on multiple processors or a multi-core processor. For example, your application may suddenly begin maxing out the CPU usage at 100 percent, appearing to lock up.The Processor Affinity setting allows you to work around such problems by configuring older applications to use only one of the cores instead.
It is recommmended to not change the process affinity on Vista system file processes to avoid potential problems. Only change the process affinity on application processes instead to be safe.
Here's How:
1. Open Task Manager.
NOTE: Right click on the taskbar and click Task Manager, or press Ctrl+Shift+Esc.
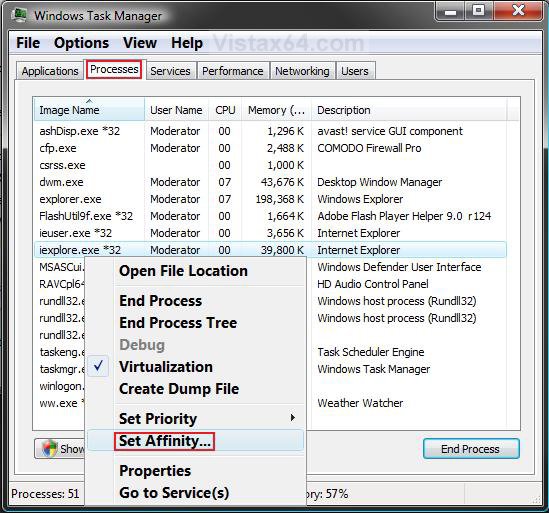
2. Click on the Processes tab. (See screenshot below step 6)
3. Click on the Show processes from all users button.
4. Click on Continue in the UAC prompt.
5. Right click the process (application) you want to change the processor affinity on.
6. Click on Set Affinity.
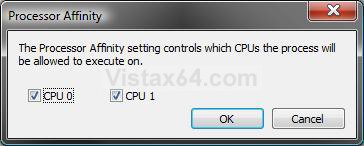
7. Check the CPU(s) that you want the process to run on. (See screenshot below step 8)
NOTE: If the process (application) does not support SMP or HT, then you may only want to have one CPU checked. If the process (application) does support SMP or HT, then you will most likely not gain any performance by not having all available CPUs checked. See the NOTE and COMMON PROBLEM sections at the top of the tutorial for more on this.
8. Click on OK.
9. Close Task Manager when done.
NOTE: If you need to change the process affinity on another application, then just repeat these steps for it.
That's it,Shawn
Related Tutorials
- How to Create a Shortcut to Run an Application with a Set CPU Affinity in Windows
- How to Set Vista for the CPU L2 Cache Memory Size
- How to Make a Program or Process Run with a Higher or Lower CPU Priority in Vista
- How to Add or Remove "Run with Priority Level" to the Context Menu
- How to Add or Remove "Run with CPU Affinity" to the Context Menu
Attachments
Last edited:


