How to Enable Simple File Sharing in Vista
This will show you how to enable simple File Sharing for other computers on your network and or for user accounts on your computer to be able to share any file or folder set to share. You will see how to set a file and folder to be shared by a user or user group you select, and set their permission level. For more information on this, see Microsoft TechNet: File and Printer Sharing in Windows Vista.
When you share files and folders with people using other computers on the network, they can open and view those files and folders just as if they were stored on their own computers. Any changes you allow them to make to a shared file or folder will change the file or folder on your computer. However, you can restrict people to just viewing your shared files, without the ability to change them.
- If you change the name of a file or folder after you have shared it with someone, the previous link you sent them will not work. You should send them a link to the new location instead. See STEP THREE step 12 below.
- When a computer on the network has password protected sharing turned on (STEP ONE step 7 below), you will need to create a user account with a password on that computer to be able to connect to and browse that computer for sharing.
- To prevent shared folder connection failures, use your same computer user account username and password when creating a user account on each other computer on the network you want to share with.
- If password protected sharing is turned off (STEP ONE step 7 below), computers on a network that do not have a user account with a password on your computer will need to use the Guest account. The Guest account must be turned on for them and allowed to share the file or folder. (STEP THREE step 10 below)
 STEP ONE
NOTE: If you are not connected to any other computer(s) on a network, then go to STEP TWO below to enable simple file sharing with only the user accounts on your computer.
1. Set the Workgroup Settings
A) Make sure all computers on the network have the same workgroup name.
2. Set the Computer Name Settings
A) Make sure that each computer on the workgroup has a unique computer name so they can identify and communicate with each other on the network.
3. Set the Network Location Type Settings
A) Change the network location type to Private.
4. Set the Network Discovery Settings
NOTE: Step 3 should turn this on by default, but it is a good idea to double check to make sure.
A) Turn Network Discovery on.
5. Set File Sharing Settings
NOTE: Step 3 should this on by default, but it is a good idea to double check to make sure.
A) Turn File Sharing on.
6. Set Windows Firewall Settings
NOTE: If you are using a 3rd party firewall you might have to change its settings to allow File and Printer Sharing to.
A) Check the exception File and Printer Sharing to allow access.
7. Turn Password Protected Sharing to On or Off
NOTE: If you turn password protected sharing off anyone who browses to your computer from the network can access your Public folder with no questions asked. If you turn password protected sharing on anyone who browses to your computer from the network will be asked for a username and password before access is allowed to your Public folder.
A) Turn Password protected sharing on or off.
8. Turn Public Folder Sharing On or Off
NOTE: If you turn Public folder sharing on, then you can share files in your Public folder with other users accounts on your computer and people on the same network. If your turn Public folder sharing off, then you can only share the Public filder with users that logon on to your computer with a user account in person.
A) Turn Public folder sharing On or Off.
 STEP TWO
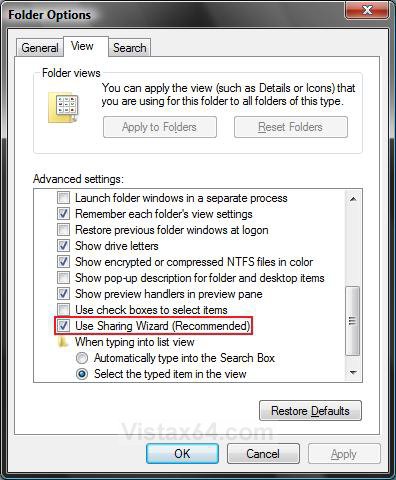
NOTE: This will turn on the Share context menu option and Share tab for the properties window of a item you right click on to set sharing for. This needs to be turned on to do simple file sharing.
1. Open Folder Options.
2. Check Use Sharing Wizard (Recommended). (See screenshot below)
3. Click on OK.
 STEP THREE
NOTE: This will show you how to set a file or folder to be shared, allow users or groups to share the file or folder, and how the users or groups can share them.
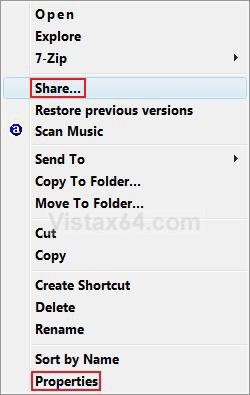
4. Right click on a file or folder.
5. Click on Share. (See screenshot below step 6)
A) Go to step 7 below.
OR
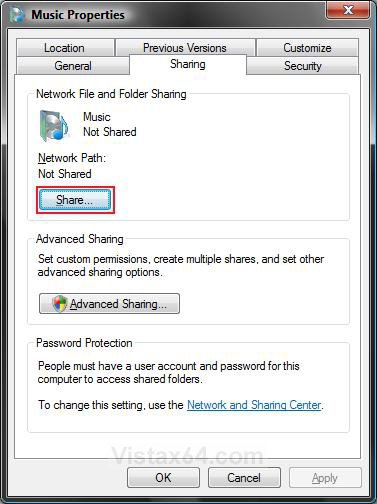
6. Click on Properties.
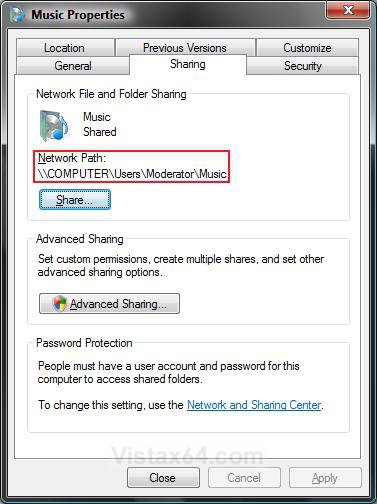
A) Click on the Sharing tab. (See screenshot below)
B) Click on the Share button.
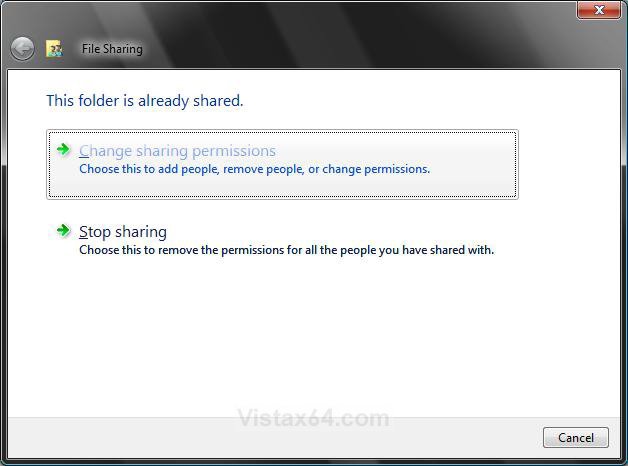
7. If this file or folder is already set to be shared, then: (See screenshot below step 9)
NOTE: If you do not have this set to share yet, then you will see step 10 below instead. Go to step 10.
8. To Change the Sharing Permissions
A) Click on Change sharing permissions. (See screenshot below step 9)
B) Go to step 10.
9. To Stop Sharing the File or Folder
NOTE: This will stop everyone from being able to share this file or folder. Of course, you the owner and any other Administrator account on the computer will still be able to access the file or folder.
A) Click on Stop sharing. (See screenshot below)
B) When it has stopped the sharing, click on Done.
C) Your done. Go back to the start of the tutorial to set something else.
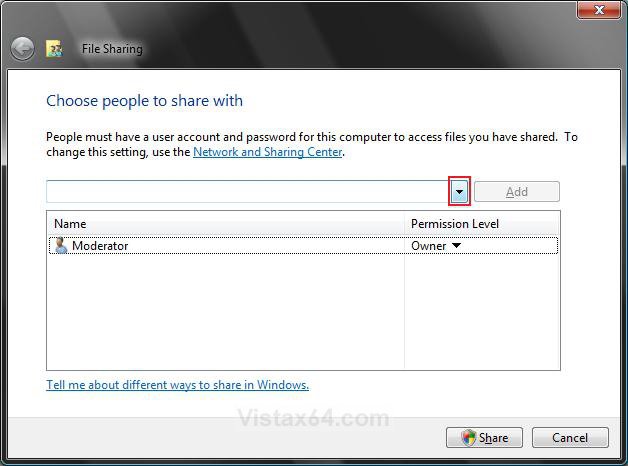
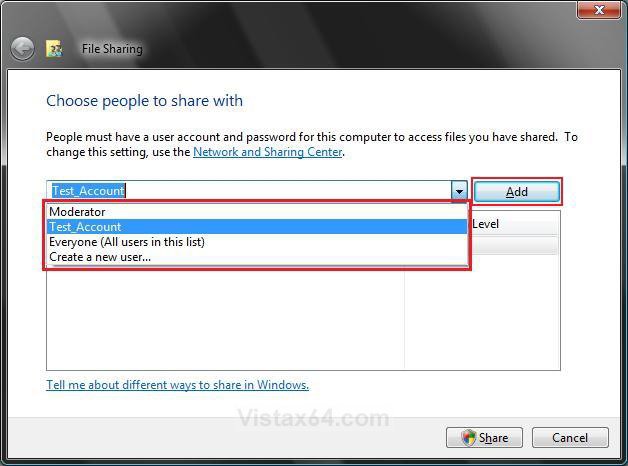
10. To Allow a User or Group to Share this File or Folder
A) Click on the drop down arrow. (See screenshot below)
B) Click on a listed user account or group to select it to allow them to share this file or folder, and click on Add. (See screenshot below)
C) Repeat this step until you added everyone you wanted to allow to share this file or folder.
WARNING: If you have Password Protected Sharing turned off for computers on your network, then you will need to allow the Guest account or Everyone (including the Guest account) to allow computers on the network access to share this file or folder. (See STEP ONE step 7 above)
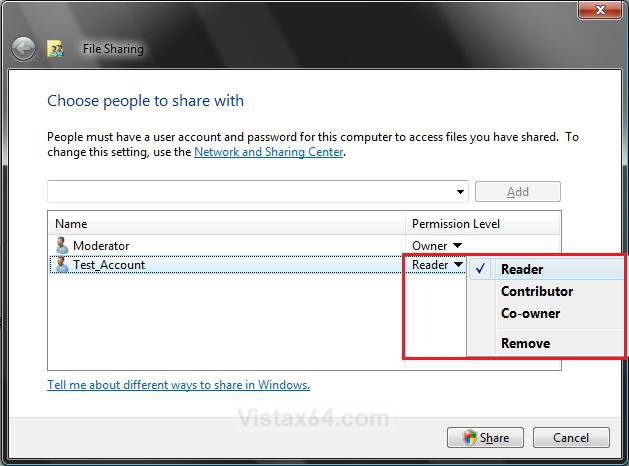
11. Set the User or Group Share Permission Level
A) Click on the Permission Level arrow for a allowed user or group to see the permission options available. (See screenshot below step 11C)
B) Check the permission level option you want to give to the selected user or group.
Here is what the permission levels mean:
[TABLE=class:-grid,-width:-500][TR][TD]Level
[/TD]
[TD]
Description
[/TD][/TR]
[TR][TD]
Reader
[/TD]
[TD]
The user account or group can only view or read files in the shared file or folder.
[/TD][/TR]
[TR][TD]
Contributor
[/TD]
[TD]
Permit the user account or group to view all files, add files, and change or delete only the files that they added to the folder. If you are sharing a file instead of a folder, then this option will not be available.
[/TD][/TR]
[TR][TD]
Co-owner
[/TD]
[TD]
Permit the user account or group to view, change, add, and delete any files in the shared folder.
[/TD][/TR]
[TR][TD]
Remove
[/TD]
[TD]
Removes the user account or group and they are no longer allowed to share the file or folder.
[/TD][/TR][/TABLE]
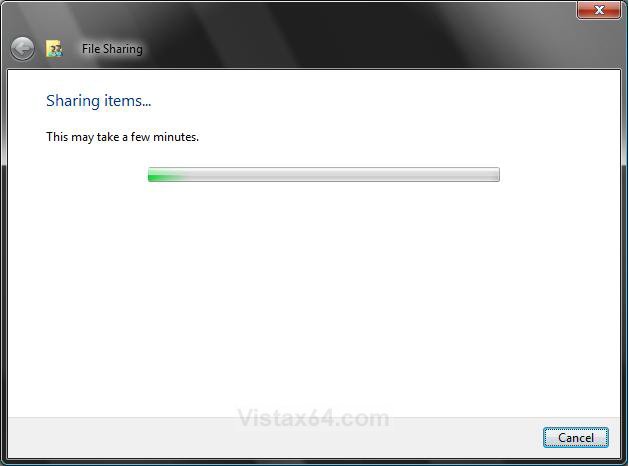
C) Click on the Share button.
D) You will now see this. (See screenshot below)
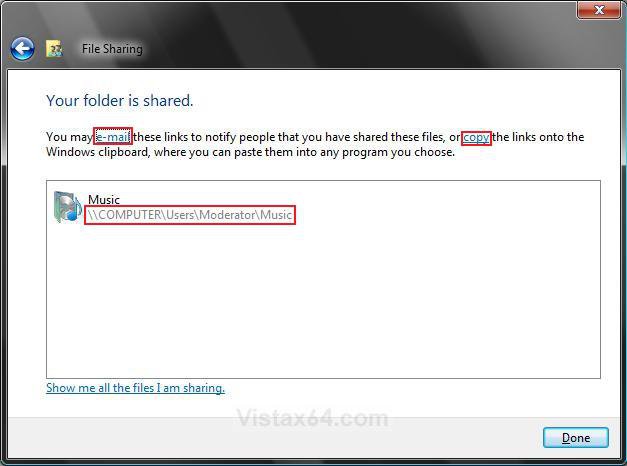
E) When the file or folder is set to share, you will see this. (See screenshot below step 12)
12. Copy the Sharing Network Path Link
NOTE: These links can be used by the computer on a network to connect to your computer using Run or a program to share this file or folder. See STEP THREE step 7 here: How to View and Browse a Computer or Device on a Network in Vista.
A) Click on e-mail to send the links to the allowed users or groups.
OR
B) Click on copy to copy the links to the Clipboard to paste them where you like.
OR
C) Write down the link displayed to store for safe keeping.
D) Click on Done.
13. Notice that the network path link is now listed on the properties window for the file or folder. (See screenshot below)
A) Click on Close.
 STEP FOUR
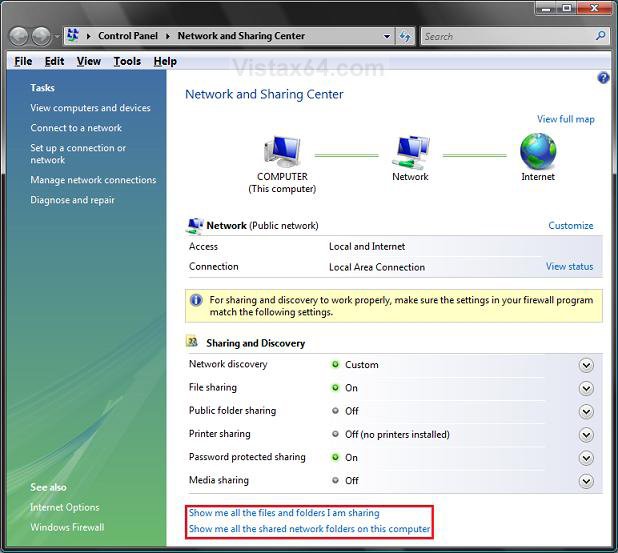
14. Open the Control Panel (Classic view).
A) Click on the Network and Sharing Center icon.
B) Go to step 16.
OR
15. Right click on the taskbar Network system tray icon.
A) Click on Network and Sharing Center.
16. Click on the option boxed in red you want to see. (See screenshot below)
NOTE: This will open a Search window and will search and display all of the shared files or folders on your computer for what you selected.
That's it,
Shawn
Related Tutorials
- How to Change the Network Location Type in Vista
- How to Turn Network Discovery On or Off in Vista
- How to Turn Password Protected Sharing On or Off in Vista
- How to Change the Computer Name in Vista
- How to Change the Workgroup Name in Vista
- How to Turn File Sharing On or Off in Vista
- How to Turn Public Folder Sharing On or Off in Vista
- How to Find the Computer IP Address in Vista
- How to View and Browse a Computer or Device on a Network in Vista
- How to Turn the Guest Account On or Off in Vista
- How to Hide or Unhide Your Vista Computer Name in a Network
- How to Change the Network Idle Session Time to Automatically Disconnect in Vista
Attachments
Last edited by a moderator:

