How to Turn Public Folder Sharing On or Off in Vista
This will show you how to turn Public folder sharing on or off so you can share files in your Public folder with other users accounts on your computer and people on the same network (ON), or just for users that logon on to your computer with a user account in person (OFF). Public folder sharing is turned off by default.
The Public folder in Vista is where you store files that you want to share with other people on the same computer or same network. It is just like your user account folder, but used for the public instead. There is only one Public folder in Vista. Everyone with a user account and password on your computer can access the Public folder, but you decide whether anyone on the network can access the Public folder. You cannot choose which individuals can access the Public folder from the network. You must either grant access to everyone on the network, or to no one. You can, however, set the permission level by choosing whether those who have access to the Public folder from the network can just open files, or also change and create them in the Public folder.
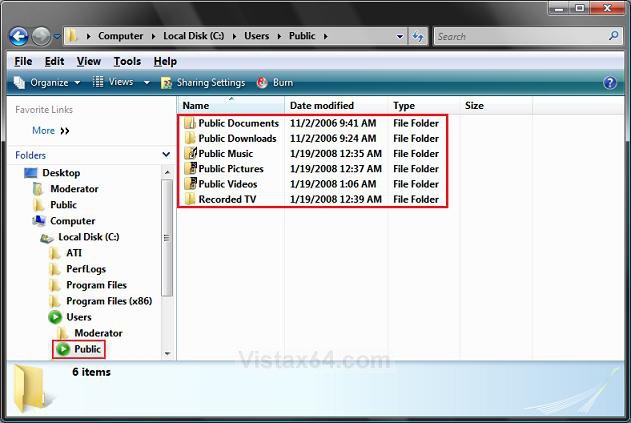
The Public folder location is at: C:\Users\Public . See the example below.
EXAMPLE: Public folder with it's subfolders in Vista
 STEP ONE
NOTE: This is if you turn Public folder sharing on in step 3 or 4 in STEP TWO below. This will not affect Public folder sharing for the users that logon to your computer directly in person.
1. Set the Workgroup Settings
A) Make sure all computers on the network have the same workgroup name.
2. Set the Computer Name Settings
A) Make sure that each computer on the workgroup has a unique computer name so they can identify and communicate with each other on the network.
3. Set the Network Location Type Settings
A) Change the network location type to Private.
4. Set the Network Discovery Settings
NOTE: Step 3 should turn this on by default, but it is a good idea to double check to make sure.
5. Set File Sharing Settings
NOTE: Step 3 should this on by default, but it is a good idea to double check to make sure.
A) Turn File Sharing on.
6. Set Windows Firewall Settings
NOTE: If you are using a 3rd party firewall you might have to change its settings to allow File and Printer Sharing to.
A) Check the exception File and Printer Sharing to allow access.
7. Set Password Protected Sharing to On or Off
NOTE: If you turn password protected sharing off anyone who browses to your computer from the network can access your Public folder with no questions asked. If you turn password protected sharing on anyone who browses to your computer from the network will be asked for a username and password before access is allowed to your Public folder.
A) Turn password protected sharing on or off.
 STEP TWO
1. Open the Control Panel (Classic view).
A) Click on the Network and Sharing Center icon.
B) Go to step 3.
OR
2. Right click on the taskbar Network system tray icon.
A) Click on Network and Sharing Center.
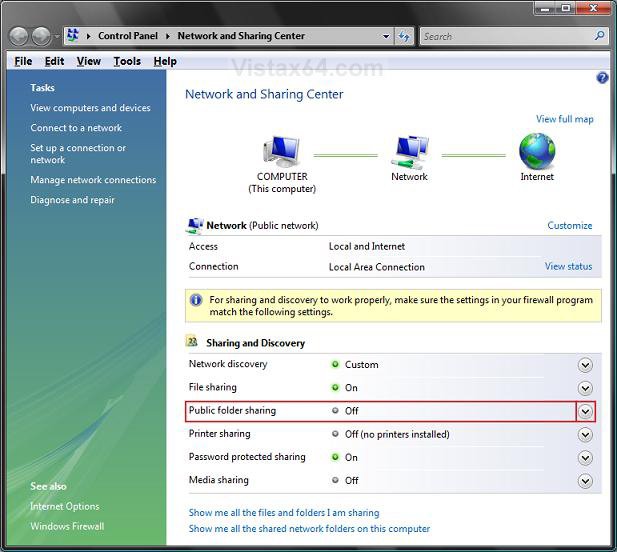
3. Click on the down arrow to the right of Public folder sharing to expand it. (See screenshot below)
4. To Turn On Sharing to Allow Open Files Only
NOTE: Anyone who can browse to your computer from the network can only view the files and folders in your Public folder. Users that can logon to your computer in person with a user account can share the Public folder to.
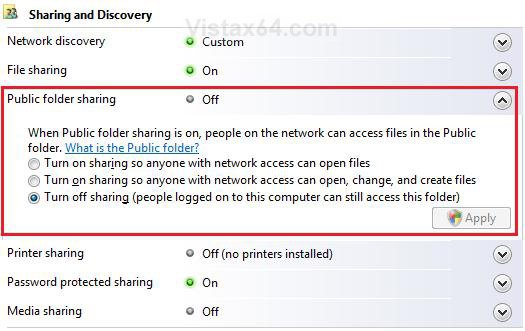
A) Dot Turn on sharing so anyone with network access can open files. (See screenshot below step 8)
B) Go to step 7.
5. To Turn On Sharing to Allow Open, Change and Create Files
NOTE: Anyone who can browse to your computer from the network can view, change, and create new files in your Public folder. Users that can logon to your computer in person with a user account can share the Public folder to.
WARNING: You should only use this if you truly trust everyone on the Private network like a home network.
A) Dot Turn on sharing so anyone with network access can open, change, and create files. (See screenshot below step 8)
B) Go to step 7.
6. To Turn Off Sharing to Not Allow Network Access
NOTE: Only users that can logon to your computer in person with a user account can share the Public folder.
A) Dot Turn off sharing. (See screenshot below)
7. Click on the Apply button.
8. Click on Continue in the UAC prompt.
That's it,
Shawn
Related Tutorials
- How to Change the Network Location Type in Vista
- How to Turn Network Discovery On or Off in Vista
- How to Turn Password Protected Sharing On or Off in Vista
- How to Change the Computer Name in Vista
- How to Change the Workgroup Name in Vista
- How to Create a New User Account in Vista
- How to Create a Password for a User Account in Vista
- How to Turn File Sharing On or Off in Vista
- How to View and Browse a Computer or Device on a Network in Vista
- How to Enable Simple File Sharing in Vista
- How to Turn the Guest Account On or Off in Vista
- How to Fix a Public Folder Displayed as a Standard Yellow Folder Icon in Vista
- How to Add or Remove the Public Folder Desktop Icon in Vista
Attachments
Last edited:


