How to Uninstall or Change a Program in Vista
This will show you how to use Programs and Features to uninstall programs or to change the program's configuration by adding or removing certain options. This was called Add and Remove Programs in XP.
If the program that you want to uninstall is not listed, then it may not have been written for this version of Windows. To uninstall the program, check the information that came with the program and see if it has a uninstall EXE program for it in it's C:\Program Files or C:\Program Files (x86) folder.
Here's How:
1. Open the Start Menu.
2. Click on the Control Panel button.
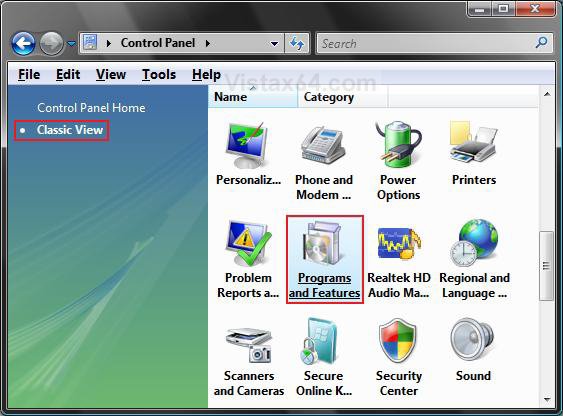
3. In Classic view, click on the Programs and Features icon. (See screenshot below)
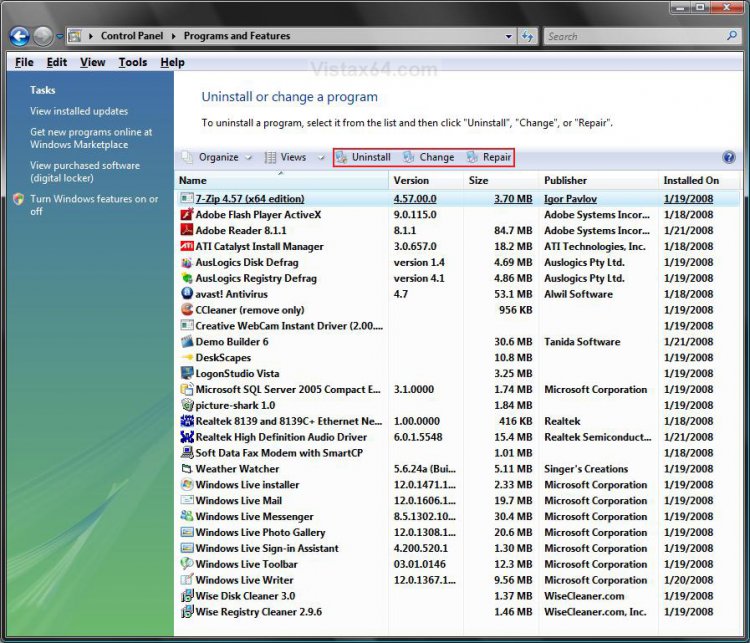
4. Highlight a listed program to see the available option on the toolbar for it. (See screenshot below)
NOTE: The options will be either Uninstall, Change, Repair, or a combination of these. A program may not have all the options available for it.
A) If mouse is set to single click, then hover the pointer over the listed program.
B) If mouse is set to double click, then left click once on the listed program.
5. Click the option you want to do on the toolbar, or right click on the listed program to select the option. (See screenshot above)
NOTE: See an explanation of each option, if available for the program, in steps 6 to 8 below.
6. To Uninstall a Program
NOTE: Uninstall will run the selected program's uninstall program to uninstall the selected program. If you check the In the future, do not show me this dialog box option in the confirmation prompt, it will disable the confirmation prompt and will not be seen again until restored. See: How to Restore the Uninstall Confirmation Prompt in Vista Programs and Features
A) Click on Uninstall or Uninstall/Change.
B) Click on Yes. (See sceenshot below)
7. To Change a Program
NOTE: The Change option is used for software that can be installed in modules and/or have different setups, such as a productivity suite where you can install applications independently. Should you decide to add or remove components at a later time, the Change install comes in handy.
A) Click on Change.
B) Make any changes in the installation setup program.
8. To Repair a Program
NOTE: Repair is usually used when you want corrupted files and settings replaced with original ones from the selected program's installation program. Sometimes the entire program is just reinstalled with all files overwritten and settings returned to default for the selected program.
A) Click on Repair.
9. If prompted, click on Continue in the UAC prompt.
10. Close Programs and Features when done.
NOTE: Some programs will require a restart afterwards.
That's it,Shawn
Related Tutorials
- How to Uninstall Programs using Command Prompt in Windows
- How to Use Disk Cleanup in Vista
- Install/Uninstall Problems With Vista
- How to Uninstall a Windows Update in Vista
- How to Turn Windows Features On or Off in Vista
- How to Restore the Uninstall Confirmation Prompt in Vista Programs and Features
- How to Remove a Uninstall Entry in Programs and Features for Vista
- How to Use the Vista SP1 Disk Cleanup Tool
- How to Uninstall a Device and Device Driver in Vista
- How to Disable or Enable Programs and Features in Vista
- How to Uninstall the Vista SP1
- How to Uninstall the Vista SP2 Prerelease Version
Attachments
Last edited:


