How to Only Show Specified Control Panel Icons in Vista
This will show you how to have the classic view Control Panel only show the Control Panel icons that you specify and hide the rest of them. This will affect all user accounts on the computer.
Unless you specify to show the Administrative Tools icon in the Control Panel, it will hide the Administrative Tools button in the Start menu to.
If you have this Control Panel problem here, then see:
Microsoft Help and Support: Icons are missing from Control Panel, or you cannot start Control Panel, the Welcome Center, or games in Windows Vista
Microsoft Help and Support: Icons are missing from Control Panel, or you cannot start Control Panel, the Welcome Center, or games in Windows Vista
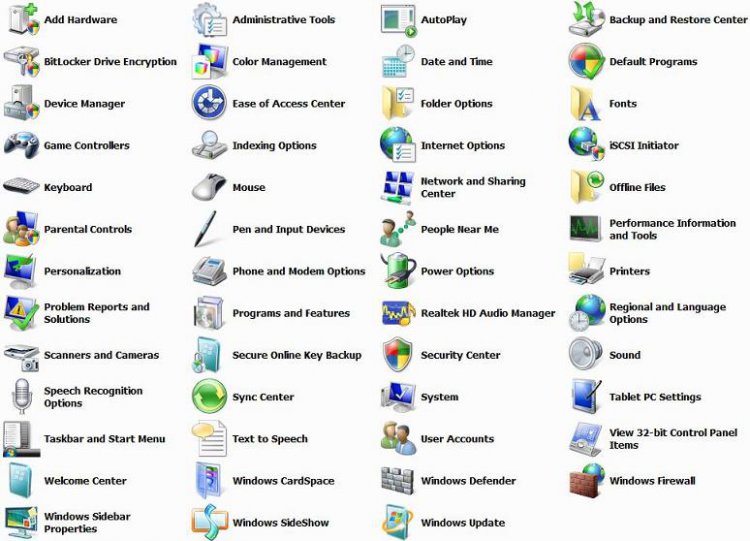
EXAMPLE: Default Classic Control Panel Icons
 OPTION ONE
NOTE: This option is only available for the Vista Business, Ultimate, and Enterprise editions. See METHOD TWO below for the Vista Basic and Home Premium editions.
1. Open the all users, specific users or groups, or all users except administrators Local Group Policy Editor for how you want this policy applied.
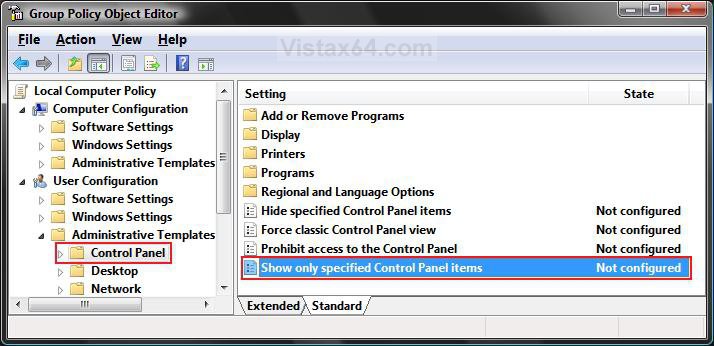
2. In the left pane, click on User Configuration, Administrative Templates, and Control Panel. (See screenshot below)
3. In the right pane, right click on Show only specified Control Panel items and click on Properties. (See screenshot above)
4. To Show All Control Panel Icons
NOTE: This will unhide all hidden Control Panel icons and clear the list from step 5 below.
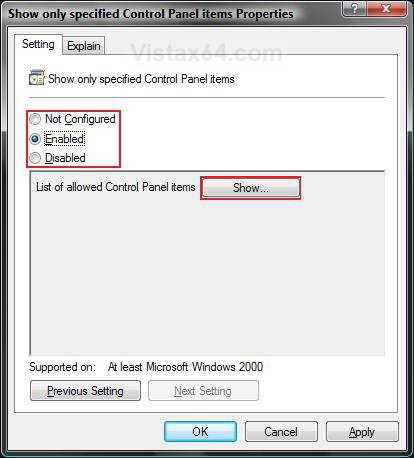
A) Select (dot) Disabled or Not Configured and click on OK. (See screenshot below 5B)
B) Go to step 6.
5. To Show Only Specified Control Panel Icons
A) Select (dot) Enabled.
B) Click on the Show button.
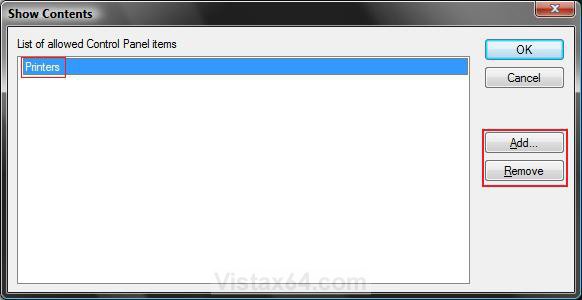
C) To Add a Icon Name to the List to Show
- Click on the Add button. (See screenshot below step E )
- Type in the name of the Control Panel icon you want to show. (See screenshot below)NOTE: For example, Printers.
- Click OK.
NOTE: Repeat steps in 5C to add any more Control Panel icons to show.
D) To Remove a Icon Name from the List to be hidden
- Click on the Control Panel icon name on the list to highlight it. (See screenshot below)
- Click on the Remove button.
E) Click on OK.
F) Click on OK. (See screenshot below step 5B)
6. Close the Local Group Policy Editor window when done.
NOTE: If you had the Control Panel open, then you will need to refresh (Press F5) it to see the changes.
 OPTION TWO
NOTE: This option will work in all Vista editions.
1. Open the Start Menu.
2. In the white line (Start Search) area, type regedit and press Enter.
3. Click on the Continue button in the UAC prompt.
4. In regedit, go to: (See screenshot below step 5)
NOTE: If you do not have Explorer, then right click on Polices and click on New and Key. Type Explorer and press Enter.
HKEY_CURRENT_USER\Software\Microsoft\Windows\CurrentVersion\Policies\Explorer
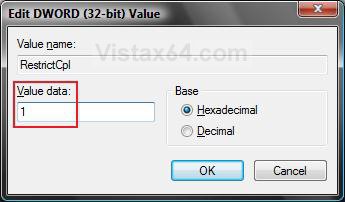
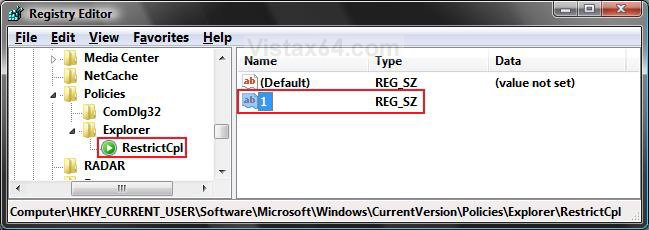
5. In the right pane of Explorer, right click on a empty area and click on New and DWORD (32-bit) Value. Type RestrictCpl and press Enter. (See screenshot below)
6. Right click on RestrictCpl and click on Modify. (See screenshot above)
A) Type 1 and click on OK. (See screenshots below)
7. In the left pane, right click on Explorer and click New and Key, then type RestrictCpl and press Enter. (See screenshow below 8C)
8. To Show a Control Panel Icon
A) In the right pane of RestrictCpl, right click on a empty area and click on New and String Value.
B) Type in a number 1 for the first item and press Enter. Repeat this process in NUMERICAL ORDER for as many items as you want to show.
NOTE: The list order has nothing to do with the icon order in the Control Panel. This is just a registry list when entering a Control Panel icon name. You will start with typing 1 for a first name, then 2 for a second name, 3 for a third name, etc...
WARNING: When entering a name, it must be listed in numerical order in the registry. For example: 1,2,3,4 not 1,7,2,6. You cannot skip a number.
C) Right click on the first number (under Name) and click Modify. Repeat this process for each New String Value number you created in step 8B. (See screenshot below)
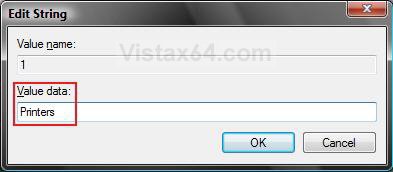
D) Type in the Control Panel icon name you want to show and press Enter. (See screenshot below)
NOTE: For example, Printers.
WARNING: You need to type in the name exactly as it appears in the Control Panel.
E) The registry will now look like this.
9. To Hide a Control Panel Icon on the List
A) In the right pane of RestrictCpl, right click on the order list number with the control panel icon name and click Delete. (See screenshot below step 8E)
WARNING: You will need to modify the other list order numbers so that they are back in numerical order. They must be in numerical order. For example: 1,2,3,4 not 1,7,2,6. You cannot skip a number. Just right click on the number (String Value Name) and click Rename. Type in the new order number. (See step 8B)
10. To Undo this and Show all Control Panel Icons Again
A) In the right pane of Explorer, right click on RestrictCpl and click on Delete. (See screenshot below step 6)
B) Click on Yes to confirm the deletion.
C) In the left pane, right click on RestrictCpl and click on Delete. (See screenshot below step 8E)
D) Click on Yes to confirm the deletion.
11. Close regedit when done.
NOTE: If you had the Control Panel open, then you will need to refresh (Press F5) it to see the changes.
That's it,Shawn
Related Tutorials
- How to Change a Icon in the Control Panel in Vista
- How to Change the Desktop Control Panel Icon in Vista
- How to Hide a Control Panel Icon in Vista
- How to Enable or Disable the Control Panel in Vista
- How to Create a Power Options Shortcut in Vista
- How to Add User Accounts Netplwiz to the Control Panel in Vista
- How to Add or Remove Local Group Policy Editor from the Vista Control Panel
- How to Add or Remove Registry Editor from the Vista Control Panel
- How to Force Control Panel Home or Classic View in Vista
Attachments
Last edited:

