How to Rename a Drive in Vista
This will show you how to rename a drive to whatever you want it to be displayed as in Vista.
If your default drive name is missing or was changed and you did not do it with the methods below, then look for a hidden autorun.inf when you open the drive letter in Computer and right click on the autorun.inf file and click on Delete. Next, approve the deletion.
EXAMPLE: Before and After Hard Disk Drive Rename
NOTE: This is in the Computer (Start menu) window. (METHOD ONE)
EXAMPLE: Before and After DVD Drive RenameNOTE: You will notice that for Devices with Removable Storage there is no Rename option when you right click on the device. (METHOD TWO)
 METHOD ONE
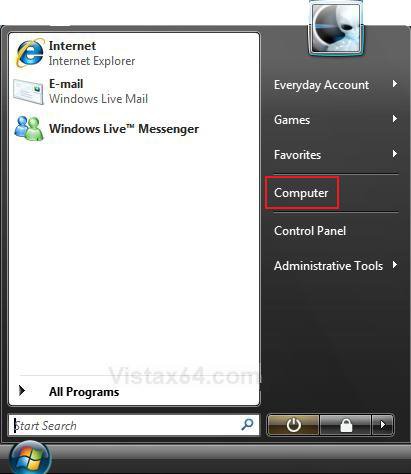
1. Open the Start menu.
2. Click on the Computer button. (See screenshot below)
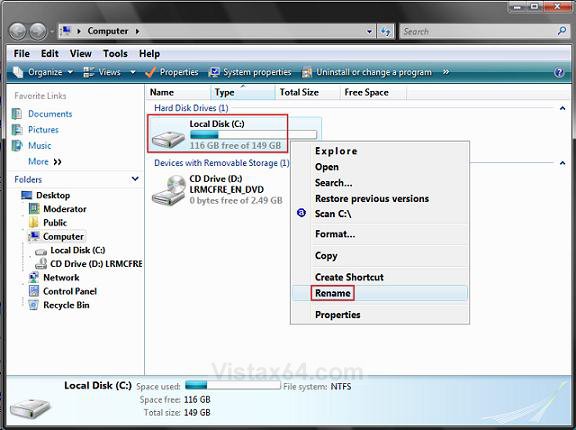
3. In the Computer window, right click on the drive and click Rename. (See screenshot below)
4. Type in a name you want to be displayed for the drive and press Enter. (See screenshot below)
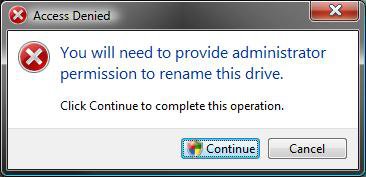
5. Click on Continue in the Access Denied prompt. (See screenshot below)
6. Click on Continue in the UAC prompt.
7. When done, close the Computer window.
 METHOD TWO
For example, a DVD drive. This will also work for all the other drives with drive letters too.
CREDIT TO: Member: AvatarOfTheShip
CREDIT TO: Member: AvatarOfTheShip
1. Open the Start Menu.
2. In the white line (Start Search) area, type regedit and press Enter.
3. Click on Continue button in the UAC prompt.
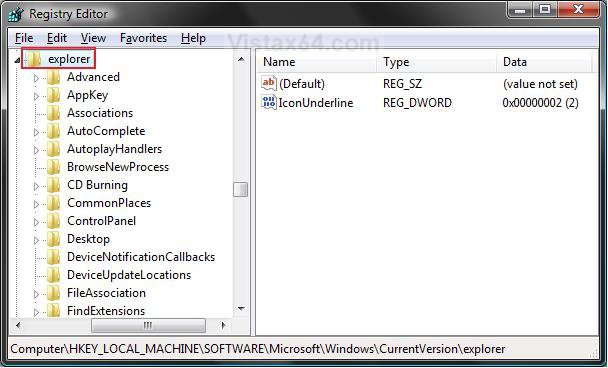
4. In regedit, go to: (See screenshot below step 5)
HKEY_LOCAL_MACHINE\SOFTWARE\Microsoft\Windows\CurrentVersion\explorer
5. In the left pane, right click on explorer.exe and click on New and Key.
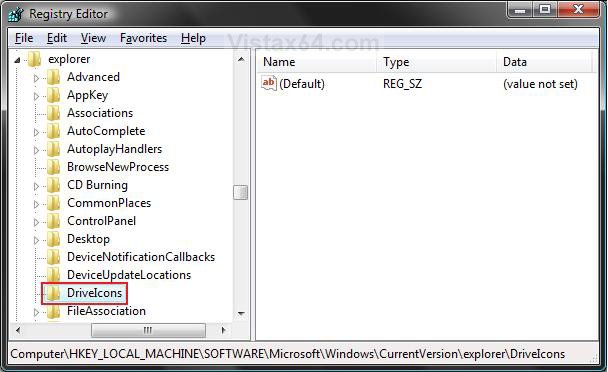
6. Type DriveIcons and press Enter. (See screenshot below)
7. In the left pane, right click on DriveIcons and click on New and Key.
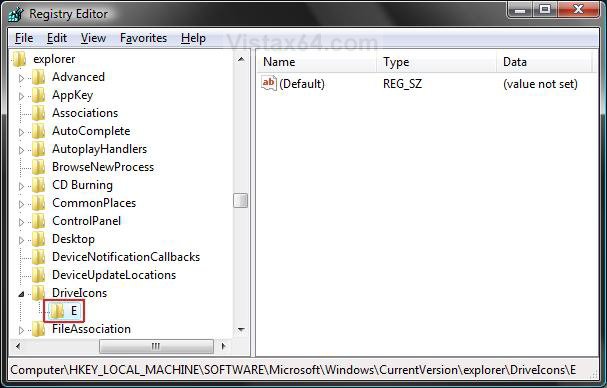
8. Type the drive letter (EX: E) you want to change the drive name for and press Enter. (See screenshot below)
9. In the left pane, right click on the drive letter (EX: E) and click on New and Key.
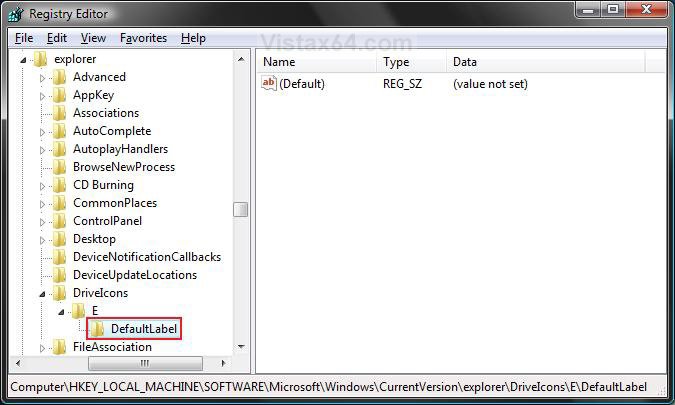
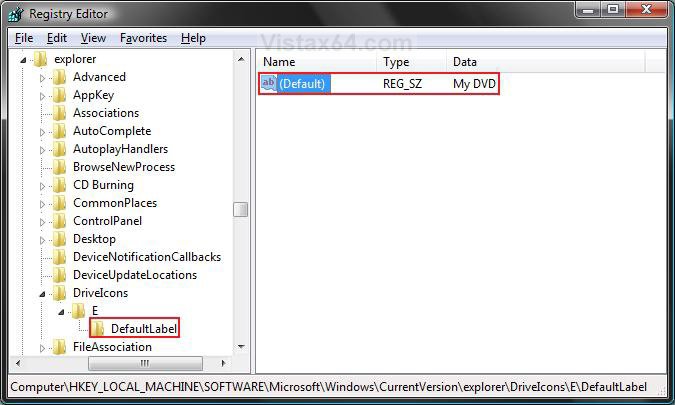
10. Type DefaultLabel and press Enter. (See screenshot below)
11. In the right pane, right click on (Default) and click on Modify.
12. To Change the Drive Name
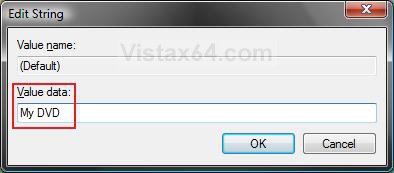
A) Type in a name (Ex: My DVD) and click OK. (See screenshot below step 13)
B) Go to step 14.
13. To Restore the Default Drive Name
A) Leave this empty and click OK. (See screenshot below)
B) Go to step 15.
14. The registry should look similar to this now. (See screenshot below)
15. Repeat steps 9 to 14 if you want to add another drive letter icon to change.
16. Close regedit.
That's it,Shawn
Related Tutorials
- How to Shrink and Create a Partition with Disk Management in Vista
- How to Delete and Extend a Partition with Disk Management in Vista
- How to Change a Drive Icon in Vista
- How to Hide or Show Drive Letters in Vista, Windows 7, and Windows 8
- How to Add, Change, or Remove a Drive Letter in Vista
- How to Disable or Enable Low Disk Space Warning in Vista
- How to Increase Hard Drive Performance in Vista
- How to Remove or Show Drives in the Vista and Windows 7 "Send To" Context Menu
- How to Restrict or Unrestict Drive Access in Vista
- How to Create a Drive Shortcut in Vista
- How to Mount or Dismount a Drive or Partition to a Folder in Vista
Attachments
Last edited by a moderator:


