How to Hide or Show Drive Letters in Vista, Windows 7, and Windows 8
This tutorial will show you how to have all drive letters set to hide or show in Vista, Windows 7, and Windows 8.
If you hide drive letters, it will not remove the drive letter for drives, but only hide them from displaying.
If you hide drive letters, it will not remove the drive letter for drives, but only hide them from displaying.
EXAMPLE: Drive Letters Set to Hide and Show
NOTE: This is in the Computer (Start menu) window.
 OPTION ONE
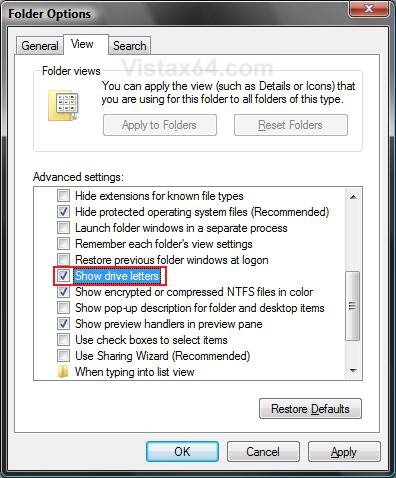
2. Click on the View Tab, and do step 3 or 4 below for what you would like to do. (see screenshot below step 5)
3. To Show All Drive Letters
NOTE: This is the default setting.
A) Check Show drive letters, and go to step 5 below.
4. To Hide (Remove) All Drive Letters
A) Uncheck Show driver letters, and go to step 5 below.
5. Click/tap on OK.
NOTE: You may need to press F5 to refresh the window to see the changes.
 OPTION TWO
1. Do step 2 or 3 below for what you would like to do.
2. To Show All Drive Letters
NOTE: This is the default setting.
A) Click/tap on the Download button below to download the .reg file below, and go to step 4 below.
Show_Drive_Letters.reg
3. To Hide (Remove) All Drive Letters
A) Click on the Download button below to download the .reg file below, and go to step 4 below.
Hide_Drive_Letters.reg
4. Save the .reg file to your desktop.
5. Double click/tap on the downloaded .reg file to merge it.
6. If prompted, click/tap on Run, Yes (UAC-Windows 7/8) or Continue (UAC-Vista), Yes, and OK to approve the merge.
7. Log off and log on, or restart the computer to apply.
8. When finished, you can delete the downloaded .reg file if you like.
That's it,
Shawn
Related Tutorials
- How to Show Windows "Computer" Drive Letters Before or After Drive Name
- How to Add, Change, or Remove a Drive Letter in Vista
- How to Rename a Drive in Vista
- How to Remove or Show Drives in the Vista and Windows 7 "Send To" Context Menu
- How to Restrict or Unrestict Drive Access in Vista
- How to Hide or Unhide a Drive in Vista
- How to Create a Drive Shortcut in Vista
- How to Mount or Dismount a Drive or Partition to a Folder in Vista
Attachments
Last edited:


