How to Add, Change, or Remove a Drive Letter in Vista
This will allow you to either add, change, or remove (hide) a drive letter to organize them how you like.
You must be logged in as an administrator to be able to do the steps in this tutorial.
You must be logged in as an administrator to be able to do the steps in this tutorial.
- You can assign the letters D to Z to each drive on your computer. A and B are usually reserved for floppy disk drives, but if your computer does not have floppy disk drives, you can assign A and B to volumes. C is reserved for the drive Vista is installed on. You can see which drive letters are used on your computer by clicking on Computer in the Start menu.
- If you want to have all drive letters set to show or be removed from being displayed instead, then see: How to Show or Remove Drive Letters from Displaying in Vista
- If you dual boot, or with multiple operating systems, the OS that you boot to will always show as the C: drive in Computer. You will need to look in Disk Management to see how the true drive letters are partitions are positioned on the drive.
Many MS‑DOS and Vista programs make references to specific drive letters in the registry. If you change a drive letter, some programs that you have already installed on that hard drive letter might not work correctly anymore. It is best to do this on a new drive or partition before installing anything on it.
 OPTION ONE
1. Open the Control Panel. (Classic View)
A) Click on the Administrative Tools icon.
B) Click on Computer Management.
NOTE: If the Computer Management shortcut is not here, then you can navigate to C:\Windows\System32\compmgmt.msc and click on the compmgmt.msc instead.
2. Click on Continue in the UAC prompt.
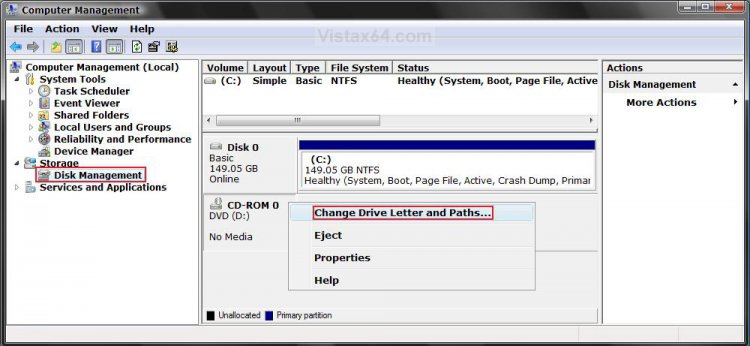
3. In the left pane, click on Disk Management under Storage. (See screenshot below step 4)
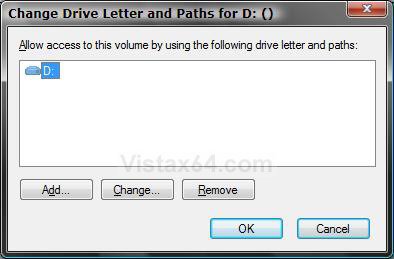
4. Right-click on the partition or drive that you want to change, and click on Change Drive Letter and Paths. (See screenshot below)
5. To Change a Drive Letter
NOTE: You cannot change a drive letter if the drive is either a system partition or a boot partition, like the partition that Vista is installed on. If you get an error, the partition or drive you are trying to change might be in use. Close any program or window that is using the partition or drive and try again.
A) Select the drive letter, and click on the Change button. (See screenshot above)
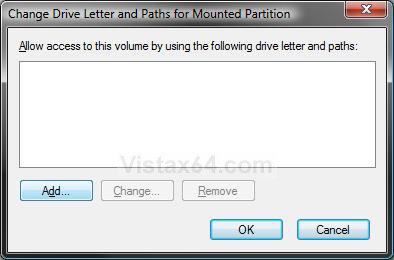
NOTE: If you are dual booting (Ex: Vista and Windows 7) and you want to change the drive letter for the Vista partition so you can see it in Windows 7, then click on the Add button if this screenshot below is empty.
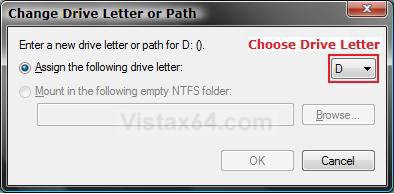
B) Select (dot) Assign the following drive letter. (See screenshot below)
C) Select a drive letter that you want that is not already being used and click on OK.
D) Click on Yes to confirm the drive letter change. (See screenshot below)
E) Go to step 8.
6. To Add a Drive Letter
NOTE: This is to assign a drive letter if one has been removed or not already assigned to the drive or partition.
A) Click on the Add button. (See screenshot below)
B) Do the same steps in step 5A to 5C above.
C) Go to step 8.
7. To Remove a Drive Letter
NOTE: This will only remove the drive letter and not the partition or drive. This can be useful if you are getting a low disk space warning for this drive letter.
A) Click on the Remove button. (See screenshot below step 5)
B) Click on Yes to confirm. (See screenshot below)
C) Click on OK to close window. (See screenshot below step 5)
8. Close the Computer Management window.
9. Click on Computer in the Start Menu to confirm the changes.
 OPTION TWO
1. Open the Start Menu, then type regedit in the search box and press enter.
2. If prompted by UAC, then click on Yes.
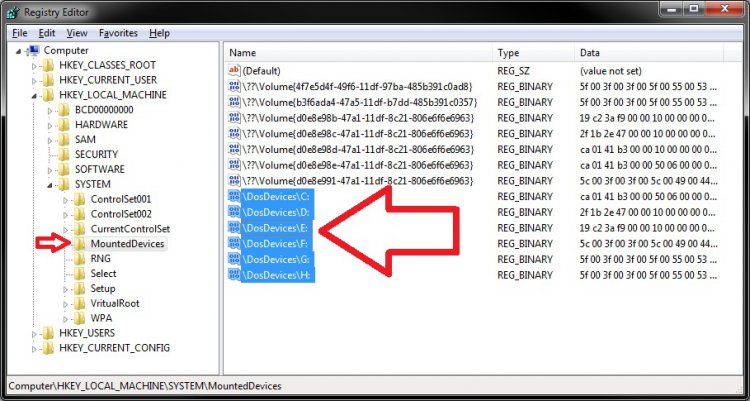
3. In regedit, navigate to the location below.
HKEY_LOCAL_MACHINE\SYSTEM\MountedDevices

4. To Change a Drive Letter
WARNING: Do not change the C: drive letter.
A) Right click on a listed /DosDevices\(drive letter) (Ex: /DosDevices\D: ) that you want to change the drive letter of, then click on Rename.
B) Rename it with a drive letter that you want to use, and is not already listed here, and press enter.
For Example: If I wanted to change it from D: to K: , then I would rename it to /DosDevices\K: instead.
5. To Remove a Drive Letter
WARNING: Do not remove the C: drive letter.
A) Right click on a listed /DosDevices\(drive letter) (Ex: /DosDevices\D: ) that you want to remove the drive letter of, then click on Delete.
B) Click on Yes to confirm the deletion.
6. Close regedit.
7. Log off and log on, or restart the computer to apply the changes.
That's it,Shawn
Related Tutorials
- How to Shrink and Create a Partition with Disk Management in Vista
- How to Delete and Extend a Partition with Disk Management in Vista
- How to Change a Drive Icon in Vista
- How to Hide or Show Drive Letters in Vista, Windows 7, and Windows 8
- How to Rename a Drive in Vista
- How to Disable or Enable Low Disk Space Warning in Vista
- How to Increase Hard Drive Performance in Vista
- How to Remove or Show Drives in the Vista and Windows 7 "Send To" Context Menu
- How to Restrict or Unrestict Drive Access in Vista
- How to Hide or Unhide a Drive in Vista
- How to Create a Drive Shortcut in Vista
- How to Mount or Dismount a Drive or Partition to a Folder in Vista
- How to Retain the DVD Drive Icon if Disappeared from Computer
Attachments
Last edited by a moderator:





 and D: HP Recovery with a fake restore point. I also noticed that my system restore default shortcut in accesseries or is it sys tools is missing. That doesnt bother me so much but no restore points does. Any suggestions?
 Thank-you. If i may ask one more question pertaining to the C: drive... who should i put as owner. I think this is where i caused alot of my present problems. I messed around with this a little too much not really being sure what i was doing. Are there any tutorials on how to set all default permissions on all folders?