How to Set and Unset the Read-only File and Folder Attribute in Vista
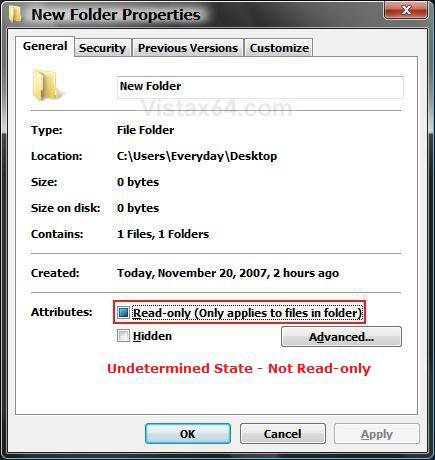
By default in Vista, folders do not have a read-only attribute. Only files have a read-only attribute. Any changes to the folder's read-only box will only affect the files inside the folder, then the read-only box will default back to blue when you check it again.
This will show you how to set and unset the read-only attribute of a file or folder in Vista.
This will show you how to set and unset the read-only attribute of a file or folder in Vista.
Read-only files cannot be modified. They can only be copied, moved, renamed, or deleted.
- Read-only box blue = File or folder is not read-only. Default setting.
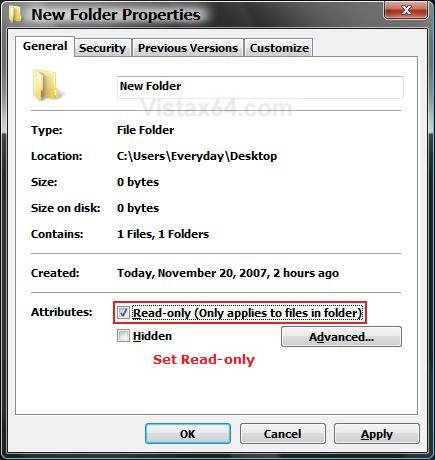
- Read-only box checked = File or folder is set as read-only.
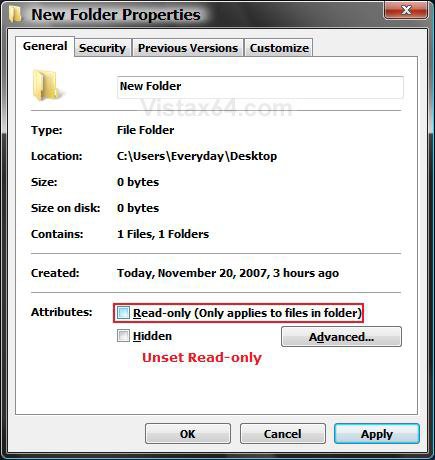
- Read-only box empty = File or folder is currently being set as not read-only.
- If you copy a read-only file, the copy will not be read-only.
- It is possible that changing a read-only file can cause a program that relies on the file to stop working properly, so be sure that it's okay to change a read-only file before you proceed.
- If You cannot view or change the Read-only or the System attributes of folders in Windows Server 2003, in Windows XP, in Windows Vista or in Windows 7
 METHOD ONE
 OPTION ONE
1. Right click on a folder that you want to make the files inside of it read-only, and click on Properties.
NOTE: The read-only box will always default back to being filled in with blue. A undetermined state of not being read-only. This is not read-only.
2. Click the General tab. (See screenshot below)
3. To Set Files in Folder as Read-only -
A) Check the Read-only box and click OK. (See screenshot below)
NOTE: This will only set the read-only attribute for all of the files in this folder and it's subfolders. It does not affect the folder itself. See: Microsoft Help and Support: KB326549
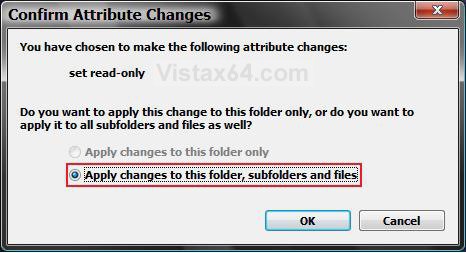
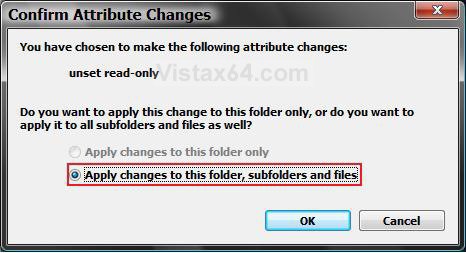
B) Click on OK to confirm changes. (See screenshot below)
4. To Unset Files in the Folder as Read-only -
NOTE: If the folder is a system folder, then you may need to use METHOD TWO below to remove the read-only attribute of the files in the folder instead.
A) Click on the Read-only box until it is blank without the blue square. (See screenshot below)
NOTE: This will unset the read-only attribute for all of the files in this folder and it's subfolders. It does not affect the folder itself.
B) Click on OK. (See screenshot above)
C) Click on OK to confirm changes. (See screenshot below)
NOTE: If this is a system folder, then you will have to approve the other pop-ups as well.
 OPTION TWO
1. Right click on the file you want to make read-only, and click on Properties.
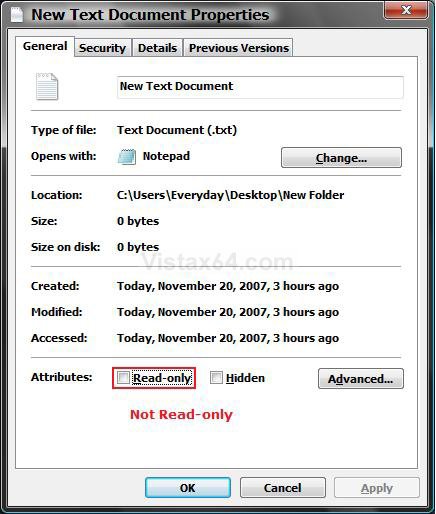
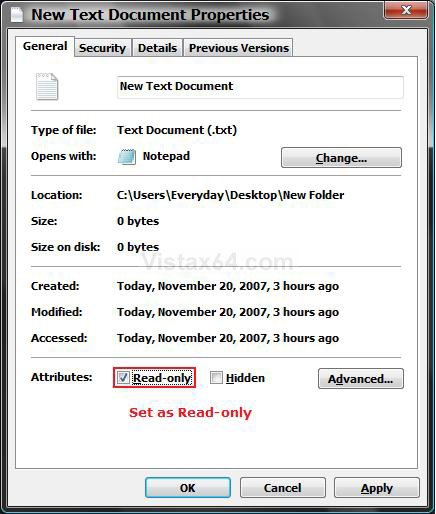
2. Click on the General tab. (See screenshots below)
3. To Set a File as Read-only -
A) Check the Read-only box. (See right screenshot below step 4)
B) Go to step 5.
4. To Unset a File as Read-only -
NOTE: If this was a system file, then you may need to use METHOD TWO below to remove the read-only attribute instead.
A) Uncheck the Read-only box. (See left screenshot below)
NOTE: To unset read-only for all files in a folder, see step 4 in the above section.
5. Click on OK to apply. (See screenshots above)
NOTE: If this is a system file, then you will have to approve the other pop-ups as well.
 METHOD TWO
 OPTION ONE
NOTE: This options is if you want to set or unset a file as read-only.
1. Open a elevated command prompt.
2. To Set a File as Read-only -
A) In the command prompt, type attrib +r "Full path of file" and press Enter. (See screenshot below)
NOTE: Substitute "Full path of file" for the actual full path of the file.
For example, attrib +r "C:\Users\Moderator\Desktop\Test.txt"
B) Go to step 4.
3. To Unset a File as Read-only -
A) In the command prompt, type attrib -r "Full path of file" and press Enter. (See screenshot below)
NOTE: Substitute "Full path of file" for the actual full path of the file.
For example, attrib -r "C:\Users\Moderator\Desktop\Test.txt"
4. Close the elevated command prompt.
5. You can verify the read-only status of the file using METHOD ONE (Option Two) above.
 OPTION TWO
NOTE: This option is if you want to set or unset all files in a folder as read-only.
1. Open a elevated command prompt.
2. To Set All Files in a Folder as Read-only -
A) In the command prompt, type the command below and press Enter. (see screenshot below)
NOTE: Substitute Full path of folder for the actual full path of the folder.
Code:
attrib +r "[B][COLOR=red]Full path of folder[/COLOR][/B]\*.*" /S /D
FOR EXAMPLE: I would type this command exactly as below for a folder on my desktop.
Code:
attrib +r "C:\Users\UserName\Desktop\Folder\*.*" /S /D
3. To Unset All Files in Folder as Read-only -
A) In the command prompt, type the command below and press Enter. (see screenshot below)
NOTE: Substitute Full path of folder for the actual full path of the folder.
Code:
attrib -r "[B][COLOR=red]Full path of folder[/COLOR][/B]\*.*" /S /D
FOR EXAMPLE: I would type this command exactly as below for a folder on my desktop.
Code:
attrib -r "C:\Users\UserName\Desktop\Folder\*.*" /S /D
That's it,
Shawn
Related Tutorials
- How to Open and Change Folder Options in Vista
- How to Hide or Show Hidden Files and Folders in Vista
- How to Show and Change a File Name Extension in Vista
- How to Disable or Enable Simple File Sharing in Vista
- How to See the Folder Size in Vista
- How to Take Ownership of a Item in Vista
- Cannot Rename or Move a File or Folder in Vista Fix
Attachments
Last edited by a moderator:

