How to Add or Remove a Desktop Toolbar in Vista
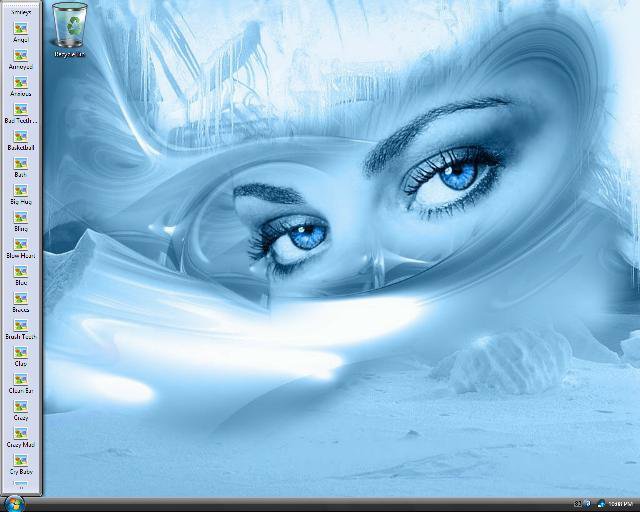
A toolbar is a row, column, or block of buttons or icons representing tasks you can do within a program or shortcuts. This will show you how to add a toolbar to either the top, left, and right of the desktop, or add one for all three borders if you want. You will also see how to use and add or remove shortcuts to this toolbar.
If you wanted to use an existing or new folder on the desktop instead of from another location in step 1 below and do not want the folder to still be displayed after creating the desktop toolbar with it, then you can hide the folder.
NOTE: The toolbar is on the left border of the desktop. You can add or move a toolbar to the other desktop borders if you like to.
 OPTION ONE
1. Navigate to any folder that you want to use for the toolbar that contains your shortcuts.
NOTE: If you do not have a folder that contains the shortcuts you want, then create a New Folder in the location you want to keep it so you can use it for the desktop toolbar.
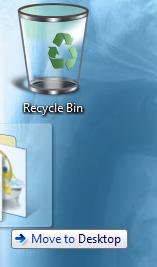
2. Drag the Folder to one of the edges of the desktop of your choice until it will not go any further and drop it. (See screenshot below)
NOTE: You will notice that the folder will have the Move to Desktop message. Do not worry, it will only make a new desktop toolbar for the folder and not move the folder from it's location.
3. Click on and hold and drag the edge of the new toolbar to the width you want it to be.
 OPTION TWO
NOTE: This will only be visible if the contents overflow the borders of the toolbar.
1. Click on the double arrows at the bottom for the left and right of the desktop, or at the right for the top of the desktop. (See sceenshot below)
2. A scroll window will pop-up with a arrow at each end allowing you to scroll through the contents of the toolbar.
 OPTION THREE
1. Right click on a empty area of the toolbar.
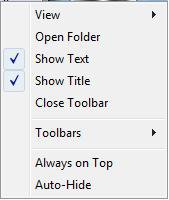
2. Click on the option you want. (See screenshot below)
- View - Click to select Large Icons or Small Icons in the toolbar.
- Open Folder - Click to open the folder location of the folder that is used for the toolbar.NOTE: You can then add or remove any shortcut icon from the toolbar you want like in any other Explorer window.
- Show Text - Click to turn the text for the icons on or off by checking or unchecking this option.
- Show Title - Click to turn the name of the folder used by toolbar as a title on or off by checking or unchecking this option.
- Close Toolbar - This will Remove the toolbar from the desktop after you click OK to the confirmation prompt. (See screenshot below)
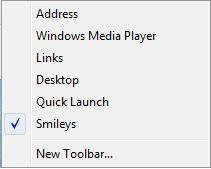
- Toolbars - This will allow you to add additional items to the toolbar. Check the items you wish to add, and uncheck the ones you wish to remove. The New Toolbar option will allow you to add another folder inside the toolbar. If you uncheck all of them, then the toolbar will be removed from the desktop. (See screenshot below)
- Always on Top - Click to allow the toolbar to always be on top of a open window or other item on the desktop.
- Auto-Hide - Click to hide the toolbar until you move the mouse pointer over it.
That's it,
Shawn
Related Tutorials
- How to Add or Remove a Toolbar on the Taskbar in Vista
- How to Restore and Change a Desktop Icon in Vista
- How to Change the Desktop Background Wallpaper in Vista
- How to Install and Use DreamScene in Vista
- How to Enhance Windows Vista DreamScene with Stardock DeskScapes
- How to Use Quick Launch in Vista
- How to Change the Desktop Theme in Vista
- How to Enable or Disable Taskbar Toolbars in Vista
Attachments
Last edited:

