How to Change the Automatic System Restore Point Settings in Vista Task Scheduler
By default System Restore is scheduled to create a restore point at 12 AM every day (Daily trigger) and at every system startup (At startup trigger) in Task Scheduler if any system changes were made from the last time it checked. This will show you how to change these schedule settings, or disable one or both triggers.
System Restore will need to be turned on for this scheduled task to be able to run.
Here's How:
1. Open the Start Menu.
A) In the white line (Start Search) area, type taskschd.msc and press Enter.
B) Go to step 3.
OR
2. Open the Control Panel (Classic view).
A) Click on the Administrative Tools Icon.
B) Click on Task Scheduler.
3. Click on Continue in the UAC Prompt.
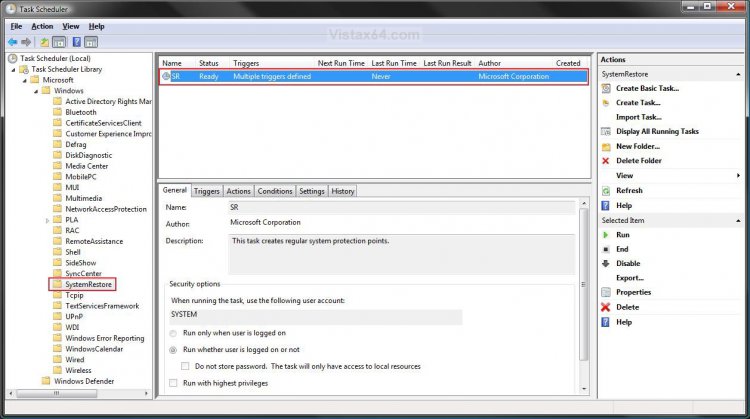
4. In the left pane click on the triangle next to Task Scheduler Library, Microsoft, and Windows to expand the folder tree. (See screenshot below step 5)
5. Click on the SystemRestore folder.
A) Choose a option or options below to do.
 OPTION ONE
6. To Disable this Task Completely -
NOTE: This will disable both the Daily (OPTION TWO) and At startup (OPTION THREE) triggers regardless of how they are set individually. You will not have anymore automatic restore points created with this task disabled. You can still manually create a restore point though. For how, see: How to Create a System Restore Point in Vista
A) In the middle pane, right click on the SR task and click on Disable. (See screenshot below step 5)
B) Go to step 22.
7. To Enable this Task Completely -
NOTE: Check to make sure that each Daily (step 12 in OPTION TWO) and At startup (step 17 in OPTION THREE) trigger is also set as Enabled.
A) In the middle pane, right click on the SR task and click on Enable. (See screenshot below step 5)
B) Continue to OPTION TWO.
 OPTION TWO
NOTE: You will need to have the task enabled in step 7 to use this trigger. This is the trigger that creates a restore point at 12 AM every day by default. If you do not want to change these settings, then continue to OPTION THREE.
8. In the middle pane, right click on the SR task and click on Properties. (See screenshot below step 5)
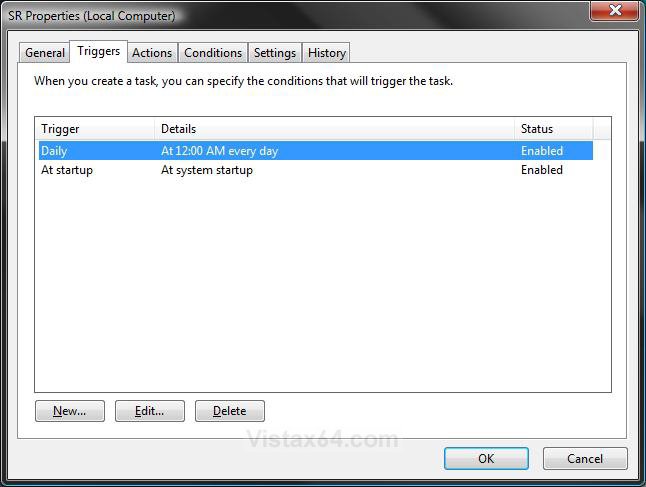
9. Click on the Triggers tab. (See screenshot below step 10)
10. Click on the Daily trigger to highlight it and click on the Edit button.
NOTE: These are the default settings for the Daily trigger in the screenshot below.
11. To Disable the Daily Trigger -
NOTE: This is if you only wanted to have restore points create with the At startup (OPTION THREE) trigger instead.
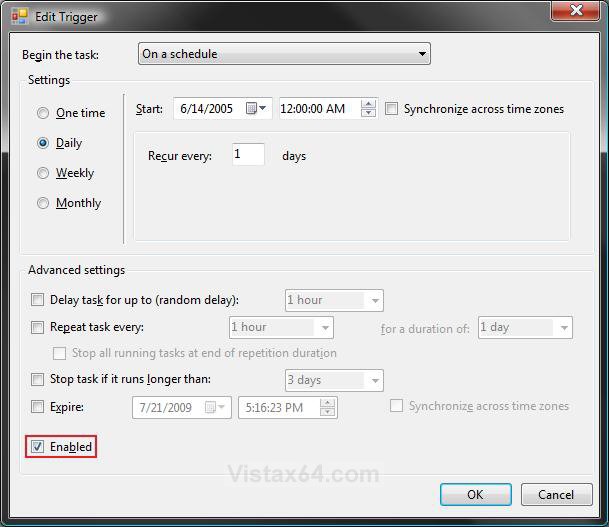
A) Uncheck the Enabled box and click on OK. (See screenshot below step 12)
B) Continue to OPTION THREE.
12. To Enable the Daily Trigger -
A) Check the Enabled box. (See screenshot below)
B) If the default settings for the Daily trigger schedule are not what you want, then make any changes that you would like.
NOTE: For more details about each of these settings, see STEP FIVE here: How to Create a Task in Vista Task Scheduler
C) Click on OK.
D) Continue to OPTION THREE.
 OPTION THREE
NOTE: You will need to have the task enabled in step 7 to use this trigger. This is the trigger that creates a restore point at every system startup by default. If you do not want to change these settings, then continue to OPTION FOUR.
13. In the middle pane, right click on the SR task and click on Properties. (See screenshot below step 5)
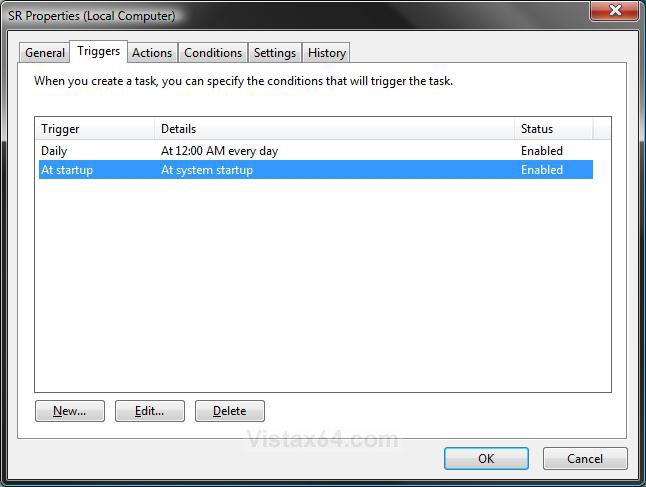
14. Click on the Triggers tab. (See screenshot below step 15)
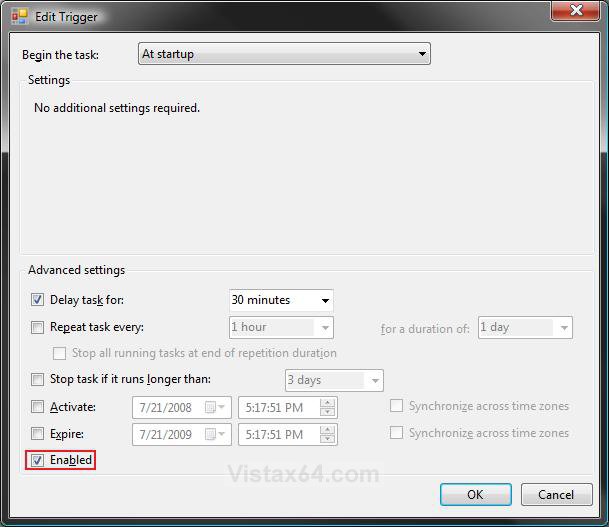
15. Click on the At startup trigger to highlight it and click on the Edit button.
NOTE: These are the default settings for the At startup trigger in the screenshot below.
16. To Disable the At startup Trigger -
NOTE: This is if you only wanted to have restore points create with the Daily (OPTION TWO) trigger instead.
A) Uncheck the Enabled box and click on OK. (See screenshot below step 17)
B) Continue to OPTION THREE.
17. To Enable the At startup Trigger -
A) Check the Enabled box. (See screenshot below)
B) To Speed Up Startup Time - Make sure that under Advanced Settings, the Delay task for box is checked and you have an amount of minutes set that you want for System Restore to run after startup.
C) If the default advanced settings for the At startup trigger schedule are not what you want, then make any changes that you would like.
D) Click on OK.
E) Continue to OPTION FOUR.
 OPTION FOUR
NOTE: You will need to have the task enabled in step 7 first. This will effect how both the Daily (OPTION TWO) and At startup (OPTION THREE) triggers run. If you do not want to change these settings, then continue to OPTION FIVE.
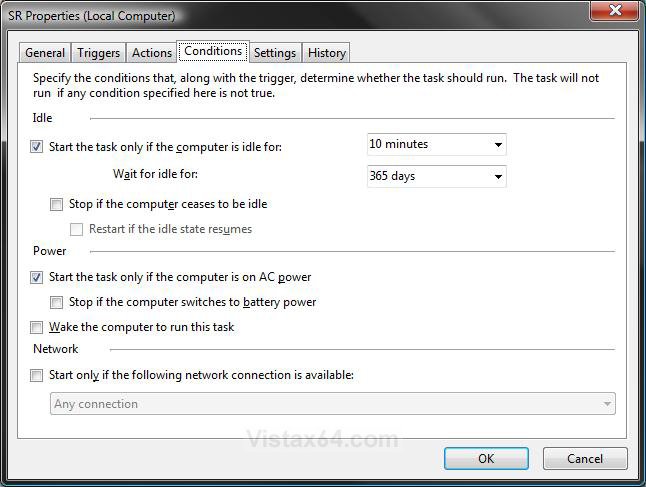
18. In the middle pane, right click on the SR task and click on Properties. (See screenshot below step 5)
A) Click on the Conditions tab. (See screenshot below)
NOTE: These are the default settings for the Conditions tab in the screenshot below.
B) Make any changes you would like.
NOTE: For more details about each of these settings, see STEP SEVEN here: How to Create a Task in Vista Task Scheduler
C) Continue to OPTION FIVE.
 OPTION FIVE
NOTE: You will need to have the task enabled in step 7 first. This will effect how both the Daily (OPTION TWO) and At startup (OPTION THREE) triggers run. If you do not want to change these settings, then continue to OPTION SIX.
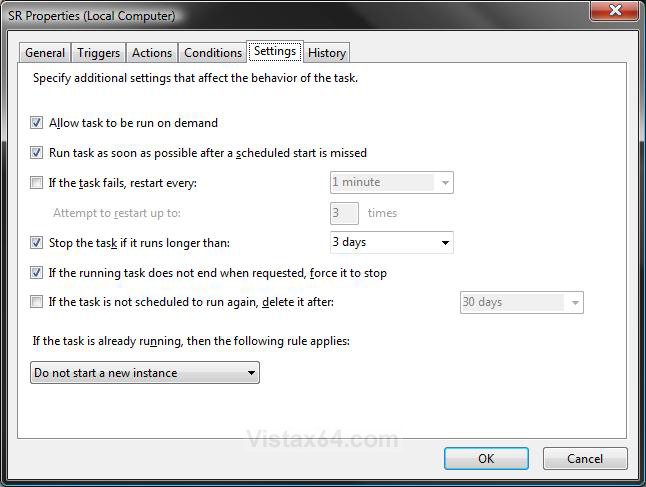
19. In the middle pane, right click on the SR task and click on Properties. (See screenshot below step 5)
A) Click on the Settings tab. (See screenshot below)
NOTE: These are the default settings for the Settings tab in the screenshot below.
B) Make any changes you would like.
NOTE: For more details about each of these settings, see STEP EIGHT here: How to Create a Task in Vista Task Scheduler
C) Continue to OPTION SIX.
 OPTION SIX
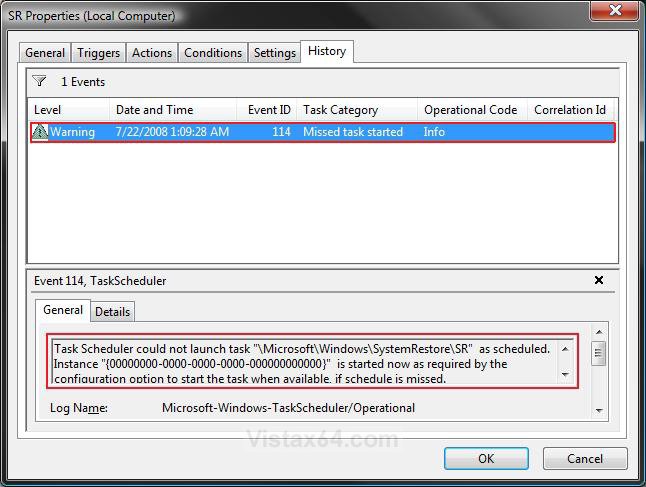
NOTE: This will show you what the run and error history for this task is. This can be handy to help troubleshoot any problems with the task, or you just want to see when it ran. If you do not want to see the history, then go to step 21.
20. In the middle pane, right click on the SR task and click Properties. (See screenshot below step 5)
NOTE: You can also just click on the History tab in the bottom half of the middle pane instead.
A) Click on the History tab. (See screenshot below)
NOTE: In the bottom pane you can get more details about a selected history event listed in the top pane.
B) Go to step 21.
21. Click on OK. (See screenshots from below either steps 10, 15, 18B, or 19B)
22. Close Task Scheduler.
That's it,Shawn
Related Tutorials
- How to Create a Task in Vista Task Scheduler
- How to Have a Task Wake up the Computer to Run in Vista Task Scheduler
- How to Create a System Restore Shortcut in Vista
- How to Create a Create System Restore Point Shortcut in Vista
- How to Create a System Restore Point in Vista
- How to Undo the Last System Restore in Vista
- How to Do a System Restore in Vista
- How to Change the System Restore Disk Space Usage in Vista
- How to Use Disk Cleanup in Vista
- How to Stop System Restore Points from being Deleted in Vista when Dual Booting with XP
- How to Turn System Restore On or Off in Vista
- How to Enable or Disable Create Vista System Restore Point when New Device Driver is Installed
- How to Enable or Disable Create Vista System Restore Point when a Application is Installed
Attachments
Last edited by a moderator:

