Hello,
Some of us don't use just a wireless router, but a combination of wireless and wired routers. In such cases the configuration of the devices can be a little tricky. But this thread it will be explained in depth, each step how to set up a wireless access points for laptops")
This tutorial is going to explain how to set-up wireless for people who have setups similar to this model:
Modem -> Wired Router -> Wireless Router
Modem -> Wired Router -> Switch -> Wireless Router
***Note, there are pictures at the bottom of this post, use those for reference when going through this guide***
Supplies:
- Wireless router / power cord
- An ethernet cable to go from the router to the computer we'll be working with
- Oh, a computer with Internet Explorer or Firefox, no chrome yet lol
Step 1: Getting everything ready
- Take the wireless router, plug in the power, and take an ethernet cable from the back of the wireless router ***NOT THE INTERNET / WAN PORT but any port labled [1,2,3,4]*** plug the other end into the computer or laptop
- Now, once the laptop is booted up make sure its connected to the router
WIRED not WIRELESSLY
- Open up Internet Explorer or Firefox
- in the address bar type in the default router IP address which for dlink's is 192.168.0.1 for linksys products its usually 192.168.1.1 and hit enter
- if prompted for a username and password:
- dlink: username: admin password: blank
- linkys: username: admin password: admin
Step 2: Wireless
- Now, there should be a button either on the top, left, or right margin of the screen with options. Setup Status, Tools, Admin, Network etc.
- Make sure that the we're in the Setup portion of the interface.
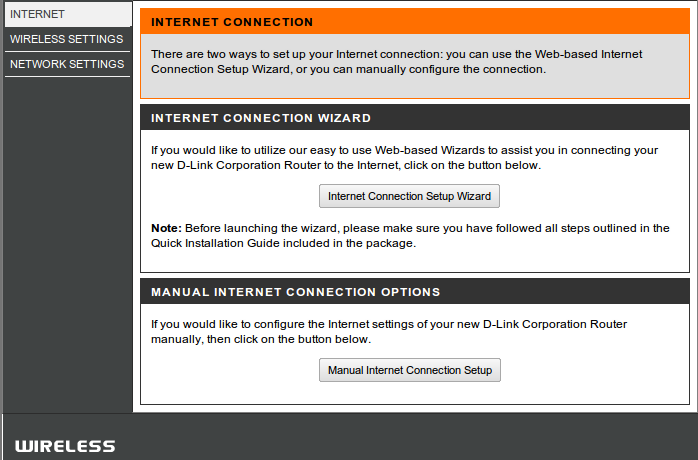
- There will be 3 options, Network, Internet, Wireless settings (depending on brand etc)
- Internet will be best if left alone, the areas of concern are the Network and Wireless portions
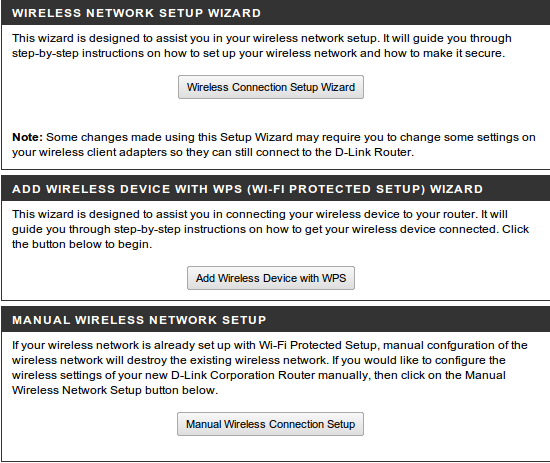
- Go ahead and click on the Wireless link
- Now, this will load a configuration page with a chunk of information, don't freak, its simple")
- NOTE: if it doesn't load a page with options, choose Manual Wireless Setup
- Now, on this page we're going to change a lot of settings so make sure they're all correct before saving it.
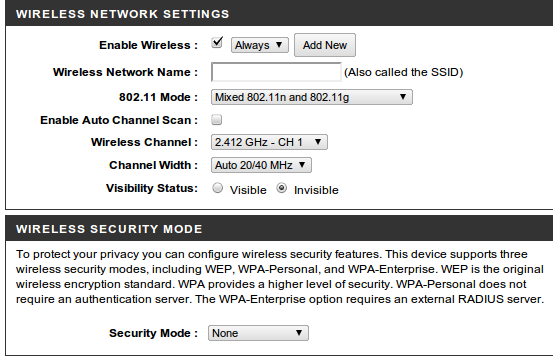
- Starting with the channel, more than likely its on 6 or auto. Lets change that to either 2 or 10 (user preference).
- Change the SSID or Wireless network name to something familiar but doesn't have too much information (house1 or media2 or something of that effect.
- Also, if the wireless router has the ability of N lets use 802.11g and 802.11n if it doesn't lets use only 802.11g as its stable.
- Make sure the network is visible, so its SSID doesn't have to be entered in
- Check that wireless is enabled and enabled always
- Here is the fun part: Encryption
- Basically there are 3 types: WEP, WPA, and WPA2
- WEP : weak and easily, extremely easily hacked (definitely not secure)
- WPA : stronger than WEP but not the strongest
- WPA2 : the best encryption method for non-commercial set-ups available if the devices connecting to the network accept WPA2 please, please use it.
- So choose WPA2 Personal with a AES + TKIP cyper or just AES. AES will prove to be more stable in some cases.
- This step is crucial to network security
- Open notepad
- start writing an encryption key that is no more than 64 characters long
- it can contain: numbers, symbols, and letters
- make it random, and make it long.
- Once that is complete, copy and paste that key into the text field for the interface
- Save the settings on the page by clicking the Save Settings button or Apply Settings button
- ***SAVE THAT NOTEPAD ENCRYPTION FILE SOMEWHERE SAFE AND ACCESSIBLE***
Step 3: Network / LAN settings
- Just like the above steps, click on setup link in the interface page.
- Now find the manual network configuration link; click that link
- This will load a page that has a similar look as the last, usually less options however.
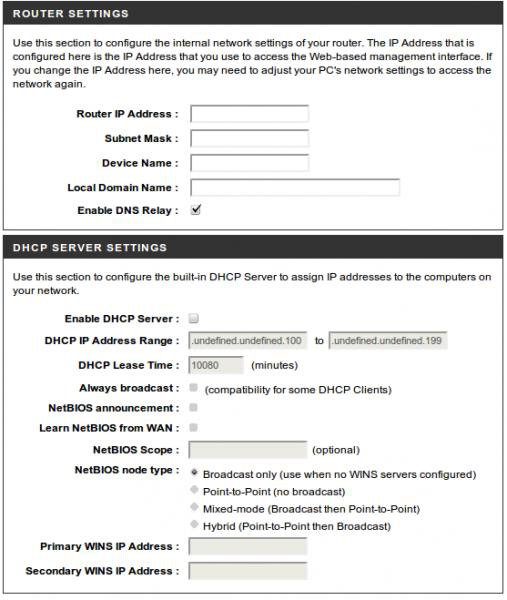
- The router IP address is more than likely 192.168.0.1 or 1.1* if this is true and there is another router or network device besides a switch or a hub this has to change. The wireless router has to be 1 digit off of the other devices
- Example: Wired Router: 192.168.0.1 Wireless router: 192.168.0.2
- Go ahead and change that so nothing has conflicting traffic
- When that is done and the settings are correct:
- Save and apply the settings
- ***Once its done saving, it wont load the previous page. Clear the address bar of the browser and type the IP address that was assigned to it. So if it used to be 192.168.0.1 and its now .0.2 change it to .0.2 and it will load from here on out***
Step 4: Advanced Network Settings; Really its easy
- Somewhere on the page there will be an advanced tab of some sort. Exactly where varies by model, manufacture etc. But once its found, click it.
- Now, look for an option that states: Advanced Network; click it.
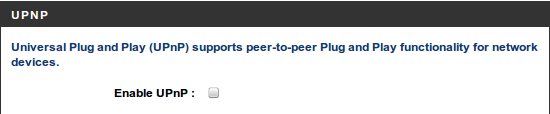
- Displaying, there will or should be an option for WAN ping, UPnP, and possibly Multicast.
- In particular were looking for UPnP; Disalbe it, Un-check it whatever. Its not needed.
- Double check that the WAN port is set to not respond to ping requests
- Leave the WAN port speed at default which is Auto 10/100
- Multicast streams is a setting that can be left alone as well
- Save / Apply the settings and that's done
Step 5: Admin Password
- In this page that is displaying, there should be a link that says Tools, Admin, or something similar; click it
- It will display a text field in which a password must be entered.
- don't make this one too long, but not too easy either.
- ***My recommendation is to make it no longer than 15 characters but again make it in notepad first and paste it into the field so its error free***
- Save / Apply the settings
- Now since the password has changed, its required to login again.
- Use the password that was just created it will work now
Step 6: One Last Network Setting and Finished
- Just like the above steps, click on setup link in the interface page.
- Now find the manual network configuration link; click that link
- The last item that needs attention is the Enable DHCP Serveroption.
- Its either a check-box or radio button(circle button)
- Disable it, its not needed
- Save and Apply the settings
- Now go enjoy wireless freedom once again
- If questions arise please post them in this thread, I will answer as soon as possible. I really hope this assists new wireless users to embrace configuring it with this tutorial.
Side note to the mods, I'm not sure if this has been posted or not but I decided it could be useful to the community. If it sees a lot of traffic I would greatly appreciate it if it became a sticky. Thanks in advance.
Some of us don't use just a wireless router, but a combination of wireless and wired routers. In such cases the configuration of the devices can be a little tricky. But this thread it will be explained in depth, each step how to set up a wireless access points for laptops
This tutorial is going to explain how to set-up wireless for people who have setups similar to this model:
Modem -> Wired Router -> Wireless Router
Modem -> Wired Router -> Switch -> Wireless Router
***Note, there are pictures at the bottom of this post, use those for reference when going through this guide***
Supplies:
- Wireless router / power cord
- An ethernet cable to go from the router to the computer we'll be working with
- Oh, a computer with Internet Explorer or Firefox, no chrome yet lol
Step 1: Getting everything ready
- Take the wireless router, plug in the power, and take an ethernet cable from the back of the wireless router ***NOT THE INTERNET / WAN PORT but any port labled [1,2,3,4]*** plug the other end into the computer or laptop
- Now, once the laptop is booted up make sure its connected to the router
WIRED not WIRELESSLY
- Open up Internet Explorer or Firefox
- in the address bar type in the default router IP address which for dlink's is 192.168.0.1 for linksys products its usually 192.168.1.1 and hit enter
- if prompted for a username and password:
- dlink: username: admin password: blank
- linkys: username: admin password: admin
Step 2: Wireless
- Now, there should be a button either on the top, left, or right margin of the screen with options. Setup Status, Tools, Admin, Network etc.
- Make sure that the we're in the Setup portion of the interface.
- There will be 3 options, Network, Internet, Wireless settings (depending on brand etc)
- Internet will be best if left alone, the areas of concern are the Network and Wireless portions
- Go ahead and click on the Wireless link
- Now, this will load a configuration page with a chunk of information, don't freak, its simple
- NOTE: if it doesn't load a page with options, choose Manual Wireless Setup
- Now, on this page we're going to change a lot of settings so make sure they're all correct before saving it.
- Starting with the channel, more than likely its on 6 or auto. Lets change that to either 2 or 10 (user preference).
- Change the SSID or Wireless network name to something familiar but doesn't have too much information (house1 or media2 or something of that effect.
- Also, if the wireless router has the ability of N lets use 802.11g and 802.11n if it doesn't lets use only 802.11g as its stable.
- Make sure the network is visible, so its SSID doesn't have to be entered in
- Check that wireless is enabled and enabled always
- Here is the fun part: Encryption
- Basically there are 3 types: WEP, WPA, and WPA2
- WEP : weak and easily, extremely easily hacked (definitely not secure)
- WPA : stronger than WEP but not the strongest
- WPA2 : the best encryption method for non-commercial set-ups available if the devices connecting to the network accept WPA2 please, please use it.
- So choose WPA2 Personal with a AES + TKIP cyper or just AES. AES will prove to be more stable in some cases.
- This step is crucial to network security
- Open notepad
- start writing an encryption key that is no more than 64 characters long
- it can contain: numbers, symbols, and letters
- make it random, and make it long.
- Once that is complete, copy and paste that key into the text field for the interface
- Save the settings on the page by clicking the Save Settings button or Apply Settings button
- ***SAVE THAT NOTEPAD ENCRYPTION FILE SOMEWHERE SAFE AND ACCESSIBLE***
Step 3: Network / LAN settings
- Just like the above steps, click on setup link in the interface page.
- Now find the manual network configuration link; click that link
- This will load a page that has a similar look as the last, usually less options however.
- The router IP address is more than likely 192.168.0.1 or 1.1* if this is true and there is another router or network device besides a switch or a hub this has to change. The wireless router has to be 1 digit off of the other devices
- Example: Wired Router: 192.168.0.1 Wireless router: 192.168.0.2
- Go ahead and change that so nothing has conflicting traffic
- When that is done and the settings are correct:
- Save and apply the settings
- ***Once its done saving, it wont load the previous page. Clear the address bar of the browser and type the IP address that was assigned to it. So if it used to be 192.168.0.1 and its now .0.2 change it to .0.2 and it will load from here on out***
Step 4: Advanced Network Settings; Really its easy
- Somewhere on the page there will be an advanced tab of some sort. Exactly where varies by model, manufacture etc. But once its found, click it.
- Now, look for an option that states: Advanced Network; click it.
- Displaying, there will or should be an option for WAN ping, UPnP, and possibly Multicast.
- In particular were looking for UPnP; Disalbe it, Un-check it whatever. Its not needed.
- Double check that the WAN port is set to not respond to ping requests
- Leave the WAN port speed at default which is Auto 10/100
- Multicast streams is a setting that can be left alone as well
- Save / Apply the settings and that's done
Step 5: Admin Password
- In this page that is displaying, there should be a link that says Tools, Admin, or something similar; click it
- It will display a text field in which a password must be entered.
- don't make this one too long, but not too easy either.
- ***My recommendation is to make it no longer than 15 characters but again make it in notepad first and paste it into the field so its error free***
- Save / Apply the settings
- Now since the password has changed, its required to login again.
- Use the password that was just created it will work now
Step 6: One Last Network Setting and Finished
- Just like the above steps, click on setup link in the interface page.
- Now find the manual network configuration link; click that link
- The last item that needs attention is the Enable DHCP Serveroption.
- Its either a check-box or radio button(circle button)
- Disable it, its not needed
- Save and Apply the settings
- Now go enjoy wireless freedom once again
- If questions arise please post them in this thread, I will answer as soon as possible. I really hope this assists new wireless users to embrace configuring it with this tutorial.
Side note to the mods, I'm not sure if this has been posted or not but I decided it could be useful to the community. If it sees a lot of traffic I would greatly appreciate it if it became a sticky. Thanks in advance.
Attachments

Last edited:
My Computer
System One
-
- Manufacturer/Model
- HP
- CPU
- Intel Neo
- Memory
- 2GB
- Graphics card(s)
- Intergrated Intel Graphics
- Sound Card
- Integrated
- Monitor(s) Displays
- 10.1
- Screen Resolution
- 1280 x 800
- Hard Drives
- 160GB
- PSU
- Power Adapter
- Case
- It's special, it flips open :)
- Mouse
- Touchpad
- Keyboard
- Acer
- Internet Speed
- Down: 16mb/s Up: 1.6mb/s
- Other Info
- I killed my HP Laptop :'(