Windows Explorer Folder View settings

How to Reset Windows Explorer Folder View Settings to Make Vista Remember

information   Information
Vista sets the Explorer window view settings and folder type template according to what folder types are in the window. This will show you how to reset the Windows Explorer folder view settings, turn off Automatic Folder Type Discovery, and increase the folder view cache to have Vista remember the view settings, folder type template, size, or position of a specific window for when it was last closed at the specific path location.

This does not work with the sub Save As, Open With, Open in New Tab (Internet Explorer), etc.... type dialog windows through the File menu bar item though. These do not seem to be able to have their size or position remembered. For these, you can use the free program AutoSizer to resize them.
Note   Note

  • The Windows Explorer window pane Layout settings are universal for all window templates. These are the Search Pane, Details Pane, Preview Pane, and Navigation Pane. They can only be turned on or off for all windows with the same folder template. For example, the Music Details, Music Icons, Pictures and Videos, All Items, Contacts, and Documents.
  • This will have no affect on the memory for the Open, Save, and Save As dialog boxes for having them open to the same location.
  • External devices (EX: USB drive) will not retain their folder view settings when turned off or disconnected from the computer.
Tip   Tip
It has been reported that installing the Vista SP2 has helped resolved this issue of Vista forgetting folder view settings for no apparent reason.
warning   Warning
The exact cause of Vista losing it's memory on your folder view settings has not been found yet. This may just reset them for now to help Vista remember them again. It has been noticed that changing a lot of window folder view settings in combination with some unknown applications settings may be triggering this forgetfulness. Make sure that you do not have a setting in a 3rd party program set to clear the folder view setting cache when it is used. (EX: CCleaner - Window Size/Location cache option under Cleaner -> Advanced)


METHOD ONE
Normal Way to Reset a Folder Type View Settings

Note   Note
This resets the folder view settings for all folders with this same folder template type back to the default view settings. You will need to use METHOD TWO below for Vista not remembering your settings for all the folder views.

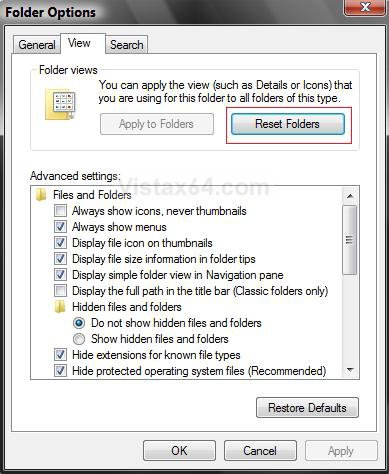
1. Open Folder Options from the Control Panel (Classic View), and click on the View tab and Reset Folders button. (See screenshot below)​
Folder Options.jpg

2. Click on Yes to the confirmation pop-up.​
3. Click on OK to close Folder Options.​


METHOD TWO
Reset All Folder View Settings to Make Vista Remember

Note   Note

  • This resets all current folder view settings so they will be rebuilt when you restart.
  • This will also bring back the Uninstall, Change, Repair, or Uninstall/Change buttons in Programs and Features if missing.


OPTION ONE
Automatically Using a REG File Download
1. Click on the Download button below to download the Reset_Folder_View.zip file and save it to your desktop.
Note   Note
This .reg download includes and does all of the Manual section below for you automatically.
download
2. Open the ZIP file and extract the Reset_Folder_View.reg file to your desktop.​
3. Right click on the downloaded Reset_Folder_View.reg file and click on Merge.​
4. Click on Run button in the Security Warning prompt.​
5. Click on Continue in the UAC prompt.​
6. Click on YES in the Confirmation prompt.​
7. Click on OK in the Success prompt.​
8. Go to step 29 in OPTION TWO below to finish wrapping this up.​


OPTION TWO
Manually Through Registry Editor
Reset Folder View Settings :
1. Open the Start Menu.​
2. In the white line (Start Search) area, type regedit and press Enter.​
3. Click on Continue in the UAC prompt.​
4. In regedit, go to:​
Code:
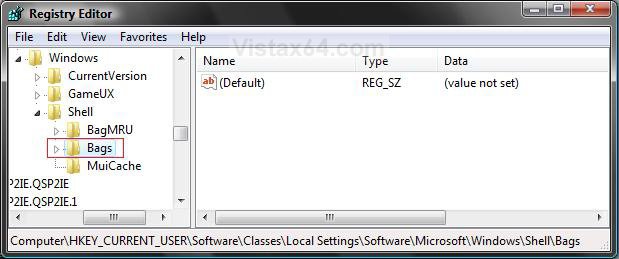
HKEY_CURRENT_USER\Software\Classes\Local Settings\Software\Microsoft\Windows\Shell
5. In the left pane, right click on Bags, and click on Delete. (See screenshot below)​
A) Click on Yes in the confirmation pop-up window.​
Delete_Bags.jpg

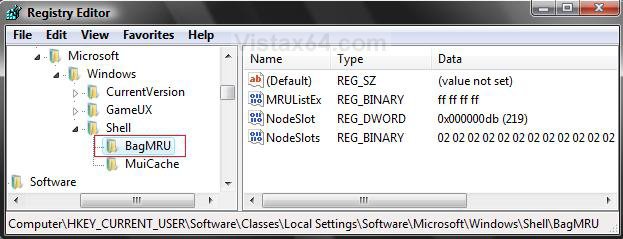
6. In the left pane, right click on BagMRU, and click on Delete. (See screenshot below)​
A) Click on Yes in the confirmation pop-up window.​
Reg BagMRU.jpg

7. In regedit, go to:​
Code:
HKEY_CURRENT_USER\Software\Microsoft\Windows\Shell
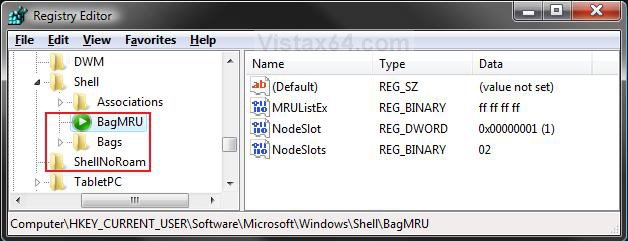
A) In the left pane, right click on BagMRU and click Delete. (See screenshot below step 8)​
B) Click on Yes in the confirmation pop-up window.​
C) In the left pane, right click on Bags and click on Delete.​
D) Click on Yes in the confirmation pop-up window.​

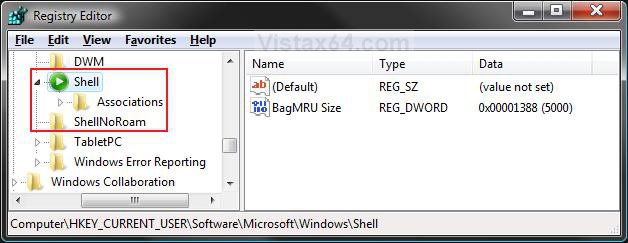
8. In regedit, go to:​
Code:
HKEY_CURRENT_USER\Software\Microsoft\Windows\ShellNoRoam
A) In the left pane, right click on BagMRU if here and click Delete. (See screenshot below step 8)​
B) Click on Yes in the confirmation pop-up window.​
C) In the left pane, right click on Bags if here and click on Delete.​
D) Click on Yes in the confirmation pop-up window.​
Step1.jpg

9. The registry will now look like this. (See screenshot below)​
Step2.jpg

Disable Automatic Folder Type Discovery for Templates :
CREDIT TO: Kristan Kenney: Confessions of a Windows Enthusiast
Note   Note
This will allow you to have what folder type template you set for the window instead of Vista automatically assigning a default template to it based on the contents of the window. This is when you have your folder template changed to Pictures and Videos from All Items when you put one image file in the folder.
Note   Note

OPTION: This is an optional section, but it is recommended. Steps 1-9 must have been done first before you do this section. If you decide to skip it, then go to step 21.​

10. In regedit, go to: (See screenshot below)​
Code:
HKEY_CURRENT_USER\Software\Classes\Local Settings\Software\Microsoft\Windows\Shell

11. In the left pane, right click on Shell and click on New and Key.​
RightClick_Shell.jpg

12. Type Bags and press Enter. (See screenshots below)​
13. In the left pane, right click on Bags and click New and Key.​
New_Key_Bags.jpg
New_Bags.jpg

14. Type AllFolders and press Enter. (See screenshots below)​
15. In the left pane, right click AllFolders and click on New and Key.​
New_Key_AllFolders.jpg
New_AllFolders.jpg

16. Type Shell and press Enter. (See screenshots below)​
17. In the right pane of Shell, right click on a empty area and click on New and String Value.​
New_Key_Shell.jpg
New_Shell.jpg

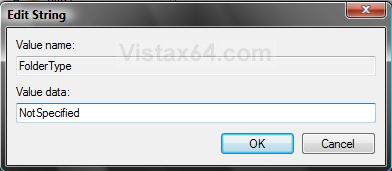
18. Type FolderType and press Enter. (See screenshot below)​
19. In the right pane, right click on FolderType and click on Modify.​
New_FolderType.jpg

20. Type NotSpecified (or one below) and click on OK. (See screenshots below)​
Tip   Tip
You can type any one of these values in bold below instead to apply the template as the default for all folder types. You will still be able to change a individual folder type template to what you want and have Vista remember it afterwards.
Tip   Tip

[TABLE=class:-grid,-width:-500][TR][TD]
Value
[/TD]
[TD]
Description
[/TD][/TR]
[TR][TD]
NotSpecified
[/TD]
[TD]
All Items folder type template
[/TD][/TR]
[TR][TD]
Contacts
[/TD]
[TD]
Contacts folder type template
[/TD][/TR]
[TR][TD]
Music
[/TD]
[TD]
Music Details folder type template
[/TD][/TR]
[TR][TD]
MusicIcons
[/TD]
[TD]
Music Icons folder type template
[/TD][/TR]
[TR][TD]
Documents
[/TD]
[TD]
Documents folder type template
[/TD][/TR]
[TR][TD]
Pictures
[/TD]
[TD]
Pictures and Videos folder type template with large icons
[/TD][/TR][/TABLE]


Modify_FolderType.jpg
step20.jpg

Increase Folder View Cache Memory :
Note   Note
This will increase the amount of folders to be remembered for changes to the folder view settings.
Note   Note

OPTION: This is a optional step, but the increase will help ensure that Vista does not forget. Steps 1-9 must be done first before you do this section. If you decide to skip it, them go to step 25.​

21. In regedit, go to: (See screenshot below)​
Code:
HKEY_CURRENT_USER\Software\Classes\Local Settings\Software\Microsoft\Windows\Shell

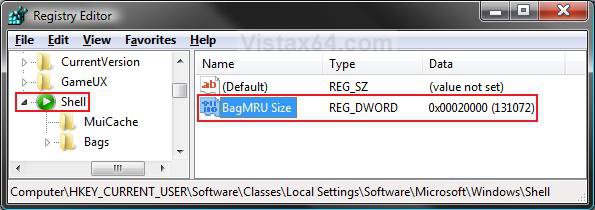
22. In the right pane, right click on BagMRU Size.​
NOTE: If you do not have the BagMRU Size value, then right click on a empty space in the right pane and click on New and DWORD (32-bit) Value. Type in BagMRU Size and press enter.​
23. Click on Modify.​
Step21.jpg

24. Dot the Decimal and type 20000 (folders) and click on OK. (See screenshot below)
Note   Note
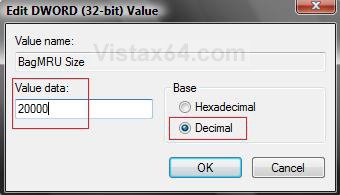
5000 is the default number of folders to be remembered.
ModifyBagMRU.jpg
Deleting Local Group Policy Setting :
Note   Note
This will show you how to check to see if this Group Policy setting has been set to not save the position of open windows or the size and position of the taskbar when users log off, and to delete if it is so that the changed will now be remembered at exit.
25. In regedit, go to: (See screenshot below)​
HKEY_CURRENT_USER\Software\Microsoft\Windows\CurrentVersion\Policies\Explorer
NoSaveSettings_Reg.jpg

26. In the right pane, look to see if you have NoSaveSettings. If you do, then right click on NoSaveSettings and click on Delete and Yes to confirm deletion. (See screenshot above)​
27. In regedit, go to:​
HKEY_LOCAL_MACHINE\Software\Microsoft\Windows\CurrentVersion\Policies\Explorer

28. Repeat step 26 if you have NoSaveSettings here as well.​
Wrapping it Up :
29. Close regedit.​
30. Log off and log on,or restart the computer to apply the reset and to let Vista rebuild the registry keys with a clean slate.​
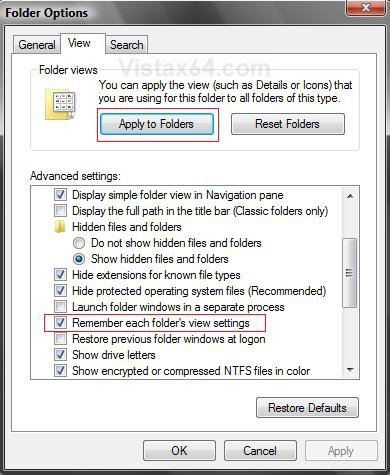
31. Open Folder Options.​
A) Click on the View tab. (See screenshot below)​
B) Check Remember each folder's view settings.​
warning   Warning
If left unchecked, Vista will ignore custom view settings for every folder and have every folder open using default settings instead. Only, uncheck this setting to force all folders to stop using display settings you have specified.
C) Uncheck Restore previous folder windows at logon.​
D) Click on OK.​
Apply.jpg

32. Make the changes you want for the opened Windows Explorer windows.​
33. To Apply These Changes to All the Same Folder Type Templates
A) Open Folder Options
WARNING: Folder Options must be opened from within the same Windows Explorer window that you are changing or the Apply to Folders button will be grayed out.​
B) Click on the View tab. (See screenshot below step 31D)​
C) Click on the Apply to Folders button.​
D) Click on Yes in the confirmation prompt.​
E) Click on OK.​

34. To Apply Changes to Just this Window Template
A) Close the window when you make your changes to the Windows Explorer window to save the folder view settings for just that one window.
warning   Warning
Vista will only remember the way it is when you last closed the window.

35. To Apply Changes to All Window Templates
A) In step 20 above, you can change the default folder template used of (NotSpecified) to what you want instead for all folder templates without having to restart the computer again.​

That's it,
Shawn


Attachments

Last edited by a moderator:
Thanks Brink. The registry edit was what I was looking for. It worked perfectly. You are hereby awarded the "High Order of the Registry Cross" for your excellent and timely problem solving skills.
..::SD::..
PS Thanks for the link ;~)
 

My Computer

You're welcome SD, and welcome to the forum.

I'm glad that this has helped.

Shawn
 

My Computers

System One System Two

  • Operating System
    Windows 10 Pro 64-bit
    Manufacturer/Model
    Custom
    CPU
    Intel i7-8700K 5 GHz
    Motherboard
    ASUS ROG Maximus XI Formula Z390
    Memory
    64 GB (4x16GB) G.SKILL TridentZ RGB DDR4 3600 MHz (F4-3600C18D-32GTZR)
    Graphics card(s)
    ASUS ROG-STRIX-GTX1080TI-O11G-GAMING
    Sound Card
    Integrated Digital Audio (S/PDIF)
    Monitor(s) Displays
    2 x Samsung Odyssey G7 27"
    Screen Resolution
    2560x1440
    Hard Drives
    1TB Samsung 990 PRO M.2, 4TB Samsung 990 PRO PRO M.2, 8TB WD MyCloudEX2Ultra NAS
    PSU
    Seasonic Prime Titanium 850W
    Case
    Thermaltake Core P3
    Cooling
    Corsair Hydro H115i
    Mouse
    Logitech MX Master 3
    Keyboard
    Logitech wireless K800
    Internet Speed
    1 Gb/s Download and 35 Mb/s Upload
    Other Info
    Logitech Z625 speaker system, Logitech BRIO 4K Pro webcam, HP Color LaserJet Pro MFP M477fdn, APC SMART-UPS RT 1000 XL - SURT1000XLI, Galaxy S23 Plus phone
  • Operating System
    Windows 10 Pro
    Manufacturer/Model
    HP Envy Y0F94AV
    CPU
    i7-7500U @ 2.70 GHz
    Memory
    16 GB DDR4-2133
    Sound Card
    Conexant ISST Audio
    Monitor(s) Displays
    17.3" UHD IPS touch
    Screen Resolution
    3480 x 2160
    Hard Drives
    512 GB M.2 SSD
Thanks so much! I was ready to put a baseball bat through my PC and go back to XP over this! now im happy :D if only Microsoft couldve gotten it right from the start!
 

My Computer

Hendinas,

Welcome to the forum. Haha, I know how you feel. It takes a bit to get use to working on a OS that is not up to full snuff yet, but it is getting there.

Glad this has helped,
Shawn
 

My Computers

System One System Two

  • Operating System
    Windows 10 Pro 64-bit
    Manufacturer/Model
    Custom
    CPU
    Intel i7-8700K 5 GHz
    Motherboard
    ASUS ROG Maximus XI Formula Z390
    Memory
    64 GB (4x16GB) G.SKILL TridentZ RGB DDR4 3600 MHz (F4-3600C18D-32GTZR)
    Graphics card(s)
    ASUS ROG-STRIX-GTX1080TI-O11G-GAMING
    Sound Card
    Integrated Digital Audio (S/PDIF)
    Monitor(s) Displays
    2 x Samsung Odyssey G7 27"
    Screen Resolution
    2560x1440
    Hard Drives
    1TB Samsung 990 PRO M.2, 4TB Samsung 990 PRO PRO M.2, 8TB WD MyCloudEX2Ultra NAS
    PSU
    Seasonic Prime Titanium 850W
    Case
    Thermaltake Core P3
    Cooling
    Corsair Hydro H115i
    Mouse
    Logitech MX Master 3
    Keyboard
    Logitech wireless K800
    Internet Speed
    1 Gb/s Download and 35 Mb/s Upload
    Other Info
    Logitech Z625 speaker system, Logitech BRIO 4K Pro webcam, HP Color LaserJet Pro MFP M477fdn, APC SMART-UPS RT 1000 XL - SURT1000XLI, Galaxy S23 Plus phone
  • Operating System
    Windows 10 Pro
    Manufacturer/Model
    HP Envy Y0F94AV
    CPU
    i7-7500U @ 2.70 GHz
    Memory
    16 GB DDR4-2133
    Sound Card
    Conexant ISST Audio
    Monitor(s) Displays
    17.3" UHD IPS touch
    Screen Resolution
    3480 x 2160
    Hard Drives
    512 GB M.2 SSD
Updated to include how to disable automatic folder type discovery for templates.
Shawn
 

My Computers

System One System Two

  • Operating System
    Windows 10 Pro 64-bit
    Manufacturer/Model
    Custom
    CPU
    Intel i7-8700K 5 GHz
    Motherboard
    ASUS ROG Maximus XI Formula Z390
    Memory
    64 GB (4x16GB) G.SKILL TridentZ RGB DDR4 3600 MHz (F4-3600C18D-32GTZR)
    Graphics card(s)
    ASUS ROG-STRIX-GTX1080TI-O11G-GAMING
    Sound Card
    Integrated Digital Audio (S/PDIF)
    Monitor(s) Displays
    2 x Samsung Odyssey G7 27"
    Screen Resolution
    2560x1440
    Hard Drives
    1TB Samsung 990 PRO M.2, 4TB Samsung 990 PRO PRO M.2, 8TB WD MyCloudEX2Ultra NAS
    PSU
    Seasonic Prime Titanium 850W
    Case
    Thermaltake Core P3
    Cooling
    Corsair Hydro H115i
    Mouse
    Logitech MX Master 3
    Keyboard
    Logitech wireless K800
    Internet Speed
    1 Gb/s Download and 35 Mb/s Upload
    Other Info
    Logitech Z625 speaker system, Logitech BRIO 4K Pro webcam, HP Color LaserJet Pro MFP M477fdn, APC SMART-UPS RT 1000 XL - SURT1000XLI, Galaxy S23 Plus phone
  • Operating System
    Windows 10 Pro
    Manufacturer/Model
    HP Envy Y0F94AV
    CPU
    i7-7500U @ 2.70 GHz
    Memory
    16 GB DDR4-2133
    Sound Card
    Conexant ISST Audio
    Monitor(s) Displays
    17.3" UHD IPS touch
    Screen Resolution
    3480 x 2160
    Hard Drives
    512 GB M.2 SSD
Hi Shawn,

This guide is great! Would you happen to know how to set the Details view (with custom columns) as default for all folder?

Thanks in advance.:cool:
 

My Computer

Hi Stefanny,

Welcome to the forum. I'm glad you like this guide.

You can change the columns to what you like and can apply them to all of the same folder type templates. See the Customize the columns in the folder type template : section at this link. Look at the Note under the title for how to apply them to all the same folder type template that you made the change in. You'll see what I mean when you see the link. If not, just let me know. I'll be happy to help.

http://www.vistax64.com/tutorials/77444-windows-explorer-folder-type-templates.html

Shawn
 

My Computers

System One System Two

  • Operating System
    Windows 10 Pro 64-bit
    Manufacturer/Model
    Custom
    CPU
    Intel i7-8700K 5 GHz
    Motherboard
    ASUS ROG Maximus XI Formula Z390
    Memory
    64 GB (4x16GB) G.SKILL TridentZ RGB DDR4 3600 MHz (F4-3600C18D-32GTZR)
    Graphics card(s)
    ASUS ROG-STRIX-GTX1080TI-O11G-GAMING
    Sound Card
    Integrated Digital Audio (S/PDIF)
    Monitor(s) Displays
    2 x Samsung Odyssey G7 27"
    Screen Resolution
    2560x1440
    Hard Drives
    1TB Samsung 990 PRO M.2, 4TB Samsung 990 PRO PRO M.2, 8TB WD MyCloudEX2Ultra NAS
    PSU
    Seasonic Prime Titanium 850W
    Case
    Thermaltake Core P3
    Cooling
    Corsair Hydro H115i
    Mouse
    Logitech MX Master 3
    Keyboard
    Logitech wireless K800
    Internet Speed
    1 Gb/s Download and 35 Mb/s Upload
    Other Info
    Logitech Z625 speaker system, Logitech BRIO 4K Pro webcam, HP Color LaserJet Pro MFP M477fdn, APC SMART-UPS RT 1000 XL - SURT1000XLI, Galaxy S23 Plus phone
  • Operating System
    Windows 10 Pro
    Manufacturer/Model
    HP Envy Y0F94AV
    CPU
    i7-7500U @ 2.70 GHz
    Memory
    16 GB DDR4-2133
    Sound Card
    Conexant ISST Audio
    Monitor(s) Displays
    17.3" UHD IPS touch
    Screen Resolution
    3480 x 2160
    Hard Drives
    512 GB M.2 SSD
Hey Shawn,

Thanks for the reply.

What I am trying to do is to have a Details View (Name,Date Modified,Type,Size) for all the subfolders inside the Documents folder.

Here's how I did it (from what I understand):
1. Opened the Documents folder
2. Changed the folder view to Details
3. Removed the Tags column
4. Right-clicked on an empty space and clicked Customize this folder
5. Went to Customize tab and then selected Documents and checked Also apply this template to all subfolders
6. Clicked Apply then OK

However, when i open any of the subfolders, I still have the Tags column.

Am i doing it correctly? Forgive me but I am new at this kind of stuff. :)

Thanks for the patience,
Stef
 

My Computer

Stefanny,

You are doing it correctly, but just left out one little step. It was the top part below what you did. ;)

Customize the columns in the folder type template :
NOTE: To apply the column changes to all windows with the same folder type template, open Folder Options and click the Apply to Folders button in the View tab. See this link for how:

http://www.vistax64.com/tutorials/84215-folder-options.html

This will apply that setting to all of the same folder type template windows and should get what you wanted.

Shawn
 

My Computers

System One System Two

  • Operating System
    Windows 10 Pro 64-bit
    Manufacturer/Model
    Custom
    CPU
    Intel i7-8700K 5 GHz
    Motherboard
    ASUS ROG Maximus XI Formula Z390
    Memory
    64 GB (4x16GB) G.SKILL TridentZ RGB DDR4 3600 MHz (F4-3600C18D-32GTZR)
    Graphics card(s)
    ASUS ROG-STRIX-GTX1080TI-O11G-GAMING
    Sound Card
    Integrated Digital Audio (S/PDIF)
    Monitor(s) Displays
    2 x Samsung Odyssey G7 27"
    Screen Resolution
    2560x1440
    Hard Drives
    1TB Samsung 990 PRO M.2, 4TB Samsung 990 PRO PRO M.2, 8TB WD MyCloudEX2Ultra NAS
    PSU
    Seasonic Prime Titanium 850W
    Case
    Thermaltake Core P3
    Cooling
    Corsair Hydro H115i
    Mouse
    Logitech MX Master 3
    Keyboard
    Logitech wireless K800
    Internet Speed
    1 Gb/s Download and 35 Mb/s Upload
    Other Info
    Logitech Z625 speaker system, Logitech BRIO 4K Pro webcam, HP Color LaserJet Pro MFP M477fdn, APC SMART-UPS RT 1000 XL - SURT1000XLI, Galaxy S23 Plus phone
  • Operating System
    Windows 10 Pro
    Manufacturer/Model
    HP Envy Y0F94AV
    CPU
    i7-7500U @ 2.70 GHz
    Memory
    16 GB DDR4-2133
    Sound Card
    Conexant ISST Audio
    Monitor(s) Displays
    17.3" UHD IPS touch
    Screen Resolution
    3480 x 2160
    Hard Drives
    512 GB M.2 SSD
Your welcome Stefanny,

Glad to hear it helped you and thank you for the feedback.

We all miss things now and then, don't worry about it. Especially when I stay up way to late. (haha) :)

Shawn
 

My Computers

System One System Two

  • Operating System
    Windows 10 Pro 64-bit
    Manufacturer/Model
    Custom
    CPU
    Intel i7-8700K 5 GHz
    Motherboard
    ASUS ROG Maximus XI Formula Z390
    Memory
    64 GB (4x16GB) G.SKILL TridentZ RGB DDR4 3600 MHz (F4-3600C18D-32GTZR)
    Graphics card(s)
    ASUS ROG-STRIX-GTX1080TI-O11G-GAMING
    Sound Card
    Integrated Digital Audio (S/PDIF)
    Monitor(s) Displays
    2 x Samsung Odyssey G7 27"
    Screen Resolution
    2560x1440
    Hard Drives
    1TB Samsung 990 PRO M.2, 4TB Samsung 990 PRO PRO M.2, 8TB WD MyCloudEX2Ultra NAS
    PSU
    Seasonic Prime Titanium 850W
    Case
    Thermaltake Core P3
    Cooling
    Corsair Hydro H115i
    Mouse
    Logitech MX Master 3
    Keyboard
    Logitech wireless K800
    Internet Speed
    1 Gb/s Download and 35 Mb/s Upload
    Other Info
    Logitech Z625 speaker system, Logitech BRIO 4K Pro webcam, HP Color LaserJet Pro MFP M477fdn, APC SMART-UPS RT 1000 XL - SURT1000XLI, Galaxy S23 Plus phone
  • Operating System
    Windows 10 Pro
    Manufacturer/Model
    HP Envy Y0F94AV
    CPU
    i7-7500U @ 2.70 GHz
    Memory
    16 GB DDR4-2133
    Sound Card
    Conexant ISST Audio
    Monitor(s) Displays
    17.3" UHD IPS touch
    Screen Resolution
    3480 x 2160
    Hard Drives
    512 GB M.2 SSD
Shawn that worked great!!

Now if there a way to disable the folder/file auto group function?

If you create a folder, then add a file, for instance .html file, then set the group, to what ever you want, then add another file, let's say a .txt file, then the group changes it to something else and does not keep my previous options.

It seems that the folder/file group function sets the 'group' to what ever it wants "everytime" I add a file to a folder. The files can be the same extension or different, it does not matter. The group function will change it "everytime".

Is there a way to stop this?


Thanks in advance,
RwsRichard
PS: I have admin rights and I have the 'save folder setting' turned on.
 

My Computer

Welcome to the forum RwsRichard,

I believe you are referring to Vista's auto dicovery of the folder template. The Disable Automatic Folder Type Discovery for Templates section above in the Second Method should turn in off in Vista allowing your last change to be remembered until you change it and not automatically assign a template like that anymore.

Shawn
 

My Computers

System One System Two

  • Operating System
    Windows 10 Pro 64-bit
    Manufacturer/Model
    Custom
    CPU
    Intel i7-8700K 5 GHz
    Motherboard
    ASUS ROG Maximus XI Formula Z390
    Memory
    64 GB (4x16GB) G.SKILL TridentZ RGB DDR4 3600 MHz (F4-3600C18D-32GTZR)
    Graphics card(s)
    ASUS ROG-STRIX-GTX1080TI-O11G-GAMING
    Sound Card
    Integrated Digital Audio (S/PDIF)
    Monitor(s) Displays
    2 x Samsung Odyssey G7 27"
    Screen Resolution
    2560x1440
    Hard Drives
    1TB Samsung 990 PRO M.2, 4TB Samsung 990 PRO PRO M.2, 8TB WD MyCloudEX2Ultra NAS
    PSU
    Seasonic Prime Titanium 850W
    Case
    Thermaltake Core P3
    Cooling
    Corsair Hydro H115i
    Mouse
    Logitech MX Master 3
    Keyboard
    Logitech wireless K800
    Internet Speed
    1 Gb/s Download and 35 Mb/s Upload
    Other Info
    Logitech Z625 speaker system, Logitech BRIO 4K Pro webcam, HP Color LaserJet Pro MFP M477fdn, APC SMART-UPS RT 1000 XL - SURT1000XLI, Galaxy S23 Plus phone
  • Operating System
    Windows 10 Pro
    Manufacturer/Model
    HP Envy Y0F94AV
    CPU
    i7-7500U @ 2.70 GHz
    Memory
    16 GB DDR4-2133
    Sound Card
    Conexant ISST Audio
    Monitor(s) Displays
    17.3" UHD IPS touch
    Screen Resolution
    3480 x 2160
    Hard Drives
    512 GB M.2 SSD
Shawn that worked great!!

Now if there a way to disable the folder/file auto group function?

If you create a folder, then add a file, for instance .html file, then set the group, to what ever you want, then add another file, let's say a .txt file, then the group changes it to something else and does not keep my previous options.

It seems that the folder/file group function sets the 'group' to what ever it wants "everytime" I add a file to a folder. The files can be the same extension or different, it does not matter. The group function will change it "everytime".

Is there a way to stop this?

Quoted From:
http://www.vistax64.com/vista-general/86771-folder-file-group-option.html

When I create a folder then add a file to the folder, the group function
creates its own 'group setting', ie, group by name.

I then change the grouping to what I want, which is group by none. Then I
add another file and the group function changes the "group setting" again, to
say group by type.

The file extensions can be the same or different. It does not matter, the
group function changes "everytime" I add a file. Sometimes it sets the same
group setting, ie. group by name, sometimes it is different, ie. group by
type.

Is there some way to disable this or make it QUIT changing my settings not
matter what I put in the folder? Usually I have mixed file extensions, so I
can understand why it is changing it, but I want it quit doing it.

I have even put ALL the files I need into the folder, then changed the
'group by' to what I want. BUT when I edit a file and save it, the 'group by'
function changes again.


Thanks in advance,
RwsRichard
PS: I have admin rights and I have the 'save folder setting' turned on.


Richard,

I just saw you other post. If you did all of Method Two above to completely reset everthing, then take a look at the How to Change the Column Sort Order section at the bottom of this link to make sure I am on the same page with you. Vista should remember the way it was when you closed the Window last. Just let me know any differences you are seeing.

http://www.vistax64.com/tutorials/77444-windows-explorer-folder-type-templates.html

Hope this helps,
Shawn
 

My Computers

System One System Two

  • Operating System
    Windows 10 Pro 64-bit
    Manufacturer/Model
    Custom
    CPU
    Intel i7-8700K 5 GHz
    Motherboard
    ASUS ROG Maximus XI Formula Z390
    Memory
    64 GB (4x16GB) G.SKILL TridentZ RGB DDR4 3600 MHz (F4-3600C18D-32GTZR)
    Graphics card(s)
    ASUS ROG-STRIX-GTX1080TI-O11G-GAMING
    Sound Card
    Integrated Digital Audio (S/PDIF)
    Monitor(s) Displays
    2 x Samsung Odyssey G7 27"
    Screen Resolution
    2560x1440
    Hard Drives
    1TB Samsung 990 PRO M.2, 4TB Samsung 990 PRO PRO M.2, 8TB WD MyCloudEX2Ultra NAS
    PSU
    Seasonic Prime Titanium 850W
    Case
    Thermaltake Core P3
    Cooling
    Corsair Hydro H115i
    Mouse
    Logitech MX Master 3
    Keyboard
    Logitech wireless K800
    Internet Speed
    1 Gb/s Download and 35 Mb/s Upload
    Other Info
    Logitech Z625 speaker system, Logitech BRIO 4K Pro webcam, HP Color LaserJet Pro MFP M477fdn, APC SMART-UPS RT 1000 XL - SURT1000XLI, Galaxy S23 Plus phone
  • Operating System
    Windows 10 Pro
    Manufacturer/Model
    HP Envy Y0F94AV
    CPU
    i7-7500U @ 2.70 GHz
    Memory
    16 GB DDR4-2133
    Sound Card
    Conexant ISST Audio
    Monitor(s) Displays
    17.3" UHD IPS touch
    Screen Resolution
    3480 x 2160
    Hard Drives
    512 GB M.2 SSD
Richard,

I just saw you other post. If you did all of Method Two above to completely reset everthing, then take a look at the How to Change the Column Sort Order section at the bottom of this link to make sure I am on the same page with you. Vista should remember the way it was when you closed the Window last. Just let me know any differences you are seeing.

http://www.vistax64.com/tutorials/77444-windows-explorer-folder-type-templates.html

Hope this helps,
Shawn

Well, I guess I am going to put a kink in this.

I followed the directions and attempted ALL the steps, twice. The second attempt, I had my son review what I had against what the directions showed.

After booting, it worked great for a couple of hours. Then it started doing it again. Everytime I would add a file to a folder, the Auto Grouping changed my settings.

Everything else from the directions is working PERFECTLY.

So I am not sure what is going on.


RwsRichard
 

My Computer

Ok RwsRichard,

I'm all kinked up. ;)

I used the same method and tried to get one of my folders to duplicate your problem, but Vista would always remember the settings I had before. Since you have multiple file types, you might try clicking the Type column's arrow and clicking Group to see if that may help. What setting are you trying to use?

Shawn
 
Last edited:

My Computers

System One System Two

  • Operating System
    Windows 10 Pro 64-bit
    Manufacturer/Model
    Custom
    CPU
    Intel i7-8700K 5 GHz
    Motherboard
    ASUS ROG Maximus XI Formula Z390
    Memory
    64 GB (4x16GB) G.SKILL TridentZ RGB DDR4 3600 MHz (F4-3600C18D-32GTZR)
    Graphics card(s)
    ASUS ROG-STRIX-GTX1080TI-O11G-GAMING
    Sound Card
    Integrated Digital Audio (S/PDIF)
    Monitor(s) Displays
    2 x Samsung Odyssey G7 27"
    Screen Resolution
    2560x1440
    Hard Drives
    1TB Samsung 990 PRO M.2, 4TB Samsung 990 PRO PRO M.2, 8TB WD MyCloudEX2Ultra NAS
    PSU
    Seasonic Prime Titanium 850W
    Case
    Thermaltake Core P3
    Cooling
    Corsair Hydro H115i
    Mouse
    Logitech MX Master 3
    Keyboard
    Logitech wireless K800
    Internet Speed
    1 Gb/s Download and 35 Mb/s Upload
    Other Info
    Logitech Z625 speaker system, Logitech BRIO 4K Pro webcam, HP Color LaserJet Pro MFP M477fdn, APC SMART-UPS RT 1000 XL - SURT1000XLI, Galaxy S23 Plus phone
  • Operating System
    Windows 10 Pro
    Manufacturer/Model
    HP Envy Y0F94AV
    CPU
    i7-7500U @ 2.70 GHz
    Memory
    16 GB DDR4-2133
    Sound Card
    Conexant ISST Audio
    Monitor(s) Displays
    17.3" UHD IPS touch
    Screen Resolution
    3480 x 2160
    Hard Drives
    512 GB M.2 SSD
Is there a way to specify the default window sizes when the WIN+E shortcut or start menu icons are used?
 

My Computer

System One

  • Manufacturer/Model
    Custom Build
    CPU
    AMD Phenom 9600 Quad
    Motherboard
    ASUS MB-M3A32-MVP Deluxe/WiFi
    Memory
    2 x A-Data 2GB DDR2-800
    Graphics card(s)
    ASUS ATI Radeon HD 2400PRO
    Monitor(s) Displays
    SAHARA 21"
    Screen Resolution
    1600x1200
    Hard Drives
    2 x 80GB Seagate (I) 2 x 120GB Seagate (I/S) 2 x 200GB Seagate (I/S) 2 x 250GB Seagate (I/S)
    PSU
    800W
    Case
    Thermaltake Tai-Chi
    Cooling
    Tai-Chi Water Cooler
    Mouse
    Logitech
    Keyboard
    Genius
    Internet Speed
    384kbps
    Other Info
    Currently dual booting between Vista x64 Ultimate Windows 7 BETA x64
Hi Peter,

Why of course there is. I should write a tutorial on this. Thank you for reminding me of this.

1. Right click on the shortcut.
2. Click Properties.
3. Click Shortcut tab.
4. Under the Run: section, click on the drop down menu.
5. Select the default window opening for that shortcut. (Normal, Min., Max.)
6. Click Ok.

- Read Tutorial

Shawn
 
Last edited:

My Computers

System One System Two

  • Operating System
    Windows 10 Pro 64-bit
    Manufacturer/Model
    Custom
    CPU
    Intel i7-8700K 5 GHz
    Motherboard
    ASUS ROG Maximus XI Formula Z390
    Memory
    64 GB (4x16GB) G.SKILL TridentZ RGB DDR4 3600 MHz (F4-3600C18D-32GTZR)
    Graphics card(s)
    ASUS ROG-STRIX-GTX1080TI-O11G-GAMING
    Sound Card
    Integrated Digital Audio (S/PDIF)
    Monitor(s) Displays
    2 x Samsung Odyssey G7 27"
    Screen Resolution
    2560x1440
    Hard Drives
    1TB Samsung 990 PRO M.2, 4TB Samsung 990 PRO PRO M.2, 8TB WD MyCloudEX2Ultra NAS
    PSU
    Seasonic Prime Titanium 850W
    Case
    Thermaltake Core P3
    Cooling
    Corsair Hydro H115i
    Mouse
    Logitech MX Master 3
    Keyboard
    Logitech wireless K800
    Internet Speed
    1 Gb/s Download and 35 Mb/s Upload
    Other Info
    Logitech Z625 speaker system, Logitech BRIO 4K Pro webcam, HP Color LaserJet Pro MFP M477fdn, APC SMART-UPS RT 1000 XL - SURT1000XLI, Galaxy S23 Plus phone
  • Operating System
    Windows 10 Pro
    Manufacturer/Model
    HP Envy Y0F94AV
    CPU
    i7-7500U @ 2.70 GHz
    Memory
    16 GB DDR4-2133
    Sound Card
    Conexant ISST Audio
    Monitor(s) Displays
    17.3" UHD IPS touch
    Screen Resolution
    3480 x 2160
    Hard Drives
    512 GB M.2 SSD
Thanks Brink, but not quite what I have in mind, as that doesn't work when WIN+E is used to open explorer windows.

I would like to now where Windows Explorer saves the last used pixel width and height of the windows it uses, so that I can specify a default position and size (not minimized or maximized).

Using and saving default column views is easy, its the window size thats bugging me.

The Folder View Settings tutorial seems to have helped in that regard, but is there a way of having these settings stored once, and then re-used, because Vista seems to be a little erratic in how and when it saves the window positions.
 

My Computer

System One

  • Manufacturer/Model
    Custom Build
    CPU
    AMD Phenom 9600 Quad
    Motherboard
    ASUS MB-M3A32-MVP Deluxe/WiFi
    Memory
    2 x A-Data 2GB DDR2-800
    Graphics card(s)
    ASUS ATI Radeon HD 2400PRO
    Monitor(s) Displays
    SAHARA 21"
    Screen Resolution
    1600x1200
    Hard Drives
    2 x 80GB Seagate (I) 2 x 120GB Seagate (I/S) 2 x 200GB Seagate (I/S) 2 x 250GB Seagate (I/S)
    PSU
    800W
    Case
    Thermaltake Tai-Chi
    Cooling
    Tai-Chi Water Cooler
    Mouse
    Logitech
    Keyboard
    Genius
    Internet Speed
    384kbps
    Other Info
    Currently dual booting between Vista x64 Ultimate Windows 7 BETA x64
Back
Top