How to Add View and Print File Directory to the Context Menu in Vista, Windows 7, and Windows 8
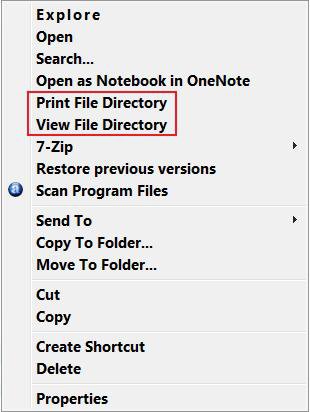
This will show you how to add View File Directory and Print File Directory in the context menu for all folders and drives. This will allow you to easily print or view a file and folder directory list when you right click on a folder and click on View File Directory or Print File Directory.
The file directory list will not include the files in a subfolder. It will only have the subfolder listed. You will need to right click on the subfolder to view or print it's file directory.
It may take a little bit to view or print the file directory of a drive if the drive is very large with a lot of files on it.
It may take a little bit to view or print the file directory of a drive if the drive is very large with a lot of files on it.
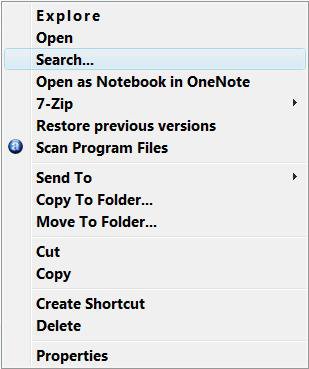
EXAMPLE: Folder Context Menu Before and After View and Print File Directory is Added
 OPTION ONE
1. Click on the Download button below to download the file below.
Print_File_Directory.zip
2. Click on Save and save the ZIP file to the Desktop.
3. Right click on the downloaded Print_File_Directory.zip and click on Open.
4. Click on Allow in the UAC prompt.
5. Extract (drag and drop) the Add_Print_Directory.reg, Remove_Print_Directory.reg, and printdir.bat files to the desktop.
6. Right click on the extracted .bat file, click on Properties, click on the General tab, and unblock it.
NOTE: If you do not see a Unblock button, then the file is already unblocked.
7. To Add "Print File Directory" to the Context Menu
A) Right click on the extracted and unblocked printdir.bat file and click on Copy.
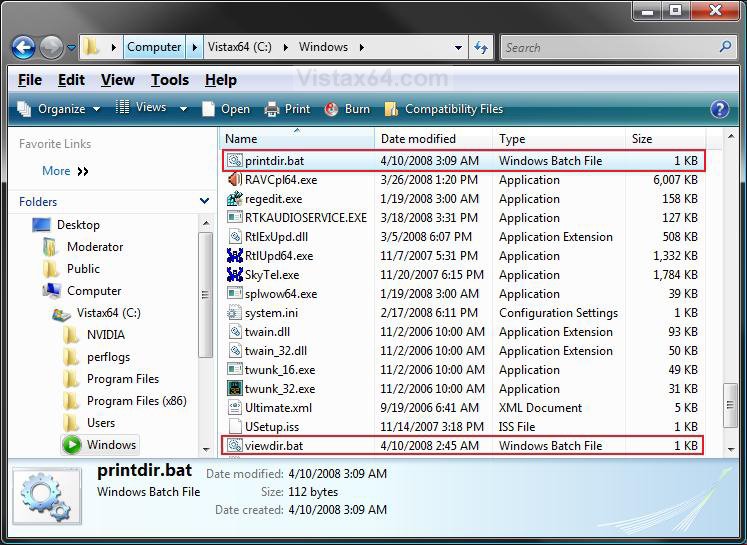
B) In Windows Explorer, navigate to C:\Windows and right click on a empty area and click on Paste. (See screenshot below)
C) Click on Continue in the Destination Folder Access Denied prompt, and on Continue in the UAC prompt.
D) Right click on the extracted Add_Print_Directory.reg file and click on Merge.
E) Click on Run, Continue (UAC), Yes, and then OK when prompted.
F) Go to step 9.
8. To Remove "Print File Directory" from the Context Menu
A) In Windows Explorer, navigate to C:\Windows and right click on printdir.bat and click on Delete. (See screenshot below step 7C)
B) Click on Continue in the Destination Folder Access Denied prompt, and on Continue in the UAC prompt.
C) Right click on the extracted Remove_Print_Directory.reg file, and click on Merge.
D) Click on Run, Continue (UAC), Yes, and then OK when prompted.
9. Your done, you can now delete the downloaded ZIP and other extracted files on the Desktop if you like.
10. When you click on Print File Directory, a file directory list for the selected folder will be sent to the printer.
 OPTION TWO
1. Click on the Download button below to download the file below.
View_File_Directory.zip
2. Click on Save and save the ZIP file to the Desktop.
3. Right click on the downloaded View_File_Directory.zip and click on Open.
4. Click on Allow for UAC prompt.
5. Extract (drag and drop) the Add_View_Directory.reg, Remove_View_Directory.reg, and viewdir.bat files to the desktop.
6. Right click on the extracted .bat file, click on Properties, click on the General tab, and unblock it.
NOTE: If you do not see a Unblock button, then the file is already unblocked.
7. To Add "View File Directory" to the Context Menu
A) Right click on the extracted viewdir.bat file and click on Copy.
B) In Windows Explorer, navigate to C:\Windows and right click on a empty area and click Paste. (See screenshot below)
C) Click on Continue in the Destination Folder Access Denied prompt, and on Continue in the UAC prompt.
D) Right click on the extracted Add_View_Directory.reg and click on Merge.
E) Click on Run, Continue (UAC), Yes, and then OK when prompted.
F) Go to step 9.
8. To Remove "View File Directory" from the Context Menu
A) In Windows Explorer, navigate to C:\Windows and right click on viewdir.bat and click on Delete. (See screenshot below step 7C)
B) Click on Continue in the Destination Folder Access Denied prompt, and on Continue in the UAC prompt.
C) Right click on the downloaded Remove_View_Directory.reg file and click on Merge.
E) Click on Run, Continue (UAC), Yes, and then OK when prompted.
8. Your done, you can delete the ZIP and other extracted files on the Desktop if you want to.
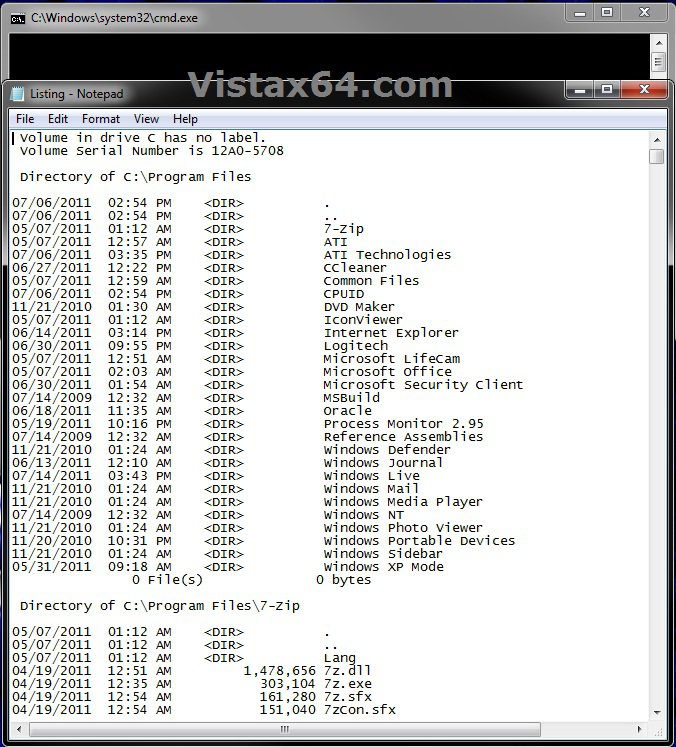
9. This is an example of what you see when you click on View File Directory. (See screenshot below)
That's it,
Shawn
Related Tutorials
- How to Expand the Context (Shortcuts) Menu in Vista
- How to Customize the Context Menu for the Start Menu in Vista
- How to Customize the Send To Context Menu in Vista
- How to Customize the Recycle Bin Context Menu in Vista
- How to Add Encrypt and Decrypt to the Context Menu in Vista
- How to Add and Remove a New Menu Item in Vista
- How to Add Take Ownership to the Context Menu in Vista
- How to Copy the Full Path of a File or Folder in Vista
- How to Add Flip 3D to the Context Menu in Vista
- How to Restore or Remove New from the Context Menu in Vista
- How to Enable or Disable the Context Menu in Vista
- How to Remove or Show Drives in the Vista and Windows 7 "Send To" Context Menu
- How to Add COPY TO FOLDER and MOVE TO FOLDER to the Context Menu in Vista
- How to Save and Print a Directory List for a File and Folder in Vista
- How to Add or Remove Copy as Path from the Vista Context Menu
- How to Add or Remove Send To from the Vista Context Menu
- How to Add or Remove Turn Aero On or Off from the Vista Context Menu
- How to Add System Properties to Computer Context Menu in Vista
- How to Restore or Remove "Restore Previous Versions" from the Vista Context Menu
- How to Add Empty Folder and Subfolders to the Vista Context Menu
- How to Add "Copy Content to Clipboard" to Context Menu in Vista, Windows 7, and Windows 8
Attachments
Last edited:


