How to Create a Task in Vista Task Scheduler
Task Scheduler helps you schedule automated tasks that perform actions at a specific time or when a certain event occurs. It maintains a library of all scheduled tasks, providing an organized view of the tasks and a convenient point of access for managing them. From within the library, you can run, disable, modify, create, and delete tasks. This will show you how to create a task of your own in Task Scheduler. For a description of all of the default tasks in Vista, see: Microsoft Help and Support: KB939039
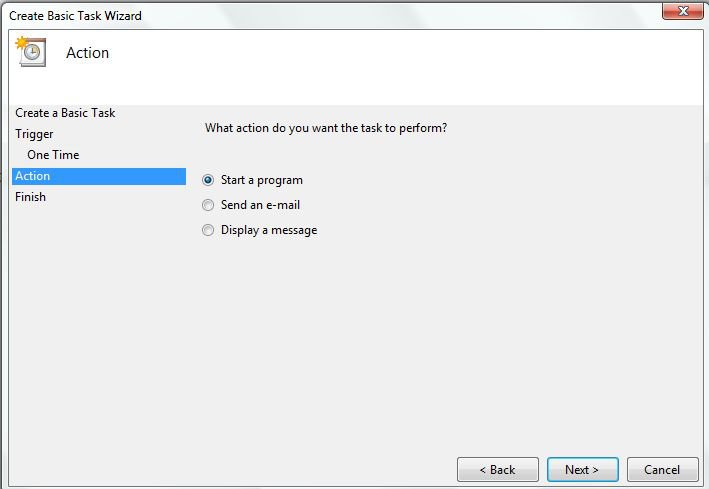
The two key concepts involved in scheduling a task are triggers and actions. A trigger causes a task to run and an action is the work that is performed when the task is run. The actions a task can perform include running a program, sending an e-mail message, and showing a message box.
You will have to do this from within an Administrator account.
TASK SCHEDULER SCRIPTING:
This is for advanced users. The scripting objects that are described in the following link provide programmatic access to the functionality that is available within the Task Scheduler for Visual Basic and Visual Basic script developers. For more details on this, see: Microsoft MSDN: Task Scheduler Scripting Objects
 STEP ONE
1. Open the Start Menu.
A) In the white line (Start Search) area, type taskschd.msc and press Enter.
B) Go to step 3 in Step Two.
OR
2. Open the Control Panel (Classic view).
A) Click on the Administrative Tools Icon.
B) Click on Task Scheduler.
 STEP TWO
NOTE: You create a new task folder to store related tasks and other task folders to help keep them organized. You cannot rename a task folder once it is created, only delete it.
3. Click on Continue in the UAC Prompt.
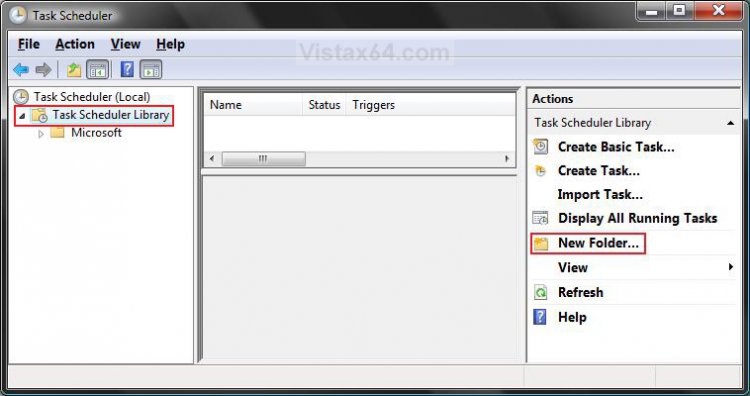
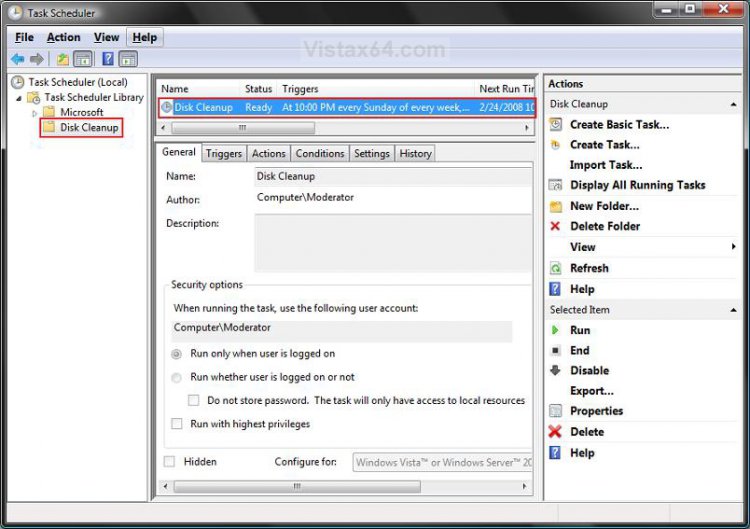
4. In the left pane click on Task Scheduler Library folder to highlight it. (See screenshot below)
5. In the right pane, click on New Folder.
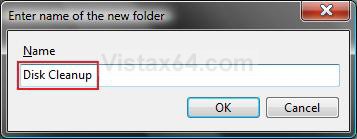
6. Type in a name you want for this task. (See screenshot below)
NOTE: For example, Disk Cleanup.
A) Click on OK.
 STEP THREE
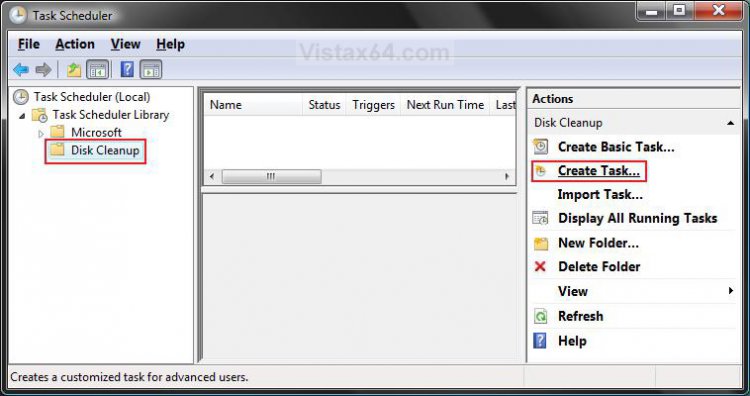
7. In the left pane, click on the new Task Folder. (See screenshot below)
NOTE: For example, Disk Cleanup.
8. In the right pane, click on Create Task.
 STEP FOUR
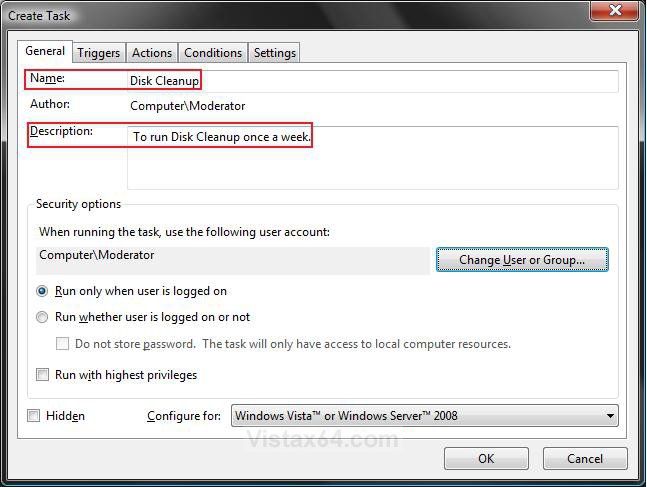
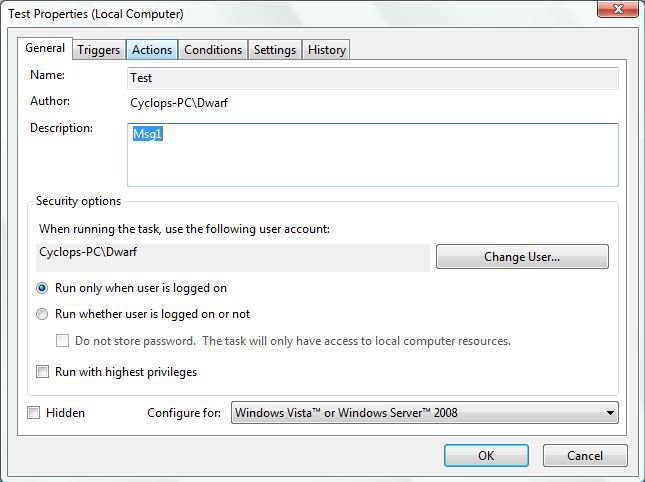
NOTE: The general properties of a task include the task name, author, description, security options, the operating system that the task is configured for, and a property that controls whether the task is hidden.
9. Under Name, type in a name for the task. (See screenshot below step 11)
NOTE: For example, Disk Cleanup. When you create a task in a task folder, you must name the task. No two tasks can have the same name if they are in the same task folder.
10. Under Description, type in a description of the task. (See screenshot below step 11)
NOTE: The task description is optional, but recommended to help remember what it is for.
11. Under Security options, select the options (see table below) you want. (See screenshot below table)
NOTE: By default, a task runs within the security context of the user who scheduled the task and only runs if that user is logged on when the task is triggered.
[TABLE=class:-grid,-width:-700][TR][TD]Security Option
[/TD]
[TD]
Description
[/TD][/TR]
[TR][TD]
Change User or Group
[/TD]
[TD]
To change the user or group for the task to use. After you click the Change User or Group button, see steps 14 to 16 in METHOD TWO OPTION ONE here: How to Take Ownership of a Item in Vista
[/TD][/TR]
[TR][TD]
Run only when user is logged on
[/TD]
[TD]
To have the scheduled task only run when the selected User is logged on.
[/TD][/TR]
[TR][TD]
Run whether user is logged on or not
[/TD]
[TD]
To have the scheduled task run whether the user is logged on or not. When this option is selected, you may be prompted to supply the password of the user account when saving the task, regardless of whether you selected the checkbox Do not store password or not.
[/TD][/TR]
[TR][TD]
Run with highest privileges
[/TD]
[TD]
This is the same as Run as Administrator, it will run the task using elevated privileges. Only tasks that require elevated privileges to complete their actions should run with elevated privileges. If your task does not run, then check this to see if it will afterwards.
[/TD][/TR]
[TR][TD]
Hidden
[/TD]
[TD]
This will hide the task in Task Scheduler unil you click View, then check Show Hidden Tasks.
[/TD][/TR]
[TR][TD]
Configure for
[/TD]
[TD]
For computers that are running Windows Server 2008 R2, Windows 7, Windows Server 2008, or Windows Vista, you can restrict the options displayed to those that are also available in earlier operating systems. However, doing this does not configure the task or the preference item to run on earlier operating systems.
[/TD][/TR][/TABLE]
 STEP FIVE
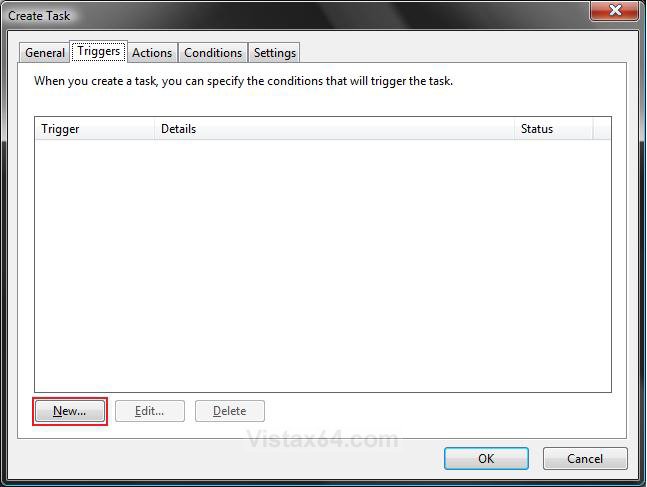
NOTE: When setting up a task, first decide what will trigger that task to start. A trigger is a set of criteria that, when met, starts the execution of a task.
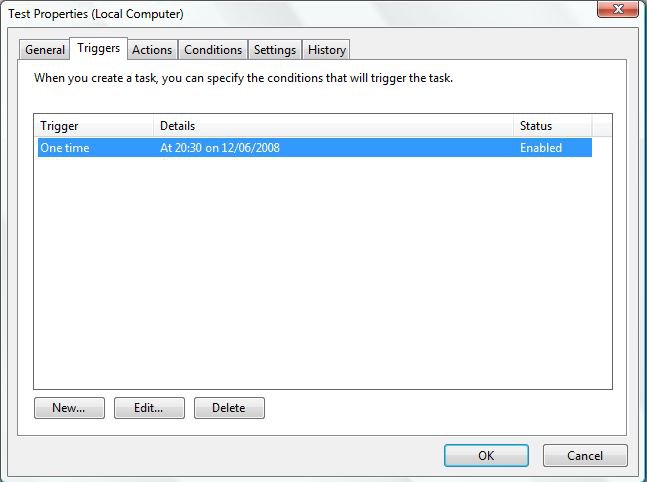
12. Click on the Triggers tab. (See screenshot below)
A) Click on the New button.
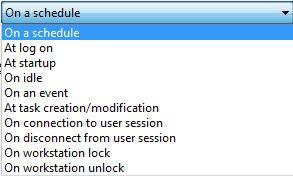
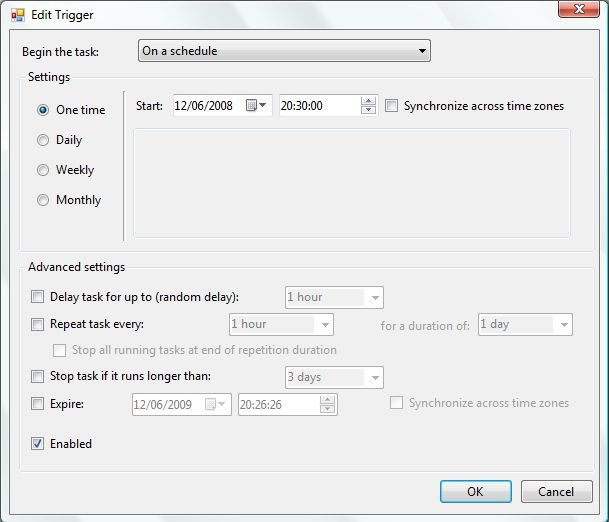
13. Click on the drop down arrow for Begin the task. (See screenshot below step 16)
A) Select what will be the trigger to run the task. (See screenshot below)
NOTE: For this tutorial, I will use the On a Schedule option.
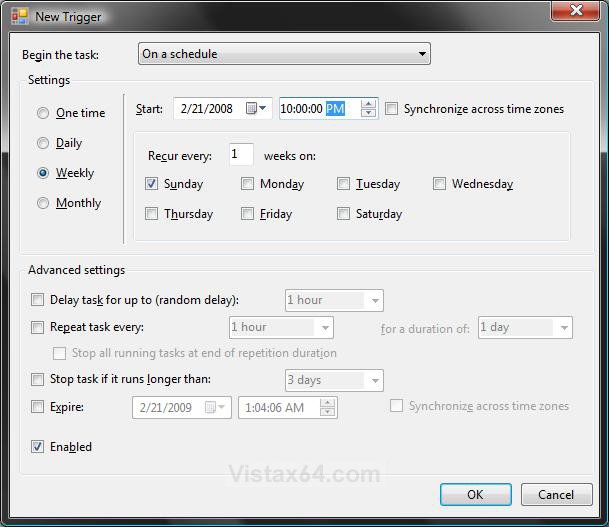
14. Under Settings, select how often you want the task to run. (See table below and screenshot below step 16)
NOTE: The settings will vary depending on what you selected in step 13A. These settings are for the On a Schedule option.
[TABLE=class:-grid,-width:-700][TR][TD]Setting
[/TD]
[TD]
Description
[/TD][/TR]
[TR][TD]
One time
[/TD]
[TD]
Choose a date and time to trigger the task.
[/TD][/TR]
[TR][TD]
Daily
[/TD]
[TD]
Choose the recurrence interval for the task and the date and time to start the task. An interval of 1 produces a daily schedule and an interval of 2 produces an every other day schedule. The task will start at the specified time each day.
[/TD][/TR]
[TR][TD]
Weekly
[/TD]
[TD]
Choose the recurrence interval for the task, the date and time to start the task, and the days of the week in which to start the task. An interval of 1 produces a weekly schedule and an interval of 2 produces an every other week schedule. The task will start at the specified time on each of the specified days.
[/TD][/TR]
[TR][TD]
Monthly
[/TD]
[TD]
Choose the months in which you want to start the task and the weeks of the month and the days of the week for each month in which you want to start the task. You can also specify that you want to start a task on the last day of each month.
[/TD][/TR][/TABLE]
15. Under Advanced Settings, select any settings you want. (See table below and screenshot below step 16)
NOTE: The settings will vary depending on what you selected in step 13A. These settings are for the On a Schedule option.
[TABLE=class:-grid,-width:-700][TR][TD]Advanced Setting
[/TD]
[TD]
Description
[/TD][/TR]
[TR][TD]
Delay task for up to (random delay)
[/TD]
[TD]
This setting allows you to specify an amount of time to delay the task from running, after the task is triggered. If you are using a time-based trigger (On a schedule), then the delay time will be a random time between the time the task is triggered and the time specified in this setting.
[/TD][/TR]
[TR][TD]
Repeat task every
[/TD]
[TD]
This setting allows you to set a repetition time interval for the task. The task will run, wait for the time interval specified, and then run again. This cycle will continue until the duration time is met.
[/TD][/TR]
[TR][TD]
Stop any task that runs longer than
[/TD]
[TD]
This setting allows you to stop long running tasks by setting a time limit on the amount of time the task is allowed to run (execute the action).
[/TD][/TR]
[TR][TD]
Activate
[/TD]
[TD]
This setting allows you to set a date and time to activate the trigger. Once a trigger is activated, the trigger can cause the task to run. The time is relative to the time zone that is set on the computer that runs the task. Check the Synchronize across time zones box to make the time relative to Coordinated Universal Time (UTC) instead of the time zone that is set on the computer that runs the task. Use the Universal setting when you want to coordinate a set of tasks to activate simultaneously in multiple time zones.
[/TD][/TR]
[TR][TD]
Expire
[/TD]
[TD]
This setting allows you to set a date and time for the trigger to expire. When a trigger is expired, it can not cause the task to run. The time is relative to the time zone that is set on the computer that runs the task. Check the Synchronize across time zones box to make the time relative to Coordinated Universal Time (UTC) instead of the time zone that is set on the computer that runs the task. Use the Universal setting when you want to coordinate a set of tasks to expire simultaneously in multiple time zones.
[/TD][/TR]
[TR][TD]
Enabled
[/TD]
[TD]
This setting allows you to enable or disable the task. A task that is enabled can run, and a task that is disabled cannot run until it is enabled.
[/TD][/TR][/TABLE]
16. Click on OK. (See screenshot below)
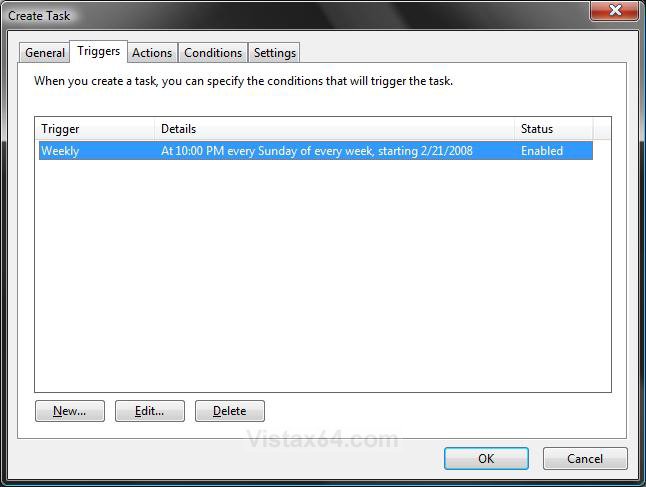
17. You will now see the trigger listed. (See screenshot below)
 STEP SIX
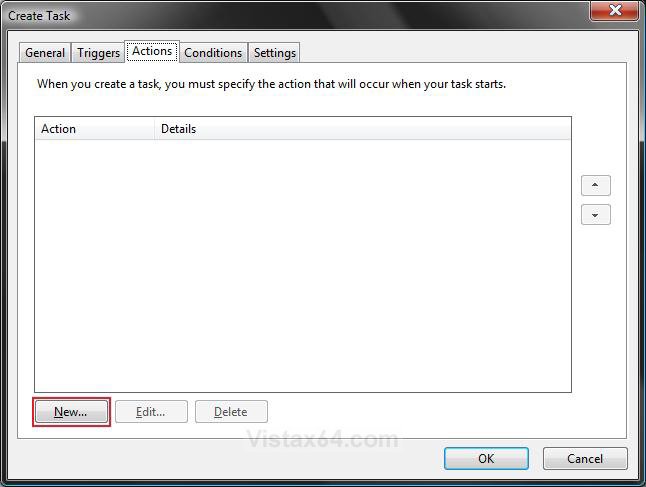
NOTE: A task action is the work that is performed when the task is run. A task can have a single action or a maximum of 32 actions. Each action contains settings that determine how the action is performed. When multiple actions are created, they are executed in sequential order starting with the action at the top of the list.
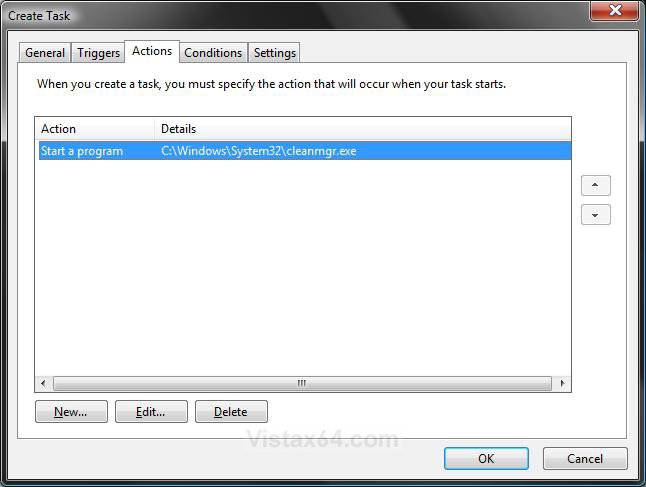
18. Click on the Actions tab. (See screenshot below)
A) Click on the New button.
19. Next to Action, click on the drop down arrow. (See screenshot below step 20)
A) Select to do one of the action options in step 20, 21, or 22 below to do when the tasks runs. (See screenshot below)
20. To Start a Program
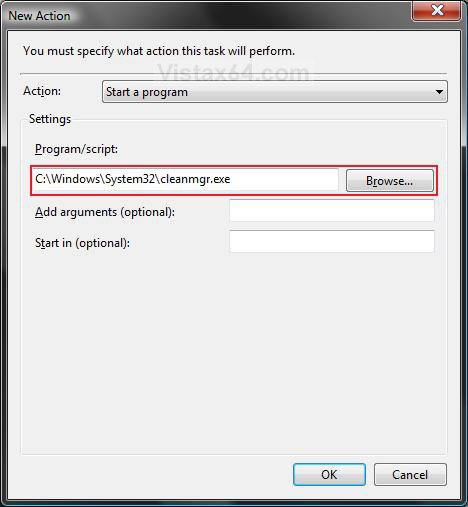
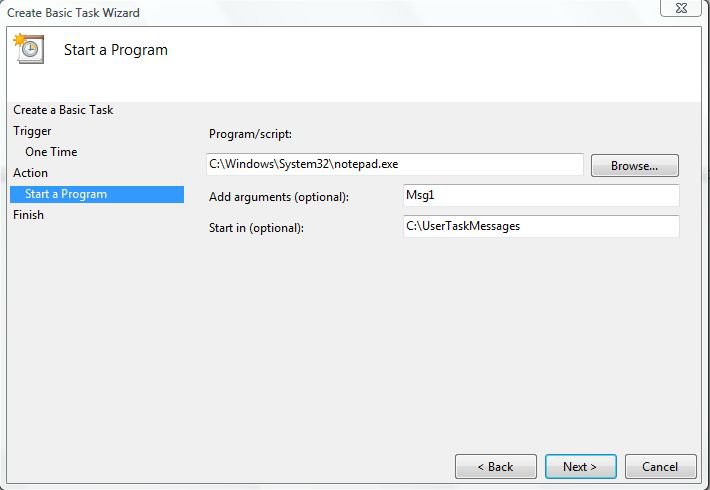
NOTE: This action starts a program or script. In the Program/script text box, enter the name of the program or script you want to start. If the program or script takes command line arguments, you can supply these arguments in the Add arguments (optional) text box. In the Start in (optional) text box, you can specify the working directory for the command line that executes the program or script. This should be either the path to the program or script file or the path to the files that are used by the executable file.
A) Click on the Browse button. (See screenshot below)
NOTE: For the Disk Cleanup Example, you would use C:\Windows\System32\cleanmgr.exe /sagerun: 1 for it to run automatically for the C: drive.
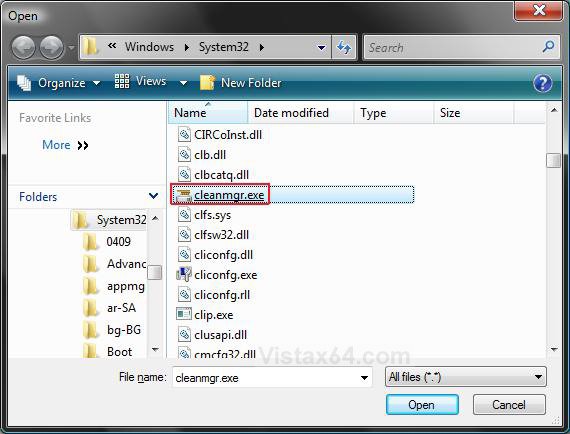
B) Navigate to the program's exe file. then select it and click on Open. (See screenshot below)
NOTE: For example, the cleanmgr.exe file for Disk Cleanup.
C) Click on OK. (See screenshot below step 19A)
D) Go to step 23.
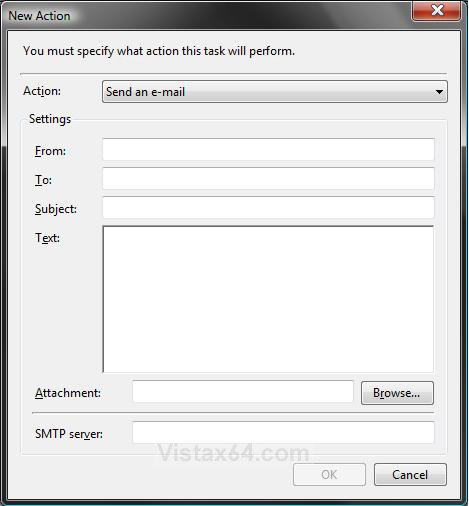
21. To Send an E-Mail
NOTE: This action sends an e-mail when a task is triggered. In the action settings you specify the e-mail address that the e-mail is from, the e-mail address that the mail will be sent to, the subject of the e-mail, the text in the e-mail message, and optional e-mail attachments. You must also specify the SMTP server that you use to send e-mail from.
A) Fill out the email information. (See screenshot below)
B) When done, click on OK.
C) Go to step 23.
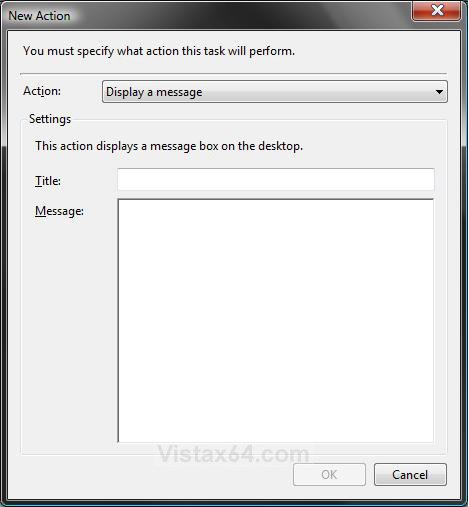
22. To Display a Message
NOTE: This action shows a message box with a specified message and title. The action settings specify the text for the message box title and the text in the message. This action will only launch if the Run only if user is logged on security option is selected in the General tab of the Task Properties (Step 10B).
A) Type in a Title and Message to be displayed when the task runs. (See screenshot below)
B) When done, click on OK.
23. Click on OK. (See screenshot below)
NOTE: The new action will now be listed.
 STEP SEVEN
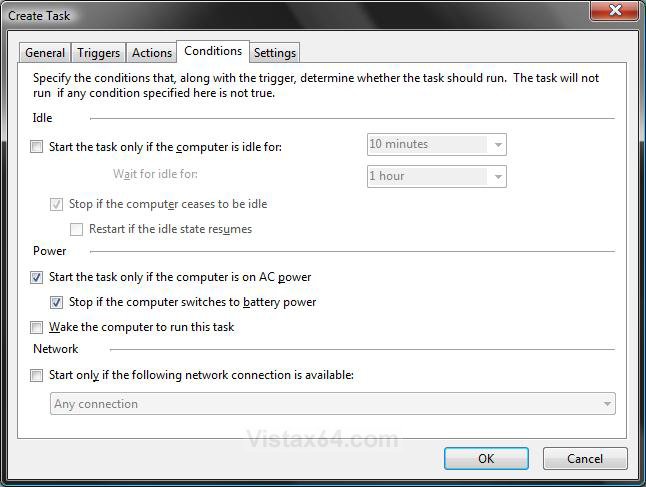
NOTE: Conditions control whether a task is run. A task will run if all of its conditions are met after the task is triggered to start. Conditions are split up into three categories: idle conditions, power conditions, and network conditions.
24. Click on the Conditions tab. (See screenshot below step 25)
25. Select the condition options you want.
A) Under the Idle section - (See table below)
[TABLE=class:-grid,-width:-700][TR][TD]Option
[/TD]
[TD]
Description
[/TD][/TR]
[TR][TD]
Start the tasks only if the computer is idle for
[/TD]
[TD]
You can set a condition that tells the task to run only if the computer is in an idle state for a specific amount of time when a trigger is activated. When you set this condition, you also set the amount of time to wait (after the task is triggered) for the computer to enter an idle state.
[/TD][/TR]
[TR][TD]
Stop if the computer ceases to be idle
[/TD]
[TD]
If this is selected for a task and the task is running while the computer is in an idle state, then the task will stop running when the computer ceases to be idle.
[/TD][/TR]
[TR][TD]
Restart if idle state resumes
[/TD]
[TD]
This will allow the task to start running again if the computer becomes idle again if it was stopped from the Stop if the computer ceases to be idle condition above.
[/TD][/TR][/TABLE]
B) Under the Power section -
NOTE: You can set a condition that tells the task to run only if the computer is on AC power (not battery power) when the task trigger is activated. If this condition is set, you can also set a condition to stop the task if the computer switches to battery power. If both of these conditions are set for a task, then you have ensured that the task will only run when the computer is on AC power. You can also set a condition that tells the task to wake the computer from sleep mode to run the task when the trigger is activated. Before you set the condition to wake the computer to run the task, ensure that the task will not cause the computer to wake at inconvenient times.
C) Under the Network section -
NOTE: You can set a condition to run the task only if a specific named network connection is available or if any network connection is available when the task's trigger is activated. If your task action requires a network connection to execute, then set this condition.
 STEP EIGHT
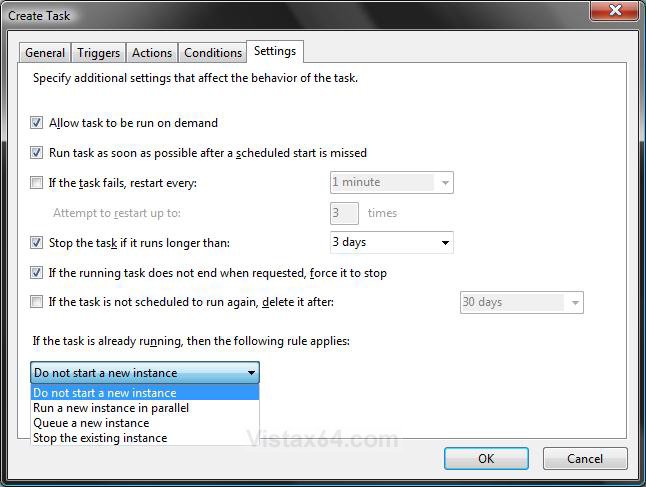
NOTE: Task settings specify how a task is run, stopped, or deleted.
26. Click on the Settings tab. (See screenshot below)
A) Select the options you want. (See table below)
[TABLE=class:-grid,-width:-700][TR][TD]Setting
[/TD]
[TD]
Description
[/TD][/TR]
[TR][TD]
Allow task to be run on demand
[/TD]
[TD]
You can specify whether a task can be run manually before or after it is scheduled to run by allowing the task to be run on demand. The default setting allows a user to run the task at any time on demand.
[/TD][/TR]
[TR][TD]
Run task as soon as possible after a scheduled start is missed
[/TD]
[TD]
If this setting is checked, the Task Scheduler service will start the task if the task was scheduled to run at a certain time, but for some reason (for example, the computer was turned off or the Task Scheduler service was busy) the task was not activated. The Task Scheduler service will not start the task immediately after the task was missed. By default the service waits ten minutes before starting the missed task.
[/TD][/TR]
[TR][TD]
If task fails, restart every
[/TD]
[TD]
Use this setting to restart a task if the task fails to run. You specify the time interval that takes place between task restart attempts, and the number of times to try to restart the task.
[/TD][/TR]
[TR][TD]
Stop the task if it runs longer than
[/TD]
[TD]
This setting allows you to limit the amount of time a task is allowed to run. Use this setting to limit tasks that might take a long period of time to execute, causing an inconvenience to the user.
[/TD][/TR]
[TR][TD]
If the task does not end when requested, force it to stop
[/TD]
[TD]
If this setting is selected, the task will be forced to stop if the task does not respond to a request to stop.
[/TD][/TR]
[TR][TD]
If the task is not scheduled to run again, delete it after
[/TD]
[TD]
If this setting is selected, the Task Scheduler service will automatically delete the task if it is not scheduled to run again. The Task Scheduler service will wait for the specified time period before deleting the task. If this setting is not selected, the Task Scheduler service will not automatically delete the task. The task must include at least one trigger with an expiration date in order to select this setting.
[/TD][/TR]
[TR][TD]
If the task is already running, then the following rule applies
[/TD]
[TD]
The button with the drop down menu.
[/TD][/TR]
[TR][TD]
- Do not start a new instance
- Run a new instance in parallel
- Queue a new instance
- Stop the existing instance
[TD]
- The Task Scheduler service will not run the new instance of the task and will not stop the instance that is already running.
- The Task Scheduler service will run the new instance of the task in parallel with the instance that is already running.
- The Task Scheduler service will add the new instance of the task to the queue of tasks that the service will run, and the service will not stop the instance of the task that is already running.
- The Task Scheduler service will stop the instance of the task that is already running, and run the new instance of the task.
 STEP NINE
27. Click on OK. (See screenshot above)
28. The task is now completed and listed in the new task folder created in step 5. (See screenshot below)
NOTE: For example, to have Disk Cleanup run once a week.
29. Close Task Scheduler.
NOTE: If you want to Delete the newly created task later, then just click on the task folder in the left pane or the task in the middle pane, and click on Delete in the right pane.
That's it,Shawn
Related Tutorials
- How to Setup Event Viewer to Send a E-mail Notification in Vista
- How to Check and Change the Startup Programs in Vista
- How to Set Windows Defender Automatic Scanning Schedule in Vista
- How to Change the Schedule for Disk Defragmenter in Vista
- How to Have a Task Wake up the Computer to Run in Vista Task Scheduler
- How to Change the Automatic System Restore Point Settings in Vista Task Scheduler
- How to Display a Message Reminder in Windows with Task Scheduler
Attachments
Last edited:

