How to Enable or Disable User Account Control (UAC) Blacking Out of Screen in Windows
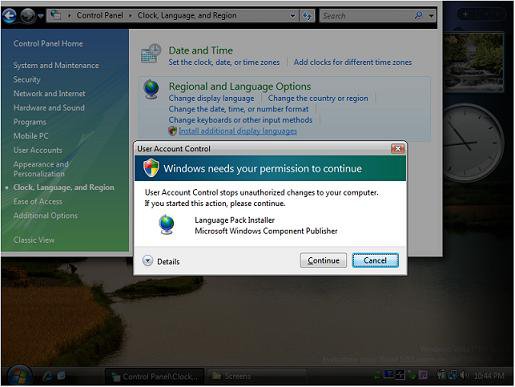
This is when the screen goes dark when the User Account Control prompt displays. This is called Secure Desktop mode. It is enabled by default in Windows.
This tutorial will show you how to enable or disable Secure Desktop mode when the screen dims for a UAC prompt in Vista, Windows 7, and Windows 8.
You must be logged in as an administrator to be to do this tutorial.
This tutorial will show you how to enable or disable Secure Desktop mode when the screen dims for a UAC prompt in Vista, Windows 7, and Windows 8.
You must be logged in as an administrator to be to do this tutorial.
This is the same security mode used when you log on or press CTL+ALT+DELETE.
Disabling the UAC Secure Desktop will allow you to take screenshots of the UAC prompts, and will not freeze the whole computer screen while it waits for you to answer the UAC prompt.
If you disable the Secure Desktop, you will be making your computer less secure. Displaying User Account Control elevation prompts on the Secure Desktop helps protect the user from unknowingly allowing a program to run with elevated privileges without their consent. Without this protection, it is much easier to create malware that tricks the user into approving an elevation request prompt that they really wanted to deny. The Secure Desktop helps protect against this because other software running on the machine is blocked from interacting with the user's interface. It is your computer and your choice.
EXAMPLE: UAC Secure Desktop Enabled in Vista
 METHOD ONE
1. Open the Local Security Policy editor.
2. In the left pane, click on Local Policies to expand it. (See screenshot below)
3. In the left pane, click on Security Options.
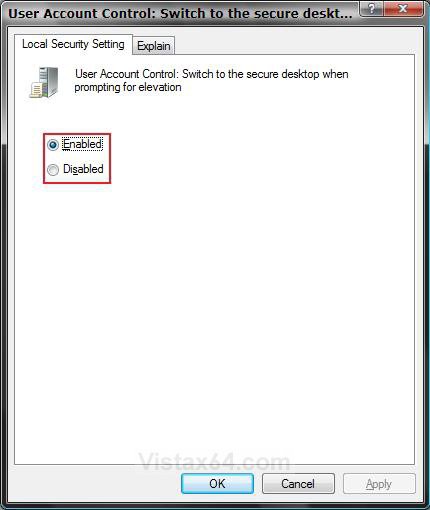
4. In the right pane, right click on User Account Control: Switch to the secure desktop when prompting for elevation and click Properties.
5. To Enable UAC Secure Desktop
A) Dot Enable and click on OK. (See left screenshot below step 6)
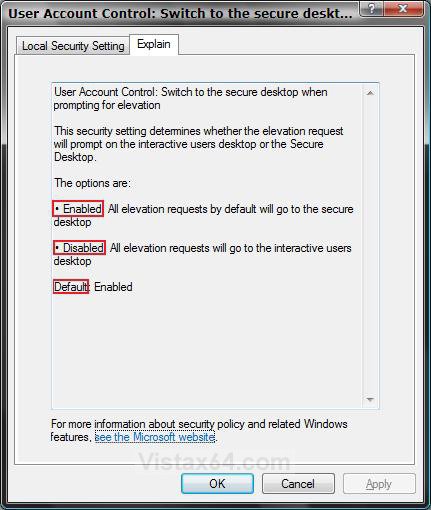
NOTE: See the right screenshot below for a explanation of this.
B) Go to step 7.
6. To Disable UAC Secure Desktop
A) Dot Disable and click on OK.
NOTE: See the right screenshot below for a explanation of this.
7. Close the Local Security Policy window. Your done.
 METHOD TWO
1. To Enable UAC Secure Desktop
A) Click on the download button below to download the file below.
Enable_Secure_Desktop.reg
B) Go to step 3.
2. To Disable UAC Secure Desktop
A) Click on the download button below to download the file below.
Disable_Secure_Desktop.reg
3. Click on Save, and save the .reg file to the Desktop.
4. Right click on the downloaded .reg file and click Merge.
5. Click on Run, Continue (UAC-Vista) or Yes (UAC-Windows 7), Yes, and then OK when prompted.
6. When done, you can delete the downloaded .reg file if you like.
 METHOD THREE
1. Press the Windows + R keys to open the Run dialog, type regedit, and press Enter.
2. If prompted by UAC, then Click on Continue (Vista) or Yes (Windows 7/8).
3. In regedit, navigate to the location below. (See screenshot below)
HKEY_LOCAL_MACHINE\SOFTWARE\Microsoft\Windows\CurrentVersion\Policies\System
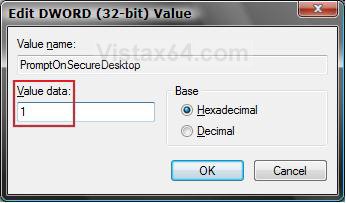
4. In the right pane, right click on PromptOnSecureDesktop and click on Modify.
5. To Enable UAC Secure Desktop
A) Type 1 and click on OK. (See screenshot below step 6)
B) Go to step 7.
6. To Disable UAC Secure Desktop
A) Type 0 (number zero) and click on OK.
7. Close regedit.
 METHOD FOUR
NOTE: This method is only available in Windows 7 and Windows 8, and not in Vista.
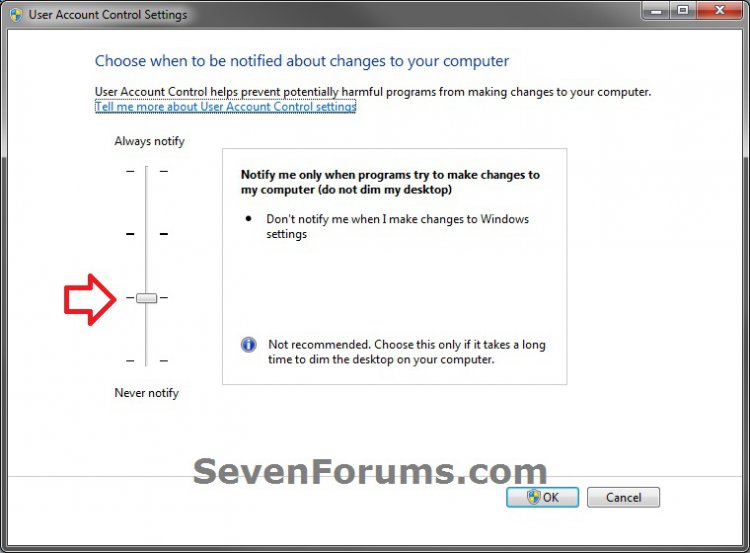
1. In Windows 7, change the UAC settings to the level 3 setting of Notify me only when programs try to make changes to my computer (do not dim my deskop), and click on OK. (see screenshot below)
2. In Windows 8 and 8.1, change the UAC settings to the level 3 setting of Notify me only when apps try to make changes to my computer (do not dim my deskop), and click/tap on OK. (see screenshot below)
3. If prompted by UAC, then click/tap on Yes.
That's it,
Shawn
Related Tutorials
- How to Turn UAC On or Off in Vista
- How to Change UAC Notification Settings in Windows 7
- How to Change User Account Control (UAC) Settings in Windows 8 and 8.1
- How to Enable or Disable the Real Built-in Administrator Account in Vista
- How to Disable or Enable the Security Center Alert Warning Notification in Vista
- How to Elevate All Administrator Accounts UAC Privilege Level
- How to Change Behavior of User Account Control (UAC) Prompt for Standard Users
- How to Change Behavior of User Account Control (UAC) Prompt for Administrators in Windows
- Enable or Disable User Account Control (UAC) Prompt for Built-in Administrator in Windows
- Bypass UAC for Standard Users
- How to Make UAC Require Password for Extra Admin Security in Vista
- How to Require Users to Press CTRL+ALT+DEL to Approve UAC Elevation
Attachments
Last edited:


