How to Change a Drive Icon in Vista
This will show you how to change any drive icon that uses a drive letter to whatever icon you want in a user account. These will be the ones that show up in Computer with a drive letter.
- This is not to fix a missing or changed drive icon that just happened out of the blue, but to replace it with one you want instead of the default one. If the drive icon went missing or changed to some odd one, then try rebuilding the icon cache first. See: How to Rebuild the Icon Cache in Vista
- If you want to also rename the drive, then see: How to Rename a Drive in Vista
The icons you decide to use must be a 256x256 bit .ico (icon) file, not .png, to be used in Vista without viewing problems. A png file must be converted to a 256x256 ico file before it can be used. To convert a PNG to ICO you must use a program such as this with a free 30 day trial program called: Axialis IconWorkshop: Axialis IconWorkshop Download Page
- The default icon path for the C:\ drive is located at C:\Windows\System32\imageres.dll,30.
- Here's a good location for some free icons: deviantArt: Dock Icons
- If your default drive icon is missing or was changed and you did not do it with the methods below, then look for a hidden (not always hidden though) autorun.inf when you open the drive letter in Computer and right click on the autorun.inf file and click on Delete. Next, approve the deletion.
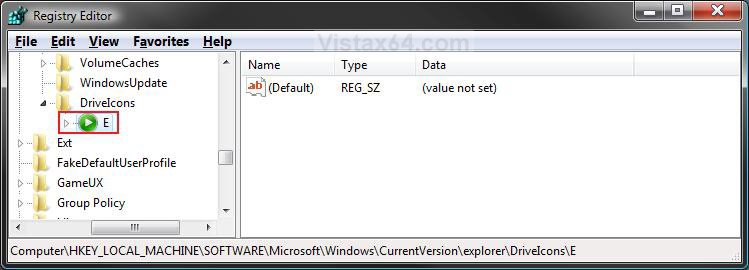
EXAMPLE: METHOD ONE Before and After Drive Icon Change
EXAMPLE: METHOD TWO Before and After Drive Icon Change
 OPTION ONE
NOTE: This will only change the drive icons for the user account that you are currently logged on in.
1. Open the Start Menu.
2. In the white line (Start Search) area, type regedit and press Enter.
3. Click on Continue in the UAC prompt.
4. In regedit, go to: (See screenshot below step 5)
HKEY_CURRENT_USER\Software\Classes
5. In the left pane, right click on Classes and click on New and Key.
NOTE: If you already have the Applications key under Classes, then go to step 7.
6. Type Applications and press Enter. (See screenshot below)
7. In the left pane, right click on Applications and click on New and Key.
NOTE: If you already have the Explorer.exe key under Applications, then go to step 9.
8. Type Explorer.exe and press Enter. (See screenshot below)
9. In the left pane, right click on Explorer.exe and click on New and Key.
NOTE: If you already have the Drives key under Explorer.exe, then go to step 11.
10. Type Drives and press Enter. (See screenshot below)
11. In the left pane, right click on Drives and click on New and Key.
NOTE: If you already have the Drive Letter (EX: C) key under Drives, then go to step 13.
12. Type the drive letter (EX: C) you want to change the drive icon for and press Enter. (See screenshot below)
13. In the left pane, right click on the drive letter (EX: C) and click on New and Key.
NOTE: If you already have the DefaultIcon key under the drive letter, then go to step 15.
14. Type DefaultIcon and press Enter. (See screenshot below)
15. In the right pane, right click on (Default) and click on Modify.
16. To Restore the Default Drive Icon
A) Empty the Value data field and click on OK. (See screenshot below step 17)
B) Go to step 19.
17. To Change the Drive Icon
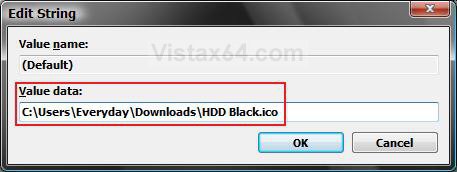
A) Type in the full path of where the icon is saved at and click OK.
(EX: C:\Users\Everyday\Downloads\HDD Black.ico)
NOTE: The icon will need to remain in it's location for as long as you are using it. You can use any icon (.ico file) you want, or one that came with Vista. (EX: A .dll file path) See the How to Use a DLL OR EXE Icon Library Filebelow.
18. The registry should look similar to this now. (See screenshot below)
19. Close regedit.
NOTE: The change will be immediate. If you have Computer open, then you may need to press F5 to refresh the window to see the new icon. If you used a wrong icon size for the drive icon, then you may need to change the window's icon size in the View or Views menu to a smaller size.
20. Repeat steps 11 to 19 if you want to add another drive letter icon to change.
21. In some cases, you may need to restart the computer to apply the changes.
How to Use another Icon from Vista
A) Download and install the free program IconViewer for your 32-bit or 64-bit Vista.
NOTE: This program will add a Icons tab to files (ex: imageres.dll) that contain a icon library in them so you can see the icons available in it.
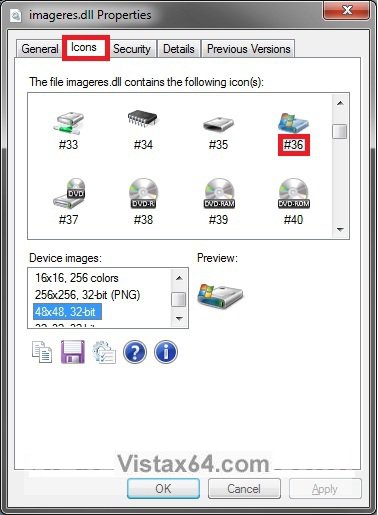
B) In Windows Explorer, navigate to C:\Windows\System32\imageres.dll and right click on imageres.dll, click on Properties, and click on the Icons tab.
NOTE: You can use any of the Vista files that include icons in them that you want though. This is just the most common one.
C) Scroll through the icons and make note of the icon number of the one you want to use to replace the default file extension icon with, then close the properties window. (see screenshot below)
NOTE: For example, icon number 36 for the default C drive icon.
 OPTION TWO
NOTE: This method can be helpful for using with optical (DVD) or removable drives.
CREDIT TO: Member:AvatarOfTheShip
1. Open the Start Menu.
2. In the white line (Start Search) area, type regedit and press Enter.
3. Click on Continue in the UAC prompt.
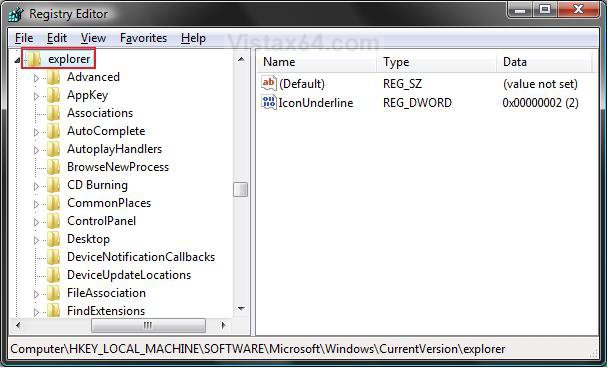
4. In regedit, go to: (See screenshot below step 5)
HKEY_LOCAL_MACHINE\SOFTWARE\Microsoft\Windows\CurrentVersion\explorer
5. In the left pane, right click on explorer.exe and click on New and Key.
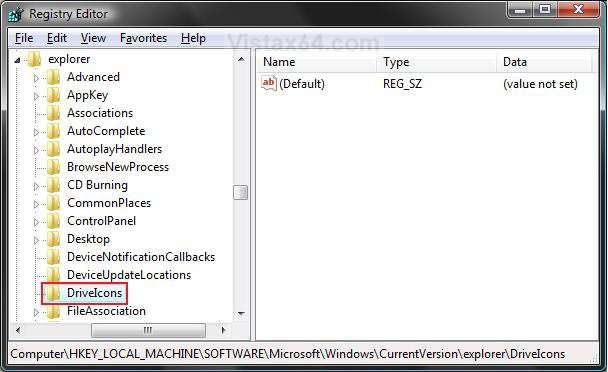
6. Type DriveIcons and press Enter. (See screenshot below)
7. In the left pane, right click on DriveIcons and click on New and Key.
8. Type the drive letter (EX: D) you want to change the drive icon for and press Enter. (See screenshot below)
9. In the left pane, right click on the drive letter (EX: D) and click on New and Key.
NOTE: If you already have the DefaultIcon key under the drive letter, then go to step 11.
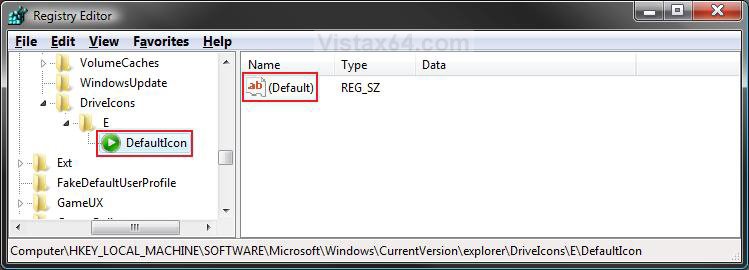
10. Type DefaultIcon and press Enter. (See screenshot below)
11. In the right pane, right click on (Default) and click on Modify.
12. To Restore the Default Drive Icon
A) Empty the Value data: field and click OK. (See screenshot below step 13)
B) Go to step 15.
13. To Change the Drive Icon
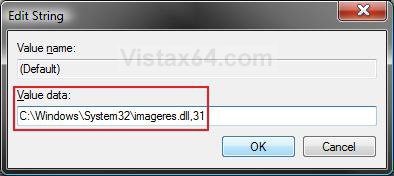
A) Type in the full path of where the icon is saved at and click OK.
(EX: C:\Windows\System32\imageres.dll,31)
NOTE: The icon will need to remain in it's location for as long as you are using it. You can use any icon (.ico file) you want, or one that came with Vista. (EX: A .dll file path) See the How to Use a DLL OR EXE Icon Library Fileabove.
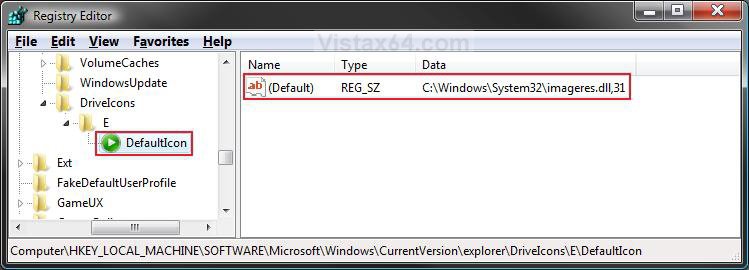
14. The registry should look similar to this now. (See screenshot below)
15. To Rename the Dive
NOTE: This is helpful for something like a DVD (optical) drive since they cannot be renamed through the normal method here: How to Rename a Drive in Vista
If you do not want to rename the drive, then skip this step and go to step 16 below instead.
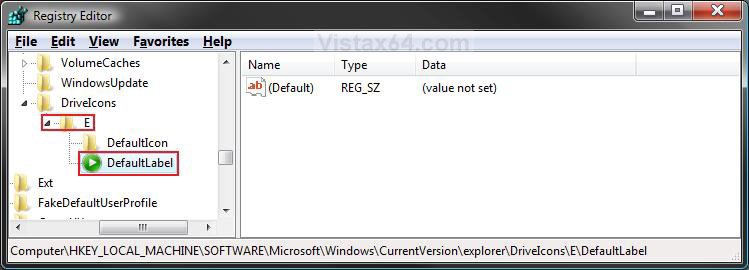
A) In the left pane, right click on the drive letter (Ex: D) and click on New and Key. (See screenshot below)
B) Type DefaultLabel and press Enter.
C) In the right pane, right click on (Default) and click on Modify.
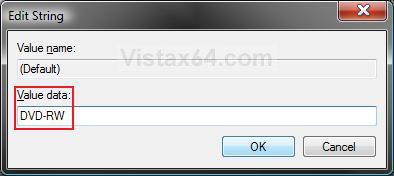
D) Type the name you want (Ex: DVD-RW) and click OK. (See screenshot below)
NOTE: To Restore the Default Drive Name, leave this blank.
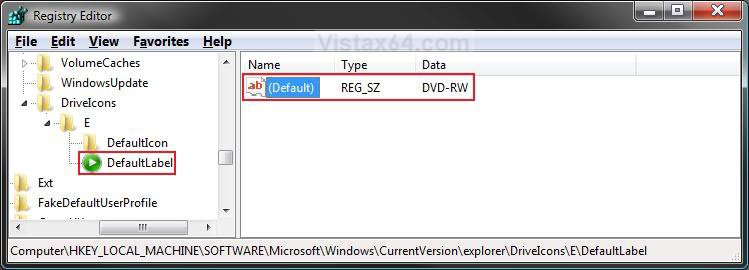
E) The registry will now look similar to this. (See screenshot below)
16. Close regedit.
NOTE: The change will be immediate. If you have Computer open, then you may need to press F5 to refresh the window to see the new icon. If you used a wrong icon size for the drive icon, then you may need to change the window's icon size in the View or Views menu to a smaller size.
17. Repeat steps 7 to 16 if you want to add another drive letter icon to change.
18. In some cases, you may need to restart the computer to apply the changes.
That's it,Shawn
Related Tutorials
- How to Change a Folder Icon in Vista
- How to Change a Shortcut Folder or File Icon in Vista
- How to Change the Open Folder Icon in Vista
- How to Change a Folder Preview Picture in Vista
- How to Change a Icon in the Control Panel in Vista
- How to Restore and Change a Desktop Icon in Vista
- How to Change the Desktop Control Panel Icon in Vista
- How to Delete and Extend a Partition with Disk Management in Vista
- How to Shrink and Create a Partition with Disk Management in Vista
- How to Add, Change, or Remove a Drive Letter in Vista
- How to Rebuild the Icon Cache in Vista
- How to Show or Remove Drive Letters from Displaying in Vista and Windows 7
- How to Rename a Drive in Vista
- How to Disable or Enable Low Disk Space Warning in Vista
- How to Increase Hard Drive Performance in Vista
- How to Remove or Show Drives in the Vista and Windows 7 "Send To" Context Menu
- How to Restrict or Unrestict Drive Access in Vista
- How to Hide or Unhide a Drive in Vista
- How to Create a Drive Shortcut in Vista
- How to Change a File Extension Type Icon in Vista
- How to Mount or Dismount a Drive or Partition to a Folder in Vista
- How to Retain the DVD Drive Icon if Disappeared from Computer
- How to Change the Vista Default Folder Icon
Attachments
Last edited by a moderator:





 I've fixed so many issues via this forum!
